Good afternoon dear friends. Replacing light bulbs on a VAZ 2107 is not complete without partially disassembling the car’s elements. So, for example, if the lighting of the devices is dim, then many owners install LED lamps instead of standard lamps. To get to them, you need to remove the tidy. Today we will learn how to remove the instrument panel on a VAZ 2107 , an explanation of each step of the operation with a detailed video tutorial. Let's share the nuances of the work so as not to break anything.
Instructions for dismantling the tidy on a VAZ 2107
The most important part of the interior is located in the front part - this is the instrument panel or tidy. It contains different types of indicators that inform the driver about the health of the car, and also provide other important information, such as driving speed or crankshaft speed. Sometimes it becomes necessary to dismantle this part, and therefore drivers wonder how to remove the instrument panel on a VAZ 2107 on their own, which you can learn from the material.
The most common reasons for dismantling
There are a lot of reasons for removing the tidy on a VAZ 2107, and some of them can be called banal, but nothing can be done. The most common reason when you need to remove the instrument panel is a burnt-out backlight bulb. Replacing light bulbs in the dashboard of a VAZ 2107 is carried out only when dismantling the device, and this procedure is simply impossible to perform otherwise.
The dashboard on the VAZ 2107 must also be removed for a number of the following reasons:
- Malfunction of pointer indicators.
- Failure of the instrument lighting, as well as lack of functionality of the arrow indicators.
- Replacing the device with a new one, for example, if a digital panel is installed instead of the factory instrument panel.
- Tuning or upgrading the device.
As practice shows, most often the need to dismantle the dashboard arises precisely because the backlight bulb burns out. If the device is dismantled for this reason, it is recommended to immediately replace conventional light bulbs with LED ones.
Required Tools
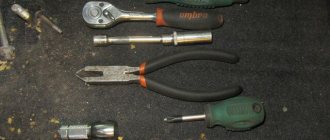
Before starting work, you will need to prepare the necessary tools so that you do not have to be distracted during the process. Despite the fact that the work of removing the device in question is quite labor-intensive, to implement it you will need a small set of tools, including:
- Phillips and slotted screwdriver.
- Electrical tape to indicate chips that are disconnected from the device.
- Work gloves for unscrewing the speedometer cable.
When all the tools are prepared, it remains to make sure that the parts and elements that are planned to be installed or replaced on the dismantled device are available. After this, we proceed to perform the main part of the work.
Instructions for removing the dashboard on a VAZ 2107
Initially, it should be noted that the process of dismantling the tidy on VAZ 2107 cars, the injector and carburetor are identical, therefore the instructions described below are appropriate for sevens of all years of manufacture. Having prepared to carry out the work, you can proceed by following the following sequence:
- First you need to turn off the power to the car, for which you remove the negative terminal from the battery. This must be done, since the work will be carried out in the electrical part, and the likelihood of a short circuit occurring is quite high.
- Next, we move into the interior, and using a slotted screwdriver, we remove three caps from the levers responsible for the operation of the heater.
- Using a slotted screwdriver, remove the plastic plug on which the heating sign is depicted. This plug is on the right, and under it there is a Phillips screw that needs to be unscrewed. (There are 2 screws under the plug, but only one needs to be unscrewed - the top one, which secures the right side of the dashboard).
- Next to the hazard warning button, there is an odometer reset button, which is secured with a plastic nut. The nut must be unscrewed and removed with the washer located behind it. The button is recessed inside the panel.
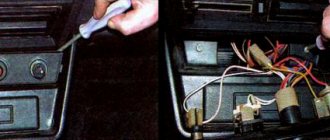
- The right side of the tidy is weakened at this stage, and it remains to perform several additional manipulations in order to completely dismantle the device. To do this, pull out the right side of the device, thereby freeing access to its rear part. Here you need to disconnect all the chips and wires to perform dismantling.
- Initially, the power chips for the stove button are disconnected. Be sure to remember the location of the wires. It is recommended to take photos so as not to be confused when assembly is carried out.
- Next you need to disconnect the speedometer cable. It is secured with a special nut, which can be unscrewed by hand.
- All chips connected to the dashboard are disconnected. It is almost impossible to confuse their locations, since they have different fastenings and differ in size.
- The supply hose is removed from the economizer fitting. This cable is located on the left side of the device.
- After all the chips, cables and wires are disconnected from the device, you can dismantle it.
If the question arises about how to remove a VAZ 2107 torpedo, then this is also not difficult to do, for which you will need to unscrew an additional dozen fasteners. There are just a lot more reasons when you need to remove a torpedo or a beard. After the instrument console is dismantled, you can begin to repair, modernize and replace it. Once the work is completed, all that remains is to install the device in its place. This is done in the reverse order of removal.
In conclusion, we summarize that the work of removing the dashboard is not at all difficult, and only takes a couple of hours of time along with the repair. By devoting a few hours of time, you can not only fix the breakdowns, but also tune the panel, which displays all the most important information when driving a car.
Disassembly of the part body
Before disassembling you need:
- screwdrivers;
- construction hair dryer;
- gloves.
To be able to disassemble the VAZ 2106 speedometer, use a hairdryer to heat the edges of the glass. This procedure will help melt the bonding sealant, making the glass easy to remove. It is recommended to use gloves during this procedure, otherwise both the device itself and your hands may be damaged. After this, the old sealant is removed from the body. Next, the arrows are dismantled and the bolts are unscrewed so that it is possible to completely disassemble the body. If necessary, any part is repaired or the device is completely replaced. Assembly is carried out in reverse order. Knowing how to disassemble a VAZ speedometer with your own hands, it will be easy to carry out the work in your own garage.
How to remove the instrument panel on a VAZ 2107? This will come in handy sooner or later
Even novice drivers can do this. Almost all men periodically have to work with a screwdriver and other tools with complex household appliances or other devices. If this works out, then you can safely begin dismantling the “cleaning” from your seven.
How to remove the instrument panel on a VAZ 2107
Let's look at it in this article. It will help anyone who has not encountered this before to independently remove and then reinstall the instrument panel of the VAZ 2107. There are no fundamental differences in the removal and installation of this body part for models of different years of production. The algorithm for carrying out such an operation is the same for carburetor and injection models.
Features of "cleaning" on the seven
This unit in the car interior is designed to provide various information to the driver during the operation of the car. It informs about the speed of movement, shows the distance traveled by the car, and signals the occurrence of problems in the main components and assemblies of the car. Unlike the “tidy” of previous models, it not only has a changed appearance, but also has a wider range of control and alarm functions.
So a voltmeter has been added to its composition; it shows the voltage of the vehicle’s on-board network, econometrics, and helps to continue driving in the most economical mode. For models with an injection engine, the instrument panel is equipped with a power unit health indicator. The designers changed the mounting of the signal lamps. If in older models wires were supplied in each of them, then in this model they are absent.
What is needed for withdrawal?
The removal process for this model is slightly different from other cars. For example, in a VAZ 2106, to remove it you need to release the latches, after which it can be easily removed from its installation location. All that remains is to remove the wiring and disconnect the speedometer cable to completely remove the panel. In a model such as the VAZ 2105, the principle is completely different. Its installation in the socket is fixed with screws.
Speedometer VAZ 2103-2106, VAZ 2121 SP193
Dear customers, in order to avoid errors when sending the SP193-3802000 speedometer to the instrument cluster of VAZ 2101-03, VAZ 2106, VAZ 2121, in the “Comment” line indicate your car model, year of manufacture
Before shipping, we check all electromechanical devices for functionality, eliminating the possibility of defects.
All control devices of the VAZ 2101-03, VAZ 2106, VAZ 2121 vehicles are combined into an instrument cluster.
The electro-mechanical instrument cluster of VAZ 2101-03, VAZ 2106, VAZ 2121 performs the function of displaying all the vehicle parameters necessary for the driver.
Speed control is one of the foundations of successful and safe driving. Especially to solve this problem, a device is installed in the car that is known even to people far from technology - a speedometer.
Speedometer 2103-3802010-01 (VAZ 2101-03, VAZ 2106, VAZ 2121) is a measuring device designed to track the speed of a car.
The traffic rules of any country indicate the permissible speed limits on various roads, and there are also signs limiting the maximum and minimum speed. This is necessary primarily to ensure safety, and in some cases only a certain speed limit ensures traffic without congestion. So every motorist should be able to monitor their current speed and quickly change it if necessary.
This device is mandatory; in Russia this is specifically indicated in the traffic regulations in paragraph 7.4 of the “List of faults and conditions under which the operation of vehicles is prohibited.” Failure to comply with the rules and driving with an inoperative device or without it at all, in accordance with Article 12.5 of the Code of Administrative Offenses, is punishable by a fine.
The modern speedometer SP193-3802000 (VAZ 2101-03, VAZ 2106, VAZ 2121), in addition to measuring speed, measures the distance traveled (the odometer is responsible for this), and the total mileage of the car and the mileage for the period of time selected by the driver are calculated separately.
The main task of the speedometer 2103-3802010-01 (VAZ 2101-03, VAZ 2106, VAZ 2121) is to track the correct speed, which has a positive effect on traffic safety.
Speed measurement is carried out by a gear speed sensor installed in the gearbox. Such a speedometer measures the angular velocity of rotation of the gearbox secondary shaft and, using a simple mechanism, calculates the speed.
The speedometer of the VAZ 2101-03, VAZ 2106, VAZ 2121 is divided into four key units - the speedometer speed unit (provides display of the current speed), the gear car speed sensor (or simply DSA), which connects them with a flexible shaft and the odometer with its mechanical transmission (associated with flexible shaft).
An odometer is a mechanical counter that is connected to a flexible shaft through a simple worm gear. The gear ratio of this transmission lies in the range of 600:1 – 1700:1, it, together with the gear ratios of the DSA and the meter itself, ensures the recalculation of revolutions into meters and kilometers.
Speedometer 2103-3802010-01 (VAZ 2101-03, VAZ 2106, VAZ 2121) has a simple design and is very reliable, which ensured its popularity.
Specifications:
— Speed reading range, km/h: 0-180
— Number of revolutions of the drive shaft corresponding to 1 km of run: 1000
— Body, casing landing diameter, mm: 100
— Connecting dimensions with a flexible shaft (type according to GOST 12391, mm: M16x1 square 2.7 (A3).
The SP193-3802000 speedometer (VAZ 2101-03, VAZ 2106, VAZ 2121) can be installed independently, without contacting specialized maintenance services.
Other article numbers of the product and its analogues in the catalogues: 21030380201001, SP193-3802000.
VAZ 2101, VAZ 2102, VAZ 2103, VAZ 2106, VAZ 2121.
Any breakdown is not the end of the world, but a completely solvable problem!
How to independently replace the speedometer in the instrument cluster on VAZ 2101, VAZ 2102, VAZ 2103, VAZ 2106, VAZ 2121.
With the AvtoAzbuka online store, repair costs will be minimal.
Just COMPARE and BE SURE!!!
Don't forget to share the information you find with your friends and acquaintances, because they may also need it - just click one of the social networking buttons located above.
Removing and installing the instrument panel of a VAZ-2107 car
Typically, the instrument panel is removed for interior heater repair or body work.
Disconnect the negative terminal from the battery.
We remove the instrument panel shelf, to do this:
Using a Phillips screwdriver, unscrew the two self-tapping screws on the right shelf fastening
Unscrew the self-tapping screw of the left shelf fastening
Unscrew the self-tapping screw securing the shelf to the engine shield
Removing the instrument panel shelf
We remove the glove box housing from the instrument panel, to do this:
Open the glove box lid.
We unscrew two self-tapping screws located on opposite side walls of the glove box and remove its body from the instrument panel
Disconnect the terminals of the first and second power wires of the glove compartment lamp
Remove the top insert of the radio receiver panel, to do this:
Use a screwdriver to press out any side edge of the liner, remove the clips from the grooves of the radio panel and remove the top liner along with the instruments.
Disconnect the connecting connector of the instrument lighting switch.
We disconnect the three wire tips from the clock terminals, having previously marked the order in which they are connected.
We disconnect the wire lugs from the lamp terminals of the signaling device block, having previously marked the order of their connection
Disconnect the ground wire from the cigarette lighter housing
We disconnect the tips of the two power wires of the cigarette lighter
To do this, remove the radio panel:
Use a screwdriver to pry and remove the switches from the panel.
Disconnect the plug blocks from the switches.
Using a screwdriver, press the latches of the lower panel insert and remove it.
Using a Phillips screwdriver, unscrew the two self-tapping screws of the lower panel fastening and using a “10” wrench, unscrew the two nuts of the upper panel fastening
Removing the radio panel from the car
We remove the headlight hydraulic corrector, to do this:
Pull it towards you and remove the headlight hydraulic adjustment handle from the dashboard.
Using pliers or a 24mm socket, unscrew the nut securing the main cylinder of the hydraulic corrector and remove it inside the dashboard
Using a Phillips screwdriver, unscrew the three self-tapping screws securing the upper insert of the instrument panel.
Using the same screwdriver, unscrew the two screws securing the heater control unit to the instrument panel.
How to remove the instrument panel on a VAZ 2107
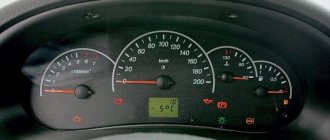
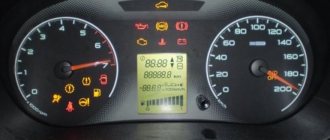
Removing the instrument panel (or dashboard) is required for many purposes: changing light bulbs, the panel itself, and control devices. You need to remove the panel in order to tune it, and some unscrupulous “specialists” get to the meter this way and “twist” the mileage. Regardless of whether it is a carburetor VAZ 2107 or an injector, the removal diagram is the same. Below is the instrument cluster for the VAZ 2107 injector:
The difference in the combination is insignificant: if you have an injector, then an engine management system malfunction indicator is added:
The symbol lights up when ignited, and goes out after a stable start. Constantly lights up or flashes if the injector is faulty or the engine is not working properly.
Let's look at the sequence of actions to remove the panel.
When installing the shield, all steps are performed in reverse order. Before installing the panel, do not forget to connect all contacts, place the negative terminal on the battery and turn on the ignition. Because if you forget to connect something, you will need to completely remove the panel again.
Once you have removed the panel, you can do its tuning. For example, change the appearance of the dials. To do this, first carefully remove the arrows, while trying not to bend them or the pins. The movement is only “pulling” perpendicular to the plane of the dial (do not forget to mark the place where the hand “lies” in the zero position before removing it).
The next step is to glue on the new dial; for good quality of the sticker, the surface needs to be degreased and the sticker carefully rolled. You can also tune the dashboard lighting by setting the LEDs to 12 V, current 350 mA. The main thing when soldering is not to forget to put a resistor in the series circuit to protect against overload. LEDs can be installed instead of standard lamps, and a rheostat can be included in the circuit.
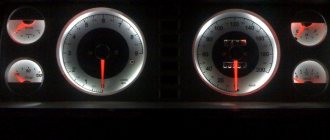
The photo shows a decent tuning of the VAZ 2107 dashboard in day and night lighting options.
Replacing light bulbs
To change the lights on the tidy, you first need to remove it.
How to do this is indicated above. After dismantling it will need to be disassembled. This is done by snapping out the terminals. The result should look like this.
The photo above shows the location of the light bulbs mounted in the car's dashboard.
After disassembly, you need to unscrew the illuminator along with the socket and install a new element in its place.
There are only two types of light bulbs used on the car panel.
- Direct lighting – AMN 12-3-1. Modern standard T3W.
- Indicators A12-1.2 or, in a new way, W1.2.
How to remove the dashboard on a VAZ 2107
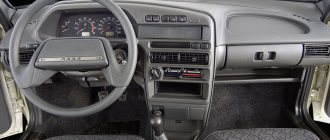
You can hear a complaint from many car enthusiasts that the “native” design of the dashboard (or in common parlance, “torpedo”) on the VAZ 2107 is extremely laconic, stingy, even boring. Others claim that yes, the pad is simple, but nothing distracts the driver.
The instrument panel, or trim, is a broader concept, “all” the plastic that is located in the front part of the car’s interior. It is with the desire to change the appearance of the instrument panel with your own hands that professional tuning of not only the interior, but the entire car, often begins.
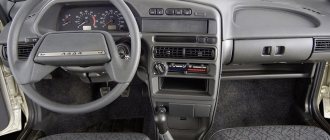
Let us remind you what the factory trim on the VAZ 2107 is:
And here’s how you can do the tuning yourself, change the instrument panel and embed a screen into the trim (not to mention the steering wheel):
But here is an almost professional tuning of the VAZ 2107 interior:
I can’t even believe that this tuning was done by hand!
To properly change the appearance of the front part of the cabin, change the instrument cluster, or install a new audio system, you often cannot do without removing the dashboard.
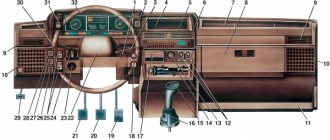
The torpedo consists of almost two dozen parts. Below is a schematic view of the torpedo.
In fact, it is very simple to remove and install the torpedo with your own hands. You will need a flat-head and Phillips-head screwdriver and a 10 mm open-end wrench.
Sequence of actions when removing a VAZ 2107 torpedo.
Attention! First, remove the negative terminal from the battery.
- Remove the negative terminal from the battery.
- the last, fourth screw is fixed in the depth of the shelf, now it can be removed.
Now you need to remove the shelf located in front of the passenger. To do this: unscrew the screws (2) on the right and one on the left;
- using a flat-head screwdriver, pry up the additional central panel from either side, release the latches from the grooves, and pull it out along with the filling, then disconnect the connector going to the light switch:
- Using a flat-head screwdriver, carefully press out the switches, release them from the connectors and remove:
- first you need to separate the front and rear halves of the casing: unscrew the screws (4 pcs.), and one unpaired screw securing the lower half and separate it with both hands:
- Using the same screwdriver, we remove the tips of the heater levers and the deflectors through which air is supplied:
- after that, we “push” the meter into the dashboard, then unscrew the right screw of the shield and lift the shield on the right side. In the gap between it and the torpedo, unscrew the nut of the cable going to the speedometer, then lift the left edge of the shield and remove the economizer hose going to the fitting (on the VAZ 2107 on the left):
- Using small pliers, unscrew the nut securing the main cylinder of the corrector and also push it inside the panel:
How to remove a panel on a VAZ 2110
We will not understand the reasons why you decide to disassemble the instrument panel on your “ten”. It’s better to talk about how to properly remove the instrument panel on a VAZ 2110.
The procedure is quite labor-intensive, but if you have free time and patience, you can do the work in your own garage with your own hands without any problems.
When disassembly is required
There are several reasons why car owners want to remove the tidy:
- It is damaged by mechanical shocks, as a result of hitting potholes, etc. In fact, the strength of the standard dashboard leaves much to be desired, so damage is not uncommon for dozens;
- There are scratches and abrasions on the surface of the device, the paint has peeled off somewhere, and there are signs of wear. That is, the appearance of the panel leaves much to be desired, so to correct the situation it needs to be removed;
- The desire to transform the interior of the car. Many VAZ 2110 owners decide to get rid of the old dashboard in order to put something more modern, original in its place, and change the backlight to LED lights.
If you connect something incorrectly and reassemble the panel without checking, you risk not only having to re-disassemble the dashboard, but also encountering non-functioning devices, short circuits and even worse consequences.
Disassembly
Now let's talk specifically about how to remove the panel on a VAZ 2110. To do this, it is enough to follow a certain sequence that will allow you to dismantle the unit correctly and quickly without unnecessary risks.
Removing the lining
Many motorists, being confident in their own abilities, ignore recommendations and do not follow instructions. At the same time, they remove the panel, while simultaneously dismantling another half of the interior.
The step-by-step guide we offer will allow you to avoid unnecessary manipulations, save time, effort and nerves.
- Buy special self-adhesive pieces of paper. The type that they stick on products in stores. You will also need a marker, pen or just a pencil. Each element to be removed should be marked so as not to get confused later when reassembling the elements. Write down the sequence on a piece of paper, or have your assistant do it under your dictation.
- Removing the front seats will make access to the instrument panel much easier. You won’t have much time to sit on them, and in order to get to certain fastening elements, the chairs may simply get in the way.
- There are screws on the sides that will allow you to remove the tunnel. Moreover, the upper part is removed first, and only then the lower. The order is not important, you can try in reverse order. Only then will it be frankly inconvenient for you to work. Tested by many craftsmen when disassembling the dashboard.
- Remove the steering column cover. This way you can remove the cover itself, as well as the steering wheel. To perform this task, three self-tapping screws and four fixing screws are removed. The steering wheel will sit on the splines quite firmly, so you will have to remove it with force. You can shake the steering wheel to the sides, tug. Just take care of your face, because with a sudden force the steering wheel can fly out of its seat and fly right at you.
- The steering column switches must be removed.
- Remove the glove compartment fasteners and remove it from its seat.
- After that, proceed to the mounting block. You have to remove not only the cover, but also remove all the connectors and relays.
- Now it’s time to figure out how to remove the VAZ 2110 panel trim and pillar trims. This is done quite simply, given that all fasteners are not hidden. Be sure to unscrew the fasteners of the headlight hydraulic corrector and push it inward.
- Now comes one of the most important moments - removing the screws that hold the instrument panel. They connect the panel to the body of your car. Unscrew the screws and two studs. It is not difficult to find them, since these studs are located under the cover of the air supply tunnel to the side windows.
- Having completed all the specified procedures, only the lower air duct and the steering shaft will hold the panel. After this, you can begin the planned repair or modernization of the car, which required the mandatory removal of the dashboard.
The dismantling procedure cannot be considered complete at this point, since when you open the dashboard, you will find a huge number of wires underneath it. What should we do with them?
Important points
- Before removing wires and connectors, it is recommended to mark them to make reassembly easier. It is convenient to apply these marks with a black marker or felt-tip pen (because most of the connectors under the dashboard are white).
- You need to carefully remove the upper part of the steering column protective cover, as you can damage the rubber ring on the ignition switch (it gets caught on the edge of the cover and breaks easily).
- When removing the additional panel, do not tilt the screwdriver too much: the clamps that hold this panel are plastic and break very easily.
As can be seen from this article, removing the dashboard on a VAZ 2107 is a labor-intensive task, but it is doable. The main thing is to adhere to the instructions outlined above and not to use too much effort when removing: the panel material, despite its apparent strength, breaks quite easily.
Didn't find the information you are looking for? on our forum.