Cold methods of sealing holes in thresholds
Depending on the degree of damage, a cold or hot repair method is selected. The cold method includes body work that does not require welding equipment. A small hole can be sealed:
- construction putty;
- using fiberglass;
- primer and secured with moldings.
The semi-hot method involves using a soldering iron to seal small holes.
How to fill a hole with fiberglass
The easiest way to repair a hole in a car sill without welding is to use a fiberglass patch. For repair you will need:
- The two fiberglass patches are 2cm larger than the corrosion area. Fiberglass or fiberglass can be used.
- Automotive primer, degreaser.
- Sandpaper, grinder for preliminary cleaning of the surface.
- Putty knife.
- Varnish, paint.
Self-repair takes up to 1 hour and does not require special skills, you need:
- Use a grinder to remove the old paint layer.
- Clean the threshold, if rusty dents or through holes are found, treat with a degreaser.
- The dents should be primed well and the material should dry completely.
- Cut out the fiberglass pads, place them on a dry surface, and secure them with adhesive and epoxy resin.
- After drying, the surface is primed, sanded and painted.
When using fiberglass, it is recommended to additionally secure the thresholds with moldings.
Filling holes with putty
It is recommended to restore thresholds with putty in the following cases:
- In the absence of large through holes.
- If moderate pockets of corrosion are observed that have not affected the geometry.
- For primary rust.
Sealing thresholds using this method is quite simple; repairs take up to 2 hours and do not require special skills, but you must have the necessary tools and material. For repair you will need:
- construction fiberglass and automotive standard putty;
- Bulgarian;
- aluminum mesh if you have to patch a significant but only hole;
- medium abrasive sandpaper from 800 grit;
- medium spatula;
- degreaser;
- automotive primer;
- paint, varnish.
Starting repairs requires preliminary preparation of the surface, for this you need:
- Clean the threshold from old paint by cutting off the layer of waste material with a grinder.
- Sand the surface and treat with degreaser.
- If the threshold does not have through holes, aluminum mesh is not used. If a significant deep focus of corrosion is discovered, cut out a patch of the required size from the mesh and apply it to the recess.
- Cover the mesh with construction putty. If the damage is minor, apply a layer of putty, leveling the composition. Let it dry.
- Sand and apply a thin layer of automotive primer.
- After drying, clean the area with sandpaper.
- Paint over, varnish.
The option of sealing holes with construction putty is often used when repairing a body, but experienced drivers do not recommend it, since it begins to dry out after 7-9 months, allows moisture to pass through, and corrosive destruction continues.
Cold welding method
The method is suitable for sealing small holes in thresholds, when there are no large pockets of rust and the internal metal, threshold amplifier, is not damaged. For repairs you will need polyester resins for body work, i.e. epoxy. Repair process step by step:
- Holes are cleaned with emery, a grinding wheel, and degreased.
- The resin is diluted in the required proportions or a ready-made composition is used.
- Fiberglass of the required size is impregnated with resin and glued to the hole.
- After drying, the surface is primed, sanded and painted.
This method is suitable for repairing those parts of the body that do not experience stress. If this method is chosen for thresholds, it is recommended to always install metal moldings.
Self-brewing
Restoration of non-removable thresholds and the bottom can begin only after placing the car on a repair platform or in a pit with a size sufficient for welding. The bottom is inspected by tapping it with a hammer.
In case of severe rust damage, it is necessary to clean the surface around the embedded area using sandpaper or a grinding tool..
Repairing a body by welding, including welding the bottom, comes down to installing a small patch of metal of the same structure and thickness on the damaged area.
But first you should prepare the problem area, namely, carefully cut out the rusted metal.
If painting after welding is not intended, then the appropriate color of the patch should be selected in advance, which, together with the threshold, after repair, must be carefully sanded and treated with an anti-corrosion compound.
If you have a certain skill and the necessary tools (semi-automatic or gas welding), anyone can repair the sills and bottom with their own hands. In addition to tools and materials, you only need a little free time and desire.
Repair by sealing the hole with metal
Metal patches and subsequent soldering are considered the most productive means for restoring thresholds, even with a large area of corrosion. If rust has not led to deformation of the central pillars and distortion of the geometry, then you can use metal patches and strengthen them with a soldering iron. For repairs you will need the following materials and tools:
- metal patch, size 2 cm larger than the corrosion hole.
- assembly hammer;
- Bulgarian;
- medium abrasive sandpaper;
- anti-gravel;
- anti-rust composition - phosphoric acid, if available;
- soldering iron, tin solder;
- automotive primer, degreaser.
Weldless auto repair options
Car body repairs without welding are considered unprofessional, since this is not the product of numerous scientific research. There are several ways.
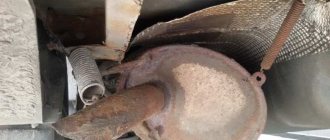
If the problem is not with the body with the exhaust system, then we advise you to see how to seal the muffler using cement or sealant
General requirements: the damaged area is removed with a grinder or chisel. Anticorrosive and zinc are applied and degreased. Next, the holes are sealed with paint putty, creating a surface of a suitable shape, and painted.
Fixing pinholes
When diagnosing a car, if there is a pinhole from corrosion on the threshold, in 80% of cases it is necessary not only to repair the hole, but also to change the amplifier. A full inspection will reveal large areas of rusty metal under a layer of paintwork. If a pinhole occurs from mechanical damage, then it is not associated with natural wear of the metal, so small holes are sealed using putty or soldering.
Soldering is carried out according to the same algorithm as sealing a hole with a sheet of metal, the only exceptions being the small size of the patch.
Use of soldering
If small holes in the threshold or bottom of the car are sealed with soldering, then simple tips will help:
- For heating metal more than 0.5 mm thick, household soldering irons are of little use. It is better to use a portable gas burner that has a small cylinder from 400 to 700 ml. The work will go faster.
- To solder thresholds you need solder and flux. For solder, a composition with lead or tin is used; the flux can be replaced with electrolytic acid.
Experts recommend not using soldering for body work at all. The main reason is that solder, tin or lead have a much lower electrical potential than iron; during their contact, electrochemical corrosion occurs, which can subsequently lead to full-fledged rust at the joints.
The second disadvantage of soldering is hot work, which is carried out in a safe place and as carefully as possible.
Using a soldering iron
There is another way to repair a hole in a car body without welding. A soldering iron is required here. First of all, we clean the area from rust. We make the patch from a sheet of metal (you don’t need to worry too much about this; an ordinary can of auto chemicals will do).
It is important that the patch is slightly larger than the holes and also completely covers them.
Additionally, you can coat the metal surface with anti-corrosion compounds - this will increase the quality of our repairs. Then we service the edges of the patch, after which, using a fairly powerful soldering iron, we solder it with a continuous seam.
Next, you should check whether it turns out that the patch protrudes somewhat above the body. If there is a protrusion, we eliminate this deformation with several gentle blows of the hammer. We remove various dents with putty (it is important that its layer reaches no more than 2-3 mm, otherwise the material will crack). Before filling, clean the surface with a metal brush.
In order for the putty to adhere well, it is important that abrasive marks (small scratches) appear on the patch.
The next step is primer. Here it is necessary to complete everything as quickly as possible to avoid the possibility of rust occurring in the future. It is best to first apply a thin layer of phosphate primer, and when it dries, another two or three layers of acrylic two-component composition (the interval between applications should be about 5-10 minutes). Everything dries in about 3-4 hours; if there is infrared heating, you can reduce the procedure to 20 minutes.
It is worth noting that this solution is more durable than in the case of aluminum mesh, and it can be used to eliminate holes of almost any size.
Repairing large-scale damage
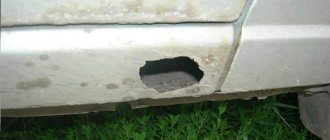
Any hole in the threshold of a car indicates the beginning of corrosion, but what to do if the destruction of the metal is large-scale and simple means cannot be avoided? In this case, a gas welding machine is required, a complete digestion of the body, and sometimes a complete replacement of parts of the bottom and wings.
Superficial repairs using putty, fiberglass, and small metal patches will not change the situation dramatically; rotting of the body will continue.
Thresholds and bumpers are considered the most vulnerable parts of a car body. Gravel flying out from under the wheels of the vehicle in front damages the paintwork, and improper crossing of the edge and careless parking lead to dents. Timely repair of thresholds without welding with your own hands will prevent corrosion of the metal and seal and restore the aesthetics of the car.
DIY welded patch on the car body
Now about welding patches automatically. Why did we immediately write so critically in the first sentence that it should be done “automatically”? You can better learn about this from the article “How to weld a car body with your own hands.” And here we will focus more on the process, and not on motivational information about what to choose and what modes to use. So, the location of the hole is cut out with an angle grinder (grinder).
Next, size to size, only cut out the patch a little smaller.
We grab it along the edges, trying to align it in the same plane with the plane of the body. Next, we weld along the perimeter of the patch and smooth out the irregularities with the same grinding machine.
We treat the metal with phosphate or primer and proceed to putty.
Each of the examples we gave ended with putty. In this case, you should not leave the putty without a protective coating, without painting, as it will adsorb moisture, and there is nothing good about that. If it comes to installing a patch, then complete the entire process. Putty, prime and paint. For more information about painting the body, see the article “How to paint a car body with your own hands.”
What are the defects?
Depending on the degree and type of damage, the repair method is selected. Without welding, it is possible to restore a part in the following cases:
- Dent of a non-removable element, bend of the lower edge. If the dent is shallow and without a sharp edge, then the drawing method, back hammering, and straightening are used.
- A chip in the paintwork with a small area of corrosion. Anti-corrosion metal treatment, stripping, and grinding are used.
- Point-through corrosion can be repaired with epoxy resins and fiberglass patches.
Do-it-yourself repair of rotten thresholds is carried out only by welding. It is necessary to cut out or knock out the rusted metal, weld a patch or a new part of the structure.
Removable elements are repaired only with minimal damage: dents, scratches, chipped paintwork. In case of serious defects, the part is replaced with a new one; the cost of the analog and repair costs are almost the same.
Safety measures during work
When carrying out repair work, it is imperative to use personal protective equipment: rubber gloves, safety glasses, a respirator.
The main danger during work is the contact of chemicals with human skin. Epoxy resin and hardeners can cause severe skin irritation. Also, resins and hardeners can cause allergic reactions. When grinding, dust may enter the respiratory tract. During the repair process, evaporation of resin, hardener and sanding dust can cause eye irritation.
How to restore a car body using fiberglass is shown in detail in the video.
- Author of the material
- Other materials
Restoration methods
There are more than ten ways to repair car thresholds with your own hands without welding. With the advent of new samples of glue, resins, protective fibers and equipment, the number of methods is increasing. The most common, simple ones for garage repairs:
- fiberglass treatment;
- epoxy glue;
- construction foam;
- hood without painting;
The use of a reverse hammer, as well as a spotter, are both spot welding repair methods.
fiberglass
Repair using fiberglass or fiberglass is quite simple, cheap, but reliable. Advantages:
- does not interact with reagents on the roads - water, acids, electrolyte;
- has little weight;
- easy to use;
- used for a long time;
- has a low price.
As an alternative, fiberglass or fiberglass is used. The method is used if there are pronounced pockets of corrosion on the metal, without impact deformation. Epoxy glue or resin is used together with the material.
For repairs you will need sandpaper, hardener, brushes, spatulas of different sizes. As a substitute for epoxy glue, you can use polyester resin, which is similar in properties, but somewhat inferior to epoxy in strength. To complete the surface sealing you need:
- Use a grinder to remove the paint layer.
- Sand it with sandpaper.
- Cut a patch from the fiberglass larger than the corrosion area.
- Degrease and prime the surface.
- Glue the patch with putty or epoxy glue.
- Fill the surface and prime it.
- Treat with anti-gravel compound.
- Paint it.
Epoxy glue
A common epoxy adhesive is the ED-20 brand; as a rule, it comes complete with PEPA hardener. These components are mixed in a ratio of 1:10. When working with epoxy glue, you must take precautions, protect your eyes and hands. Contact with chemically active substances can cause severe irritation of the skin and mucous surfaces of the eyes, which can cause allergies.
The repair procedure is similar to using fiberglass. If the deformation is minor, it is permissible not to use reinforced mesh. The glue is applied to the damaged area in several layers, puttyed, primed and painted.
Construction foam
Manufacturers of Japanese vehicles often use special foam, which is used to fill the permanent threshold box during factory assembly of the car. It is believed that the material will ensure that there is no corrosion inside the threshold and will preserve the parameters of the seal. The sealant is anti-corrosion resins and mastics, polyester components, which have nothing in common with construction foam.
Work technology
The most important conditions when carrying out work are consistency and unhurriedness . The repair procedure looks like this:
- patches are cut out of the material in shape and size corresponding to the damaged part of the body;
- epoxy resin and hardener are mixed in the prepared container in the proportions specified in the instructions;
- the first layer of the resulting mixture is applied to the prepared area;
- a prepared piece of fiberglass is placed on top and smoothed with a roller impregnated with resin;
- when the resin has set, the surface is covered with sandpaper;
- the next step is applying putty;
- After complete hardening, paint and varnish work is carried out.
How to stretch a threshold without welding
Repairing a threshold after a dent involves using a reverse hammer, a suction cup, or cutting the area of deformation for a non-removable element. The algorithm of action is as follows: it is necessary to drill holes with a diameter of 1-2 mm near the dent, insert special metal corner hooks of a reverse hammer into them. Then tapping on yourself straightens the area of deformation.
You can weld by spot welding, placing the end of a hammer on the dent, and drawing out the metal. In this case, you need to start from the corner of the dent, welding the end every 3-5 mm, while straightening the surface with a hammer.
The most reliable way to stretch the threshold without full welding is to use a spotter, rings, or stop. The method is often used at service stations, since many drivers do not have the necessary tools in the garage. You can make the device yourself from a used microwave oven. Drawing process step by step:
- The negative terminal from the battery is disconnected.
- Using a sanding machine, a layer of old paint is removed from the entire surface of the dent.
- Spot welding is used to install rings through which the puller bar is passed, and the metal is drawn out using a stop. The procedure is repeated until the surface becomes as smooth as possible.
- The metal is sanded with emery, treated with a degreaser, and primed.
- A thin layer of automotive putty is applied and treated with anticorrosive.
- After complete drying, it is painted with enamel.
Another way is to use a vacuum suction cup. This approach allows you to preserve the paintwork. The difficulty of using suction cups is due to the uneven edge of the dent; it is quite difficult to use a vacuum even if the dent has sharp edges and metal creases.
A frequent question about how to repair rotten sills on a car has only one answer: nothing. Rotten parts must be knocked out or cut out, the seal checked, and new metal welded. Cosmetic repairs are used only before urgently selling a car, but this is just one way of deceiving a gullible driver; it has nothing to do with a full restoration.
It must be remembered that thresholds are called rotten if metal corrosion exceeds 65-70% and there are through holes.
With minimal foci of primary corrosion, the elements are ground, treated with putty, and primed. To strengthen the structure, plastic or aluminum overlays are used.
Materials to fix the problem
Net
A special aluminum patch mesh is used as the main material, or a similar non-professional mesh with a fine cross-section is selected. Nowadays, you can get by with ordinary household plastic, metal or fabric mesh.
Several suitable pieces are prepared. By stretching one of them from the inside of the part and giving the necessary shape to the missing part, the mesh is attached using masking tape. Epoxy resin is applied to the mesh layer by layer.
Each layer must dry well. This must be repeated with the next piece of mesh. And so we seal it until we get a hard surface.
Fiberglass
From this material you can make not only a fragment, but also a complete part. The sequence of actions is the same as with the mesh (sealing the rust hole on the car body), but using fiberglass. In fact, the frame of the missing element is created.
Restoration of permanent thresholds
A reliable technology for restoring a permanent threshold remains the application of a metal patch by welding if there are through holes and large corrosion damage. Pull out dents with a reverse hammer or spot welding; chipped paintwork with epoxy resin.
If it is necessary to repair a removable part from primary rust and it is not possible to replace the part, it is recommended to use fiberglass and epoxy glue.
The thresholds are first removed so as not to damage other body parts. Then traces of rust are removed from the surface using a solution. Next, the epoxy resin is diluted with a hardener and applied to a previously degreased surface. Pieces of fiberglass of the required size are placed on the laid glue and pressed down for adhesion. After 12 hours, the area is sanded, uneven areas are removed, a layer of primer is applied, and at the final stage it is painted.
If we are talking about minor damage - rust or dents in a small area, then even beginners can do such repairs. If you lack the skills or desire, it is recommended to contact specialized workshops; tinsmiths will conduct a full inspection of the part and adjacent elements, and will also suggest how to seal the thresholds in the car reliably and quickly.
Stages of work
Body corrosion can be removed only if a certain sequence of actions in this process is followed. Despite the variety of methods for repairing through corrosion with your own hands, a car enthusiast should know what to do with through body corrosion at the beginning of work. The complexity of the work itself will depend on the general condition of the car body.
Preparatory stage
First, you need to clean the surface subject to corrosion so that there is a clean piece of metal without traces of corrosion. If it is not possible to do this carefully, then the damaged fragment is cut out.
In each option for repairing through corrosion, all cleaned areas are coated with acid or epoxy primer.
Welding
From a suitable piece of metal (for body repairs of through corrosion you will need metal 0.8 mm thick), a patch is made 2-3 mm larger than the through hole. If possible, the patch is applied to the back side of the body part and, using welding, is scalded at points along the contour on the front side.
In no case should you weld with a continuous seam, so as not to lead and tighten the metal.
Welding points are cleaned flush with the repair area. This creates a depression, which is then leveled with automotive putties.
Description of the VAZ 2101 body
The Kopeyka, like any other sedan, is equipped with a monocoque chassis. In other words, the metal frame not only provides a convenient container for the driver, passengers and luggage, but also at the same time carries a large number of elements, components and assemblies. Therefore, a sedan, like no other type of body, needs timely inspection and repair.
Body dimensions
The dimensions of the car frame are usually understood as dimensional data. The body dimensions of the “penny” are as follows:
- width is 161 cm;
- length - 407 cm;
- height - 144 cm.
The mass of the bare body of the “penny” is exactly 280 kg. This was found out through simple mathematical calculations. It is necessary to subtract the weight of the engine, gearbox, cardan, rear axle and radiator from the total weight of the car.
As for the total weight of the “penny”, it is 955 kg.
Body number
As a rule, it is placed on the identification plate, which must be looked for in several places:
- on the right cup of the telescopic stand support;
- on the top cross member of the engine compartment.
The VAZ 2101 body number can be read on the identification plate.
In some cases it may be stamped separately.
The body number of the VAZ 2101 in some cases can be stamped separately
Additional items
Body parts are usually divided into basic and additional elements. The first include whole parts - wings, roof, floor, side members; the second includes mirrors, sills, a platform for the battery, etc.
The VAZ 2101 mirrors are designed to provide the driver with good visibility. The interior mirror is equipped with a special anti-dazzle device. As for the side exterior mirrors, there were many of them, depending on the year of production of the “penny”. Old versions were equipped with round models, new ones with rectangular ones.
VAZ 2101 mirrors were installed round and rectangular, depending on the year of manufacture
The mounting option was gradually modernized - instead of three holes for screws, only two were left.
On the VAZ 2101, one of the weak points of the body is the sills. They quickly rust and rot, as they are subject to regular mechanical stress. In order to protect and extend their service life, they are covered with plastic covers.
Today on the market you can find “standard” plastic linings for any modifications of the VAZ, including the “penny” one. You can also install linings from more modern models on the VAZ 2101 - VAZ 2107, Lada, etc.