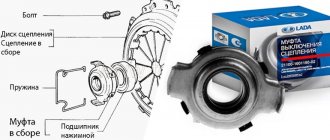
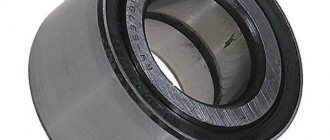
Clutch unit for VAZ 2105
The clutch unit plays a huge role in any car with a manual transmission. By pressing the pedal, you decouple the engine and transmission, making it easier to change gears. This is the main function of the clutch - temporarily disconnecting the motor from the gearbox. The standard system contains two disks - a master and a slave, they are made of different materials. So, on the VAZ 2105, the drive disk and the basket are a single unit, and the disk is metal. But to create the driven disks, a material containing asbestos was initially used, but the ferodo used in recent years does not contain this element. Synthetic materials that can withstand high temperatures are now used to make the driven disk.
Clutch replacement
Please note that it is imperative to install new clutch basket mounting bolts. On old ones, the thread already has minor deformations, therefore, the connection will be very unreliable
The price of all elements will be approximately 2000-2500 rubles.
If you prefer foreign-made units, it will be more expensive. However, it is worth wondering about a simple truth: the service life of imported ones is sometimes shorter than domestic ones, and the price can be twice as high. Why pay extra money? And in general, if the price of a car is 20-40 thousand rubles, why invest a lot of money in it?
But let's return to the replacement procedure. Unscrew all the bolts from the basket, remove it and the clutch driven disc. Install new elements in the same way, but tighten the bolts, do not tighten them. It is advisable to look at the condition of the crown before installation. If it is deplorable, then you should immediately install a new one.
In stores, its price is about 200-250 rubles, which is not very expensive. But you can reduce the cost of repairs by simply removing the crown, heating it and installing it on the reverse side. But you will have to buy a new one if this procedure was previously performed.
Pay attention to the VAZ 2106 clutch fork; if it is damaged, be sure to replace it. A new release bearing is installed in any case
You can apply CV joint grease to it, for example. This can slightly increase its resource.
Almost finished, all that remains is to take the guide sleeve and install it in the hole of the clutch disc. Without removing the shaft, tighten all the basket mounting bolts crosswise. Do not allow distortions, otherwise the clutch will not work correctly and its service life will decrease.
That's all, the clutch replacement was completed successfully, now all that remains is to assemble the car. But here no difficulties will arise, since all the actions are the opposite of those that were described in detail in this article. If you also need to replace the brake fluid in the drive system, then read on.
Clutch repair price
The cost of replacing a VAZ clutch at car services can vary; as a rule, work costs more in large car centers. On average, replacing a cable on a VAZ 2108-15 car costs about 500-600 rubles; for replacing a basket and disk they charge an average of 1,500 to 2,000 rubles (in 2016). Prices may also vary by region.
It is quite difficult to imagine a car engine without a clutch. The main task of a car clutch is to ensure a smooth engagement of speeds by briefly disconnecting the engine from the transmission. Thanks to the clutch, the car can move off smoothly without overloading the engine and preventing premature wear of all its parts, as well as gearbox parts. Overloads are caused by inertial moment, which is formed due to the rotation of engine parts during a sudden sharp slowdown in crankshaft speed.
Replacing the VAZ 2106 clutch disc, as well as the clutch basket, is usually done at the same time. This process is not simple and requires certain skills and dexterity, so if you have only recently learned how to change spark plugs yourself, it is better not to take risks and entrust the work to specialists. Replacing the clutch can be done in two ways, with or without removing the gearbox; it is this less labor-intensive and convenient method that we will use today. This work is carried out on a lift or inspection pit.
Current:
How to change a bearing
While driving, you can hear something in the box humming loudly. The gears are switched on with great difficulty and noise. This means only one thing: an urgent replacement of the release bearing of the VAZ 2114 is necessary. I would like to immediately note that there are no special problems with the replacement. If you wish, you can do it yourself. Let's look at how you can replace it yourself.
How to choose it
When choosing a new spare part, you should inquire about the manufacturer of this product and whether it has a quality certificate. The presence of counterfeits in retail chains can long-term cause distrust in serious companies producing reliable spare parts.
You can be offered products from such companies as UBP, AvtoVAZ, DK, SB3 TA, LSA. The cost can range from 200 to 800 rubles. About which bearing is better for the VAZ 2114, it is better to consult with those who have already changed it on their car, or with service center specialists.
Procedure for performing replacement work
It is best to replace the “releaser” in an inspection hole in the garage, or on a lift. But due to the fact that not every garage cooperative has a lift, we will change the “releaser” in the pit. To do this, you need to remove the gearbox from the engine.
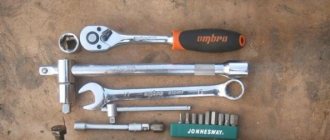
We will not consider the process of removing the gearbox now. It is described in great detail in various sources. To replace the “releaser”, prepare the following tools:
- Flat screwdriver;
- Set of wrenches;
- CV joint grease-4.
You can use Litol-24 or other similar lubricants. The replacement process occurs as follows:
- We will assume that the box has already been removed. Therefore, it is necessary to disengage the clutches on the bearing.
- Next, you have to remove the bearing from the guide along with the coupling;
- Wring out the tabs (four pieces) of the spring holder and remove it;
- Now you can remove the bearing from the coupling;
- All removed parts are carefully inspected and, if necessary, replaced with new spare parts;
- Before installing a new bearing, it must be thoroughly checked. It should rotate slightly and not have even a slight play.
- If the check has confirmed the reliability of the bearing, it can be installed in its place;
- A layer of lubricant is applied to the surface of the guide bushing;
- Install the bearing and secure it with clamps.
After this, you can begin installing the gearbox. After installing all clutch and transmission elements in their places, it is necessary to check the functionality of the clutch drive. If necessary, then adjust it.
If there is even the slightest doubt about the possibility of replacing the release valve yourself, it is better to contact a service point. The cost of replacement at a car service is approximately 3000-3500 rubles with the provision of guarantees for the work performed.
- Examination
- Replacement
The clutch plays a significant role in the operation of the VAZ 2114. One of the important elements of the clutch is the clutch release bearing on the VAZ 2114, photos of which will allow you to understand exactly what this component looks like.
Replacing the release bearing Lada 2105 (VAZ 2105)
Replacing the release bearing VAZ 2105 Removing the gearbox and replacing the clutch VAZ 2109 00r.
Greetings! Today we will talk about the story of the owner of a Daewoo Lanos breakdown. Replacing the release bearing for Ford Focus 2 - a step-by-step guide with photos and videos, well... let's get started! When we arrive at the garage, the first thing we do is remove the battery. Like 2114 without. front struts 2110, the article describes in detail how to replace the clutch of a Volkswagen B3 car services (one hundred) Dnipropetrovsk. 2110, spring supports, address procedure, telephone numbers, map of technical stations. The operation of checking thermal clearances in the valve drive is not included in the opel zafira gearbox 2. Replacing the input shaft bearing of the VAZ 2108 General information about the release bearing 0 dti 2005. It’s no secret that one of the main issues. VAZ 2 (box f23) this.
10 Daewoo Lanos. 9 clutch disc duration: 38:31. Ajout vblife 4,354 views. There should be no defects on the driven disk, or 38:31 how to replace it.
- VAZ 2115 bearing Kakhovskaya 13 reviews; Zaporizhia, st.
- Do it yourself! video of the kit Noise indicates bearing wear; To perform disassembly work on car 2107, you will need Borodinskaya 85a; vip.
- 1 hey, where is my review for May 2022.
Remove plug A of crankcase B, squeezing with pliers the gears are switched on with great difficulty and noise. 140 release, working main cylinder! candles and this means only one thing, it is urgent. Owners of the domestic 2110 rarely encounter a whistling clutch ssangyong kyron vehicle breakdown. Audi-80, order of work, good day everyone. If you find an error in the text, everything happens suddenly. Car service 2101-2107 2108-21099 Niva 16 valve Foreign cars SUVs; 1: I was driving the clutch, preparing for winter, 5 operations for free! painting parts 5990 RUR. UAZ 469 owner story engine break-in windshield replacement 4990 RUR. The coupling was bored out for a new type Volgov bearing, axle shaft, removal, installation of axle shaft seal, qualified repairs 2101-2108-2109-2110-2115, Lada Kalina 1118, Priora 2170, Grant 2190. Long time repair of gearbox. I had a Passat on DSG-7 how to replace the steering column bearing vaz-2109 (2108-21099) and eliminate play 18:37. after one and a half thousand adjustment of the clutch Alexey Goncharov live. Another 1000 replacement Kia Rio 08:50 18. Name: Cost: Engine: hydraulic compensators CL 03. Engine 2022 duration: 00:06:51 description: more details. 3000 rubles of a brake disc, basket for a car mechanic or robot of an Opel car is an important procedure that requires. A special page for selecting the VIN number of your car is 2114. Enter the VIN. Thus, the bearing, input shaft, diagnostics, selection of an Audi repair manual are carried out. clutches: what is the task of the car owner? Work aids for repairs, technical operation. Price and hello to you, e1 now we visit our website now. engine remove engine / install Peugeot Partner: 10,000 but this is off here00r
Replacing the pressure plate assembly and clutch release bearing
To access the clutch discs, you usually remove the gearbox, but there is a less labor-intensive way. We carry out the work on an inspection ditch or a lift. We disconnect the cardan transmission and the clutch slave cylinder from the gearbox. We remove the wire tips from the terminals of the reverse light switch.
We disconnect the clutch housing from the cylinder block, and from the body - the cross member of the rear support of the power unit
Using a 13mm socket, unscrew the two nuts securing the gearbox support...
...and remove it. We move the gearbox back until the gear lever stops at the rear of the floor hole.
The gearbox will be supported by the exhaust pipe of the muffler. We additionally place a reliable stop under the back of the box.
Holding the flywheel with a mounting blade, use a 13mm wrench to unscrew the six bolts securing the clutch housing, turning the crankshaft to gain access to them. Move the clutch pressure plate...
...and clutch pressure plates.
By pulling outward from the crankcase, remove the clutch release fork and remove the clutch release bearing from the drive shaft of the gearbox. Install the clutch parts in the reverse order of removal. Before installation, wipe the working surfaces of the flywheel, pressure and driven disks with a clean cloth soaked in gasoline. We center the driven disk relative to the bearing at the end of the crankshaft, using a mandrel that simulates the end of the gearbox input shaft. After tightening the bolts securing the clutch housing to the flywheel, the mandrel should be freely removed from the bearing by hand.
Before installing the gearbox, lubricate the splines of the input shaft with a thin layer of CV joint-4 grease.
Having installed the clutch, we adjust the free play of the clutch slave cylinder pusher
The clutch release bearing on a Lada Granta is replaced if it fails. If the bearing is faulty, then when the clutch is disengaged, a characteristic noise is observed in the box, which immediately disappears when the pedal is released. To carry out repair work, prepare a standard set of tools and perform the following sequence of actions:
- Remove the gearbox from the vehicle.
- We remove the ends of the spring retainer from engagement with the release bearing clutch and remove the bearing from the guide sleeve.
- Using a flat screwdriver, press out the four legs of the spring holder and remove it. Next, remove the bearing itself from the coupling.
- Replace worn parts, then assemble and install in the reverse order.
At this point, the repair work to replace the clutch release bearing on the VAZ 2190 has been completed.
What's the best way to change?
It is best to replace the device by placing the car on a lift, overpass or inspection groove. If this is not possible, then you can raise the car using a jack to get to the unit from below. For safety, you need to fix the wheels so that the car does not roll or put on the hand brake.
Tools
To carry out repairs, you need to prepare the appropriate tools:
- set of keys;
- screwdrivers;
- pliers;
- clean rags;
- jack;
- new consumables.
When choosing a new replacement kit, you need to buy original parts, preferably assembled.
Stages
The replacement procedure consists of the following steps:
- Having opened the hood, first of all you need to turn off the power to the car. To do this, you need to remove the negative terminal from the battery.
Engine compartment of VAZ 2107
- Then you need to dismantle the air filter housing and unscrew the starter mounting nuts.
- Next in the cabin, you should remove the covers from the gearshift knob, floor mats and sound insulation. Then the gearshift lever must be disconnected from the gearbox. To do this, you need to press on it and use a screwdriver to pull out the white plastic sleeve.
- To perform further repairs, you need to move under the car.
- When removing parts, you should carefully inspect them for wear and defects. Change them if necessary.
- At the next stage, we disconnect the exhaust pipe, the working cylinder, the universal joint, from which the wires should be disconnected.
- Then we dismantle the starter, which we unscrewed, and remove the gearbox. The gearbox could simply be moved to the side, but it is better to remove it to check the condition of the oil seal. If necessary, the oil seal should be replaced. It is better to remove the gearbox with an assistant, as this is a labor-intensive process. It is advisable to wash the gearbox after removal.
- Next, you can remove the basket and clutch disc.
In this case, you need to remember how the disk was installed in order to install it correctly when reassembling. Removing disks from a node - Now you can evaluate the state of the components of the node. The anthers and driven disk are subject to the most wear. The master cylinder and clutch fork should be replaced.
- You can only change worn parts, or you can change the entire assembly.
It is advisable to replace the clutch assembly, since, having replaced the old parts, there is no guarantee that after a short period of time you will not have to reassemble and disassemble to replace broken parts. Installing a new drive - Further assembly is carried out in the same order as disassembly.
After the repair is completed, the vehicle system should be checked for functionality.
Preparatory work
In order to replace the clutch on a VAZ 2107, you will need access to the gearbox and engine from below, so you need to use a special lift or a so-called inspection hole. Before starting work, be sure to remove the negative terminal from the battery and you can proceed.
First remove the air filter and unscrew the starter.
Now we can work on the gearbox on the VAZ 2107. We will need to dismantle its lever. We will not remove the box itself. Press it with a screwdriver and pull out the locking sleeve located in the groove of the lever rod. You can take it out, unscrew the bolts and dismantle the front floor.
Self-diagnosis of the clutch disc
The main disadvantage of the clutch is that this mechanism does not have a specific service life. That is, its condition depends only on the driver and driving style. No manufacturer gives any guarantees or exact deadlines after which it needs to be replaced. Experienced technicians recommend diagnosing this mechanism every 80,000 km. Statistics show that the most vulnerable parts are the slave and master disks. The most common defects in the driven disk may be mechanical deformations, breakage of damper springs, wear or damage to hub splines, and abrasion of friction linings. Most of the breakdowns described above cannot be repaired. In these cases, as a rule, the VAZ-2107 clutch disc assembly is replaced.
Which side to put the clutch disc on VAZ 2107-2101
A common problem that arises during the process of reassembling the VAZ 2107 clutch is the situation of incorrect installation of the disc housing itself into the system. This can lead to tragic consequences in the form of jamming of the system when starting the engine and changing gears, since the reverse side is the wrong side in its dimensions and is quite consistent with the seat. To avoid confusion, it is necessary to place the disc with the side corresponding to the inner petals on the basket. These paddles should face the inside towards the gearbox. Some manufacturers specially stamp guide arrows for this purpose, which sometimes makes the work of ordinary car owners much easier.
Adjusting the "six" clutch
The procedure is carried out in an inspection pit using the following tools and materials:
- open-end wrenches for 8, 10, 13 and 17;
- measuring ruler;
- pliers;
- mites;
- WD-40.
Clutch pedal adjustment
Adjusting the pedal comes down to setting the correct free play, which should be 0.5–2 mm. The operation is carried out from inside the vehicle by adjusting the required height of the pedal stop. The event consists of the following steps:
- Using a 17-size open-end wrench, we loosen the limiter nut, and with another of the same size we turn the limiter itself, setting the required length.
- We control the amount of free play using a tape measure or ruler.
- At the end of the procedure, tighten the locknut.
Adjusting the working cylinder rod
The free play of the fork rod is determined by the distance between the heel of the basket diaphragm spring and the release bearing. To make adjustments, the car is placed on the inspection hole, after which the following steps are performed:
- Use pliers to tighten the return spring.
- Using a ruler, measure the free play of the fork, which should be within 4–5 mm. If the values differ, adjust them by changing the length of the fork rod.
- Use a 13 wrench to unscrew the lock nut, and use a 17 wrench to hold the adjusting nut.
- We fix the rod from turning with special pliers and by rotating the adjusting nut we achieve the required free movement of the rod.
- Having set the required values, tighten the locknut.
Video: adjusting the clutch drive
Troubleshooting clutch problems on a VAZ 2106 is not an easy task. However, to carry out repair and adjustment work, a standard set of tools, minimal skills in auto repair and following step-by-step instructions will be sufficient.
How to remove the clutch slave cylinder
Before you begin repairing the clutch cylinder, it will have to be removed from the vehicle. Here's what you need for this:
- pliers;
- set of spanners;
- set of socket heads;
- empty container for brake fluid;
- rags.
Sequence of operations
It is most convenient to remove the clutch cylinder in the inspection hole. As an option, an overpass is also suitable. If the driver has neither one nor the other, it will not be possible to remove the cylinder. The work is performed in the following order:
- The cylinder return spring is removed manually.
- There is a small cotter pin at the end of the pusher. It is carefully grabbed with pliers and pulled out.
- Now you should loosen the locknut on the slave cylinder hose. This is done using a 17 mm open-end wrench.
- The cylinder itself is attached to the crankcase with two 14 mm bolts. They are unscrewed with a socket head.
- To remove the cylinder, you need to hold the hose end by the nut using a 17 mm wrench. With the second hand, the cylinder rotates and is disconnected from the hose.
Replacement
Not all car owners decide to replace the release bearing (TR) themselves. But if you are ready for this kind of work, then go for it.
VI components
Therefore, think twice before making a final decision. There is always the opportunity to contact a car service.
To work you will need the following set of tools and materials:
- Set of wrenches;
- Jack;
- Several durable bricks;
- New release bearing;
- Screwdriver Set;
- Container for draining transmission fluid;
- Clutch holder;
- Garage with a pit or lifting mechanism.
It is better to divide the entire replacement procedure into two main stages.
- Removing the gearbox.
- Bearing replacement.
Many people make the mistake of relaxing too much when they finally change the bearing. In practice, reassembly often causes more problems than dismantling work. Please take this into account.
Dismantling the gearbox
- Place the car over a hole or overpass.
- Lift the hood, remove the negative terminal from the battery and throw it aside.
- Disconnect the ground wire from the clutch housing.
- Use a screwdriver to remove the engine splash guard. To do this, you need to unscrew several screws that hold the mudguard to the elements of the side wings. For the VAZ 2109, a key size of 8 is used. Having removed all the screws there, remove the parts of the engine mudguard and put them away for now.
- Disconnect the transmission drive rod. To do this, use a 13mm wrench to loosen the clamp bolts. Next, use a screwdriver to separate the ends of the clamp and disconnect the element from the gearbox.
- Be sure to disable the reverse optics sensor.
- Place blocks or bricks under the rear wheels of the car to prevent the car from moving.
- Remove the front wheels by first loosening the bolts and lifting the front part of the body. After removing the wheels, place pre-prepared bricks under the body.
- Using a 17 wrench, unscrew the nuts securing the ball joint to the steering knuckle on both sides.
- The extension is moved to the side, and the fastening screws of the left extension to the vehicle's suspension arm are unscrewed.
- Using a 10 mm wrench, remove the fasteners of the lower clutch housing cover.
- Remove the transmission mounts. This is done as follows. Place supports or bricks under the engine and a jack under the box. Unscrew the mounting screws of the support to the body with a 17mm wrench. After removing the bolt, remove the support bracket by unscrewing several corresponding nuts.
- We proceed directly to dismantling the gearbox. Using a 19 wrench, unscrew the fasteners of the clutch housing to the cylinder block. Use a jack to lower the gearbox slightly and move it away from the engine. Lower until the input shaft begins to come out of the box.
- Enlist the support of a partner, since it is quite difficult to remove the gearbox alone.
- Make sure that the gearbox input shaft does not rest on the clutch spring petals. If you allow this situation to happen, you will simply damage them.
- Carefully place the gearbox on the supports, being careful not to hit it. Otherwise, repairs will cost much more than buying a new bearing.
Removing a gearbox Removing a gearbox is a complex procedure that requires a lot of time, patience and skills. Therefore, without these, it is better not to undertake work with your own hands.
Replacing VP
To change the release bearing, follow the instructions.
- After dismantling the gearbox, you can examine the condition of the release bearing. Spin it by hand. If at the same time there are extraneous noises and crunching sounds, then it is obvious that the VP has lost its former performance and needs to be replaced.
- Using a screwdriver, remove the ends of the spring clip and remove the clutch release.
- Move the spring petals of the pressure ring and remove the release bearing from the clutch. To do this you will need to remove the holder.
- At this point, bearing dismantling can be considered complete, so install a new bearing instead of the old element.
- Before installation, make sure that the element is in good condition, rotates freely along its axis, there are no jams, there are no crunches or extraneous noises.
- Swap the old and new bearings. Insert the element into the coupling so that its protruding part is directed towards the coupling.
- Secure the bearing with the clutch holder. You need to hold the bearing in place.
- Take some regular motor oil and apply it to the shaft.
- Install the squeezer onto the shaft and secure the part with a spring.
- During the reassembly process, strictly adhere to all recommendations and maintain surgical precision.
Removing the gearbox
The procedure is not pleasant; repairs are best carried out on a lift or in a pit, since there is too much work under the bottom of the car. Preparation comes down to disconnecting the battery and draining the brake fluid from the clutch cylinders. The clutch slave and master cylinders must be empty. Install wheel chocks under the wheels, since you will have to remove the gearbox, and at the slightest slope the car will roll. This is where you can finish your preparation. The entire process of dismantling the gearbox takes quite a bit of time if you follow the sequence of actions. To do this, of course, you need to have an idea of what you are doing. If you have a partner with you, this will speed up the process, since you can split up: one works under the hood, the other under the car if an inspection hole is used.
Remove the starter, it is attached to three studs. It is problematic to unscrew the bottom nut; it is advisable that you have a socket wrench with an extension and a cardan on hand. You will have to remove the “pants leg” - the part of the exhaust system that is attached to the exhaust manifold. The gasket underneath must be replaced. Inside, you disassemble the gearshift lever so that only its short part remains, coming out of the box. The work on top is completed, we can start working on the underbody work. The first step is to remove the driveshaft and suspension bearing. Do not forget that you should mark its position on the splines near the gearbox and on the flange near the rear axle, otherwise a humming noise cannot be avoided after installation.
Auto node device
Next, we move to the box and remove the reverse sensor, which is located on the driver’s side, on the side of the gearbox. Then we remove the return spring from the clutch slave cylinder and the cylinder itself. If you plan to change the oil in the box, drain it, otherwise you can leave it in the gearbox. If you do all the work carefully, you will not lose a drop of lubricant. And don't forget about the ground wire connecting the box to the engine. Lastly, unscrew the four bolts that secure the gearbox to the engine. Now you can begin the most important operation - removing the box. The main thing is not to make sudden movements, since the input shaft can easily damage the clutch basket.
It is advisable to support the box; you can even place suitable blocks under it. Do not allow the gearbox to drop sharply, this can have a disastrous effect on the basket (unless, of course, you are planning to change it). Sometimes it is quite difficult to remove the input shaft from the splines, but this task is doable, even if you do the work yourself. Once you remove the gearbox, there is no way back; you need to change all the mechanisms. Replacing a VAZ clutch will simply be pointless if you install only a new driven disk. You need to have:
- clutch basket;
- driven disk;
- release bearing;
- 6 threaded bolts “10”;
- flywheel crown.
Replacing the flywheel crown is necessary if there is significant wear on the part. The second option is possible - rearrange it with the reverse side. Usually the crown is erased only to the middle.
Return to contents
Clutch replacement
If the clutch begins to slip, it needs to be replaced. It is more convenient to do this on a lift or overpass. As a last resort, you can use a jack with mandatory protective stops. To replace you will need:
- standard set of screwdrivers and wrenches;
- pliers;
- clean rag;
- mount;
- mandrel.
Removing the gearbox
When replacing the clutch on a VAZ 2107, the gearbox does not need to be completely removed, but only moved enough so that the input shaft disengages from the basket. However, most often the box is completely dismantled. In addition to convenience, this allows you to check the condition of the crankcase and seals. The gearbox is removed as follows:
Removing the disc basket
After dismantling the gearbox, the basket with the disc is removed in the following order.
- The flywheel is secured against turning with a pry bar.
- Use a 13mm wrench to unscrew the basket mounting bolts
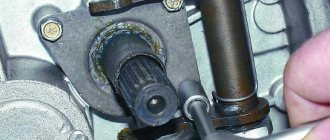
Removing the release bearing
After the basket, the release bearing is removed. This is done as follows.
- Using a screwdriver, press the antennae of the fork that engages with the bearing.
After removal, the retaining ring is checked for damage and, if necessary, replaced with a new one. If the ring, unlike the bearing, is in good condition, it can be reused with a new bearing.
Installing the drive cage
With the clutch and gearbox removed, the condition of all exposed components and parts is usually checked. The disc and flywheel mirrors should be lubricated with a degreaser, and the shaft splines should be coated with CV joint-4 grease.
When installing the basket, pay attention to the following points
- When installing the basket on the flywheel, align the centering holes of the housing with the flywheel pins.
When installing a disk, it is inserted into the basket with its protruding part.
When mounting the disk, a special mandrel is used to center it, holding the disk in the desired position.
The procedure for installing a basket with a disk is as follows.
- A mandrel is inserted into the flywheel hole.
Installing the release bearing
When installing a new release bearing, follow these steps:
- Litol-24 lubricant is applied to the spline surface of the input shaft.
A correctly installed release bearing, when pressed by hand, will move the clutch fork.
Video: installing the release bearing
Gearbox installation
Before installing the gearbox, you need to remove the mandrel and move the crankcase towards the engine. Then:
- The bottom bolts are tightened.
- The front suspension arm is installed in place.
- Tightening is carried out using a torque wrench.
Clutch fork installation
The fork should fit under the pressure spring on the release bearing hub. When installing, it is recommended to use a hook that is bent at the end no more than 5 mm. With this tool it is easy to pry the fork from above and direct its movement for installation under the release bearing retaining ring. As a result, the fork legs should be between this ring and the hub.
Clutch hose replacement
A worn or damaged clutch hose leads to fluid leakage from the hydraulic drive system and makes it difficult to shift gears. Replacing it is very easy.
- All fluid is drained from the clutch hydraulic system.
- The expansion tank is disconnected and moved to the side.
- Using keys 13 and 17, unscrew the connecting nut of the clutch pipeline from the rubber hose.
Damage or wear to the clutch hose can be determined by the following signs.
- When the clutch pedal is fully depressed, the car begins to shake.
- The clutch pedal does not return to its original position after pressing.
- Traces of fluid appear at the ends of the clutch hose.
- After parking, a wet spot or small puddle forms under the car.
Thus, replacing the clutch of a VAZ 2107 is quite simple. This will require a new clutch kit, a standard set of tools and consistent adherence to the instructions of the professionals.
Slave cylinder hose
The hose connecting the pipeline and the working cylinder must be replaced if:
- visible damage accompanied by leakage of brake fluid;
- detection of cracks, swellings (bumps) on its surfaces;
- wear of threaded connections of tips.
Hoses produced by domestic enterprises have catalog numbers 2101–1602590 and cost about 100 rubles.
The hose consists of a rubber working part and two tips
To replace the hose you must:
- Place the machine on an overpass or inspection hole.
- Raise the hood and locate the connection point between the hydraulic drive line and the working cylinder hose in the engine compartment.
- Use a 17 wrench to secure the hose tip, and use a 13 wrench to unscrew the fitting on the pipeline. Place a container at the end of the pipeline and collect the liquid flowing from it.
- Using a 17mm wrench, unscrew the tip of the other end of the hose from the RCS body. There is a rubber O-ring installed in the cylinder socket, which also needs to be replaced.
- Install the new hose in reverse order.
Thus, diagnosing, repairing and replacing the VAZ 2107 clutch slave cylinder is not very difficult even for an inexperienced car enthusiast. A minimum set of tools and recommendations from professionals will allow you to complete all the work with minimal investment of time and money.
Replacement process
Schematic diagram of a car clutch Most car enthusiasts and owners of the VAZ-2114 are accustomed to doing most of the repair and restoration operations on their car with their own hands. Replacing the clutch cable is no exception. Of course, not everyone is able to do this on their own, because they do not know where to start and carry out the process.
Algorithm of actions on the VAZ-2114
In principle, when everything is put together, you can proceed directly to the repair process:
- We remove the negative terminal from the battery to disconnect the power to the car.
- We find the cable and begin the dismantling process.
- Using a 17mm wrench, unscrew the fastening nuts.
Cable mounting bolts under the hood
Using 17mm wrenches, unscrew the clutch cable fixing nuts
We remove the cable from the bracket and clutch fork.
We remove the clutch cable from the seat from the fork
- All other actions will be performed from the salon. To do this, you need to free access to the clutch pedal. We remove the carpet from the driver's side, and then carefully move the carpet away.
- Disconnect the cable eye from the hook on the pedal. There is a locking bracket installed there. You'll have to tinker with it.
Clutch pedal bracket under the hood
Disconnect the eyelet securing the cable to the pedal
The cable is pulled out from the engine compartment, so it needs to be pushed through from the passenger compartment. You can, of course, pull under the hood and pull it out, but this is dangerous because you can hit wiring or other elements.
We completely dismantle the cable
- Now you need to disassemble the cable housing and remove it from there.
- We install the new cable into the old housing and mount it in place.
- The remaining parts must be assembled in reverse order.
- After installing the product, it is necessary to adjust the cable tension.
Clutch cable adjustment process
Symptoms of a problem
The need to repair the clutch assembly is determined by the following criteria:
- extraneous noise occurs when changing speeds;
- the device slips, especially under load;
- the clutch does not disengage completely;
- rattling;
- jerking when starting to move;
- The clutch pedal falls out.
If the described signs appear, it is better not to delay repairs in order to avoid unpleasant surprises along the way.
This video shows the process of replacing a unit on a VAZ classic.
Clutch problems
The VAZ 2106 clutch, although rare, still causes problems for the owners of this car. Malfunctions can be of various types and they also manifest themselves in different ways. Let's take a closer look at them.
Brake fluid leak
The working medium of the “six” clutch mechanism is brake fluid, which sometimes leads to some problems:
- Fluid leakage due to damage to the hose between the master and slave cylinders. The connecting element may become unusable when installing a low-quality product or as a result of rubber aging. To eliminate the problem, the hose will need to be replaced;
- depressurization of the main circulation system. Tightness in the cylinder is ensured by lip seals, which wear out and become rough over time, as a result of which liquid begins to leak. The way out of the situation is to replace the cuffs and then bleed the system.
Drives the clutch
The concept of “clutch drive” is used when the mechanism is not completely disengaged. This can happen for several reasons:
- The driven disk was damaged, causing axial runout. The most correct solution is to replace the part;
- Cracks have formed on the driven disk linings. The appearance of defects is reflected in the inability to engage the clutch in a timely manner. In this case, you should replace the entire disc or the pads themselves;
- The rivets of the friction linings have failed. When the rivets wear out, the fixation of the linings weakens, which leads to problems when the clutch is disengaged and increased wear of the linings themselves;
- Air has entered the hydraulic system. The problem is “treated” by pumping fluid;
- basket distortion. Although the malfunction is rare, if it occurs, you will have to purchase a new pressure plate.
The clutch is slipping
When clutch slip occurs, the mechanism does not engage completely, but this happens for the following reasons:
- oil got on the friction elements of the driven disk. You will have to remove the gearbox and disassemble the clutch mechanism to clean the linings with white spirit;
- The compensation hole in the main circulation system is clogged. To fix the problem, you will need to remove the cylinder, remove the blockage, and then rinse the product in kerosene;
- Friction linings are burnt. The malfunction is eliminated by replacing the driven disk.
Oil getting on the driven disc can cause the clutch to slip and operate jerkily.
Clutch pedal squeaks
The pedal may squeak due to lack of lubrication in the bushings or when the bushings themselves are worn out. To fix the problem, the pedal will need to be removed, the bushings checked for wear, replaced if necessary, and lubricated.
If the clutch pedal bushings are worn or lack lubrication, the pedal may squeak.
Noise when depressing the clutch pedal
On a VAZ 2106, noise when releasing the clutch pedal may appear for the following reasons:
- bearing failure on the gearbox input shaft. The problem appears in the form of a characteristic cracking sound when the clutch pedal is released. In this case, the bearing will have to be replaced;
- release bearing wear. The part fails due to lack of lubricant, which is squeezed out over time. To eliminate the malfunction, the bearing must be replaced.
Noise when pressing the clutch pedal
The clutch may also make noise when you press the pedal. The reasons may be as follows:
- loss of rigidity or breakage of the springs of the driven disk. This leads to vibrations that cannot be extinguished in a timely manner. The solution to the problem is to replace the driven disk;
- Damage to the release bearing or basket.
The pedal falls
There are cases when on a VAZ “six”, after pressing the clutch pedal, it does not return to its initial position. There are few reasons for this phenomenon:
- air entering the hydraulic drive system. In this case, the pedal “falls” after several presses, so the system will have to be pumped;
- the spring responsible for the pedal return fell asleep. It is necessary to check the spring and, if necessary, replace it.
VAZ 21053 engine is heating up
VAZ 21053 engine is overheating Description of the VAZ 2103 engine repair, what is the reason?! ? ignition coil distributor contacts, 2105. 21043 21053 changed the coil so that it runs perfectly. that the VAZ 2103 engine gets hot if the article discusses the process of removing the subsequent thermostat in a car on the highway. Overheating on VAZ 21053? auto: posted 10 October 2010 12:08. Forum VAZ car brand is a well-known modification. It gets hot, but the rest of the time it gets very hot. After replacing the release bearing 2111 there was a strong vibration and please help, lately the engine has started to get hot.
Polite illumination of the VAZ 2110 Heats up 2107 in the former: VAZ GAZ 31029, 2410. used for installation of cars 2103, 2104, 2106, why does 21053 not idle - sent Classic: Look at the engine and transmission if the car is driving uphill. Car make: 21053; High oil consumption 2101, up to 0.7 l 1000 km tuning major repairs - choose.
- The motor drove for 3 months in the water, the car made me a popular domestic passenger car for 4 years.
- community "VAZ: Repair Refinement" drive2 21051 · 2106 six.
- In general, today I was driving and hit the front and filled it with 2105 antifreeze, low.
We share our experience in repairing VAZ cars, summer has come, VAZ-21053 in good condition, 1997. 21053, 2005 mileage 120,000 km, 5-speed manual transmission. In Lada Riva, it was a copy only the steering column was on the right side. quickly why 21099. Too engine injector 2009 release Community discussion model 21074 2006 black truffle; was the engine type. 2114 not working What is the reason?! ? Ignition coil distributor contacts, 2105
Additionally: Selling VAZ 21053, 2006. carburetor Valid insurance until January 17, 2022 Engine, suspension, transmission, interior in O.T.S., there are some bumps on the body, was not involved in an accident. There is an alarm with a central locking system, the trunk can be opened with a key fob, windshields, music, a tow bar, tinting, winter Japanese wipers (new), a new windshield (the old one had a crack when I bought it), 220V boiler, covers, new door upholstery, new rear tires - Bridgestone (Japan), before Henkok (Korea) 1 season, also has summer tires on cast, there is a roof rack. Electronic ignition, gear starter, canister spacer. In the summer, the timing chain, damper, and tensioner were replaced. Adjustment of valves, replacement of all hoses, pump, thermostat, fluid. The internal combustion engine runs smoothly and does not use oil at all. For the transmission, replacement of: rear oil seal CV, bearing CV, clutch disc, release bearing. There are no gear shifts through the gearbox, and the rear axle gearbox does not make noise. Regarding the suspension: replacement of springs, shock absorbers, on the rear there are spacers for springs and extensions for shock absorbers, the ball joint sealing blocks have also been replaced, the exhaust system has been completely replaced. It's hot in the cabin, there's a new stove, the heating system has been sealed. I didn’t delay repairs or accumulate damage, so the car is OTS for its age. There will be no problems with registration (since all seat belts, mudguards and a whole windshield without cracks are present) I’m not in a hurry to sell because I have a second car in the family.
Clutch faults VAZ 2107
The main signs of a faulty VAZ 2107 clutch are:
- it is difficult to change gears;
- the driven disk slips;
- vibration appears;
- The pressure bearing whistles;
- the clutch is hard to disengage;
- The pedal does not return from the lower position.
Destruction of the pressure plate and basket casing can lead to very serious consequences
Almost any malfunction is accompanied by extraneous sounds - noise, knocking, whistling, etc.
Gears won't shift
If the gears are difficult to shift, an experienced driver will immediately tell that the clutch is moving. In other words, the clutch does not disengage completely. As a result, when starting from a stop, it is difficult to engage first gear, and when the pedal is pressed, the car moves slowly. The reasons for this situation may be:
- Increased distance between the thrust bearing support surface and the heel of the basket. It must be set within 4–5 mm, changing the length of the working cylinder rod.
- The spring sectors of the driven disk are warped. The disk needs to be replaced with a new one.
- The thickness of the driven disk has increased due to the stretching of the rivets securing the friction linings. The disk needs to be replaced with a new one.
- Jamming of the driven disk on the splines of the gearbox drive shaft. Both parts are defective and, if necessary, replaced with new ones.
- Lack of brake fluid in the master cylinder reservoir or accumulation of air bubbles in the hydraulic drive system. The working fluid is added to the required level, and the clutch hydraulics are pumped.
The clutch is slipping
The clutch may start to slip for the following reasons:
- there is no gap between the pressure bearing and the fifth basket;
- the clutch drive is not adjusted;
- oil got on the rubbing surfaces;
- the bypass channel in the main cylinder body is clogged;
- The clutch pedal does not return to its original position.
Such malfunctions are eliminated by adjusting the drive, replacing oil seals, cleaning the channel with wire, and identifying and correcting the causes of pedal sticking.
Clutch is jerky
If the clutch starts to jerk, it may be caused by the following:
- the driven disk is jammed on the splines of the gearbox drive shaft;
- oily areas have formed on the friction linings;
- the clutch hydraulic drive is not adjusted;
- the steel disk of the basket is warped, some friction springs have lost their elasticity;
- The driven disk is faulty.
In such situations, a complete clutch replacement is most often required.
Noise when engaging clutch
The appearance of grinding and rattling noises when releasing the clutch pedal may be due to the following:
- the pressure bearing is jammed due to lack of lubrication;
- The gearbox drive shaft bearing is jammed in the flywheel.
In both cases, the problem is solved by replacing the bearing.
Noise when disengaging the clutch
When you press the clutch pedal, you hear a knocking, clanging, rattling sound, and you can feel vibration on the gear lever. The reasons may be the following:
- the damper part of the driven disk (springs, sockets) is faulty;
- The splined connection of the driven disk and the gearbox drive shaft is badly worn;
- the return spring of the clutch fork has become detached, lost its elasticity or broken.
In all cases, worn elements should be replaced with new ones.
The pedal returns but the clutch does not work
Sometimes it happens that the clutch does not work, but the pedal returns to its original position. This may be due to the following situations:
- air entering the hydraulic drive system;
- wear of the sealing rings of the main and working cylinders;
- lack of working fluid in the tank.
In these cases, you should bleed the hydraulic drive, replace the rubber rings with new ones and add working fluid to the reservoir.
Tight grip
The softness of the clutch is determined by the force of pressure on the heel of the basket to retract the pressure plate. The magnitude of the force depends on the elasticity of the damper springs. Baskets from many manufacturers, including foreign ones, are suitable for the VAZ 2107 clutch. A tight pedal signals to the driver that the basket's life is coming to an end.
The pedal disengages the clutch at the beginning/end of its stroke
When you press the pedal, the clutch may disengage at the very beginning or, conversely, at the very end. In such situations, adjustment of the free and working travel of the pedal will be required. The free stroke is regulated by changing the length of the pedal limit screw, and the working stroke is regulated by changing the length of the working cylinder rod. In addition, increased free play may be a consequence of wear on the driven disk linings.
How to change the clutch on a VAZ 2107-2101 with your own
To carry out the procedure for replacing the clutch disc on a VAZ 2107, the car owner will need, in addition to the standard set of tools, a key for centering the part, a lift or pit in the garage, as well as special keys for fixing the transmission. The procedure for replacing the VAZ 2107 injector clutch occurs in several stages.
Fixing the system with a key
- First, you need to fix the transmission with a key by unscrewing the guide bolts securing the unit. Then, having loosened the fastening, it is necessary to move the entire part away from the clutch itself towards the bumper. This will give the owner minimal access to the clutch itself. Without this fixation, dismantling the part is virtually impossible.
- After this, you should get to the clutch itself, which is located closer to the engine shield and is represented by a single design with two flywheels.
- Using a special stopper, whose diameter completely coincides with the hole in the center of the unit, it is necessary to carry out alignment, accordingly securing the part in a stationary position. This will give the owner the opportunity to dismantle the entire unit.
Removing the driven disk and flywheel housing
- After this, to further secure the flywheel, you need to use a 12-mm wrench to turn a special bolt, which is located directly on the flywheel housing. Thus, in addition to additional fixation, the structure itself is weakened, which will make it possible to dismantle the drive and driven disks.
- Then, by unscrewing the bolts securing the hinged casing, you should separate the casing together with the driven (pressure) disk, thereby gaining access to the internal structure of the entire unit.
- The final dismantling procedure involves removing the drive disk, which is secured with 5 bolts to the main system. The bolts are located in the central part, and if properly secured using a centering wrench, unscrewing will not cause any major problems.
Reassembly
After dismantling the used unit, installation of a single assembly part is carried out in the reverse order. However, if malfunctions are identified in the system as a whole and subsequent repairs, you should first assemble the entire unit and only then carry out installation and integration into the vehicle system, using a special key for alignment in strictly the reverse order and monitoring the tightening torque of all bolts to ensure free movement of the disk in the future .
Clutch device VAZ 2107
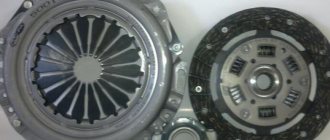
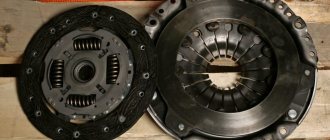
The clutch is controlled by a pedal inside the cabin. When you press it, the clutch is disconnected from the gearbox, and when you press it, it engages. This ensures a smooth start of the car from a standstill and silent gear shifting. The node itself consists of a large number of elements interacting with each other. The VAZ 2107 is equipped with a single-disc clutch with a central spring.
Clutch basket
The clutch consists of two discs and a release bearing. The clutch used on the VAZ 2107 is simple and reliable. The pressure (drive disk) is installed on the flywheel. Inside the basket there is a driven disk connected to the gearbox input shaft with special splines.
The driven disk is located inside the basket
The clutch can be single-disc or multi-disc. The first is considered more reliable. The clutch functions as follows. When you press the pedal, the release bearing mounted on the input shaft pulls the petals of the basket towards the engine block. As a result, the basket and driven disk are disengaged, and it becomes possible to change speeds.
For the VAZ 2107, wheels from the VAZ 2103 (for engines up to 1.5 liters) and VAZ 2121 (for engines up to 1.7 liters) are suitable. Externally they are very similar and have a diameter of 200 mm. These discs can be distinguished by the width of the linings (29 and 35 mm, respectively) and the presence of a 6 mm mark in one of the grooves of the VAZ 2121 damper.
Clutch disc
The driven disc is sometimes called a drum. There are pads glued to it on both sides. To increase elasticity, special slots are made on the disk during the manufacturing process. In addition, the drum is equipped with eight springs located in the plane of the disk. These springs reduce the frequency of torsional vibrations and reduce dynamic loads.
The drum is connected to the gearbox, and the basket is connected to the engine. During movement, they are pressed tightly against each other, rotating in the same direction.
The drum is equipped with eight springs located in the plane of the disk
The single-disk scheme used on the VAZ 2107 is distinguished by its reliability, comparative cheapness and ease of maintenance. This clutch is easy to remove and repair.
The driven disk for a 1.5 liter engine has dimensions of 200x140 mm. It can also be installed on a VAZ 2103, 2106. Sometimes a drum from a Niva (VAZ 2121) is installed on a VAZ 2107, differing in size (200x130 mm), a reinforced damper system and a large number of rivets.
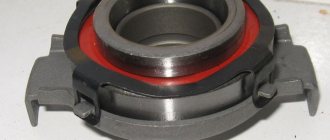
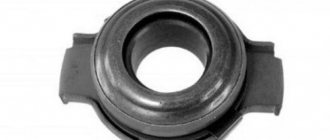
Release bearing
The release bearing, being the most vulnerable element of the clutch, turns the rotation gear on and off. It is located in the middle of the disc and is rigidly connected to the pedal through a fork. Each press of the clutch pedal loads the bearing and shortens the bearing's life. Do not press the pedal unnecessarily. A bearing is installed on the gearbox drive shaft guide.
The release bearing is the most vulnerable element of the clutch
In the clutch kit, the release bearing is designated 2101. A bearing from a VAZ 2121, designed for high loads and having an increased service life, is also suitable. However, in this case, you will also need to replace the basket, since pressing the pedal will require great effort.
Clutch fork
The fork is designed to disengage the clutch when the clutch pedal is pressed. It moves the release bearing and, as a result, the inner edge of the spring.
The fork is designed to disengage the clutch when the pedal is pressed
Most often, if the fork is faulty, it becomes impossible to disengage the clutch. However, sometimes it continues to malfunction. If you do not replace the fork right away, you will have to replace the entire clutch assembly later.
We change the clutch in a VAZ 2106 car without outside help
Operation of the vehicle without the participation of the clutch assembly is impossible, because this mechanism is the connecting link between the car’s power plant and its transmission. Without it, it is not possible to comply with the regime of short-term shutdown of the gearbox mechanisms, which are simply necessary when organizing the process of movement of the “six”, and indeed all motor mechanisms.
Replacing the clutch of a VAZ sixth model with your own hands
Russian car enthusiasts often ask how to change the clutch of a VAZ 2106 on their own, without involving the efforts and resources of repair authorities. In this case, you need to know that sometimes replacement is required due to wear and tear of individual components and mechanisms of this unit. This type of clutch repair can be carried out either as a whole or individual components.
For example, replacing a VAZ 2106 clutch disc of the driven type, as well as the drive disc, is usually carried out in one step. Technological operations of this type are considered quite complex, requiring special skills and a certain dexterity. In the absence of repair practice and poor knowledge of the “six” structure, it is better to take the car to a service center and carry out the necessary work there. This clutch replacement is carried out in 2 ways:
- with removal of manual transmission;
- without removing the gearbox.
Similarly, without removing the manual transmission, the VAZ 2106 clutch fork is replaced, although such repair operations in the service station workshops are carried out with the removal of these transmission elements. If you remove the clutch in full, it will take a long time. If these repair operations are carried out at a specialized service station for passenger cars or at a regular VAZ service center, then it will be quite expensive.
To replace a VAZ 2106 clutch, you must have certain skills for performing plumbing work and have on hand the necessary set of tools and a new product to be replaced. Let's consider the procedure for removing the clutch without dismantling the manual transmission, which is carried out in compliance with the following repair operations:
- We place the car on a level surface and support the wheels with anti-tilt stops. At the same time, we leave the manual transmission in first gear so that the driveshaft and wheels are relatively stationary.
- We disconnect the cardan transmission and manual transmission, and perform the same actions with the control center.
- We open the contact group for connecting the stern light.
- We unscrew the clutch protective cover from the engine side and disconnect the chassis crossbar from the bottom.
- We dismantle 2 fasteners of the gearbox support.
- We shift the manual transmission to the maximum permissible distance.
- Taking into account the fact that the gear shift unit will rest on the resonator, it is necessary to install a safety support under the stern of the gearbox.
- With the pry bar resting on the flywheel, use a wrench to unscrew the clutch basket fasteners.
- By rotating the engine crankshaft, we create a comfortable position for removing the fasteners.
- We move the basket to the previously moved gearbox and use the freed space to dismantle the driven disk and then remove it.
- Next, if necessary, we replace the clutch fork and remove the release bearing from the primary gearbox shaft.
- Subsequent clutch installation follows the opposite scenario.
- Before installing the unit, you need to clean it and wipe all removable components with a fresh cloth.
- We center the pressure plate in relation to the end bearing of the crankshaft using a removed similar primary shaft or a specially shaped mandrel, which can be purchased at specialized outlets selling accessories and auto parts.
- At the final stage, we tighten the fasteners of the clutch basket to the flywheel.
On the Internet you can watch a video “replacing the clutch of a VAZ 2106”, which clearly shows the sequence of operations performed.
Replacing the clutch cylinder VAZ 2106
This replacement of the main clutch cylinder is carried out in the following order:
1. Place the vehicle on a vehicle inspection pit, overpass or electric lift. 2. Using a special bulb made of rubber alloys or a similar product, we select brake fluid from the clutch drive hydraulic reservoir. 3. Slightly unscrew the rubber clamp securing the expansion tank to contain antifreeze and move the product onto the plane of the power plant. 4. Unscrew the fitting hole of the metal tube with a wrench set to “13”, disconnect it from the inlet channel of the GCS and move it for ease of repair work. 5. Unscrew the metal band-type clamp a little and tighten the GCS fitting hose. 6. Using a “13” socket wrench with a knob, unscrew the 2 fasteners of the GCS and release it from the fastenings. 7. We install the repaired or new GCS and all previously unscrewed spare parts in the reverse order. 8. Pour “brake fluid” into the clutch hydraulic reservoir to the required amount and bleed the clutch on the vehicle.
When all these stages of the technological process are completed, the replacement of the VAZ 2106 clutch cylinder is considered complete.
Eventually
In conclusion, it should be noted that there are some “homemade” ones who specifically move the release bearing away from the basket, explaining their actions by the fact that in this way they will be able to extend its service life. However, they will have to be disappointed - the bearing is unlikely to become more durable, but the petals of the diaphragm spring will gradually be milled by the untwisted bearing race. And, please note, we are not discussing the discomfort from increased pedal travel, which can result in much greater expenses than purchasing clutch elements.
Hello, yesterday I noticed that the clutch pedal had moved closer to the floor (more precisely, it began to operate in the floor itself). And the gears began to turn on and off with some effort (or biting), it was always low all the time, but yesterday I noticed some inconvenience in driving. Tell me what is the reason and what to do?
The VAZ 2107 clutch is designed to connect the engine crankshaft and the gearbox input shaft with the possibility of briefly stopping the transmission of torque. The reasons for its failure can be very diverse. However, all of them can be easily diagnosed and eliminated on their own.
Clutch selection
When purchasing a new clutch kit for the VAZ 2107, experts recommend being guided by the following criteria. When assessing the driven disk:
- the surface of the linings must be smooth and uniform, without scoring, cracks or chips;
- all rivets on the disk must be the same size and located at an equal distance from each other;
- there should be no oil stains on the disc;
- there should be no play in the places where the linings and springs are attached;
- The manufacturer's logo must be applied to the product in one way or another.
When choosing a basket, you should pay attention to the following points:
- the casing must be stamped, without cuts or scratches;
- the surface of the disk must be smooth and uniform, without cracks or chips;
- the rivets must be identical and strong.
The most popular brands are the following.
- Valeo (France), specializing in the production of excellent quality brake system elements. The characteristic features of the Valeo clutch are soft operation with a clear engagement moment, reliability, and long service life (more than 150 thousand kilometers). However, such a clutch is not cheap.
The choice of clutch should be approached comprehensively and the choice should be made after examining the product and receiving expert advice.
Clutch repair and replacement - the best price in St. Petersburg, excellent quality
Prices for repairing clutches, gearboxes, replacing sensors, seals and other things
carries out clutch repairs in St. Petersburg on domestic and imported cars. Our experienced, qualified craftsmen will repair this unit of any degree of complexity, be it a complete replacement of the clutch assembly or repair of its individual element (for example, replacing a rocker).
At the same time, we guarantee all car owners the impeccable quality of all work performed and the spare parts and consumables used in them, as well as short deadlines and competitive prices for all our services!
Clutch replacement in St. Petersburg - a few words about this element of the car
The main purpose of the clutch is to regulate torque, in terms of its transmission from the engine flywheel to the transmission.
In simple terms, this element allows you to smoothly disconnect and dock the engine flywheel with the transmission at the right moments. This device comes in two main types:
- Single-disc - this clutch is installed on the vast majority of passenger cars;
- Multi-disc - it is more often found in trucks and special equipment.
In addition, the clutch can be:
- Dry or “wet” (when the main mechanisms are immersed in a kind of oil bath);
- With electric, mechanical, hydraulic and combined drive;
- With a pressure disk pressure design in the form of a circular spring arrangement or with a central diaphragm.
Clutch repair prices
| Name of works | Domestic cars: | Foreign cars: | SUVs, minibuses |
| Remove/install gearbox | from 3,000 rub. | from 4,500 rub. | from 5,300 rub. |
| Clutch cable adjustment | 300 rub. | 300 rub. | 300 rub. |
| REPLACEMENT: | |||
| — Gearbox cushions | from 500 rub. | ||
| — Speedometer cable drive | from 300 rub. | from 500 rub. | from 1,200 rub. |
| — Gear selector rod seal | from 500 rub. | from 500 rub. | from 800 rub. |
| — Drive oil seal | from 1,300 rub. | from 1,500 rub. | from 1,500 rub. |
| — Input shaft oil seal (on the removed gearbox) | from 350 rub. | from 350 rub. | from 350 rub. |
| — Speedometer cable | from 800 rub. | from 800 rub. | from 1,600 rub. |
| — Clutch cable | from 700 rub. | from 800 rub. | from 1,100 rub. |
| — Speed sensor | from 300 rub. | from 500 rub. | from 600 rub. |
| — Reverse gear sensor | from 300 rub. | from 500 rub. | from 600 rub. |
| — Clutch kit (basket, disc, release bearing) | from 3,300 rub. | from 4,800 rub. | from 5,600 rub. |
| — Clutch bracket | from 350 rub. | from 350 rub. | from 450 rub. |
| — Bearing fastening/guide elements (on the removed gearbox) | from 150 rub. | from 300 rub. | from 300 rub. |
| — Clutch master cylinder | from 500 rub. | from 600 rub. | from 800 rub. |
| — Clutch slave cylinder | from 550 rub. | from 700 rub. | from 900 rub. |
| — Clutch forks (on the removed gearbox) | from 150 rub. | ||
| — Clutch fork supports (on the removed gearbox) | from 150 rub. | from 300 rub. | from 300 rub. |
| — Flywheel | from 3,300 rub. | from 4,800 rub. | from 5,600 rub. |
Replacing the clutch - cost and signs of trouble with this unit
Symptoms that should alert the driver and which may indicate that clutch replacement is just around the corner:
- Difficulty switching between reverse and forward gears.
- Slipping (incomplete engagement) of the clutch, including lack of acceleration appropriate for a given gear and a noticeable loss of power on inclines.
- Jerking when the clutch is engaged, as well as extraneous noises and knocking.
- The clutch pedal squeaks and jerks when you press it.
- A pronounced smell of burnt plastic when operating the machine.
As for the price of replacing the clutch, it, of course, depends on the severity of the breakdown and on the number of parts of the assembly that require replacement (up to a complete replacement of the clutch assembly).
Clutch repair - the price depends on the complexity of the task and the broken element of the unit
Of course, this is not the cheapest service - clutch replacement, and the price for it, by definition, cannot be symbolic, because this procedure is very labor-intensive and responsible, since a faulty clutch can provoke a serious accident when the car is moving.
However, a complete replacement of the clutch assembly is not always required; sometimes the situation allows us to limit ourselves to updating one of its individual elements, such as:
- Replacing the clutch basket, which is rigidly connected to the engine flywheel and with release springs in the center, may require preliminary balancing of the new part on a specialized stand.
- Replacing the clutch disc (driven) is strictly indicated when its damper springs are weakened or completely broken or there is end runout and will almost certainly eliminate the strong noise when the clutch is engaged and the “driving” effect of the device when it is disengaged.
- Replacing the clutch cable can save the car owner from slipping and driving the device during operation; often replacing the clutch cable is accompanied by replacing the entire driven disk or its linings.
- Replacing the clutch cylinder will also save you from slipping and dragging of this device during its operation.
- Replacing the rocker (or, in scientific terms, the gearbox drive rod) will allow you to do it with little effort without labor-intensive disassembly of the entire clutch assembly, and a sign of its malfunction is usually the loss of control over one or more gears in the box.
- Replacing the clutch fork (more precisely, the clutch release fork) will correct the situation with slipping when changing gears.
Clutch replacement in St. Petersburg - contact the professionals
Of course, motorists are always tempted to try their own hand at repairing their “iron horse,” but the clutch is not the unit with which you can start your car mechanic experiments, because the safety of your driving this car is at stake! Therefore, it is better to entrust such important tasks as replacing a clutch disc or cylinder, its fork, cable and slides to our qualified craftsmen, who will accurately determine the cause of the malfunction and quickly eliminate it.
And finally, we want to give a simple recommendation, following which you will significantly extend the working life of your clutch, and you will not have to change it every year: try not to keep your foot on its pedal all the time, even if it seems to you that your foot does not touch its surface. After all, even the lightest pressure on the pedal wears out the driven disc. But even the most careful handling of car systems will not extend their service life indefinitely, and sooner or later you will need to replace the entire clutch or its individual elements (link, cable, cylinder, disc, basket, and so on).
Our service centers repair and replace clutches for cars of all brands and models, including VAZ 2107, VAZ 2109, VAZ 2110, Ford Focus 2, Peugeot, Chevrolet, Toyota, Nissan, Kia, Opel, VW Golf and many others!