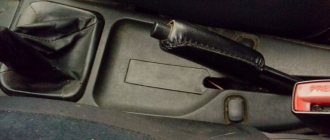
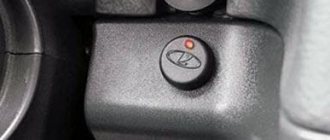
The parking brake (hand brake) is also popularly called the “handbrake”. It is a permanent brake, which is used when parking on a slope, when parking a car, and is also used by masters to perform complex stunts. The hand brake blocks any spontaneous movement of the vehicle. The parking brake is activated using a special lever mounted on the dashboard with the gearbox. The handbrake is a fairly important and irreplaceable thing, but not all drivers use it. The fact is that if the car is put in gear, it will not roll away. However, if the slope is quite steep, then the box will no longer help. In general, most novice drivers cannot imagine driving normally without a handbrake. More on this later in the article.
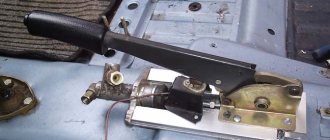
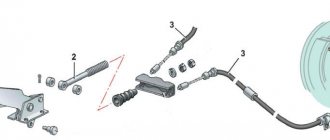
Handbrake device
Drive lever (1), lever pawl rod (2), rod spring (3), lever button (4), front cable axle (5), M6x14 bolt (6), spring washer 6 (7), drive rod (8) , lock washer 6 (9), protective cover (10), cable equalizer (11), washer 8 (12), M8 nut (13), low M8 nut (14), lever axis (15), washer 10 (16) , cotter pin 2x20 (17), right lever (18), left lever (19), right expansion bar (20), left expansion bar (21), M6 nut (22), lock washer 6 (23), cable bracket (24 ).
Conclusion
A properly functioning braking system is the key to safe driving and the absence of any problems on the road. The life of not only the transport driver, but also all passengers depends on how efficiently it works.
The VAZ hand brake is the simplest mechanism. Its repair cannot cost a large amount, so you should not put off repairing the brake system until a later date. You don't even need sophisticated tools to carry out repairs. You can repair a VAZ 2114 with ordinary garage equipment.
If you take proper care of your car and its braking system, it will repay its owner with more than just longevity. In an emergency, a car can save lives if all its mechanisms are in good working order and functioning normally.
Causes of handbrake malfunction
Breakage of the handbrake is not such a rare occurrence, where cable stretching is not an exceptional problem. It happens that the handbrake on a VAZ 2114, 2115, 2113 does not hold even after tightening. We will examine the most common causes of this phenomenon in more detail.
The handbrake has an unpretentious device, but it also sometimes breaks down. There are several reasons for this:
- Drum wear.
- Deformation or rupture of the cable.
- Worn brake pads.
Any elements of the parking brake system may also be subject to mechanical damage or wear. The problem in such cases is diagnosed by eye or at a service station. In addition, the handbrake will not work if the cable falls off the lever. In this case, you can use any high-quality sealant that can prevent slipping, or simply tighten the parking brake cable.
Dismantling and replacement
It is difficult to confuse the cable from the handbrake with anything else under the bottom of your VAZ 2114, which greatly simplifies the repair and replacement procedure.
Dismantling works
We provide detailed instructions for replacement, and additionally recommend watching the video.
- We advise you to get the car in order in terms of cleanliness in advance. This will make it easier for you to find all the nuts and fasteners.
- Additionally, treat the nuts with the almighty WD40. This will make it much easier for you to unscrew the sometimes sticking and rusting nuts.
- Place the handbrake lever all the way down.
- Start with the adjusting nut and locknut that you used recently to try to tighten a loose cable. In this situation, you should loosen the nuts and remove them from the handbrake rod.
- Remove the washers and cable equalizer. Although this can be done after you jack up the car. But be sure to do it before removing the wheels.
- Raise the rear of the car with a jack, unscrew the wheel bolts and remove them.
- Tap the brake drum locking pins. This will allow them to be removed from the brake pads.
- Remove the block.
- You now need to disconnect the ends of the two cables from the equalizer. The fasteners can be removed from their places with the simplest pliers, so don’t bother.
- The shifted spacer lever has hooks from which the cable loop can be removed.
- The cable sheath must be removed from the entire suspension of the rear of the car. To do this, the mounting bolts are first unscrewed.
- Pull the cable out of the holes through the brake flaps.
- We got rid of the old cable, so all that remains is to replace the old one with a new element. The procedure is performed exactly in reverse order.
- Thread the new cables through the washers and hook the loops. You can additionally make bosses - this is a special clamp that allows you to fix the cable even more tightly.
- Reassemble the entire disassembled wheel structure.
- Route the cable along the suspension through the sheath and secure the bolts.
- Pull the handbrake in the cabin.
- Check the correct tension and operation of the new hand brake, or rather the cable.
It is not uncommon for the parking brake to cause an unpleasant squeaking noise from the rear. By changing the cable, you can get rid of this problem at the same time. To do this, rubber seals are installed under the cable fasteners on the body frames.
Do-it-yourself handbrake tensioning (step-by-step work)
- First of all, you should put the gear lever in first gear.
- Next, you need to count the number of clicks of the handbrake. If less than two, loosen the cable tension; if more than five, on the contrary, increase the tension.
- Then release the handbrake completely.
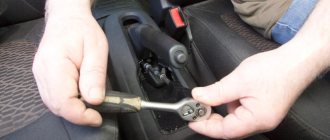
- Now we take two keys for 13 and climb under the car.
- To lengthen the cable, it is necessary to unscrew the lock nut; accordingly, to reduce it, the lock nut should be tightened.
- We find the muffler and remove the muffler and manifold mounts, which will greatly simplify the process.
- Next we find the cable equalizer, as well as the nut and locknut.
- Using the first wrench, we loosen the locknut, and using the second, we hold it to prevent twisting.
- We adjust and systematically check the progress. An acceptable number of clicks is from two to five.
- When the required result is obtained, it is necessary to jack up the rear of the vehicle so that the wheels hang. Next, we check whether the brake pads are interfering with rotation.
- Now we raise the lever, after which the wheels should be firmly in place.
- Tighten the locknut.
Some craftsmen manage to tighten the parking brake without loosening the muffler mounts. At the same time, they use the notorious homemade keys. As a result of the fact that tensioning is carried out quite often, such devices are very relevant.
Tension
So, having understood the diagram, you can begin the procedure of tightening the handbrake cables.
Stretch
The tensioning procedure is as follows.
- Place the car on an overpass or pit. If you don’t have a garage and you have the opportunity or desire to carry out the procedure at a service station, use a jack. The rear of the car is raised on a jack. The most extreme option is a curb onto which the car is driven and all you have to do is crawl under it.
- Engage the gearbox in first gear and put the car on the handbrake by pulling the lever up.
- The ideal number of handbrake clicks is from 2 to 5. If there are fewer or more clicks, it is easier to take appropriate measures to tension the cable.
- If there are less than 2 clicks, then the cable will need to be lengthened. If there are more than five clicks, then the cables are shortened.
- Lengthening the cable means relaxing it. To do this, unscrew the locknut. When tightening the cable, the locknut must be tightened in reverse.
- Before you start looking for the required nut on the bottom of the car, release the handbrake lever all the way.
- Take a 13mm wrench under the car and head down.
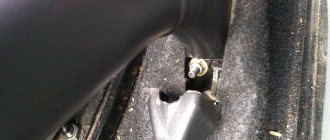
- Find the handbrake cable equalizer. This is the same element from which the main handbrake cable is divided into two cables.
- In some cases, it is simply not possible to gain access to the equalizer, since the muffler holders made of rubber are in the way. In such a situation, it is better to remove them. This is not difficult to do, but working with the handbrake will be much easier.
- Now there are two nuts in front of you. One is a simple nut and the other is a lock nut. Having two keys in your hands, fix the nut with the first one, and with the second one begin to unscrew or tighten the locking nut. Be careful that the nut does not start to turn.
- Taking into account the condition of the handbrake and the need to loosen or tighten the lever, turn the locknut in the appropriate direction. Remember what is the optimal number of clicks.
- Tighten or unscrew the locknut to obtain the required degree of tension.
Examination
But if you twisted the nuts there, this is not a guarantee that the handbrake now works perfectly. This needs to be clearly verified.
To do this, it is enough to go through a successive stage of verification activities.
| Stage | Explanation |
| Spin the wheels after tensioning is completed | The wheels are lifted one by one on a jack. When the handbrake lever is turned off, they should rotate freely without obstacles. By squeezing the brake, the wheels should lock. |
| Drive up a slight slope, stop and engage the handbrake | The fact that the wheels do not spin when suspended is good. But you need to make sure that the handbrake holds the car even when exposed to gravity. |
If the check shows that the handbrake still does not hold, even if the cable was tensioned exactly according to the instructions, the handbrake is probably simply worn out and the cable needs to be replaced.
Signs that replacement is needed
It is not uncommon for the VAZ 2114 handbrake cable to rust, as a result of which it breaks or weakens so much that no tightening can restore its previous functionality.
At the first sign of cable wear, you should consider replacing it. This problem may manifest itself as follows:
- The handbrake is not able to withstand the required traction;
- Drum brakes overheat;
- When you pull the parking brake lever, the cable does not respond to your actions;
- The cable sheath is seriously worn.
To check the operation of the handbrake, it is enough to perform one simple action. Place the car on a level surface, apply the handbrake, get out of the car and try to push it hard. If movement begins, the cable is dead and needs urgent replacement.
Pro Tips
If you do not want to waste your time and energy on mastering a fairly simple handbrake design and tightening the handbrake yourself, you can contact a car service center. The price of the issue is at least 400 rubles, depending on the region of the country, but the event is not a one-time event. After a certain time, you will need to adjust the handbrake cable again, for which you will have to go to a car service center again. It is worth noting that the cost of the procedure will increase with each new visit.
After a tightening, it often happens that a strong cracking sound appears. It is possible that a cable or two cables were not installed correctly during tightening. Make sure that the cable does not catch on the fasteners or anything else. You can unscrew the bolts that hold the cable and see what condition they are in. If there are signs of rubbing, it is necessary to lay the cable correctly. In addition, the cable may crack because it is overtightened (even when the parking brake clicks fall within the required interval).
You have to tighten the handbrake quite often. This is due to the design of the parking brake. In addition, you will have to adjust the parking brake when replacing brake pads, repairing the handbrake, repairing the cable, and replacing the rear brake cylinder.
The cost of this work in a car service
Not every car owner wants to do car repairs themselves. Therefore, let's look at approximate prices for the cost of work in car services:
- Adjusting the hand brake will cost about 500 rubles;
- If, in addition to adjustment, replacement of the mechanism cables is required, the price will be about 900 rubles.
The process does not take much time, but the price of the work includes the occupied space in the service and the work of the master. In addition to the adjustment, as described earlier, additional repairs may be required in the form of replacing the rear pads, then the repair will accordingly become more expensive. By contacting a car service, of course, you will have a guarantee for the work performed, but adjusting the handbrake is a process that does not require investment if you do it yourself. In this case, you will save a decent portion of your budget. And using the information obtained from the article, the question “how to tighten the handbrake of a VAZ 2114” will not be too difficult for you.
Features of pedal settings
The driver controls this entire complex assembly using a single pedal. That is why it is very important to monitor the condition of these mechanisms and correct errors in a timely manner. It is necessary to pay attention to the following features:
- Each owner of this vehicle must remember that when the engine is not running, the pedal must have free play. The adjustment can be made with the vehicle turned off. This can be done by moving the brake light switch and lowering its nuts.
- When the switch at the brake light is very close to the pedal itself, this risks the fact that it will not return to its original state. But even here there is a possibility of only partial release of the wheels when the pedal is released.
- When it was not possible to correct errors using a brake light and eliminate incomplete release of the brakes, you can simply disconnect the master cylinder at the brake drive and double-check that the adjusting bolt is not too far from the plane to which the flange of this cylinder is attached (the difference can be from 0.2 to 0.25 mm). This size will be optimal for adjusting the pedal.
Front brake mechanism
The design of the front brake mechanism on the VAZ 2114
The front brake mechanism consists of the following components:
- Brake disk. Directly connected to the wheel hub and rotates with it. Slowing down the rotation and stopping the disk leads to the slowing down and stopping of the wheel.
- Pad guide. Serves as a holder for the pads and a base for the guide pins.
- Caliper. It combines the pads, cylinder, and piston into a single unit and ensures uniform transmission of force from both pads to the disc.
- Brake pads. They directly act on the disc, squeezing it on both sides and slowing down the movement.
- Cylinder. A sealed cavity in which the piston moves.
- Piston. Under the influence of hydraulic fluid pressure, the pad is pressed against the disc. Thanks to the “floating clamp” system, the second block is pressed simultaneously. This ensures uniform wear of their linings and discs and guarantees effective braking.
- Seal ring. Prevents fluid leakage and ensures system tightness
- A cover to protect the guide pin from dirt, allowing for unhindered movement of the pads.
- Guide finger. Allows the pads to move evenly and adhere to the disc with their entire plane.
- Protective cover. Protects the disc from road dirt.
The front wheels are equipped with disc brakes. They automatically adjust the clearance from the pad to the disc. The caliper and cylinder form a floating caliper, which creates the same even force on both pads. This ensures uniform wear of the linings. To monitor their wear, there is an indicator on the inner block.
System elements
The hydraulic brake drive of the VAZ 2114, 2115 will include the following components:
- brake mechanism from the front right wheel;
- pipeline from the brake circuit, front left-rear right;
- a pair diagonal to them;
- hydraulic main cylinder;
- tank from it;
- vacuum booster;
- brake mechanism for rear wheels;
- elastic lever that regulates pressure;
- pressure regulator;
- a simple lever to drive the pressure regulator;
- pedal;
- hoses for front and rear brakes.
Malfunctions and their symptoms
Determining that a cable needs adjustment or replacement is quite simple. Signs of a faulty mechanism appear as follows:
- The handbrake is pressed effortlessly - the cable is loose, you need to tighten it.
- The mechanism does not respond to pressing the lever - the drive is torn or flew out, or the reason may be the wear of the rear pads.
- If the handbrake is stuck, the drive is damaged and needs to be replaced.
Read more: VAZ 2107 tire pressure in summer and winter table of values
Having taken out the main element, you can visually determine its condition. Replacement is required in the following cases:
- Up to 2% are damaged or torn.
- The cable moves with difficulty even after applying lubricant.
- The drive tips have grooves.
Why won't the handbrake hold?
The handbrake or handbrake is just a scourge on our VAZs. Very often it turns out that you lift the handle of this brake, but nothing happens - that is, the car rolls.
When undergoing a technical inspection, there is a golden rule:
If the car stops after three clicks, it means the handbrake is working and you can issue the coveted ticket. But if it doesn’t hold well with 4 or more clicks, then the performance is at a low level, or it doesn’t exist at all!
Faulty cars are sent to be repaired or the handbrake tightened, without it there is no way.
Repair methods
A quick but costly way to get rid of handbrake problems is, of course, to go to a service station. The cost of such a service is about 400 rubles. However, is it worth spending money on something that you can do yourself, especially without much effort? Applying the parking brake yourself is not that difficult, and the savings are not small.
If you practice enough, tensioning the cable or replacing the pads will take no more than half an hour. Experienced car enthusiasts can handle this faster. Some operations require welding, so having the appropriate equipment and skills will not hurt. But this usually only applies to those who do not want to replace old parts with new ones, and prefer to repair worn-out elements with their own hands.
How to properly tighten the handbrake on a VAZ-2110
At the same time, problems with the handbrake can lead to serious trouble if an uncontrolled car crashes into some obstacle or, even worse, into another car. Let's look at problems with the handbrake and how to fix them yourself without contacting specialists at a service station.
Advice! If the cable tension on the handbrake is insufficient, in addition to the handbrake, the car must be left “at speed”, this will protect you in case of unforeseen circumstances.
When the linings on the rear brake pads wear out and the drive cables are pulled out, a problem often arises in adjusting the handbrake stroke (parking handbrake). The examples that will be described in the article will help to cope with this problem not only for the VAZ-2110, but also for other domestically produced cars.
If the problem cannot be resolved by adjusting and tightening the handbrake, you must immediately replace the faulty part with a new one; there is no need to take unnecessary risks. If the handbrake malfunctions, the car can move on its own, and this is an important factor that this mechanism must be checked regularly and, if necessary, the handbrake must be tightened. It will not be difficult for you to replace the handbrake at home, and you do not need to take the car to a service center.
Hydraulics or mechanics
It is worth noting that at the moment not all rear brakes are cable or mechanical; now there are quite a large number of handbrake brakes that operate hydraulically, this is especially true for rear disc brakes rather than drum brakes. Hydraulics duplicate the operation of the main braking system.
That is, when you lift the handle, a special piston creates pressure on the rear discs and they are blocked. If the handbrake does not work in such a system, then the reasons are significantly different from its mechanical counterpart.
Design
Many people mistakenly believe that the handbrake is a simple lever located near the gearbox, on the right hand of the driver. In fact, it is a whole system of elements that are connected to each other.
When the hand brake fails, in 90% of cases the culprit is a cable or a pair of cables that go to the rear brake pads from the equalizer.
To determine the reasons for the failure of the handbrake, it is necessary to understand the circuit diagram of the device and its components.
Handbrake diagram
The device includes a number of structural elements. Namely:
- Lever arm;
- Traction;
- Springs;
- Lever button;
- Main cable axis;
- Bolts;
- Washers;
- Drive unit;
- Equalizer;
- Case;
- Locknuts;
- Cotter pins;
- Right and left lever;
- Expansion left and right strip;
- Lock washer, etc.
Introduction
Such an important element of the parking brake as the cable is a device through which the force applied to the handbrake by the driver of the vehicle is transmitted to the braking system of the rear wheels. Recently, car owners are increasingly resorting to using the parking brake lever when braking at intersections, however, this cannot be said about cars with a manual transmission, such as the VAZ-2115, whose handbrake helps to slow down the car on a steep descent.
Often VAZ-2115 owners are faced with the fact that they have to change or tighten the parking brake lever
If any malfunction is detected in the functioning of this structural element, the car owner must know how to tighten the handbrake cable. With a faulty part, the car owner will not be able to reduce the turning radius during emergency turns. In addition, a working handbrake will make it easier and faster to jack up the car.
Operating principle
The brake in the VAZ 2114 will work on the hydraulic principle: when pressed, the liquid pressure will increase and the brake mechanisms will operate. As a result, the wheels begin to rotate more slowly and force appears at the point of contact of the tire with the road surface. And the harder the pedal is pressed, the faster the process will go. The forced-up pressure in this case will reach from 10 to 15 MPa. It will also increase in the drive itself: this will move the pads to the wheel rims.
How do they work?
The operation scheme is banal and simple - there is a handle that is connected to a cable, which in turn is in a special braid (that is, the cable runs in it). Then this cable is hooked onto a special adjusting bolt (it can be tightened and loosened), which is engaged with a bar, along the edges of which there are two more cables that go to the two rear wheels. And these cables (extending to the wheels) are engaged with a special bracket, it is this that opens the pads and blocks the drums.
That is, in simple words, when you move the handle up (raise the handbrake), the cable stretches and pulls two separate cables to the wheels. Inside the drums, the brackets are unclenched, which spread the rear pads, due to which the wheels are blocked.
Let's watch a short video and it will become clearer.