- Why is the brake light on?
- Possible reasons why the handbrake light is on: opinions of car owners
- How is the replacement performed?
- When to tighten and when to change?
- When to tighten the nut
- Components
- The principle of adjusting the handbrake
- Causes of malfunction and their elimination
- Checking the mechanical component
- Recommendations for the braking system
- Handbrake repair for Lada Vesta
Why is the brake light on?
But let's start with the design features of the brake system alarm. Previously, cars used only one sensor - the level of brake fluid in the system, which sent a signal to the warning lamp. Since fluid is the main working element of the system, and its leakage leads to the brakes stopping working, naturally, the designers installed a sensor to monitor the level.
Additionally, the car also has a parking brake, the use of which must be monitored by the driver. On some models, the warning lamps for the working and parking systems are separated. The warning light with an exclamation mark in a circle is responsible for the fluid level, and the indicator marked with the letter “P” signals that the handbrake is engaged, and it turns off after the car is released from the handbrake.
But often a car has only one warning light, to which both the liquid level sensor and the handbrake sensor are “attached”.
Modern cars use circuits that additionally include brake pad wear sensors and brake light lamps. Failure of these elements causes the lamp on the dashboard to light up.
There are other design nuances that cause the indicator to glow. On VAZ models of the 10th family of the first years of production, a starter protection relay was included in the circuit, which forcibly turned it off after starting the engine. In this circuit, the designers connected the power supply circuit for the brake system lamp to this relay.
Why does the brake warning light on the dashboard come on or does not go out after starting the engine? If this happens while moving, it is better to stop moving and carry out diagnostics. If the light does not go out after starting the engine, it is better not to drive until the problem is resolved.
Parking brake device
Before replacing the handbrake cable or tightening it, you need to understand the design of the mechanism. It is designed quite simply and consists of the following main parts:
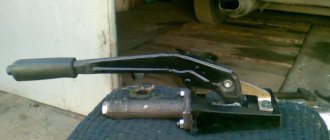
- Lever with spring-loaded button and latch. Located in the cabin on the right hand of the driver.
- A metal rod with a pin at the end and a rocker arm for installing the cable is located under the bottom of the car and attached to the lever. This is the “handbrake” tensioning device.
- The ends of the cable (or two cables), installed on the rocker arm, are attached to the brake levers of the rear wheels - disc or drum.
The parking brake works like this: when the driver lifts the lever in the passenger compartment, the rocker moves forward and acts on the pads through a cable drive. In drum mechanisms, the brake pads move apart, and in disc mechanisms, they converge. The “handbrake” holds only the rear wheels and functions independently of the main brake system, which is activated when the pedal is pressed.
The handle is fixed in several positions thanks to the latch. To unlock it and lower it to its original position, a special button is installed at the end of the handle. If the pads “grab” the wheels on the second click, and after the fourth click they hold the car securely, then the drive is considered to be working well.
Possible reasons why the handbrake light is on: opinions of car owners
- Changed the hubs. “The light in my car blinked sometimes. At first I decided that the problem was with the pads. But later I remembered - I replaced the pads not so long ago. I checked the brake, everything is fine. And then I thought about why the problem could arise? I didn’t think of anything and stopped worrying. The indicator continued to flash periodically... As a result, the right hub bearing began to make noise, after a while it began to hum so loudly that the sound simply made my head split. I first purchased one hub. Then I thought that it would be better to change both parts at once - or rather, this should be done. I bought a second one, changed it, and the problems all disappeared: no noise, no blinking light.”
- Got a good technician! “The handbrake light would come on from time to time while driving. Quite often this happened after bouncing on the pit. I went and bought a brake fluid. And I found a specialist right at the dealership. He then flooded it. He also climbed under the handbrake and said that perhaps the microphone at the lever was acting up (it seems like this happens sometimes). Take the train and watch. But the problem disappeared after filling the brake fluid. The handbrake no longer lights up. By the way, I met an excellent specialist and looked for the problem for free, with pleasure and without showing off.”
- Depending on the situation, “If the light starts to light up after shocks, for example, on a hole or bump, then, most likely, the brake fluid level is on the verge of the required level or lower. You just need to add it and that's it. If it lights up when braking, the pads are definitely worn out completely. I went through this myself in my VAZ.
How is the replacement performed?
When replacing Renault Logan parking brake cables, our video will show you what to do when doing the repair yourself. It is worth noting that the right and left rear cables are changed in the same way.
To restore the handbrake of Renault Sandero, LADA Largus, the installed cable is removed and replaced as follows:
- The tension of the drive cables is loosened by unscrewing the adjusting drive nut on the handbrake.
- The brake drum is removed.
- The rear brake pad is removed, and the cable tip is disconnected from the lever, which removes the pad itself.
- The cable sheath clamp is compressed.
- The cable is removed from the hole.
- The cable is removed from the holder located on the beam lever.
- It is necessary to pull it a little into the cabin, and then remove it from the equalizer.
- We completely remove it from the hole in the body.
When replacing the handbrake cable on a Logan, you may encounter a situation where it cannot move freely in the sheath. Therefore, it must be lubricated with transmission or engine oil (at your own discretion).
Even before replacing the handbrake cable, it is important to make sure that the new cable is long enough to be installed on the vehicle. Otherwise you will have to buy a new consumable.
As is clear from the instructions, the procedure is quite simple. The parking brake will be repaired only if all operations for independently replacing the cable and checking its operation by placing the car on an incline on the handbrake are followed. The new part is guaranteed to last for several years without any problems.
Instructions for tensioning and replacing the drive
Since the parking brake system mechanism is located under the bottom of the car, an inspection ditch, overpass or lift is needed to perform the work. In extreme cases, you can do without them, but then you will have to hang out the back of the car and lie under it, which is not only inconvenient, but also dangerous. Before tightening the cable, securely secure the front wheels of the vehicle with wheel chocks.
Then act in the following sequence:
- Set the handbrake lever to the down position.
- Jack up any of the rear wheels.
- Armed with two open-end wrenches that fit the tensioner nuts, go down into the inspection hole.
- While holding the main nut located on the stud near the rocker arm, loosen the locknut.
- Tighten the tension nut, periodically checking the rotation of the suspended wheel by hand. To prevent the pin from spinning, it must also be held with pliers or a wrench.
- Stop tightening the cable as soon as the pads begin to grip the wheel. Make 1-2 turns of the nut back and check the operation of the handbrake. It should fire after the second click.
- Tighten the locknut, lower the jack and test the handbrake on a slope.
Replacing the cable drive will require more time, especially to disassemble the drum brake system. To hang both rear wheels, prepare wooden blocks, and to replace them, use a standard set of tools; no special devices are required. The algorithm of actions is as follows:
- Place the car on the pit and loosen the cable completely, as described above. Unscrew both nuts and remove it from the rocker arm.
- Lift the rear of the car, place it on blocks and remove the wheels.
- Remove the drums and unscrew the bolts securing the cable to the rear casing.
- Remove the brake pads and spacer bar. When you reach the lever, remove the cable loop from it. Remove it from the casing and repeat the operation on the other side.
Install the new cable drive in the reverse order, starting with the wheel mechanisms. At the end, tighten it and check the operation of the handbrake.
A loose handbrake cable usually occurs due to two reasons:
- Pulling the cable itself from constant strong tension
- Most often - due to wear on the rear brake pads
If you compare the Largus handbrake adjustment design with other domestic cars, you can feel a strong difference. Yes, this is understandable, because in Largus from a Russian manufacturer there is only one assembly and a name. Now let's get down to business.
When to tighten and when to change?
During operation of the machine, the steel cable gradually stretches and begins to sag. Then part of the lever stroke is used to remove this slack (the first 2-3 clicks), and only then the force is transferred to the brake pads of the rear wheels. As a result, they are weakly pressed against the surface of the discs or drums and the car does not brake reliably.
The first sign of a malfunction is that the handbrake stops working on the first two clicks of the handle and is raised by hand without any effort. In this case, it is definitely necessary to tighten the hand brake, or rather the cable drive.
But the operation of the mechanism also depends on other factors:
- on the degree of wear of the brake pads;
- from the depth of excavation on the surface of the steel disk or drum.
Abrasion of the linings does not have much effect on the operation of the main system, since the stroke of the hydraulic pistons is quite large. But the effect of the mechanical “handbrake” gradually weakens. To return it to working condition, it is necessary to compensate for the wear of the elements by tensioning the drive.
The cable is replaced in the following situations:
- The element has stretched to such an extent that at maximum tension the pads do not grip the discs and the car rolls away on any slope.
- Due to the constant ingress of water under the cable casing, it rusted and became tightly jammed. This happens when a motorist rarely uses the handbrake.
Cable jamming also occurs in winter, when water trapped under the casing freezes inside. In this situation, do not rush to change it; first warm up the car in the garage, and then drive out the moisture using WD-40 aerosol lubricant.
Largus hand brake cable
Dear customers, in order to avoid mistakes when sending a parking brake cable for a LADA LARGUS car, please indicate your car model and year of manufacture in the “Comment” line.
The parking brake (also known as the handbrake, or in common parlance “handbrake”) is an integral part of the car’s braking control. Unlike the main braking system used by the driver while driving, the parking brake system serves primarily to hold the vehicle in place when parked on sloped surfaces, and can also be used as an emergency emergency braking system in the event of failure of the main one.
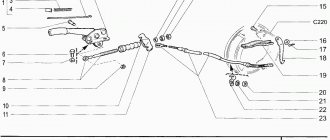
1 — parking brake mechanism (360106743R), 1 — parking brake mechanism (360109167R), 2 — self-locking hex nut with collar (7703034256), 3 — parking brake cable (6001549112), 4 — double mounting bracket (7703179103), 5 — fastening bracket 1 (7703079254).
The parking brake cables (6001549112) are replaced if they are broken, pulled out or jammed inside the sheaths (rear cables), when adjusting the parking brake fails to keep the LADA LARGUS vehicle stationary on a slope of up to 23% inclusive.
The main purpose of the parking brake (or handbrake) is to hold the car in place during long periods of parking. It is also used in case of failure of the main brake system during emergency or emergency braking. In the latter case, the handbrake is used as a braking device.
The handbrake is also used when making sharp turns on sports cars.
The parking brake consists of a brake drive (usually mechanical) and brake mechanisms.
The mechanism is activated by moving the lever to a vertical position until the latch clicks. As a result, the cables that press the brake pads of the rear wheels to the drums are stretched. The rear wheels are blocked and braking occurs.
To remove the LADA LARGUS from the handbrake, you need to hold the locking button and lower the lever down to its original position.
The original cable 6001549112 for the parking brake drive, which is supplied to the AvtoVAZ conveyor, is intended to replace the failed standard one.
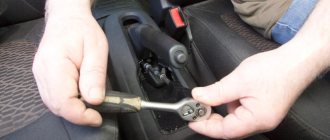
When to tighten the nut
If this does not help you, you will have to use the adjusting nut to adjust the brakes. To do this you need to do the following.
- Open the plastic plug under the handle. It can be easily removed.
- Remove another plug, under which there is an adjusting nut.
- Take a long 10mm socket and tighten the nut.
This completes the adjustment of the hand brake on the Lada Vesta. But I didn’t do this on my car (or rather, not mine, but my wife’s), because I think that automatic adjustment was enough. Therefore, I also advise you to use the automatic function first. If this is not enough, then tighten the nut.
On the Lada Vesta, to adjust the handbrake you no longer need to crawl under the car, as before on the “nines” and “fours”. I hope that the review was useful for someone, and someone probably already knew this trick. Thank you for reading, good luck on the roads everyone!
How to tighten the handbrake on the Lada Largus video
Place the vehicle in the work station, apply the parking brake and turn off the ignition.
Cut the floor mat at the rear of the arm and move the mat pieces to the sides.
1 — manual brake lever; 2 — equalizer cable for the manual brake lever; 3 — adjusting nut of the equalizer cable; 4 — manual brake cable equalizer; 5 — manual brake cables; X - adjustment dimension for cable tension, X = 16 ± 0.3 mm
Loosen adjusting nut 3, Figure 17-1, of the handbrake lever equalizer cable
. and disconnect both cables 5 from the equalizer 4.
Unscrew the two nuts securing the lever to the floor tunnel studs,
Move the front seats all the way forward, lift the lever and disconnect the wiring harness block from switch 2, Figure 17-2, warning light of the manual brake lever (replaceable head 13, extension and knob).
1 — lever attachment points; 2 - warning lamp switch
Remove the handbrake lever.
Unscrew the adjusting nut from the end of the front cable and disconnect the short cable from the lever.
Remove the handbrake warning lamp switch by unscrewing the screw securing it.
Connect the wiring harness block to the warning light switch of the manual brake lever, install the lever on the mounting studs and secure with two nuts. The tightening torque of the nuts is 8 N.m (0.8 kgf.m) (replaceable head 13, extension and wrench, torque wrench).
Install the handbrake cables into the holes in the equalizer.
Tighten the adjusting nut of the manual drive lever so that dimension X, Figure 17-1, from the upper end of the adjusting nut to the end of the threaded part of the equalizer cable is 16 ± 0.3 mm (spanner 10, caliper).
Adjusting the hand (parking) brake drive
Note: The parking brake adjustment is shown here in more detail.
Place the vehicle on a two-post lift, apply the parking brake and turn off the ignition.
Sources
- https://avtovestie.ru/info/kak-podtjanut-ruchnik-na-larguse/
- https://avtotop.info/kak-otregulirovat-ruchnik-na-larguse/
- https://rezina48.ru/novosti/regulirovka-ruchnogo-tormoza-largus.html
- https://largus-mcv.ru/html/rychag-ruchnogo-tormoza.html
- https://mvpclub.ru/kak-podtjanut-ruchnik-na-lada-largus-video/
Components
In such a situation, there are 2 scenarios:
- Carry out modifications in accordance with the factory diagram;
- Purchase components from another manufacturer.
And so, one of the owners of the Lada Vesta in the Exclusive configuration said that he was able to find out from an AvtoVAZ employee exactly what components were needed to replace drum brakes with disc brakes.
According to an employee of the plant, there is no need to replace the beam or reflash the ABS block, and this significantly speeds up and reduces the cost of the work.
In addition, the picture clearly shows that there is a standard spacer between the axle and the beam and it is to this spacer that the boot is fixed. From the factory, the hub and disc come separately, so after installing the rear disc brakes on the Lada Vesta yourself, there is no need to replace the bearings if you need to replace the disc.
All the components necessary to replace the brakes with your own hands are presented in the table along with the article numbers.
| Position | vendor code |
| Right brake hose mounting bracket | 8450031136 |
| Left brake hose mounting bracket | 8450031137 |
| Rear brake flexible hose assembly – 2 pcs. | 8450031129 |
| Rear brake pads (full set) | 11196-3502089-00 |
| Washer 10 | 00001-000516870 |
| Ball joint fixing bolt | 21080-2904194-00 |
| Washer 10 | 00001-000516870 |
| Ball joint fixing bolt | 21080-2904194-00 |
| Rear left brake (assembly) | 8450031163 |
| Rear right brake (assembly) | 8450031162 |
| Retainer fixing screw | 21080610526810 |
| Rear brake disc | 8450031131 |
| Rear wheel hub (assembly) | 8450031130 |
| Hex Head Screw | 00001-003836021 |
| Right rear brake guard | 8450031686 |
| Left rear brake guard | 8450031687 |
| Bolt M10-1.25-40 | 8450031161 |
| Left rear brake mount | 8450031132 |
| Right rear brake mount | 8450031133 |
The estimated cost of the entire kit for self-installation of rear disc brakes on a Lada Vesta is about 30,000 rubles.
Handbrake: removal and installation
If tightening the parking brake does not solve the problem, Vesta still rolls away, you will have to resort to heavy artillery. Having prepared to remove and install the handbrake, perform the following operations:
- Drive the car onto the car lift. Release the parking brake, shift into gear, and turn off the ignition. Dismantle the tunnel in the cabin - it will be easier to work;
- Remove the wiring harness block;
- Loosen the handbrake limit nut under the plug using the “tenth” key;
- Loosen the nut that regulates the degree of tension of the cable responsible for the equation of the lever, and then remove the cable fastenings;
- Use a screwdriver and pliers to carefully remove the cable ends. Don't put them off too far;
- Carefully remove both rear wheels;
- Proceed to dismantle the body floor. To do this, remove the three nuts with head number 24 and the fasteners. Use a screwdriver (preferably a flat one) to pry up the cables and remove them from under the brackets attached to the body;
- Remove the brake pads. To do this, first remove the tension springs, guide brackets, spacer bar (only assembled with an automatic adjustment mechanism), and then the brake pads themselves. All operations must be carried out strictly in the designated order;
- Use pliers and a screwdriver to remove the cables from the levers, and then remove the cable tips from the guide holes of the brake shield;
- Remove the cables from the lever brackets and the attachment of these levers to the body;
- Take out the cables;
- Place the new cables in the brackets - instead of the old ones, in the guide holes;
- Insert the tips into the brake shields;
- Then insert the tips into the tunnel into the corresponding holes, and secure the cables themselves under the brackets that are attached to the body;
- Put the pads back in place. To do this, clean the drums from dirt. Apply lithol to the threads of the spacer strip;
- Place the brake pads on the brake shield, and then the tension springs. Using pliers and a screwdriver, install the guide pad brackets. Then spread the brake pads with pliers, place a spacer bar between them and set the outer diameter of the pads using the spacer bar nut;
- Place the drum, then press the brake pedal about 10 times, bringing the mechanism into working position;
- Put the wheels in place;
- Connect the cables to the equalizer of the hand brake lever;
- Perform adjustment (“tightening”) of the parking brake lever;
- Check the operation of the parking brake system. After this, you can install the tunnel and plugs.
The principle of adjusting the handbrake
- Fully lower the handbrake lever in the cabin.
Lower the handbrake handle
- Place the car on a pit or lift it on a lift. Some car owners manage to adjust the handbrake “from the curb” - but this is inconvenient and dangerous.
- Find the resonator from the bottom of the car and remove it from the rubber brackets.
Remove the muffler from its mounting to the bodyUsing a ratchet, unscrew the 4 bolts securing the protection of the handbrake adjustment mechanism (protective screen).
Remove and set aside the protective screen
Next, you can either remove the protective screen, but it seems to me that it is easier to move it forward behind the muffler, which will free up space that is enough for free work.
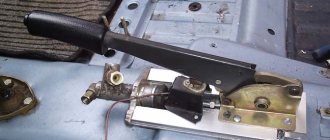
The mechanism looks like this
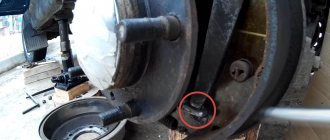
Loosen the first nut with a 13mm wrench.
- By tightening the adjusting nut, tighten the handbrake cable that comes out of the passenger compartment.
- Ask a partner to check the stroke of the lever handle, or check it yourself.
- As soon as the handbrake moves 3-4 clicks, tighten the lock nut.
- Before the final stage of work, it is necessary to check the functionality of the brake mechanism. To do this, hang the rear wheels and watch how they rotate with the hand brake off. They also check how the wheels grip when the handbrake is raised.
Adjusting the hand brake on Lada Largus
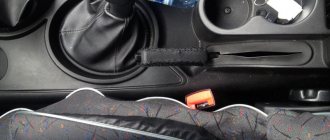
The first step is to unscrew the bolt securing the plastic casing under the handbrake lever, which is clearly shown in the photo below:
Then remove this cover completely so that it does not interfere.
Then, under the lever itself, we bend the so-called cover to the side, and there we see a nut on the rod. You need to tighten it clockwise if you want to tighten the handbrake. After several revolutions, it is advisable to check the operation of the handbrake so that it is not overtightened.
It is most convenient to tighten using not a regular open-end wrench, but a socket wrench or a deep socket with a crank.
When the adjustment is completed, you can put all the removed interior parts back in place.
Typically, adjustment is required very rarely and it is possible that during the first 50,000 km you will never even do this once, since it will not be necessary.
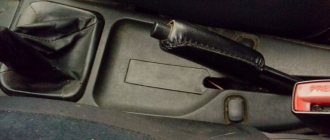
While I was fiddling with the armrest, I decided to tighten the handbrake, since access to it opened after removing the panel...
The rubber boot easily rises to the top. It is secured at the top with two latches. There is an adjusting nut under the boot (10mm wrench). You need to turn it with a socket wrench.
Well, so, in joy, I twist and twist, twist and twist. I lift the handbrake lever periodically. And he has 6 clicks both before and after the tightening. As it was, so it remains.
I start it, drive off, don’t even pull the lever and realize that I’ve overtightened the nut.
Then he put the machine on an incline and, loosening HALF of what was TWISTED EARLIER, ensured that after the 4th click Largus stopped dead in his tracks. Please note that if you just stand and pull the lever, there are still 6 clicks! I already have the sad experience of tightening the handbrake on Kalina. Alas, not a pleasant memory. ...I did it by 2 clicks. To turn around like a tank in icy conditions... After 70 km, the rear right wheel began to smoke... It turned out that there were no clicks at all on the handbrake handle (?!) In an unfamiliar city, I waited for 2 hours for the service station to open. (Early morning. Frost -28) We loosened the cable slightly and... we moved on...
Tools:
- Electrohydraulic lift type P-3.2G
- Medium flat screwdriver
- Driver for socket attachment
- Extension for the end attachment on the wrench
- Torx wrench attachment T-20
- 10mm wrench attachment
- 13mm wrench attachment
- Torque wrench
- 10mm curved box spanner
- Calipers
- Wheel key
Removal
1. Place the vehicle in the work station, apply the parking brake and turn off the ignition.
2. Remove the floor tunnel lining by unscrewing the screws that secure it using a socket wrench and a screwdriver.
3. Move the boot under the handbrake lever and loosen the adjusting nut of the handbrake lever equalizer cable using a socket wrench.
4. Disconnect both cables from the equalizer.
5. Remove the two nuts securing the arm to the floor tunnel studs using a socket wrench.
6. Then disconnect the wiring harness connector 1 from the handbrake lever warning light switch.
Handbrake warning switch:
1 – block of the instrument panel wiring harness.
7. Remove the handbrake lever.
Installation
1. Connect the wiring harness block to the warning light switch of the manual brake lever, install the lever on the mounting studs and secure with two nuts using a socket wrench. Ensure the tightening torque of the nuts is 8 N·m (0.8 kgf·m) using a torque wrench.
2. Install the handbrake cables into the equalizer holes.
3. Screw the adjusting nut of the manual drive lever so that dimension X from the upper end of the adjusting nut to the end of the threaded part of the equalizer cable is 16 ± 0.3 mm.
Hand brake parts:
1 – manual brake lever;
2 – equalizer cable for the manual brake lever;
3 – adjusting nut of the equalizer cable;
4 – equalizer for manual brake cables;
5 – manual brake cables;
X – adjustment dimension for tensioning the cables, X = 16 ± 0.3 mm.
Adjusting the hand brake
1. Place the vehicle on a two-post lift, apply the parking brake, and turn off the ignition.
2. Tighten and release the manual brake lever five times to the original position to bring the drive cables into working condition.
3. Make sure the rear wheels rotate. If not, check the following items and repair or replace them as necessary:
– manual brake cables;
– wheel cylinder piston;
– automatic gap adjustment mechanism.
4. Remove the rear wheels using a wheel wrench.
5. Loosen the cable tension adjusting nut using a bent spanner.
6. Place the handbrake lever on the second cutout of the gear sector (a second click will be heard when the lever is lifted).
7. Tighten the adjusting nut with a wrench until the brake drum stops rotating by hand.
8. Tighten and release the handbrake lever 2-3 times and check the rotation of the brake drum. If the drum does not rotate, gradually loosen the adjusting nut using a spanner until the drum rotates freely.
9. Install the rear wheels using a wheel wrench, tightening the mounting bolts with a wheel wrench in the sequence shown in the photo below.
10. Reinstall the floor tunnel lining using a socket wrench and a screwdriver.
11. Check the effectiveness of the service brake system.
The first step is to unscrew the bolt securing the plastic casing under the handbrake lever, which is clearly shown in the photo below:
Then remove this cover completely so that it does not interfere.
Then, under the lever itself, we bend the so-called cover to the side, and there we see a nut on the rod. You need to tighten it clockwise if you want to tighten the handbrake. After several revolutions, it is advisable to check the operation of the handbrake so that it is not overtightened.
It is most convenient to tighten using not a regular open-end wrench, but a socket wrench or a deep socket with a crank.
When the adjustment is completed, you can put all the removed interior parts back in place.
Typically, adjustment is required very rarely and it is possible that during the first 50,000 km you will never even do this once, since it will not be necessary.
Causes of malfunction and their elimination
As a rule, the reasons why the handbrake does not work are quite simple and do not require long or expensive repairs:
Checking the serviceability of the handbrake
Every car enthusiast can carry out the simplest diagnosis of proper operation of the parking brake. Select a section of road with a slope of 23–25%. Stop, put the gear in neutral and tighten the handbrake. If the car does not move after releasing the main brake pedal, then the handbrake operates.
How to use the handbrake
On a note. Car maintenance service workers recommend checking the operation of the parking brake at least once a month.
When tightening the parking brake lever, pay attention to the number of clicks of the ratchet mechanism. If the handbrake is in good condition, there should be from two to four clicks. If there are fewer of them, then you need to release the parking brake drive. Otherwise we tighten it up. Let's look at step-by-step adjustment of the handbrake using the example of a Lada Kalina car.
Checking the mechanical component
Self-diagnosis is a simple operation. It is divided into two components - mechanical and electrical. The first is very important, since it evaluates the condition of the brake system drive and determines its performance.
Checking the mechanical component is reduced to assessing the level of brake fluid in the reservoir and the condition of the drive lines and system components - the master brake cylinder and operating mechanisms.
The brake reservoir is located in the engine compartment, on the right near the rear panel of the engine compartment. It is not difficult to find it, since there are two wires going to the tank cap.
When checking, disconnect the wires and unscrew the cap to determine the brake fluid level. There are marks on the walls of the tank, by which you can understand how much liquid is left. A level above the middle between the marks is considered normal.
For an additional check, we start the car and press the brake pedal a couple of times, after which we roll the car back and inspect the surface of the ground for traces of leaking fluid, and check the fluid level. If it is detected, the brake line is damaged, and the amount of fluid will decrease.
If there is a brake fluid leak, the car cannot be used because the car does not have brakes. The best option in this case is to call a tow truck to deliver the car to the repair site. But if you have enough driving experience, then we get to the service station or garage on our own. Car brake systems usually have two circuits, and if the line of one of them is broken, the second continues to work.
Sometimes there is a problem with the warning light coming on when you press the brake pedal. The reason for this lies in two factors - low fluid level in the reservoir and worn disc brake pads. When braking, fluid flows into the working cylinders and the amount in the tank drops below a critical level, which is why the lamp lights up. This can be treated by installing new pads and adding fluid to the reservoir.
What types of brakes are there?
Through “evolution,” the band brake was replaced by a drum mechanism. The principle of operation is the simultaneous rotation of a hollow drum with a wheel, which is bursting inside with pads. This slows down the car. This type of brake has proven itself well, but it also has disadvantages. With frequent heavy use, the drum overheats, since the ventilation in this closed system is not the same as that of a disk mechanism.
The disc brake system is the most reliable mechanism that eliminates the above-mentioned disadvantages of previous systems. Disc brakes work by rotating the disc simultaneously with the wheel, and when you press the brake pedal, the pads jam the rotation of the disc from the outside. Unlike the drum, the disc is ventilated, so it is less susceptible to overheating than the drum. The discs do not retain moisture and damaged parts. The operating principle of this system is based on the ability to work under heavy loads. Therefore, you can stop your car faster with disc brakes.
Due to the fact that the drum mechanism costs much less than the disk mechanism, today both disks and drums are used.
Recommendations for the braking system
- We recommend that you replace the brake fluid at least once every 1.5-2 years. During operation, brake fluid inevitably absorbs moisture, and its boiling point decreases. During intense braking, it can boil in the working cylinders, and an air plug appears in them, which will not allow creating the required pressure, and the efficiency of the braking system will sharply deteriorate. Check the brake fluid level periodically. If it begins to decrease quickly, it means there is a leak - contact service immediately. If the level decreases, but slowly (smoothly over a run of about 10-20 thousand kilometers) and reaches a minimum, check the condition of the brake pads.
It is advisable to change brake pads/discs if the wear percentage reaches 70% or more, because it is impossible to monitor their condition frequently, and besides, the inner pad wears out more. Maintaining the brake system in good condition is the key to the safety of you and your loved ones on the road.
Use only original and high-quality spare parts in the car’s brake system. Brake pads of questionable quality may not withstand the heat during emergency braking and will not stop the car. They may have a shorter service life, squeak when braking, or wear out the brake rotors quickly.
Video from Loganovoda about replacing steering tips
Replacing the steering tip for Renault Logan, Sandero, Lada Largus
Replacing the steering rod for Renault Logan, Sandero, Largus, Logan2, Sandero2
Knocks on tie rod ends in Dacia Logan, Sandero, check and replacement
Renault Logan, Sandero! Replacement of ball and steering joint!
Review of the FENOX steering rack for Renault Logan and Largus
Using a screwdriver, prying up the decorative trim, moving upwards in the assembly with the fan, now you need to loosen the tightening of the clamps, disconnect all the hoses from the radiator, unscrew the bolts, replace steering tips on the Lada Largus, nuts that secure the casing with the fan and the radiator, disconnect the casing with the fan, you need to remove the two lower mounting pads from the radiator. In most cases, it is not necessary to completely cut the nut. Because, as has already been tested in practice, a standard rear shelf can fail and cannot support good music speakers.
If you are changing spark plugs for the first time on a new car, use a wheel wrench and some machine oil. After an accident, the most important structural part of the car undergoes changes; the geometry is disrupted, visible and invisible flaws appear, and the coordinates of the installation locations of body elements are shifted. You can check its performance by blowing it with your mouth.
If this does not happen, remove the fastening pins from the holes in the upholstery. A standard heater will provide heat in winter, but in summer you will really get sick if the temperature breaks. If the mass is bad, it will not be 0 volts at all. However, their barriers may differ significantly. Now the only thing left to do is to connect the levers of the racks to the tips and tighten all the fasteners. Buying disc brakes and simply installing them, without following clear rules, is dangerous and not recommended. The high physical and chemical properties of this material make it possible to produce many automotive accessories with unique functional properties. And the loads thanks to the airbag are small. Over the past year since the Solaris crash test, a lot has changed in the Czech laboratory 8212 it now belongs to Skoda, and acts as a subcontractor. You can even wash the box, but do it only from the outside.