Among the most popular cars in the domestic engineering industry, it is worth highlighting the VAZ 2110, or as it is also called “Ten”. This vehicle was produced in 1995 - 2007. The 8 valves of the VAZ 2110 were a kind of replacement for the usual carburetor. The main difference between the models is the method of supplying fuel to the fuel cylinders. In the injection machine, everything happened under pressure.
The VAZ 2110 has 8 valves and a more powerful engine. At the same time, fuel consumption is less. Car repair requires the use of additional equipment and painstaking work. Engine capacity 1.5 – 1.6 liters. How to correctly set the ignition on a VAZ 2110 injector with 8 valves? To do this, you need to know the technology of work and then all the actions will seem simple. This will be discussed further.
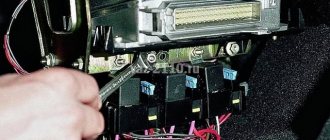
How to set the ignition on a VAZ 2110, injector, 8 valves
The VAZ 2110, or as it was popularly called “Ten,” was one of the most common domestic cars on our roads. The vehicle was produced from 1995 to 2007 at the AvtoVAZ plant. VAZ 2110 injector, 8 valves was a kind of replacement for the carburetor. The main difference was the type of fuel supplied to the cylinders: in the injection version it is sprayed under pressure. Having a more powerful engine and consuming less fuel, the VAZ 2110 injector requires more painstaking repairs using additional equipment. The engine capacity of the car varied from 1.5 to 1.6 liters. In this article we will look at one of the nuances in car repair, namely: how to set the ignition on a VAZ 2110? First of all, you need to find out what ignition system is installed in the vehicle:
- non-contact with distributor-distributor: the breaker is rotated several degrees and thus the advance angle is set;
- the non-contact electronic ignition system does not have a distributor , and the advance angle is set by controlling the internal combustion engine (using sensors, for example, a crankshaft position sensor).
VAZ 2110
The advance angle is set with the engine running without the vehicle moving with the crankshaft rotating at 820-900 rpm. The angle value is from 0 +/- 1 to the upper mark. If the angle is set incorrectly, the engine will overheat, power will decrease, fuel consumption will increase, and knocking will occur.
First, you need to use sensors, for example, a crankshaft position sensor (which regulates the flow of fuel), to set information in the control unit.
Adjusting the ignition of a VAZ 2110 injector, 8 valves requires some minor car repair skills:
- Release the timing gear drive from the case.
- The distance between the sensor and the toothed disk on the crankshaft should not exceed 0.5 - 0.7 mm so that the sensor impulse can pass through and sparks can form uninterruptedly.
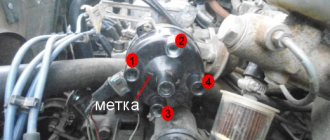
- The crankshaft pulley should be in place, you can check this using the marks. The mark on the flywheel must coincide with the mark on the gearbox housing, for which it is necessary to turn the crankshaft.
- The mark on the oil pump should align with the boss of the cylinder block.
- Another mark on the camshaft drive wheel should coincide with the timing belt cover.
- When all points are aligned, the pistons of cylinders 1 and 4 will be placed in the upper position. Then the distance between the teeth will coincide with the tide on the cylinder block, the 20th tooth will converge with the crankshaft sensor.
- The sensor gives a signal to the internal combustion engine control system that the piston of cylinder number 1 is in the upper position in a state of compression.
Setting marks in the ignition system on a VAZ 2110
When working with current, you must follow safety precautions: wear rubber gloves and choose tools with rubberized handles.
The ignition installation will be complete if you check the work done. Accurate diagnostics can only be carried out using a computer, but you can evaluate the functioning of the circuits:
- check the contacts (only with the ignition off);
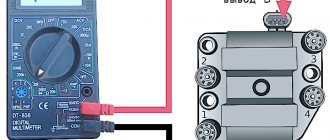
- inside the module you need to find out the voltage at terminals C and B;
- To check the high-voltage wire, you need to place a spark plug in the cap and place it on the cylinder block. When you turn on the internal combustion engine using the starter, a spark should appear. All wires must be checked. The absence of a spark should be a reason to check or replace the ignition system;
- If the engine continues to operate incorrectly, you need to check the power system.
On the VAZ 2110 carburetor it is also necessary to set marks to regulate the ignition system. It should be remembered that early and late ignition worsens the ergonomics of your engine and the power drops. The internal combustion engine is exposed to high temperatures and excessive loads. Detonation is also possible.
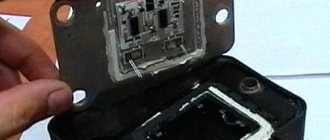
The ignition unit of the VAZ 2110 cannot be repaired; only a complete replacement with a new device is possible!
How to remove the coolant temperature gauge sensor?
Before removing the coolant sensor, remove the air filter, it will interfere with its unscrewing. And first of all, drain the antifreeze (antifreeze). We will merge as follows:
- The engine must be cool.
- You will need spanners for 8, 13, 17.
- Prepare a container for the coolant to drain!
- We remove the engine protection, use a wrench to unscrew the radiator mounts
- We set the heater to maximum, then open the heater tap and the cap of the expansion tank.
- We place the container under the radiator and SLOWLY (if you do it quickly, you will flood the generator) unscrew the drain plug.
- Let him run away for about 10 minutes.
- Let's move on to the engine itself: similarly, we place the container under it and unscrew the plug (under the ignition module) on the cylinder block.
- Let it flow again for 10 minutes.
Before closing all the plugs, wipe the neck of each of the holes!
We remember where the coolant temperature sensor is located on the VAZ 2114, and begin to remove it:
- found it, removed the protective rubber layer;
- we look at the body, look for the markings (on one of its 6-sided parts), remember it, so that later we can put everything in accordance with the system;
- unscrew the meter with the twenty-first key;
- install a new one.
How to change the temperature sensor on a VAZ 2114:
- bought a new one;
- Using the same key number 21, we turn the new one into its rightful place;
- remember the markings;
- add a little heat sealant to the threads just to be sure;
- pour coolant (antifreeze or antifreeze) back into the heating system (radiator) and the engine cylinder block.
If the VAZ 2114 coolant temperature sensor still does not work, then carefully check the following:
- Its quality may be defective (take it to the store and ask for a replacement), therefore, always keep the receipt for any spare parts purchase. parts!
- There may be a coolant leak, or perhaps you have splashed the generator after all.
- You just might not have refilled the antifreeze.
- The sensor is not screwed in tightly enough
We checked everything, but the meter still does not show the temperature of the VAZ 2114 engine. Then you should contact a service center. As with any vehicle, everything in the fourteenth is interconnected. The system may fail for a related reason: for example, when you removed the DTOZH, you decided to remove the ignition module so as not to interfere. The decision is correct, however, removing the module and putting it in its place is also an art.
The second point related to the temperature sensor: coolant level. It may be unstable, it may be that the meter for this level (also a sensor) has failed, and so on. Keep an eye on the antifreeze and save your nerves and your coolant temperature meter.
The service will replace the sensor for you and guarantee a high-quality replacement with proper high-quality assembly of all parts in their places. Naturally, you can buy a coolant temperature sensor on the spot, and the cost of replacement work will be twice the cost of the device.
How much a VAZ 2114 coolant temperature sensor costs should be judged based on geographic location: from 80 to 400 rubles in any store that sells auto parts. The pleasure, in principle, is not expensive, but, given the fact of fairly frequent breakdowns (the car stopped being produced in 2013, breakdowns are a natural process), it is still expensive. Therefore, you should not bother with the service, you need to try to figure out the situation yourself. Moreover, now the Internet is saturated with all sorts of useful links, forums, photographs, diagrams and even videos on replacing one or another auto part.
Despite its importance, DTOZH is a relatively simple sensor; its task is to monitor the condition of the coolant (coolant) in the cylinder block jacket. The temperature sensor promptly reports changes in coolant temperature, after which it transmits this information to the electronic control unit (ECU).
DTOZH is often confused with DTUOZH (coolant temperature gauge sensor)
The difference is that the second displays information on the instrument panel in order to keep the motorist informed about what is happening in the engine, essentially about the coolant temperature. While the DTOZH works with the ECU, which, after receiving information about the high coolant temperature, turns on the fan.
DTOZH is often confused with DTUOZH (coolant temperature gauge sensor). The difference is that the second displays information on the instrument panel in order to keep the motorist informed about what is happening in the engine, essentially about the coolant temperature. While the DTOZH works with the ECU, which, after receiving information about the high coolant temperature, turns on the fan.
Setting the ignition timing yourself
In this article you will find useful information about ignition timing and its installation.
First, a brief excursion into the theory: ignition advance is the ignition of the working mixture in the engine cylinder before the piston reaches TDC (top dead center).
When starting to perform this work, it is worth knowing that the ignition timing is checked and set only at idle speed of the engine, and the crankshaft rotation speed should be no less than 820 and no more than 900 rpm. Also, the angle should be between -1 and +1 degrees from top dead center. If the ignition timing is set incorrectly, the engine begins to overheat, does not operate at full capacity, consumes too much fuel and exhibits detonation.
Video
Perhaps adjusting the gap on the spark plugs will help solve the problem:
Or setting ignition marks:
Ignition timing is the most important parameter that determines the operation of the ignition system. This concept refers to the time during which the ignition system ignites the compressed working mixture with a spark discharge. It is defined as the position of the crankshaft of a car engine at the moment an impulse is applied to the spark plug in advance of the top dead center in degrees.
This is due to the fact that in order for the combustion of the working mixture in the cylinder to occur, it takes some time, because the speed of propagation of the flame front is approximately 20-30 m/s. If the mixture is ignited with the piston in the TDC position (i.e., top dead center), then its combustion will occur during the expansion stroke, as well as partially during the exhaust. As a result, effective pressure on the piston will not be provided. Therefore, the ignition timing, which is optimal, is selected so that the maximum pressure of the burnt gases occurs at top dead center.
The optimal ignition timing depends on
piston speed (i.e. engine speed), degree of lean/rich/mixture and, to some extent, the fractional composition of the fuel, which affects the combustion rate of the mixture. To automatically bring it to the optimal value, vacuum or centrifugal regulators are used, as well as an electronic control unit.
It should be noted that in gasoline engines under load conditions at optimal ignition angles, detonation often occurs, i.e. explosive combustion of the mixture. Accordingly, in order to prevent such a situation, the actual ignition timing must be slightly larger, i.e. to the threshold of detonation.
Relative to the optimal, both “late ignition” and “early ignition” lead to a drop in the power of a car engine and a decrease in efficiency due to a decrease in efficiency. In addition, this leads to excessive heating of the engine and excessive stress on its parts. It should be noted that “early ignition” also leads to strong detonation, this is especially true if the gas pedal is pressed too sharply.
Typically, the process of adjusting the ignition timing on vehicles consists of setting the earliest timing that does not yet lead to detonation during acceleration.
Setting the ignition timing, procedure:
1. First, you will need to disconnect the vacuum hose from the vacuum corrector.
2. Connect the “+” clamp of the strobe to the “+” terminal of the battery. This way you can check the ignition timing.
4. Next, you need to remove the tip of the high-voltage wire from the socket of the first cylinder of the distributor cap and insert the strobe sensor into the vacated socket. Connect the high-voltage wire from the first cylinder to the sensor.
5. Remove the rubber plug from the clutch crater hatch.
6. Start the engine, direct a flashing stream of strobe light into the clutch crater hatch.
7. The mark on the flywheel should visually appear motionless in the flashing light. When the ignition timing is set correctly, the mark on the flywheel will be located between the previous and average pressure of the scale. If the location does not correspond to what is written above, the ignition timing should be adjusted.
8. Loosen the three nuts that secure the distributor to set the ignition timing.
9. The final point in our work is to increase the ignition timing. To do this, turn the sensor housing clockwise so that the “+” mark located on the flange of the distributor housing is aligned with the protrusion on the auxiliary drive housing. One division should be equal to eight degrees of crankshaft rotation. If it is necessary to reduce the angle, it is necessary to turn the distributor body in the opposite direction, that is, counterclockwise.
When to tension the timing belt
The timing belt of the VAZ-2112 and other VAZ models is tensioned in the following cases:
- Installing a new belt;
- Loose belt;
- “Slipping” of the belt with a violation of the timing adjustment;
- Replacement of the tension roller and other timing drive mechanisms.
If the cause of the intervention is a broken or “slipping” belt, you must first ensure the integrity of the valves. A broken gas distribution mechanism (drive) leads to engine damage on 16-valve 1.5-liter power units. However, in cases of drive failure at high speeds, valves and CPGs are also destroyed on other engines.
They check the operation of the timing belt on the VAZ-2114 and other models equipped with 8-valve units by turning the camshaft manually. A working mechanism should turn with some effort. A faulty one, as a rule, cannot be affected.
During the procedure, it is necessary to check the compression in each of the cylinders. The easiest way to do this is to tightly cover the spark plug hole with paper. If there is pressure in the cylinder, the plug is knocked out of its seat at a certain stage of camshaft rotation. It is not recommended to carry out a similar test on 16-valve engines. The risk of damage to an initially good valve mechanism is too great. There are no grooves in the pistons of one and a half liter engines of this type. Therefore, valves that move down bend when they contact the piston surface.
Injector types
The injector controls fuel injection and can also control the ignition. On all new injection machines, the ignition is set by a computer and regulated by filling in different firmware. But this was not always the case, and on older cars, the same Japanese from the 90s, the computer regulates only fuel injection, and the ignition timing is set using a distributor and is set in the same way as on old Lada models, and depending on the speed The ignition timing is adjusted using a more complex vacuum system than on carburetor Zhigulis. Sometimes, one tube breaks, and during operating mode the traction may disappear; you will have to look for and correct this defect.
But let’s return to more modern ignition systems that are controlled using a computer, especially since these were the ones that were originally installed on the injection VAZ.
Ignition system sensors and marks
For the ignition system to operate correctly, the computer needs to read the correct information from the sensors. Subsequently, this information will be processed in accordance with the fuel maps hardwired into the injector.
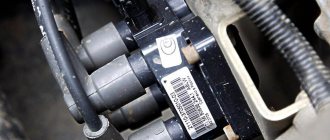
The main signal comes from the crankshaft sensor. This sensor shows what position the crankshaft is in at a given time and, based on it, calculates at what moment it is necessary to inject fuel, and at what moment this same fuel should be ignited, depending on the engine speed, which is also determined by this sensor.
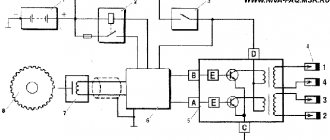
1 – crankshaft drive disc; 2 – crankshaft position sensor; 3 – angle of rotation of the crankshaft; 4 – output signal of the crankshaft position sensor
And this is what a typical signal received by a computer from the crankshaft sensor looks like. Pay attention to 270° - this is like the zero point, showing the computer that the engine has completed a revolution and a new cycle begins. This is achieved due to the absence of a tooth on the crankshaft drive sprocket.
Replacing the timing belt 16 cl. engine — Lada 2112, 1.6 l., 2007 on DRIVE2
Replacing the timing belt VAZ 2112 1.6 16 cl.
1. Remove the timing belt protection. The timing belt guard is secured with six bolts. Remove the chip from the crankshaft sensor, unscrew one bolt and remove the sensor.
2. One tooth is missing on the pulley, this is not without reason, this allows the crankshaft sensor to determine the top dead center, and also allows you to block the crankshaft in order to unscrew and tighten the pulley mounting bolt.
3. This is done like this: the pulley is aligned with the hole for the crankshaft sensor and through the hole for the sensor, a suitable size tube or other suitable object is inserted, in my case it is a hexagon, the pulley is blocked, and then unscrewed and removed.
4. Loosen the tension roller nut and remove the old timing belt.
5. Install a new belt, the belt can be installed by turning the right camshaft with a wrench, or you can remove the tension roller, whichever is more convenient for you.
6. Tighten the pulley mounting bolt back and align the timing belt drive gear according to the marks. If there are no marks on the oil pump housing, put marks on the flywheel and, using a chisel, make a mark on the oil pump, this will be more convenient.
Ignition control
Electronic ignition control
How to set the ignition angle? On systems with electronic ignition control systems, this can be done using computer diagnostics that connect to the Electronic Control Unit (ECU) or the “brains” of the car. And there you can see how the engine operates in real time - what signals are received from the sensors, what engine speed, fuel consumption, injection timing, ignition timing and other input and output data.
Setting the piston of the first cylinder to the TDC position of the compression stroke
Setting the piston of the first cylinder to the TDC position
When carrying out work related to removing the camshaft drive belt (timing), the valve timing may be disrupted; to prevent this from happening, the piston of the 1st cylinder is set to the TDC (top dead center) position of the compression stroke. If the valve timing is incorrect, the engine will not be stable or operate properly. Set TDC according to the mark on the camshaft pulley (when installing according to the marks on the flywheel or crankshaft pulley, the piston of either the 1st or 4th cylinder may be in this position). After this, be sure to make sure that the marks on the flywheel or on the crankshaft toothed pulley are aligned (if the generator drive pulley is removed). If the marks on the flywheel or crankshaft pulley do not match, then the valve timing is incorrect (the piston of the 1st cylinder is not installed at TDC). In this case, it is necessary to remove the camshaft drive belt and rotate the crankshaft until the marks align. Important! Rotate the crankshaft exclusively by the pulley mounting bolt (do not rotate the crankshaft by the camshaft pulley itself).
TIP Since it is inconvenient to turn the crankshaft using the bolt that attaches the pulley to it, you can do this in one of two ways
How the device works
Instead, an ignition module is used, consisting of high-energy control electronics and two coils. The advantage of the new system is that it does not require regular maintenance and maintenance, since there are no moving elements. Also, no special adjustment of the system is required. The reason lies in the presence of a controller. is the one responsible for setting up and adjusting.
Dual-circuit ignition on the VAZ 2110
The operation of the system is based on the idle spark technique. The essence of dual-circuit ignition on the VAZ 2110 is as follows:
- Cylinders, as you know, work in pairs - the first with the fourth, the third with the second, etc.;
- The spark fires simultaneously in two cylinders;
- The working spark ignites in the cylinder, where the fuel-air mixture is compressed;
- An idle spark ignites in the cylinder on the exhaust stroke;
- Since the current in the coil windings is constant, it turns out that in the first spark plug the electrons move from the central electrode to the side electrode, and in the second spark plug from the side to the central one.
In the second case, the key size is reduced to 16 millimeters. The distance between the electrodes of the spark plugs is approximately 1 millimeter.
We have already noted that the controller is responsible for controlling the ignition. For the most efficient control, it reads the following data:
- Coolant temperature;
- Presence of detonation;
- Current crankshaft rotation speed and its position at the moment;
- Engine load (air flow).
A special sensor allows the system to understand what position the crankshaft is in. It is he who transmits the relevant information to the controller. After this, it is calculated how and in what sequence the module coils will operate.
Initially, it seems that the system is incredibly complex. But when using the module, everything becomes much simpler. Repairing or maintaining this system does not require spending a lot of time. The procedure is quite easy and can be done with your own hands.
Lada 2113 Black Storm › Logbook › Instructions for flashing VAZ firmware for beginners, setting up UOZ
Stage 6. Creating combat firmware for driving around the city, setting up the ignition (UZ)
Warm greetings to everyone!
Today we will light, light, set on fire! I will try, together with you, to figure out the third main question of any firmware for a gasoline engine - when to ignite the fuel-air mixture?!
First, a little theory. What is UOZ? Translated as ignition timing. What kind of corner is this? How is it related to ignition? Where did the word advance come from? I’ll tell you in simple terms how I understand it!
For a full working cycle, 4 strokes occur in the engine: - Compression of the fuel-air mixture; — Working stroke; - Release; — Inlet; Now, as I understand it, this is a matter of degrees, which the firmware uses: - 0g - the piston is at TDC, the end of the compression stroke, the mixture is set on fire; — 180g — piston at BDC, end of stroke, start of release; — 360gr — piston at TDC, end of exhaust stroke, beginning of intake; — 540gr — piston at BDC, at the end of the intake stroke, the beginning of the compression stroke; - 720g - piston TDC, at the end of the compression stroke, and set the mixture on fire again.
In total, the crankshaft rotates two revolutions - 720 degrees. We are interested in the moment - the end of the compression stroke - 540 - 0 g! It is at this moment, when the engine has compressed the fuel mixture very strongly, that it is necessary to ignite it in order to obtain maximum pressure on the piston. The stronger the pressure on the piston, the more powerful our motor. The pressure is maximum at the moment when all the fuel burns, the gases expand greatly, and it is at this moment that our piston must be at the very top of the combustion chamber - TDC (top dead center), so that powerful pressure begins to push it back down - to BDC (bottom dead center). dot). The stronger the pressure, the faster the piston moves down, the more powerful our motor. And we feel it with our body. And we say: “Waaaaaaaaaaaaaaaaaaaaaaaaaaaaaaaaaaaaaaaaaaaaaaaaaaaaaaaaaaaaaaaaaaaaaaaaaaaaaaaaaaaaaaaaaaaaaaaaaaaaaaaaaaaaaaaaaaaaaaaaaaaaaaaaaaaaaaaaaaaaaaaaaaaaaaaaaaaaaaaaaaaaaaaaaaaaaaaaaaaaaaaaaa majority time! Chip tuners have a device called an ass meter
.
Butt meter
- a device located inside a person that cannot be deceived; it shows the person how his car rolls. A very important device that replaces expensive dynos.
We laughed a little! The ignition timing is the angle before TDC is reached on the compression stroke. For example, OZ = 30g. This means that our spark plug will ignite the fuel-air mixture when the crankshaft is in the 0°-30° position, or 720°–30°. The calculation is simple: 720g - 30g = 690g.
But you ask, how is this possible? Why so early? The piston is not yet at the very top of the combustion chamber! I will now reveal the meaning of the word “advanced”. The fact is that while the mixture begins to burn, flare up, precious time passes! During this time, the crankshaft has time to rotate at a certain angle, it can have time to travel 20 degrees, it can travel 15 degrees while the mixture is burning. Thus, the piston manages to get closer to TDC.
In my opinion, the most difficult task of an engine tuner is to determine the best, most accurate ignition timing angle at which the fuel will have time to ignite by the time our piston is at TDC! This is the angle that gives a significant increase in power, it gives maximum acceleration.
Moreover, the burning time of the mixture is different, depending on the octane number of gasoline, the fuel-air ratio, the amount of this mixture in the combustion chamber, and the temperature of the fuel mixture. If the mixture is rich, it burns faster than a lean mixture. High octane fuel burns longer than low octane fuel. 98 gasoline burns longer than 95 gasoline.
Also, if you set the ignition angle very early, you can run into something called detonation. Detonation
- This is an explosion of the fuel-air mixture. The usual combustion speed of the mixture in a cylinder is hundreds of times less than the speed of explosion of the fuel mixture. Can you imagine what could happen to the engine if severe detonation begins? At best, nothing, at worst, you will have to collect the remains of the pistons and connecting rods from the pallet. Maybe the pan will tear off or the head will come off. I don’t wish this kind of grief on anyone.
So, it is important to know which angle is early
, and which one is
later
, so as not to get into detonation. Let's look at an example. Given an angle equal to 30 degrees and an angle equal to 35 degrees. Here the angle of 35 degrees will be before the angle of 30 degrees. (720-30=690g or 720-35=685g). 685g will come earlier than 690g. It's simple.
I noted several possible causes of detonation: 1) Low-quality gasoline with a low octane number. 2) High engine compression ratio. 3) Engine temperature (the higher it is, the higher the likelihood of detonation). 4) Ignition angle too early. 5) The mixture is too lean (15.5/1-16.5/1) (firstly, it burns worse, and secondly, it does not cool the combustion chamber).
Operation of the contactless ignition system
- By turning the ignition key, current from the battery is supplied to the mounting block.
- From it, low voltage current passes to the coils, starter and other electrically dependent devices of the system.
- The starter begins to turn the engine. At the same time, the transistor switch receives a signal from the pulse sensor.
- The commutator interrupts the current on the primary winding of the coil, which allows you to create a high voltage current on the secondary winding.
- The resulting current goes to the central terminal of the coil and enters the distributor.
- Depending on the position of the crankshaft, current is transmitted through high voltage wires to the corresponding spark plug.
- The current produces a spark charge that ignites the fuel-air mixture.
Replacement
- hex key 5;
- spanners or sockets for 15, 17;
- tension roller wrench;
- large flathead screwdriver.
1.We install the machine on a level area. Raise the hood, turn off the power to the on-board circuit by removing the ground terminal on the battery.
2. Unscrew all six bolts securing the timing case to the left of the cylinder head.
3.Disconnect the contacts on the crankshaft sensor.
4. We check the marks on the gears of both camshafts with the marks on the rear cover of the casing (triangular notches).
5. We also check that the mark on the flywheel crown matches. To do this, use a screwdriver to pry off the rubber plug located on the clutch housing under the thermostat. Under it there is a flywheel gear, on which the mark is located. It should coincide with the cut on the left side of the crankcase.
6. Move on to the crankshaft pulley mark. To do this, you need to loosen the tension on the generator belt by unscrewing the tensioner nut.
7. Having removed the belt from the pulley, we fix the current position of the flywheel by inserting a screwdriver between its crown and the crankcase.
8. Place the 17 key on the generator pulley bolt, unscrew it and remove it. Behind it there is a crankshaft gear with a mark, which should coincide in this position with the mark on the oil pump cover.
9. If any pairs of marks do not match, you need to turn off the gear, screw in the bolt securing the generator pulley, and, without removing the key from it, gradually turn the crankshaft until all the marks match.
10.When the marks are in place, remove the tension roller with a 15mm wrench, then the support roller, and remove the timing belt.
10. We install new rollers, install a new belt, starting with the crankshaft pulley.
11.Tighten the belt by rotating the tension roller clockwise using a special wrench (or fixing it with curved pliers) until the tension is optimal. You can check the degree of tension without the help of tools. It is enough to grasp the belt in the area between the crankshaft pulley and the camshaft pulleys and rotate it horizontally. The optimal tension will be at which you can turn it with your fingers no more than 90 degrees.
12. Installation is carried out in reverse order.
13.Pull out the screwdriver from the crankcase hole.
Starter problems
Many VAZ 2110 owners had a situation where the starter did not turn after inserting and turning the key. They heard characteristic clicks. This indicates that the solenoid relay is not working.
But the fact is that the “ten” does not have a starter relay, that is, an ignition relay as such. Instead, a solenoid relay works. It is supplied with a positive contact from the ignition switch. Mount this relay to the starter. It has a round shape and is approximately half the size of the starter itself.
A little about prices
We have already noted which switch and transistor are used when repairing the ignition module of a dozen. The first costs about 3 dollars, and for the second you will have to pay about 6 dollars.
Some craftsmen use a domestic analogue of the transistor - model KT848A. Of course, it costs less. But its problem is its lower quality and larger size, which somewhat complicates the repair process.
We recommend watching:
- Replacing high-voltage wires Kalina 8 valves
- After warming up the engine runs intermittently
- Zil 130 shoots into the carburetor reasons
- Expiration date of spark plugs
- Why doesn't the starter start?
- Why does the car jerk at high speeds?