Responsibility for faulty lighting devices
Traffic rules prohibit operating a vehicle with faulty lighting devices. This is due to safety considerations for all road users. It is also prohibited to use vehicles that use lamps that do not meet the design requirements for the operation of the vehicle.
It is important to remember that you are not the only participant driving on the highway, and it is highly not recommended to install more powerful and brighter lamps in the headlights of your car. By this action you endanger traffic participants moving in the opposite direction.
All changes in the design of the vehicle or non-working lighting devices entail administrative penalties.
What causes the squeaking sound when you press the brake pedal?
Published: 03/11/2019
Spread the love
Spread the love Squeaking and other noises during braking. Contents 1 Squeaking and other noises during braking. 1.1 Reasons for squeaking car brakes 1.1.1 Reasons for squeaking brakes when braking 1.1.2 Brake system maintenance Screeching and squeaking of brakes is something that not only causes discomfort the driver, but also makes us feel like our car is faulty. Unfortunately, …
What causes the squeaking sound when you press the brake pedal? Read completely "
Types of lamps used in Priora
- H7 (Low beam);
- H15 (High beam and DRL);
- PY21W (Turn signal lamp);
- P21W (Reversing lamp);
- P21/5W (Brake and parking lamp);
- H11 (PTF lamp);
- C10W and C5W (Lighting lamp: interior, glove box and trunk);
- W5W (Lamp for side lights of headlights);
- H1 (High beam lamp until 2013 without DRL);
What kind of lamps are in Priora foglights?
Lamps for fog lights
The effectiveness of PTF according to fog criteria is immediately determined by several factors. Their low location, different range and direction of light allow them to illuminate only the sidewalk itself, without affecting the surrounding area, like long-range headlights. This allows the road to be paved even in the face of intense fog, which completely dissipates the headlights, creating a white wall in front of the car.
Types of PTF lamps
If PTFs are installed by an automobile concern, they use standard halogen lamps. They are dissatisfied with many motorists, forcing them to look for replacement options. There are currently three types of bulbs that can be used for fog lights:
- halogen;
- LIGHT-EMITTING DIODE;
- gas discharge or xenon.
Before choosing your final replacement, you should find out what kind of fog light
.
The main difficulty for most drivers is to correctly determine which bulbs are best located fog lights . each has its own advantages and disadvantages.
halogen
The most common type of fog lights, which has affordable value as its main advantage. Such elements provide acceptable PTF performance in foggy conditions and, when properly configured, do not cause blindness to oncoming drivers. Disadvantages of halogen lighting include a small labor force, and replacing a fog light bulb is not always an easy task. In addition, the headlights become very hot, which when cooled can lead to cracking of the glass. If the power of standard lamps for the driver is insufficient, when replacing lamps in fog lights
At greater, greater risk, the control unit overheats and turns off the headlights automatically.
LIGHT-EMITTING DIODE
A more acceptable option for most. They feature a wide range of colors, brightness and low power consumption. LED lamp
Fog lights heat up very little due to their unique operating principle. This allows you to avoid melting the inside of the headlight during continuous operation of the PTF. They almost never cause blindness to oncoming drivers. Why a second fog light and Skoda. Disadvantages include higher cost, as well as the need to carefully select the lamp itself. They do not fit every headlight.
Gas discharge
Xenon makes fog lights as bright and effective as possible. High-quality xenon has a lifespan of about three years, but xenon can only be used for fog lights under strict regulations, violation of which will result in a fine of up to one year rather than a fine. Yes, only special headlights marked “D” can be used for xenon, and an automatic leveler is required. Self-installation of xenon in fog lights It is more complicated than other types of lamps, but if installed correctly, the result will be happy for several years in a row. The disadvantages of a gas-discharge lamp, in addition to its high cost, include the need to replace both lamps if only one burns out.
Testing of H11 LED lamps in PTF. Choose brighter than LEDs or halogens
Buy LED lamp
CL6 H8, H9, H11.
Replacing a light bulb in the LADY PRIOR fog lights
Hi all! In this video we will talk about replacing light bulbs in fog lights on a LADA PRIORA
How filmed.
How to replace a lamp yourself
Replacing fog lights in itself is not a difficult operation, but if the lamp
The changes in the like were burned out, there are almost no problems. Before working, for example, on a VAZ family car, it is advisable to drive the car into a hole, use a lift or raise the front part of the jack. It will be much more convenient and take less time.
Before changing a fog light bulb, you should buy one. It is better to give preference to well-known brands with a good reputation. For VAZ, the process for replacing a light bulb is as follows:
- a power supply for fog lights and a rubber shield from the headlight were found;
- after this, the device carefully turns off;
- spring clips for unlocking headlights;
- the light bulb is removed from the wire;
- new lamp ;
- The headlight is reassembled and checked.
This manipulation is enough to be performed once to replace the bulbs in the fog in just a few minutes. The replacement process for other models depends on the design features of the fog lights. Some PTF cars are located in the headlight unit. here you will have to disassemble the optics. An example of replacing the domestic Kalini with a video:
If regular fog lights are not suitable
You can often see motorists who are categorically dissatisfied with the light of ordinary fog. This is especially true for those who often have to travel long distances. Indeed, in times of heavy fog, the installed PTFs do not cope with their main task. As a rule, these lamps are equipped with ordinary lamps. Replacing them with similar ones, but higher power is impractical; it is much more reasonable to replace them with LEDs or xenon.
It is worth noting that LED lamps are found in fog lights and can be installed without any restrictions or conditions, as required for xenon. No special knowledge or equipment is required to replace a halogen lamp with an LED lamp. But there is one rule that should not be ignored: you can only buy diode dumps in fog lights if they are branded. Inexpensive Chinese samples do not meet quality requirements and will last a very long time.
Headlight bulbs
The headlight bulbs of the Lada Priora differ depending on the year of manufacture of the car, since at the end of 2013 daytime running lights began to be installed in the Priora.
Headlight bulbs for Priora models up to 2013.
| Installation location | Lamp type | Power, W) | Number in photo |
| Low beam | H7 | 55 | 1 |
| High beam | H1 | 55 | 9 |
| Turn signal | PY21W | 21 | 3 |
| parking lights | W5W | 5 | 8 |
Headlight lamp for Priora after 2013
| Installation location | Lamp type | Power, W) | Number in photo |
| Low beam | H7 | 55 | 1 |
| High beam/DRL | H15 | 55/15 | 2 |
| Turn signal | PY21W | 21 | 3 |
| parking lights | W5W | 5 | 8 |
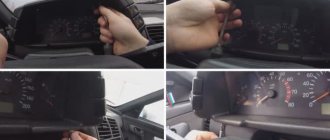
Replacing low and high beam bulbs in the headlight
- To replace the high and low beam lamps, you must remove the rubber or plastic headlight protection covers. Then pull the connector towards you and remove it from the lamp. By pressing on the lamp clamp, release it from the clamps and remove the lamp.
Replacing the turn signal lamps in the headlight
- Replacing the turn signal lamps must be done by turning the socket counterclockwise and removing it towards you from the headlight.
Replacing the headlight bulb
- To remove the side light bulb, you need to pull the bulb socket towards you.
How to open a frozen car?
Published: November 22, 2019
Spread the love
Spread the love How to open a car door in winter? Rain or snowfall and freezing temperatures are enough to freeze car locks. How to open a frozen car then? Humidity in the air and freezing temperatures have never been associated with the smooth operation of a car. This applies, among other things, to locks in which ice plugs form due to subzero temperatures, preventing the key from being inserted. However …
How to open a frozen car? Read completely "
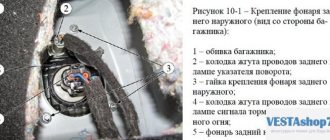
Tail lamps
The taillights also differ depending on the year of manufacture. In cars after 2013. The taillight brake lights have become LED, but the bulbs used in the lights remain unchanged.
| Installation location | Lamp type | Power, W) | Number in photo |
| Reverse | P21W | 21 | 4 |
| Brake light/dimensions | P21/5W | 21/5 | 5 |
| Turn signal | PY21W | 21 | 3 |
| Rear PTF | P21W | 21 | 4 |
Replacing tail light bulbs
- To replace it, you must remove the rear light. To do this, unscrew the 3 screws that secure the light and move it away from the car body. Then unscrew the sockets counterclockwise and remove the desired lamp.
Installation
There is practically no difference in the installation of PTF Priora 1 and 2. The only differences will be noticeable in making holes in the bumper for the headlights. In the SE bumper you need to cut a triangle along the contour and in a regular bumper you don’t need to cut anything.
There will be no other differences in installation.
Required tool:
- 10mm wrench;
- Screwdriver “+”;
- Insulating tape;
- Knife or jigsaw;
- Pliers;
Installation process
- Remove the negative terminal of the battery;
- We remove the car bumper; to do this, unscrew many screws from the bottom and top of the bumper, then disengage it from the fender and remove it.
- Next, use a knife to cut out a hole in the bumper for the PTF. Be careful and take your time so as not to damage the paintwork on it.
- We attach the PTF to the bumper using self-tapping screws.
- Let's start running the wiring into the cabin. We lay the wires from the PTF next to the main braid of wires on the left side of the car (in the direction of travel) behind the washer reservoir.
- Next, you need to run the wires into the car interior. The most convenient place to run the wires is in the area of the brake master cylinder. There is a hole there plugged with a rubber band, you need to insert the wires into this hole. For convenience, it is recommended to remove or move the expansion tank.
- We fasten the wires tightly so that they do not rub or come into contact with the metal. It is better to place them in a protective plastic corrugation.
- In the cabin, remove the cover of the fuse box (attached with three clips), turn them counterclockwise 90° and pull the cover towards you.
- Then we bend the sound insulation and tighten the wires under the center console.
- Remove the center console (central insert), fasten it with screws.
- Next, we proceed to connecting the wiring; for a correct and safe connection, we use the diagram from the kit or the diagram below.
- We install a button instead of a plug on the center console.
- After connecting, we check the functionality of the PTF. The main difficulties arise precisely when connecting the wiring. To avoid problems, carefully double-check the connected wires and strictly follow the connection diagram.
- Assembly must be done in reverse order.
Turn signal repeaters
Repeaters are installed in the front fender, with the exception of luxury trim levels, where the repeater is installed in the side rear view mirror.
| Installation location | Lamp type | Power, W) | Number in photo |
| Turn signal | W5W | 5 | 8 |
To remove the lamp in the turn signal, you need to pull it towards you and remove it from the wing. Then turn the socket counterclockwise and remove the lamp.
Video review of the procedure for replacing lamps in the rear combination lamp of Lada Priora (sedan, hatchback)
When purchasing a book in PDF
1. You will be able to download the book immediately after payment.
2. The book will be downloaded in PDF format, and you can download it to any device.
1. All books are of ideal quality, since we work with publishers directly.
2. Electronic books are in no way inferior to paper books and are their complete analogue.
3. Our company has offices in Ukraine, Russia and Poland, you can always contact us at a specific address.
4. All payments on the site are maximally protected and are made using global payment systems.
The book is not intended for sale in your country.
You can place an order for the paper version of this book on the website autoinform96.com.
Payment for goods and downloading of the book in electronic form (PDF format) is made on the website.
To do this, you need to find the book you are interested in and click on the “Buy” button. The price of the book is indicated on the button.
For convenience, the price on the website for residents of Russia, Belarus and Kazakhstan is presented in rubles.
For residents of Ukraine in hryvnias, and for all other countries - dollars.
After clicking on the “BUY” button, a payment window will open where you can select a payment system with which you can pay for the selected book using any bank card (Visa, MasterCard, MIR, etc.)
When you click on the “Pay by bank card” button, the Portmone payment system will open, which is the easiest way to make a payment.
In addition, the website offers four payment systems for payment:
- Yandex (payment from any bank cards, Yandex Money account, QIWI Wallet, terminals, etc.);
- Portmone (payment from any bank cards, Portmone account);
- PayPal (payment from any bank cards, PayPal account);
- WebMoney (payment from any bank cards, payment from WebMoney wallets).
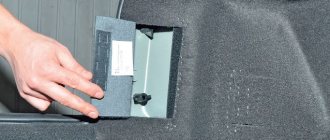
Interior lamps
Lada Priora has lighting for the entire interior, glove box, trunk and license plate lighting.
| Installation location | Lamp type | Power, W) | Number in photo |
| Number plate illumination | W5W | 5 | 8 |
| Interior lamp | C10W | 10 | 7 |
| Glove compartment lamp | C5W | 5 | 7 |
| Trunk light | C5W | 5 | 7 |
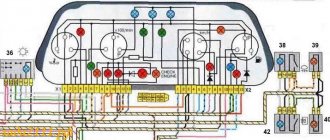
Description of the scheme
The relay must be connected according to this diagram. The relay has only 4 contacts, which are assigned numbers: 85, 86, 87 and 30.
- We connect contact number 86 to the negative of the battery;
- We connect contact number 30 to the “plus” of the battery;
- Contact number 87 is connected to the power wire (plus) of the PTF;
- We connect contact number 85 to the PTF ON/OFF button with a blue wire through a fuse;
We hope our article was useful to you.
Car : Lada Priora. Asked by : anonymous. The essence of the question : lamps in PTF for PRIORU, price/quality?
Hi all. The lamps in the PTF burned out, and my car was yellow. I will change to standard ones, I'm afraid of sanctions from the traffic police. Tell:
- Which PTF lamps are better in price and quality?
- What type?
- Is it possible to install diodes, will there be any benefit?
Problems when paying with bank cards
Sometimes difficulties may arise when paying with Visa/MasterCard bank cards. The most common of them:
- There is a restriction on the card for paying for online purchases
- A plastic card is not intended for making payments online.
- The plastic card is not activated for making payments online.
- There are not enough funds on the plastic card.
In order to solve these problems, you need to call or write to the technical support of the bank where you are served. Bank specialists will help you resolve them and make payments.
That's basically it. The entire process of paying for a book in PDF format on car repair on our website takes 1-2 minutes.
Installation of fog lights
It is impossible to install any fog lamp without dismantling its predecessor. The scheme for replacing equipment is very simple:
- Remove all plugs from the bumper;
- Remove the previously installed headlights;
- Install new ones in their place;
- Carefully tighten all screws.
Installing PTF on a Priora
It may happen that the size of the holes in the old headlights will be too small for the new fog analogues. In such a situation, you should remove the bumper from the priors and widen the holes. If there are no places in the bumper itself for fog lights, then this problem can be quickly solved by cutting out these holes with a sharp knife.
After the replacement has been made, it is necessary to make a harness from the wires coming from the headlights and lay it along the cable under the hood. The wires are routed to the control panel mainly through the hole next to the fuses. After this, the negative wires must be connected to the body of the priors, and the bumper must be fixed in place.
Why the headlights don't light up - reasons
The most common reason for headlights not working is a burnt out light bulb. Its service life is indicated in hours on the packaging. For a low beam bulb, this limit can be 400 hours of operation. The second extremely possible reason could be a wiring malfunction due to water leakage, or the wire simply frayed. This problem is already more serious, because you will have to fuss with it much longer than with a regular replacement of consumables.
Often, car enthusiasts are too lazy to change light bulbs, driving out onto the road in “one-eyed” cars. This is very unsafe - it is recommended that immediately after a malfunction is noticed, you go for a spare part to replace a new lamp.
What bulbs are best for H7 headlights?
Rating of the best H7 lamps - Top 10
| Category | Place | Name |
| Best Standard H7 Halogen Bulbs | 2 | BOSCH H7 Pure Light |
| 3 | Narva Standard H7 | |
| The best H7 lamps with increased luminous flux | 1 | Bosch H7 Plus 90 |
| 2 | Osram H7 Night Breaker Unlimited |
Installation of PTF
Priora needs to be driven into the inspection hole and checked whether all the necessary components for modernization are at hand:
- PTF and wiring kit.
- Pliers.
- Set of screwdrivers and keys.
Installing headlights
- We disconnect the negative terminal from the battery and move on to the front bumper fastenings - the screws are located on the top, bottom and side. Remove the Lada Priora bumper; Unscrew the marked fasteners and remove the front bumper
- Let's move on to the plugs. They are attached using several self-tapping screws; here it will be most convenient to work with a short Phillips screwdriver;
- It is necessary to place the fog lights in the places where the plugs were. For fastening, you can use self-tapping screws from the plugs; Remove the plugs and screw the fog lights in their place.
- Now we need to find the longest wire in the set. We connect it to the left headlight, and then to the right one and pull it from the battery side into the engine compartment;
- With the “tenth” key we dismantle both tanks of the Lada Priora, with the 13th key we unscrew the fastenings of the wipers;
- We need to get to the left edge of the upholstery, to do this we need to remove the protection. The hose must be moved to the side, loosen the clamp;
- Now the upholstery can be completely removed;
- Our task is to pull the headlight wiring through the plug into the Priora’s interior and secure the wires with the clamp that comes in the kit;
- We assemble Lada components in reverse order. Wires must be connected to the crankcase protection bolts.
Electrical connections in the cabin
Under the steering column of the Lada, you need to remove the protective plastic - turn the three latches 90 degrees; Under the safety block you will see a self-tapping screw - unscrew it and pull out the block. The PTF kit includes instructions that contain a detailed connection diagram; Now let's move on to the central panel. Take out the plug and the button for turning on the heated rear window, you will find these elements to the left of the clock; Take the PTF button from the kit. The blue wire goes to the safety block, the rest need to be connected to the heating button - you can do this using the clamps that come in the kit. Here is the connection diagram: We need to install the PTF relay in the block
It is important here not to confuse: connect the wires coming from the hood to F18 and F17, also connect the yellow wire to these sockets, black and red go to A86 and A30, insert the fuses from F18, F17, connect the blue wire to A. Understand The diagram will help you with this. We connect the relay to the indicated sockets
Installation of PTF on Lada Priora is completed. All that remains is to assemble the parts and connect the negative terminal to the battery. The fog lights only work when the ignition is on. You should only install the dashboard covers when you are sure that the optics are working properly. All that remains is to adjust the headlights; for this, a standard scheme is used.