Checking the temperature sensor is a simple procedure that even a novice car enthusiast can handle. The coolant temperature sensor (abbreviated as DTOZH) is a thermistor, that is, a resistor that changes the value of its internal resistance in accordance with the temperature where its actuator is placed. Most often, a multimeter is used for this (another name is a tester, “tseshka”), which is able to measure the value of electrical resistance in a circuit.
Coolant temperature indicator sensor as an element of the cooling system
The cooling system is a set and coordinated interaction of devices that supply coolant to hot areas and remove excess heat outside. It constantly maintains the optimal thermal conditions of the parts, adjusting the indicators through the control unit under different operating conditions of the motor.
Deviations in the direction of excessive cooling are also unacceptable. Under such conditions, the fuel mixture, interacting with the cold walls, condenses on them and flows into the crankcase, contaminating and diluting the oil. Low temperatures cause an increase in oil thickness, making it difficult to supply it to the cylinder, which again negatively affects the operation of the engine.
The coolant temperature sensor (CTS) is the informational and signaling part of such a system. With its help, data is transferred to the ECU about temperature changes during the heat exchange process. There, the operating parameters of the engine are determined and decisions are made to regulate it.
What is DTOZH
Modern sensors are thermistors, with a semiconductor whose resistance easily changes with temperature fluctuations. An increase in t entails an increase in the number of free electrons in the semiconductor material, which is the reason for the drop in resistance. Those. has an inversely proportional relationship, with a negative coefficient. The initial resistance corresponds to a voltage of 5V. As the engine heats up, the resistance drops to 0, and vice versa, when the engine is cold, it is maximum. Deviations from this parameter are recorded by the ECU.
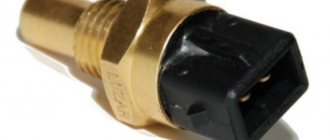
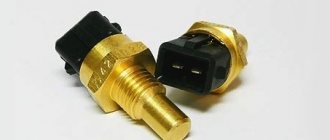
The semiconductor resistor is placed in a metal case with high thermal conductivity. There is also a threaded mount and an electrical connector for connecting to the on-board computer.
The device is miniature, built into the output line of the cylinder block, or rather, its head. It simply screws into a hole specially designated for it. In different car models, it may be located in or near the thermostat. The main thing is that there is contact with coolants.
To obtain the most accurate information about temperatures, an additional sensor is installed at the radiator outlet.
What is the sensor for?
The sensor reads the temperature of the fluid in the cooling system and transmits this data to the ECU (electronic control unit). And based on this data, the on-board computer maintains the optimal temperature regime for the engine (which is about 80–90 degrees Celsius). That is, the ECU “understands” when it is necessary to slow down the fan and increase the engine temperature (when warming up), and when, on the contrary, it is necessary to reduce the temperature as quickly as possible and prevent the coolant from boiling. Thanks to this, the motor will definitely not jam, and the wear of its mechanical parts will be minimal (for example, if overheated, the same rings will quickly “burn out”).
Maintaining the correct temperature is also important for maintaining the correct viscosity of the engine oil. Only in this case will the motor be able to operate at full power, but without accelerated wear.
If the temperature sensor is faulty, then the ECU receives incorrect information. Accordingly, when the engine is cold, it can force the fan to turn on “full,” which will only complicate warming up the engine. Or vice versa: if it overheats, the fan will not work at all, which may result in engine failure without the possibility of further repair (if it jams, not only the cylinder block is damaged, but also the camshaft, crankshaft, and in some cases the flywheel).
How does DTOZh affect the operation of the internal combustion engine?
Based on the parameters supplied to the control device, the module performs the following functions:
- Enrichment of the air-fuel mixture or its depletion. If the controller detects that the temperature is too low, it will begin to increase the duration of the signal sent to the injectors, which helps to enrich the fuel mixture. In accordance with the normalization of the temperature regime, the fuel is gradually depleted, which prevents possible excessive consumption of gasoline and reduces the volume of exhaust gases. If the sensor breaks down, it can regularly lower the temperature in the engine, which will lead to fuel contamination and increased consumption.
- The control unit sets the ignition. It can be early or late. If the temperature increases, the control module adjusts the ignition timing to reduce exhaust toxicity.
- Thanks to DTOZH, proper recirculation of gases is performed during warming up. The recirculation valve closes tightly when the power unit warms up. If the car’s engine is still cold, then recirculation will cause fluctuations in idle speed and random engine stops.
- With the help of DTOZH, the control unit purges the filtration system, which traps fuel vapors. To achieve better machine controllability, the carbon filter element is not purged until the engine is completely warmed up.
- Locking of the gearbox torque converter when the internal combustion engine warms up. The control module should not limit the operation of the device until the machine warms up.
- The ECU controls the operation of the unit's cooling fan. Based on the temperature controller readings, the module activates and deactivates the ventilation device to correctly select the temperature of the unit. If the DTOZ gives incorrect impulses, there is a possibility of the motor overheating.
Where is the coolant temperature sensor located?
In 99% of cases, the sensor is installed on the exhaust pipe of the cylinder block. This is the place where the coolant “leaves” the engine (that is, it is at the highest possible temperature) and then enters the radiator. In some modern cars, 2 controllers are installed: on the outlet and inlet pipes (for more precise temperature control). The sensor itself is connected to a cable (of 2, less often - 3 wires).
Visually, the DTOZH looks like a plastic “plug”, with a metal thread and an additional contact pad at the end. It must be taken into account that the sensor is in direct contact with the coolant. Accordingly, if there are signs of engine overheating, then you should not pull it out (which is necessarily indicated in the technical instructions for the car).
Video: where is the temperature sensor located, how to replace the DTOZH
Where is
Before you start diagnosing the DTOZH, you need to determine where it is installed. You need to look for a large nut from which there are 2 electrical wires. Sometimes they are hidden in a corrugated box. The location of the sensor depends on the make and model of the car, but most often the locations are as follows:
- cylinder head exhaust pipe - cylinder head;
- upper radiator cooling hose;
- thermostat housing (antifreeze temperature regulator).
Sensor installation location
The installation location must be such that contact of the sensor's sensitive element with antifreeze is ensured. If coolant leaks from the system, contact may be lost. As a result, the device readings will be incorrect.
The thermistor is placed in a protective housing, which has a thread that allows you to attach the sensor. It is connected to the electrical circuit through a connector. It is screwed into the seat with a wrench. Some cars have a pair of sensors installed. One measures the “degree” coming out of the engine, the other from the radiator.
Causes of failure of the coolant temperature sensor
Structurally, the coolant sensor is quite simple, and accordingly, it rarely fails. Usually this happens simply due to its old age or mechanical damage. For example, corrosion of contacts and metal parts of the case may occur due to the fact that instead of antifreeze or antifreeze, ordinary water was poured into the cooling system (and even more so if this water is “hard”, that is, with a high content of metal salts). Also, the reasons for the failure of this device may be:
- Hull damage . This can be expressed in various aspects. Often, leaks of coolant are visible, which flows from the threads of the sensor or its housing. Also, the electrical contacts and/or the thermistor itself may be damaged, which will produce an incorrect signal.
- Oxidation of contacts . Sometimes situations arise when, under the influence of fumes or simply from old age, the contacts on the sensor oxidize, so the electrical signal does not pass through them.
- Damage to the chip . In some cases, due to mechanical damage, the so-called “chip” may fail, that is, a group of contacts that is connected to the coolant temperature sensor. Simply put, the wires at the base of the connector fray. According to statistics from reviews found on the Internet, this is one of the most common malfunctions that occurs with the sensor and the corresponding system.
- Lost electrical contact inside the sensor . In this case, unfortunately, repair is hardly possible, since usually its body is sealed and does not allow access to the insides of the DTOZH. Accordingly, in this case the sensor only needs to be replaced with a new one.
- Violation of wire insulation . In particular, we are talking about the power and signal wires that go to the sensor from the electronic control unit and back. The insulation can be damaged due to mechanical stress, abrasion, or even simply from old age, when it “peeles” in pieces. This is especially true for those machines that are operated in conditions of high humidity and sudden changes in ambient temperature.
If it is possible to simply clean the body/threads/contacts of the sensor, then to restore its normal operation it is enough to carry out the appropriate measures. However, if the housing is damaged and/or the internal thermistor is damaged, then repair is hardly possible. In this case, you just need to replace the sensor with a new one. Its price is low, and the replacement process is simple and will not take much time and effort even for novice car owners.
Principle of operation
When the engine is not running, the antifreeze temperature is practically the same as the ambient temperature. In this case, the thermistor resistance has a maximum value. No current is supplied through the sensor to the electrical circuit of the control unit. When the engine starts, a short circuit occurs in the ignition switch. The sensor receives voltage.
Sensor operation schedule
During the period of increasing speed of the power unit, the resistance of the thermistor decreases. If the permissible limit is exceeded, the sensor operates in conductivity mode. The signal about the resistance value is sent to the logical block, which, in turn, sends commands to the motor. As a result, the speed decreases and the volume of the injected mixture decreases.
The motor starts running at reduced power. The coolant cools down and the sensor resistance returns to normal.
The material used to make the thermistor is nickel oxide or cobalt alloy. These metals were not chosen randomly. They are full of free electrons, which help increase or decrease resistance during temperature influences. The standard voltage for the sensor is 5 V.
Signs of a malfunctioning coolant temperature sensor
Coolant temperature meter test
Now that you have installed ECT on your vehicle, you are ready to test it.
- Disconnect the sensor electrical connector.
- Obtain engine surface heating values using an infrared thermometer or a suitable cooking thermometer. Measure the engine temperature at a location near the ECT.
Before we move on to the next step, let's digress here for a second:
Okay, at this point you may be wondering why you would need to measure engine heat to troubleshoot a faulty meter. The main reason is that you are trying to check two common potential faults here: the ECT sensor and the thermostat.
Symptoms of malfunction
Judging by our experience, DTOZH does not break down too often. But the malfunction has a direct impact on the operation of the power unit. Here are the typical symptoms:
- Problem starting the engine in the cold season.
- Excessive fuel consumption, above standard.
- A warm engine stalls. The usual time is when the coolant temperature reaches 100°C. Especially at low speeds.
- Antifreeze is leaking through the housing next to the device.
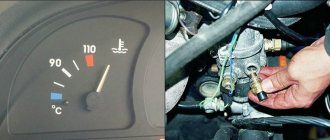
- The engine heat indicator on the instrument panel does not respond.
- The antifreeze has warmed up to 100°C, but the fan impeller does not start.
- The blades rotate “cold” or operate at maximum speed.
New and broken sensors
The engine may begin to “trouble”, which will worsen the dynamics of the car. And sometimes antifreeze boils in the expansion tank. If the sensor is shorted or there is an open circuit, the fan spins like crazy and does not stop.
How to determine a faulty DTOZH?
If the pointer functions correctly and the wiring is intact, plug the sensor back into the circuit, start the engine and warm it up as normal. If, at the same time, readings are stored on the pointer that do not correspond to normal values, or the pointer arrow has not even moved, then the problem lies precisely in the sensor. In this case, you simply need to replace it.
By the way, you can learn about the signs of a malfunctioning coolant temperature sensor by following this link. After reading this material, you will learn in more detail about methods for testing the sensor for functionality, as well as its role in the car engine.
Another way to check the temperature sensor
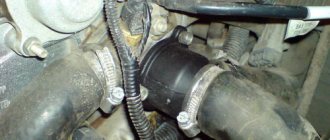
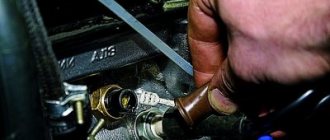
There is another way to check the sensor, your actions should be as follows. First of all, you need to disconnect the negative terminal from the car battery and drain the antifreeze from the engine so that the liquid does not spill after removing the sensor.
Next, you need to remove the sensor from the engine and test it with an ohmmeter. One contact must be attached to the sensor contact. The second terminal of the device must be closed to the DTOZH housing. The ohmmeter reading at normal temperature should be about 700-800 Ohms.
Try checking the sensor in other conditions, for example, by immersing it in hot (about 70-80 degrees) water: in this case, the resistance will be less. It's also worth testing it in cold water, where resistance will naturally increase. If the ohmmeter readings at given temperatures differ from normal values, or there is no decrease or increase in resistance when the sensor is heated and cooled, then this is the problem - it should be replaced. Otherwise, you need to look for a fault in the indicator or the wires going to it.
We recommend watching a useful video about checking the coolant temperature indicator and sensor. In this video you will learn where the pointer sensor is located, how to check it, and also determine what exactly is the problem in the pointer sensor itself or the instrument panel, be sure to watch:
Checking the removed DTOZH
Before removing the sensor from the cooling system, you need to drain a small amount of antifreeze. If this is not done, antifreeze will flood the entire engine compartment.
With thermometer
If the initial diagnosis does not reveal anything, you need to unscrew the sensor with a wrench. Before carrying out further testing, it is worth cleaning the body and probe of the thermistor from plaque and dirt.
Checking with a thermometer
Checking the DTOZH at home with a thermometer:
- Place a container of water on an electric stove or gas.
- Take a multimeter and turn on the resistance measurement.
- Immerse the sensor thermistor in water and attach the alligator clips of the multimeter to the contacts.
- Place a thermometer in a container of water in which the DTOZH is placed.
- Gradually increase the water temperature and record the multimeter readings in 5-degree increments.
The recorded temperature parameters and the corresponding resistance values must be compared with the parameter table for a specific car model. Slight deviations from the specified values are possible.
Without thermometer
This method differs little from the previous one, but in it it is enough to take readings once. To diagnose a sensor without a thermometer, you need to:
- Dip it into a container of water and bring it to a boil.
- Connect the multimeter probes to the output contacts of the sensor and look at the readings.
- If the sensor is working properly, the tester will show a resistance of 176 Ohms in boiling water.
Checking with a tester
Some cars have two antifreeze temperature sensors. Both devices cannot fail at once, so you need to check each of them alternately.
Checking the coolant temperature sensor with a multimeter
- Using an ohmmeter or multimeter, measure the resistance value of the coolant temperature meter by connecting one of the meter leads to one of the terminals on the meter's electrical connector and the other lead to the other terminal on the ECT electrical connector.
On vehicles with older single wire meters, connect the meter leads to the connector terminal and the gauge body (ground) to obtain a reading.
- Check your vehicle's repair manual for the correct resistance value for your ECT. However, not all service manuals have this information.
Most meters of this type have a resistance value of 3000 ohms or more at about 55 °F (13 °C). You can try searching online for a table of resistance values for your specific ECT if you know the brand.
However, if you find resistance values for your specific ECT sensor, continue with these tests anyway; the meter's behavior and temperature readings can give you a clue about its operating condition.
- Record the resistance.
Now you are going to do another test
- This time, start the engine and let it idle.
- Place the transmission in neutral and set the parking brakes.
- Wait about a minute or two and measure the engine temperature and resistance of the meter as you did before.
- Write down this new pair of values.
- With the engine running, wait about one to two minutes and repeat this procedure again.
- Do another pair of readings after a minute or two again, always noting the meanings.
- Then turn off the engine.
Check without removing from the car
If the temperature sensor has stopped showing the temperature of a car engine or is doing it incorrectly, there is no need to remove this component from the vehicle at all. All necessary operations can be performed without dismantling using a diagnostic device or a special tester.
To do testing directly on the car, you need to disconnect the chip from the thermistor. After this, you will have access to all outputs.
- If the vehicle drive is hot, you should work carefully.
- Otherwise, the risk of getting burned and melting a modern multimeter is very high!
Then, using a tuned multimeter set to the magnetoresistance detection mode, you need to measure this value between the metal terminals.
Note! Such meters do not break down often, which is good news. But cases when the temperature sensor lies are not so rare. Therefore, you can completely compare the temperature readings on the panel with the obtained resistance value. If a spare part produces erroneous data, it is better to remove this component and perform testing using a water heating device and a thermometer.
Previously
To check this component of the car, you will first need to start the car and let the car engine warm up a little to about ninety-five degrees.
After this, you need to disconnect the connector from the temperature sensor and observe the behavior of the arrow on the panel:
- If it goes down, then the fuse needs to be checked. If it is in perfect order, and when the steel terminal is shorted to ground, the arrow jumps, then the problem is in the resistor.
- If the arrow has not moved from its place, then a check of the meter or the electrical circuit that goes to the device is required.
Multimeter
If the part does not indicate the degree of heat of the car engine, it is important to know how to properly check the temperature sensor with a multimeter. This is the simplest testing method. To use it you need:
- Check the voltage and turn on the multifunction device mode for measuring voltage.
- Disconnect the connector from the temperature sensor.
- Activate the ignition.
- Connect the positive wire of the device to the connector with a plus sign, and short the second terminal of the device to the drive.
The tester should show from 4.8 to 5.2 V.
To test a part you need to:
- Disconnect the leads from the DTOZH.
- Enable a special mode for determining magnetoresistance on the electronic device.
- Measure all parameters between different terminals.
- Compare them with indicators from a special table.
If the temperature sensor constantly gives erroneous information, it will need to be removed for a more thorough check and then replaced with a new one.
The use of this multifunctional device greatly simplifies diagnostics, which is why this method is very popular and popular today. Buying an electronic multimeter nowadays will not be difficult. You can find this device in almost any car store. And this cannot but rejoice.
Diagnostic device
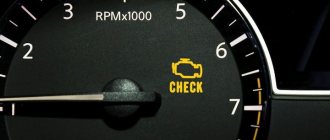
If the Check Engine sign suddenly starts to glow constantly on the dashboard, then it’s time for a new full scan of the error code. In this situation, the most effective and efficient way is testing with an ODB2 scanner. For example, a scanner model Scan Tool Pro.
- If there are no signs of damage to the resistor during visual inspection, but testing shows the presence of one of its errors, then the meter is still faulty. To diagnose a thermistor, you do not need to test it with a device. The scanner will easily show in real time the functioning of the vehicle’s thermistors.
- If the thermistor's performance is quite normal, the scanner will show what degree of heat the resistor produces.
The device operates on a 32-bit chip, so it can test both the car’s engine and its various other components. In addition, it allows you to measure the operation of all vehicle systems over specific time periods and store valuable information. The scanner is currently compatible with virtually all known diagnostic programs. At the same time, it supports different formats of communication and Internet access.
Replacing the coolant temperature sensor
You can only replace a failed DTOZ with a similar device.
Required Tools
To complete the task you will need:
- container for collecting waste liquid;
- wrench 19;
- sealant.
Step-by-step instruction
Dismantling and installing the controller is performed as follows:
- Some of the coolant must be drained from the radiator; this will be required to dismantle the sensor.
- Disconnect the connected wires from the device.
- The controller itself is disabled using a 19mm wrench.
- Run device diagnostics if necessary. If you are changing the device, then before installation it is necessary to treat its threads with sealant.
- Screw the new controller into place and connect the wiring to it.
- Fill the cooling system with previously drained antifreeze. Make sure that there is no refrigerant leaking through the unit.
Signs of trouble
Typical symptoms of DTOZ failure are as follows:
- Turning on the fan when the engine is not warmed up;
- A warm engine does not start well;
- Unstable engine speed at idle;
- Unstable engine operation (triggering, lack of traction)
- Gasoline consumption increases;
If the DTUOZH fails, the engine runs stably, without interruptions, but on the dashboard you see that the liquid does not heat up or does not cool down at all. These are all signs of a faulty DTOZH on a VAZ 2114.
Possible reasons
The most common cause of such problems for DTOZH and DTUOZH are:
- Oxidation of terminals (contacts);
- Broken power wire;
- Damage to the sensor itself;
Recommendations for care and maintenance of sensors
- Strictly adhere to vehicle maintenance schedules;
- Buy parts with original catalog numbers. The exact data is indicated in the instruction manual for your technical device;
- Carry out preventative maintenance, install consumables and spare parts at certified service stations. Relevant while the car is under factory warranty. There are frequent cases of warranty cancellation due to third-party intervention.
- When the first signs of engine malfunction appear, contact a service station.