Lamp functions
Dashboard-mounted lighting devices serve two purposes. Some of the light bulbs provide the actual illumination of the dials. This allows the person sitting behind the wheel to freely take readings from them, even when it is completely dark outside.
Other products are control. They are indicators that confirm the switching on of certain devices (headlights, headlights, etc.) or indicate problems. Making the panel more aesthetically pleasing is just an additional function.
How to remove the tidy
On a VAZ 2110, removing the dashboard from the dashboard is not difficult, and the only tools you need are a Phillips screwdriver and pliers or a wrench. With their help, we will remove the positive terminal from the battery before starting work. So, lower the steering wheel and unscrew the 4 screws that secure the decorative trim.
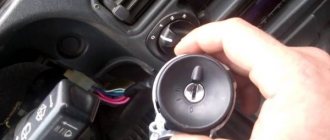
Releasing the decorative trim on the VAZ 2110
After this, we pull the cover towards ourselves, and it can be easily removed, hanging on the wires of the switches. To prevent the cover from getting in the way, the wires from the switches can be disconnected - they are on the connectors.
Disconnecting wires from switches and removing buttons located on the decorative trim
Before disconnecting the connectors, do not forget to label them so as not to mix them up during assembly!
So, now we have a tidy in front of us, which is held in place by two screws located on the sides.
The instrument panel is secured with two screws
We unscrew them and carefully remove the panel, not forgetting that it is also on the wires. In principle, the wires supplying the instrument console in the VAZ do not need to be disconnected, since their length is sufficient to replace the lamps.
The ten have long enough wires, they allow you to replace light bulbs without disconnecting the connectors
Which bulbs are suitable for the 2114th model
In general, the current legislation provides for quite serious sanctions against motorists who dare to make any changes to the design of the vehicle at their own discretion. In accordance with the rules, they are obliged to replace components and assemblies only with analogues of those chosen by the manufacturer. Failure to comply with this requirement provides grounds for punishment of the driver.
Fortunately, this standard applies to the dashboard purely formally. The owner only needs to ensure proper illumination intensity and proper operation of the display.
Thus, more and more owners are installing LED lamps on their 2114 Ladas instead of the standard halogen ones. This choice is easy to justify. In particular, they:
- consume approximately 8-9 times less electricity, which means the load on the on-board power system is reduced;
- last 5-10 times longer;
- give brighter light;
- practically do not heat up.
Finally, the dashboard looks much more attractive, because the light bulbs can be of different colors - blue, red, green, etc.
The problem is that LEDs cost about twice as much, but this disadvantage is more than compensated by their longer lifespan. In addition, LED lamps are becoming cheaper every year.
The backlight of the Lada 2107 tidy does not work: the reason
The nodes should be checked.
- Fuse. The fuse link often fails or burns out due to moisture or condensation.
- Contact groups and wire blocks. Here the terminals often break off and the pads oxidize.
- Damage to the dashboard itself. Voltage surges can damage sensitive tracks, causing lighting failure.
On versions of the injector and carburetor type, the tidy is identical. The only difference here is the connection to the check engine lamp.
Why do light bulbs fail?
The main reason for the relatively rapid burnout is rather difficult operating conditions. Reduce resource:
- voltage fluctuations;
- vibration;
- overheating (in a closed space of the instrument panel this is normal).
In addition, filaments have a short service life of only 1500 hours.
In addition, lamps may stop working due to:
- wiring damage;
- destruction of board tracks;
- contact oxidation;
- blown fuses due to short circuit, etc.
For this reason, before replacing a light bulb in a Lada 2114, it is advisable to find out why it stopped working. Until the root cause is identified, the situation cannot be corrected.
How many lamps does the VAZ-2114 dashboard contain?
Now we will tell you how many lighting elements are installed on the dashboard of the VAZ model in question. This will allow you to estimate upcoming expenses and immediately purchase the required volume.
So, the instrument lighting is provided by 7 lamps. In addition, there are other indicators:
- left and right turn signals – 2 pcs.;
- emergency oil pressure – 1;
- handbrake activation – 1;
- battery charge – 1;
- alarm - 1;
- malfunction of the motor control system - 1;
- high beam - 1;
- brake fluid level – 1;
- external lighting – 1;
- fuel reserve – 1.
In total, the VAZ-2114 has a total of 18 units. Experts recommend that even when one incandescent light bulb has burned out, immediately change everything. This ensures that the operation does not have to be performed again in the near future.
Panel components
The electronic instrument panel is located on the dashboard of the car so that the driver can see all the icons and indicator lights. Thanks to tuning a car with an injector, using auto instruments (AP) has become more convenient. In order to effectively use information from the dashboard, every driver must know its composition, combination, purpose and layout of all buttons and indicators.
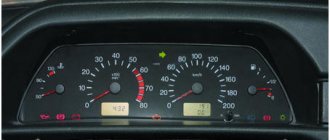
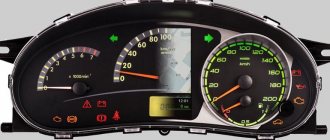
Dashboard of a VAZ 2114 car
The main elements that are located on the left side of the panel are:
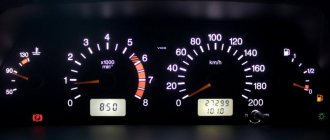
- Speedometer. The VAZ 2114 is equipped with an induction speedometer, which displays current speed readings on the display board, received from a sensor located in the gearbox. The instrument scale is divided into divisions of 10 km/h and shows speed from 0 to 200 km/h. The speedometer has an error of 5 km/h. Under the dial in the center there are two electronic inscriptions that reflect information about the car’s mileage: total and current.
- Tachometer. Next to the speedometer on the left is the tachometer. It transmits crankshaft revolutions in real time. It receives this data from the on-board computer. The numbers are indicated every 10 scale units. One division equals 5 units. The maximum possible value is 80 units. To obtain the number of crankshaft revolutions, you need to multiply the value on the tachometer by 100. For example, 45 units means that the crankshaft makes 4500 revolutions per minute. The range from 55 to 60 is shaded in red, warning that the engine is operating in difficult conditions and may break down at any time. Below the tachometer in the middle, the electronics display the ambient temperature and time.
- Coolant temperature gauge. On the left side of the tachometer, the reading of the coolant temperature sensor, located near the thermostat and cylinder head, is displayed. Digitization starts from 50, the division price is 20 degrees, the next number is 90 and the maximum value is 130 degrees. If the value is in the range from 105 to 130 degrees, then you need to stop moving, turn off the engine and let it cool, otherwise the engine may boil.
- Fuel level indicator in the gas tank. Located on the right side of the speedometer. Each of the numbers has its own designation: 0 - tank is empty; 1/2 - the tank is half full; 1-full tank (video author IZO)))LENTA).
At the top there is an electronic gas station icon, it means that the tank is completely filled. In the lower right corner, the same electronic icon lights up in orange if there are less than 6 liters of gasoline left in the tank.
The instrument panel is not complicated. If you want your car to be different from others, many people use tuning for this. With its help you can make your salon cozy and impressive. Most often, the instrument panel is subjected to tuning, the backlight is made brighter, and trims and parts are inserted.
Tuning the VAZ 2114 tidy
In order to tune the backlight and other parts of the panel, you need to follow simple steps:
- disassemble the panel;
- remove the shield;
- make tuning of the intended parts, lighting, insertion of additional light bulbs and parts;
- return the removed parts to their place.
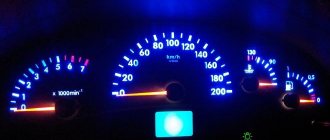
Tuning the backlight involves replacing the yellow indicators with bright LEDs.
Replacement - order
Having figured out how many lamps the dashboard contains, it won’t hurt to find out how to replace them on the 2114th model. The procedure itself is not very complicated, but extremely troublesome.
- First of all, you will need to disassemble the shield. The radio tape recorder, heater and ventilation control levers are removed from it.
- Then unscrew the screws holding the decorative panel trim. Before doing this, the steering wheel should be moved to the lowest possible position - this way it will not interfere.
- Find the screws - there are five of them, and they are closed with plugs. Carefully pry the latter with a knife and pull it towards you. After removing the screws, pull the VAZ-2114 panel towards you.
- Now you need to unscrew the two screws holding the instrument panel itself. This is done with a Phillips screwdriver.
- Afterwards, the panel is lowered and the opened terminals of the wire loops are disconnected. Then the element is freely taken out.
- Next, the damaged light bulb is pulled out - turn it 90 degrees in any direction until the protrusions on the socket fit into the grooves. Then all that remains is to remove the product from the base and put a new one in its place.
As noted above, so that the 2114 panel does not have to be disassembled again after some time, it is advisable to immediately replace all the lamps. This will also ensure an even glow of all elements.
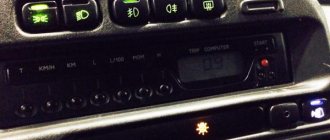
Identification of buttons
It is also important to know the designation of the buttons on the VAZ 2114 panel. On the instrument cluster on the right side there is a button (11), with which the time and temperature on the digital indicator are switched, and when pressed for 5 seconds or more, the current mileage is reset, if pressed this button on a stationary car.
In the central part of the dashboard are located in a row:
Buttons VAZ 2114
Double headlight switch. Button 1 turns on the dimensions, button 2 turns on the low beam;
Buttons on VAZ 2114
Key switch block. The first 1 turns on the front fog lights, the second 2 turns on the rear fog lights and the third 3 turns on the heated rear window.
Functionality check
After completing the replacement, install the panel inside the car, connect the connectors, but do not rush into final fixation - you still need to make sure that everything works properly.
To do this, turn on the ignition and see if the backlight turns on. Then check whether the indicator lights responsible for:
- hand brake;
- oil pressure;
- fault signal, etc.
Then test the turn signals, headlights and side lights. If everything is in order, then complete the panel assembly.
Bottom part
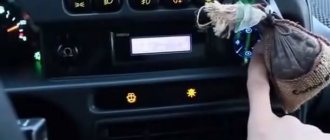
Let's look at the indicators at the bottom of the control panel. If they don’t light up, it means the machine is working normally, and when any of them lights up, this indicates a malfunction in certain components. Most often, this is a signal that repairs are needed, and the sooner the better. From left to right:
- The indicator on the far left at the bottom is the air damper light (if you have a carburetor engine);
- Icon in the form of an oil can. If this light comes on, it means there is insufficient oil pressure in the engine. An alarming signal. You need to stop, find the reason;
- A round icon with the letter P inside on the control panel indicates that you have the parking brake on, which, as you know, should be turned off when moving away;
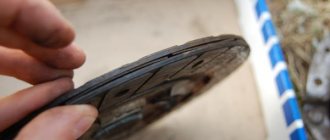
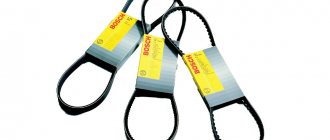
- Indicator of a fault related to the generator or battery (a symbolic image of the battery is shown on the indicator). Perhaps the battery is not charging from the generator, there is an open circuit, or the generator belt is loose or broken. In any case, your intervention and repairs are needed, otherwise troubles cannot be avoided;
- If the engine is running and the Check Engine indicator is on on the control panel, this is the most unpleasant thing for the driver, since it indicates serious malfunctions in the engine. In general, when this indicator lights up, it is recommended to stop driving and turn off the engine. Most likely it needs repairs;
- Typically there is a red triangle above the Check Engine. It lights up when the “hazard light” is on - an emergency signal sign;
- The headlight light indicates that the high beam is on. Designed to control headlights: when an oncoming car appears, do not forget to switch to low beam;
- A very important indication icon on the front panel (in a red circle) is a signal that there is not enough brake fluid. Perhaps it is leaking somewhere, which it is advisable to find out as soon as possible and, if necessary, carry out urgent repairs and replenish the level;
- The icon of a burning light is a control for turning on the dimensions;
- In addition to the indicated lights, the front control panel has time indicators (and a button for setting hours and minutes) as well as a display that shows the total and daily mileage. On the new panel, this display may be narrow.
Step-by-step instructions for replacing light bulbs in the dashboard of a VAZ-2114
- We release the decorative cover of the front panel. For this we need screwdrivers: a short Phillips and a flathead one. Lower the steering column to the lower position using the height adjustment lever to keep it out of the way. The photo shows the mounting locations for the casing:
- There are four screws on the bottom of the visor and above the steering column. Unscrew them with a short Phillips screwdriver.
- Using a flathead screwdriver, pry off the decorative cap to the right of the row of switches. There is another fastening screw under it.
- Also, remove the handles from the heater switch and damper control sliders by pulling them towards you.
- If you have a car radio, you will also have to remove it.
Unfortunately, complete dismantling is not possible. Arrows indicate locations for removal - Pull the front panel cover towards you. He must move. There is no need to remove it completely - there will be enough space to access the mounting screws on the sides of the instrument cluster.
Carry out your actions carefully - Unscrew the fastening screws with a long screwdriver. The combination will be released and you can tilt it towards yourself. Pull out the two blocks with wires. Don’t be afraid to mix them up - there is a color marking, and the asymmetrical shape of the connector will prevent you from connecting it incorrectly.
The arrow indicates the location of the cartridge handle - On the back cover of the instrument cluster there are cartridge handles. Arm yourself with small pliers. This will make it easier to unscrew them. To release the cartridge, half a turn counterclockwise is enough. You can safely take out all the cartridges - they are the same. Next, you can check the lamps with a tester and replace the burnt ones, or replace them all with LEDs at once. Try to ensure that they fit tightly in the cartridge, otherwise the contact will be unreliable.
- We reassemble in reverse order. We insert the cartridges into the seats so that the antennae fall into the grooves, carefully turn them with pliers until they stop. We connect both blocks to the connectors of the instrument cluster.
- Let's check if all the lamps are working:
- raise the handbrake and turn on the ignition: so let’s check the handbrake, generator, oil pressure and check lamps,
- turn on the hazard warning lights - check the warning lamp and direction indicator lamps,
- pull the headlight switch lever towards you - temporarily turn on the high beams, check the warning lamp,
- turn on the dimensions - see if the scales are evenly illuminated, and if the warning lamp, if any, is on.
If everything works correctly, we fix the instrument cluster and the front panel casing, and replace the heater switch handles and damper controls.
Check the brightness and functionality of all devices
Congratulations, now the instrument lighting and warning lights are working properly, and you will always be aware of what is happening with the car. The overall aesthetics of the front panel will also improve - the evenly lit front panel looks beautiful.
The instrument panel on the VAZ-2114 is specially designed for the driver to control all data emanating from the engine, monitoring the fuel level, and other data.
Video with replacing light bulbs on the dashboard of a VAZ-2114:
The instrument panel should always be kept in good working order, because a non-working backlight can cause not only discomfort when moving in a car, but can also cause a simple error due to missing a problem with the warning lamp.
Therefore, as soon as you discover a non-working lamp on the instrument panel of the VAZ-2114, it should be changed immediately, and how to do this is described in detail below in our article.
Solution
The stores offer several options for light sources for replacing lamps in the instrument cluster:
- traditional incandescent lamps,
- LED in a plastic socket,
- SMD LED is a more expensive and reliable option, a super-bright diode.
The choice will always depend on financial capabilities and lighting preferences.
The number of backlight and control lamps is up to 19 pieces. It varies slightly depending on the design of the instrument cluster and the modification of the vehicle. Many car owners choose LEDs due to lower energy consumption and longer service life. This backlight is brighter and gives an interesting bluish color instead of the standard green. But due to the design of the diode, the brightness control of the instrument illumination will not work, always turning it on at full power. On a long road trip at night, this can be distracting and irritating to the eyes. But in any case, the choice of light sources is yours.
If you are going to install LEDs, it is recommended to first check them with a tester for the absence of a short circuit.
Reasons for failure of dashboard lights
Old burnt out dashboard light bulb in socket
There may be several reasons why the instrument panel lamps are out of order:
- The incandescent lamps burned out, or in the case of LED analogues, the tracks stopped working.
- A malfunction has occurred in the circuit of electrical appliances (a break has occurred or the contacts have oxidized - approx.).
- The fuse box has failed.
- Damage has occurred on the instrument panel contact board.
- There is a short circuit to ground.
In order to understand this problem more closely, it is necessary to dismantle the instrument panel.
Brief summary of the work done
As you can see, this work is not labor-intensive and does not require large financial investments or effort. Therefore, you should not rush to contact a car service center, where you will most likely be offered to replace the entire dashboard , which will cost several hundred rubles, not one thousand. Now you know what to do if suddenly the light bulbs on the panel fail. We wish you good luck and a safe journey!
Bright backlight
But quite often, VAZ 2114 owners discover that the instrument panel lights do not light up. If such a situation occurs, appropriate action should be taken immediately to eliminate it.
Replacing light bulbs with LEDs in the instrument panel
I decided to change the light bulbs in the instrument panel due to the fact that they began to burn out, since an alarm was connected to the dimensions. I decided to buy LED bulbs so I don’t have to climb anymore.
light bulb with socket
In the store I decided to buy regular white ones; there were red and green ones to choose from. I also bought bases for them, since in my device, and it is from AP. The bulbs are soldered to the bases. If you need to change all the light bulbs, you need 12 pieces, if only for the backlight, then 7... I decided not to save money and change everything.
Disassembly began by removing the side panels. 3 screws on the left
left panel
and 5 screws on the right
right panel
Then you unscrew the fastening of the front panel to the rigidity using a self-tapping screw on each side.
left
on right
Then remove the heater control lever handles. prying the upper arms from above with a screwdriver
levers
and the bottom one is below.
Then remove it by pulling it towards you and prying the fan switch lever with a screwdriver.
fan lever
Then we take out the ashtray so it doesn’t rattle and stick out the radio, my wires turned out to be long, I didn’t have to disconnect anything except the antenna.
radio tape recorder
After this, remove the plug in the upper left part of the front panel and unscrew the screw
top panel
And now all that remains is to unscrew the 4 screws in the mount in front of the instrument panel. 2 on top are bigger
up
and 2 smallest ones below right and left of the steering wheel
to the left of the steering wheel
After this, the panel is completely unscrewed, we slightly pull it towards ourselves and turn it to the right, freeing the instrument panel.
front panel
Next, unscrew the instrument panel itself. it is secured with two screws.
on right
left
Having unscrewed it, we freely pull out the panel and can begin replacing the light bulbs. It is better to do this with pliers.
panel
The backlight lamps are marked in red, and the signal lamps are marked in blue.
rear instrument panel
Reassemble in reverse order. During this work, no difficulties arose; everything fell into place. The result was a good result... The backlight turned pale blue.
finish
Procedure for installing new light bulbs
- If there are faults in a particular lamp, the first step is to unscrew the non-working socket where it was located.
- Unscrew it counterclockwise, being careful.
We carefully remove the socket with the light bulb.
The LED light bulb is ready for installation.
Please note that the shape of LED lamps is square, and since it differs from ordinary light bulbs, the excess simply needs to be sanded off.
- After all the new lamps are installed in place, we check their functionality by connecting the wire block to the instrument panel without first fixing it.
- When everything is checked and working, you can reassemble everything in reverse order, remembering to tighten each bolt securely.
Reasons for failure of dashboard lights
The dashboard lighting performs several important functions in parallel:
- control. The lamps light up when failures or malfunctions of individual components occur;
- informational. Notifies the driver in real time about the status of important vehicle systems;
- decorative In a dark interior, beautiful lighting on the instrument panel decorates and enlivens the front part of the cabin.
The main reason for the failure of light bulbs in the instrument panel is difficult operating conditions - heating, vibration, power surges. This significantly reduces the life of the lamps and causes a lot of problems:
- burnout of filaments in halogen devices, burnout of current-carrying paths in LED lamps;
- broken wires or the appearance of an oxide film on the contacts;
- problems with the fuse box or contact board;
- somewhere shorted to ground.
Before you try to change the lamps, you should accurately determine the cause of the problems that have arisen, otherwise you will not be able to get the expected result. It is important to know the condition of the fuses and the condition of the wires. The insulation on them often frays and begins to short to ground. It is necessary to inspect the wiring and replace problematic connections. In addition, you need to clean the contacts. The terminals oxidize and the ability to conduct current decreases. This applies not only to Ladas; such danger is a common “disease” of most cars.
Why lamps burn out or stop working: causes and consequences
The backlight operating conditions are not ideal: shaking, temperature changes, possible power surges in the on-board network, and so on. When driving, you must turn on low beam headlights. Along with it, the instrument lighting also turns on. This can shorten the life of the lamps, and over time, not the entire panel is illuminated evenly.
The main danger of lamps burning out in the instrument cluster is that some of them are control lamps. In this case, you may not know about the failure of individual machine components. And uneven illumination looks ugly.
How to choose lamps
According to current rules, tampering with a car's structure is punishable by a fine or even deprivation of a license. Therefore, only an equivalent replacement with the same lamps used by the manufacturer is considered acceptable. However, the attitude of traffic police officers towards the dashboard lighting is more loyal. This is explained by the absence of danger for drivers of oncoming cars.
Most car owners use LED analogues instead of conventional incandescent lamps. This choice is explained by the significant advantages of LED devices compared to traditional lamps:
- long service life;
- low power consumption that does not drain the battery;
- no heating that negatively affects plastic parts.
Attention! The only drawback can be considered the relatively high price, but since the appearance of LED lamps on the shelves, there has been a noticeable decrease in their cost. In addition, the range of LED lamps is wide and allows you to choose inexpensive units.
Be sure to check out:
The best lamps for Opel Astra h: manufacturers, markings, table of those used The best lamps for headlights VAZ 2114 High beam lamps Lada Priora: the best models and step-by-step replacement instructions Low beam lamps Chevrolet Lacetti: the best manufacturers, replacement and adjustment process
All lamps are selected according to the following parameters :
- cartridge type - 2W2;
- supply voltage - 12 V;
- power - 12 W.
Sometimes you have to change all the lamps. When purchasing, you need to know how many light bulbs are in the dashboard of a VAZ 2114.
For a complete replacement you will need to purchase:
| Purpose | Quantity |
| Panel lighting | 3 pcs. |
| Bottom row warning lights | 12 pcs. (usually not everyone is involved) |
| BSK (on-board control system) | 6 pcs. |
| Battery discharge indicator | 1 PC. |
Usually LEDs are initially installed in the BSK, since it comes as a separate unit. When purchasing replacement lamps, it is not necessary to purchase sockets; they remain operational for a longer period than the lamps themselves. A total of 8 light bulbs need to be replaced. They are the same; when purchasing, you should be guided by the type of cartridge, supply voltage and power.
Selection of light bulbs
Wiring ringing
Today the market offers a wide range of lamps that can be used for the dashboard of the VAZ 2114. Among the most well-proven devices, we note a few. Their name and cost are presented in the table.
| Manufacturer | Price |
| LED lamps Sho-Me SM-T5 (blue, white and red (Korea) | 80 rubles - pair |
| High Brightness SMD LED Module | 20 rubles |
| LED Sho-me SM-T5-cap-super (white) | 50 rubles |
| Osram and Philips halogen lamps | About 40-80 rubles per unit |
Replacement instructions
The procedure for replacing dashboard lamps is not particularly difficult. The only problem may be disassembly, which allows you to remove the backlight panel and get to the light bulbs. The difficulty is that the fastening screws are located at different points, and you need to know their location. Let's consider the process in order:
Required Tools
To replace the light bulbs in the dashboard you will need:
- a screwdriver with a cross blade;
- a flat-head screwdriver, preferably with a thin blade for unsnapping plugs and fasteners;
- pliers for dismantling cartridges;
- set of replacement lamps.
A small number of necessary tools makes the work convenient and fast. If you plan to make a small tuning - changing the color or brightness of the backlight, then additional devices will be required to remove the factory paint, dismantle the plastic filters and a solvent to clean the remaining paint layer on the back of the instrument panel.
Replacing the backlight
To obtain an even backlight, it is recommended, if possible, to change all the dashboard bulbs at once. Replacing one lamp can create a situation where after a week you will have to repeat the entire procedure in order to change another burnt out lamp. Therefore, experts recommend updating all the lighting at once. It is also advisable to replace incandescent lamps with LEDs - they are economical, have a wide range and provide a large selection of shade and brightness.
How to disassemble the dashboard
First of all, you need to remove the decorative trim from the radio. On the VAZ 2114, the dashboard is mechanically connected to this part, so you need to immediately disconnect it. After this, perform the following steps:
- Using a flathead and Phillips screwdriver, the decorative casing is disconnected. The steering column should be lowered as much as possible so that it does not interfere with the work. You will have to carefully snap off the decorative plugs and unscrew the 5 screws securing the casing. You also need to remove the handles from the sliders and the heater switch;
- After disconnecting the screws, the casing must be pulled towards you. You should act carefully; perhaps not all elements have been removed yet and they can be broken. You don’t have to completely remove the casing; there’s enough room to unscrew the mounting screws;
- To disconnect the dashboard you need a long Phillips screwdriver. Unscrew the screws, tilt the shield towards you and pull out the terminal blocks with connecting wires.
Important! After this, the panel will be completely freed and you can work with it freely.
Replacing backlight bulbs
To dismantle the cartridges, it is convenient to use small pliers. They grip the flat back. It is carefully turned half a turn counterclockwise, after which the assembly can be removed from the socket. In a similar way, all elements to be replaced are extracted. Then the lamps are removed and new copies are installed in their place. Insert the cartridges into the sockets and turn them half a turn clockwise to secure them. After this, it is recommended to connect the terminal blocks, apply operating voltage and check the functionality of the light bulbs until the casing is assembled.
The vehicle systems are checked:
- turn on the ignition and check the operation of the oil pressure, generator and check indicators. Raise the handbrake lever and see if the lamp lights up;
- trigger an alarm to check;
- switch the high and low beam of the headlights and determine whether the indication works;
- include dimensions.
If all elements of the lighting system are operating normally, reassemble the dashboard in the reverse order. This completes the process of replacing the VAZ 2114 dashboard bulbs.
Let's get started
First of all, we remove the decorative trim of the radio (since the dashboard and radio are connected to each other, you will have to disturb the music system too), which is held on by fasteners; here it is better to use a screwdriver, threading it under the trim.
The main condition of work is caution. You need to start detaching the cover from the bottom edge. When the bottom edge comes off, you need to pull it towards you a little. Now detach the top edge. Further:
- Disconnect the wire directed to the cigarette lighter.
- In the same way as we removed the cover from the radio, we remove it from the dashboard . Above the left and right edges we find two self-tapping screws. They need to be unscrewed. We unscrew the screws located at the top and bottom.
- We remove the trim with a little effort (since it is also held on by fasteners, so the decorative plate will have to be rocked a little).
- We disconnect all the wires: from the alarm system, from the clock, from the headlights and other things.
- panel itself , for which we unscrew the four screws on which it is held. In order not to damage the wires, it would be better to disconnect them on the one hand.
- Now the most important thing. We remove the sockets of the light bulbs that have stopped burning. To remove the cartridges, you need to turn them counterclockwise with a gentle movement. We replace the defective lamps with new ones, wrap them and install the entire structure in the reverse order of disassembly.
Main conclusions
The process of replacing the backlight takes some time. The whole difficulty of the procedure lies in dismantling the front panel. The following conditions must be met:
- free the casing from handles, sliders and other elements;
- remove the handle from the gear shift lever;
- push the panel towards you, unscrew the shield and disconnect the terminal blocks from it.
The remaining operations are simple, performed quickly and without surprises. It is impossible to make a mistake during reassembly; the blocks with wires are made different and cannot be mixed up. Express your thoughts about replacing light bulbs in the VAZ 2114 dashboard in the comments.
Sources
- svetilnik.info/avtomobilnyj-svet/zamena-lampochek-v-pribornoj-paneli-vaz-2114.html
- drive2.ru/l/3636448/
- kalina-2.ru/remont-vaz/skolko-lampochek-v-pribornoj-paneli-vaz-2114
- ladaprofi.ru/vaz-2114/skolko-vsego-lampochek-v-pribornoj-paneli-vaz-2114.html