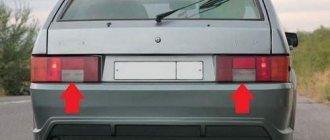
Hi all! Reversing with non-working lights, especially at night, can be fatal for the driver of a faulty car and the cars moving behind. You need to understand that if the reverse light is not on, this is a serious problem that needs to be fixed.
The only question is to find the reason for such a situation. If the car's reverse light suddenly stops working, it is recommended to immediately begin diagnostics.
There are several potential problems. Once you find out exactly why the light does not turn on, you can take appropriate measures to eliminate the problem.
Possible reasons
If the reverse lamps do not turn on when shifting into reverse gear, whether it is manual or automatic, you need to look for the reason.
The light must be on. This will not only result in a fine, but can also lead to a serious accident or accident.
- Sensor malfunction
. It is also a reverse switch, limit switch or frog. This controller is quite reliable and durable. But still, the possibility of its breakdown cannot be ruled out. Especially if the car was hit from behind, the headlight was broken and the lights were changed; - Burnt out light bulb
. Or maybe everything is outrageously banal. Over time, the light bulb has used up its resource, and therefore no longer works. It will have to be replaced; - Fuse
. Also, the signal may disappear if the sensor responsible for these lights burns out. This is a fuse link that burns out when the permissible voltage is exceeded. Since this fuse is responsible for several devices at once in most cars, in parallel with the reverse gear, other lamps, dashboard lights, etc. may not light; - Open circuit
. Here pins can break off, wires can fray, and more; - Oxides and corrosion
. Formed in places where the contacts of the circuit leading to the rear lights are connected; - Ground contact
. If the ground is bad, reverse gear may not function. This is also one of the reasons why the brake lights on a car do not light up.
Unlike the situation when the lamp is constantly on, there are many more potential causes.
But still, the most common problem is the failure of the reverse switch. It is also called a frog.
Fuse and relay diagram for VAZ 2107 old model. Video
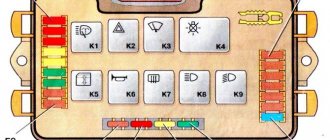
The old-style fuse and relay box includes 17 fuses mounted on the board using spring contacts and 6 electromagnetic relays.
The block has two printed circuit boards mounted parallel to each other and connected by jumpers. It is also connected to the car’s network through detachable connections made in different colors for proper docking. The photo below shows a diagram of the location of power supply control elements and VAZ 2107 relays.
Photo of old VAZ 2107 fuse box
The body is made of plastic; there is a cover on top with the location of the elements on the block and their purpose in the form of images. The table below shows the decoding and pinout with the assignment of fuses and relays of the VAZ 2107 car.
Table decoding the fuse and relay block of the VAZ 2107:
| Fuse and relay number (rated current*) | Purpose of fuses and relays VAZ 2107 |
| F1 (8A/10A) | is responsible for the operation of the rear lights, or more precisely, for the light that turns on when the gearbox shifts into reverse. It is also responsible for the operation of the electric motor of the stove (heater), the rear window heating relay, also called the winding. In a VAZ 21057 car, this relay is responsible for the electric motor of the rear window washer. |
| F2 (8/10A) | Designed for headlight and windshield cleaner relays, as well as wipers of the VAZ 2107. |
| F3/4 (8A/10A) | is a backup fuse |
| F5 (16A/20A) | is responsible for the element (heater) of the rear window and, accordingly, for its relay, and all contacts of this unit. |
| F6 (8A/10A) | cigarette lighter in a VAZ 2107 car, as well as a socket (plug) for a lamp. |
| F7 (16A/20A) | fuse for the engine cooling fan, its engine, as well as the sound signal of the VAZ 2107 |
| F8 (8A/10A) | “Hazard signal”, as well as a breaker for direction indicators and hazard warning lights (in hazard warning mode) |
| F9 (8A/10A) | "Fog lights". Generator voltage regulator G-222 (on some vehicles) |
| F10 (8A/10A) | Dashboard. Parking brake, carburetor solenoid valve, voltmeter, fuel level, brake fluid level, oil pressure. "Turn signals." Battery charge. |
| F11 (8A/10A) | Stop signals. Interior lighting. Brake lamps. |
| F12 (8A/10A) | Headlight wiper relay. High beam (right headlight). |
| F13 (8A/10A) | High beam (left headlight) and high beam indicator lamp |
| F14 (8A/10A) | Engine compartment lamp. License plate lighting. Side light (left headlight and right rear light). |
| F15 (8A/10A) | Glove compartment lamp. Instrument lamp. Cigarette lighter lighting. Side light (right headlight and left rear light). |
| F16 (8A/10A) | Headlight cleaner relay. Low beam (right headlight). |
| F17 (8A/10A) | Low beam (left headlight) |
| * The denominator is the value for pin fuses | |
Relay VAZ 2107
In every modern car, such an important element as a relay is necessary to reduce the incoming current in the circuit when the car engine starts.
Relays with designations such as R1, R2, R3 are necessary for heated rear window. Also, relay R2 turns on the high beam of the car, and R3 turns on the low beam.
You can see empty connectors in the relay block. The first connector is responsible for the operation of the headlight washer, and the second for the sound signal. The third empty connector is needed for the fan cooling the VAZ 2107 engine. The fourth block is used as a spare option; blown fuses can be installed in its place.
Video review of the old VAZ 2107 fuse and relay box:
Repair and maintenance of such an installation structure is very difficult and inconvenient. If a track on the board is shorted or broken, not everyone will be able to repair the device.
Location
The location of the switch or frog largely depends not on the make and model of the car, but on the transmission with which the vehicle is equipped.
If it is a manual transmission, then the switch will be installed directly on the gearbox housing. When reverse gear is engaged, the switch button is pressed, the frog contacts are bridged, and current flows to the rear lights.
As for automatic transmissions, instead of a standard limit switch (frog), a selector position sensor is used. Depending on the change in the position of the automatic transmission handle, the corresponding signal is transmitted to the power unit control unit, which transmits it to the unit that controls the light.
How to replace reverse lights?
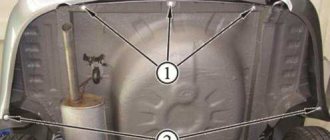
Replacing lamps in rear lighting depends on the type of car. For example, on a Lada Kalina with a station wagon, you need to unscrew 2 bolts holding the lamp in the opening of the tailgate. Then the housing is forcefully removed from the mounting socket (the design provides additional plastic clamps) and the cartridge is removed along with the wiring. On cars with a sedan body, to remove the courtesy light, you need to fold back the flap on the trunk trim and unscrew the fastening nuts with a long-head wrench.
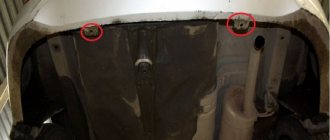
On a VAZ-2105 or 2107, the rear light is covered with a plastic cover located in the luggage compartment. To dismantle the casing, you need to unscrew the nuts and then remove the printed circuit board with the lamps from the lampshade. The faulty element is removed from the socket for replacement, and at the same time the condition of the tracks and contacts is visually checked. Detected oxides must be removed.
On the Kia Rio sedan, you need to remove the handle on the trunk lid, and then partially dismantle the trim, which is attached to the pistons. After bending the casing, access to the flashlight opens; to remove the cartridge, you need to turn the element counterclockwise. The lamp is removed from the socket by the bulb (no thread is provided); the lamp body is marked with a marking indicating the type and power of the lamp.
Checking the functionality of the sensor
Replacing the fuse is not difficult. But checking the condition of all wiring, ringing it and replacing it if necessary is a much more difficult task.
If we talk about restoring the functionality of the reverse lamps with our own hands, then we mainly have to deal with the switch.
To check it you need to do the following:
- remove the rear lamp switch chip;
- turn on the ignition;
- Using a piece of wiring, close the contacts of the sensor and the reverse gear to each other.
If at the same time the lamp lights up, then the reason lies directly in the limit switch.
In this situation, the simplest and most logical solution would be to replace a completely faulty sensor. Indeed, on many cars, replacing it is impractical, too complicated and virtually useless. It is not always possible to restore the functionality of the device. Although there are a number of examples when the sensor was simply disassembled, the contacts were cleaned, and everything returned to normal operation.
It is very difficult to say how long the restored switch will work. This could be for many years, or just a few days.
If everything is fine with the frog, then you will have to ring the circuit and look for the area where the voltage disappears. For these purposes, you will need to use a test light or a multimeter. The task is not for beginners, since we are talking about electrical circuits and working with car electrical systems. Here, for many, it will be more profitable and safer to turn to specialized specialists.
Algorithm of actions when replacing a sensor
Changing it is not particularly difficult, but you need to do the following:
- To replace the car, you need to put it in a pit or drive it onto an overpass.
- If there is engine protection, it must be removed.
- You should first prepare some kind of container for the oil, since the moment the sensor is unscrewed, a certain part of the oil will leak out.
- Then you need to unscrew the wires that are connected to the sensor.
- The old sensor must be removed and a new device installed in its place.
- The oil that leaked out during the sensor replacement process must be added to the box.
- Next, the wires are connected. They must first be wiped dry to remove any oil that has got on them.
- Then you should start the car and check for light from the bulbs when reverse is engaged.
Such measures are one of the options for eliminating the problem in which the reverse lights of the VAZ 2110 do not light up.
VAZ 2107 fuse box: injector
In modern VAZ 2107 models with injection engines, there is also an additional block with fuses and relays, which is installed under the glove compartment in the car. Its main purpose is to control the activation of the electric fuel pump, electric fan, and also the main relay.
The figure below shows an additional block with relays and fuses for VAZ 2107 vehicles with injection engines.
Additional relay block VAZ 2107
Diagram of an additional relay and fuse block for VAZ 2107
Deciphering the diagram of the additional relay and fuse block VAZ 2107
- fuse protecting the power circuits of the main relay;
- main relay;
- fuse protecting the constant power supply circuit of the controller;
- a fuse protecting the electric fuel pump relay circuit;
- fuel pump relay;
- electric fan relay;
- diagnostic connector.
There are also a number of relays that are necessary to ensure the operation of the equipment:
- The brush drive relay is located under the dashboard.
- Starter relay, location to the right of the mudguard.
- Turn, ignition, alarm relays are located under the dashboard.
- The fog light fuse is installed next to the radio receiver under the plugs.
- The fuse for the headlight cleaner is located in the electrical wiring directly at the wiper drive.
For ease of maintenance and detection of failure of circuits in the electrical equipment of the car in case of malfunctions not related to the operation of fuses and relays, an electrical extended diagram of the operation of fuses and relays in a VAZ 2107 car is used, shown in the figure below (click on the picture to enlarge)
VAZ 2107 fuse box diagram Explanation of the fuse box diagram
Checking and replacing the VAZ 2107 relay
A very important role in the proper operation of the system is played by relays, which periodically perform operations to turn on or off the necessary functions in the car.
An electromagnetic relay consists of a coil, which is supplied with power through a circuit and making contacts.
To check the functionality of the relay or to replace it, you must perform a number of sequential operations:
- The ground wire in the car is disconnected from the battery.
- The relay can be easily pulled out by hand.
- A visual inspection of the relay contacts is carried out, the contacts are cleaned of oxidation, and the reliability of the pin fastenings of the contacts is checked.
- Checking the functionality of the relay is carried out by supplying 12V power to the relay winding using two pieces of wire.
- When power is supplied, the coil should operate and the contacts should close, which can be checked using a multimeter in vertebrae or resistance measurement mode.
- If the relay or its contacts do not work, the relay should be replaced with a new one. Since their repair is not provided.
The performance and technical condition of the car, electrical systems, comfort and safety depend on the proper operation of the fuse and relay box of the VAZ 2107 car.
That's all! If you didn't find what you were looking for, please leave your question in the comments. Thank you!
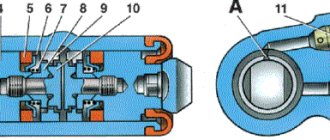
Electrical diagram of VAZ 2115 - 20 cars (left half):
1 – headlights; 2 – fog lights; 3 – air temperature sensor; 4 – electric motor of the engine cooling system fan; 5 – blocks connected to the wiring harness of the ignition system; 6 – engine compartment lamp switch; 7 – block for connection to a single-wire type audio signal; 8 – sound signal; 9 – washer fluid level sensor; 10 – front brake pad wear sensors; 11 – oil level sensor; 12 – generator; 13 – engine compartment lamp; 14 – coolant temperature indicator sensor; 15 – starter; 16 – battery; 17 – relay for turning on fog lights; 18 – coolant level sensor; 19 – brake fluid level sensor; 20 – reverse light switch; 21 – windshield wiper gearmotor; 22 – oil pressure warning lamp sensor; 23 – block for connecting to the rear window washer electric motor; 24 – windshield washer electric motor; 25 – instrument cluster; 26 – mounting block. Conventional numbering of plugs in blocks: A - block headlights; B — electric fuel pump block; C — blocks of the mounting block, ignition switch, windshield wiper gearmotor; D — interior lamp
Source
Burnt out lamps
One of the most common problems is a burnt out lamp. To check this, remove the light bulb from the holder and connect it to the battery terminals with a short wire. If the light comes on, then the fault must be looked for at another point in the electrical circuit.
First, check that the light bulb socket and electrical terminals are clean and bright. If there are any signs of corrosion, clean the socket with wet and dry paper, then reinstall the bulb and retest.
A burnt out light bulb is the most common cause
If the reverse light still does not come on, the fuse may have blown. Also, everything indicates a blown fuse if two reversing lights are constantly on. In this case, a replacement will be needed. Fortunately, getting to the fuse box where they are located will not be too difficult for you.
Diagram of the fuse and relay block of the VAZ 2107 of the new model. Video
In the new version, the fuse and relay block is made taking into account modern technologies in terms of reliability and quality:
- Cylindrical fuses have been replaced by fuse links with pin contacts, which are placed on the unit board in two rows.
- The load value is marked on the fuse body. The body of the fuse link is transparent and if the fuse contact burns out, the contact break will be visible.
- For maintenance and replacement, a special plastic puller is used, which is attached to the body of the mounting block. Or use regular pliers to remove the fuse from the block socket.
Replacing the fog light fuse
Proper operation of the fog lights is ensured by a fuse, which is located separately from the fuse box. Its location in a VAZ 2107 car is under the console central panel, next to the fog light button on the panel next to the radio.
To carry out work to check or replace the fog lamp circuit fuse, perform the following sequence of operations:
- Turn off the car's power;
- You need to use a screwdriver to disconnect the switches from the console in the place where the radio is installed, ensuring free access;
- Pull out the plastic insert on the console by squeezing it with a screwdriver to gain access to the fog lamp fuse housing.
- Remove the housing and check or replace the fuse.
- Reassemble all the elements and switches in the reverse order to make sure the fog lights are working.