Mechanical damage to the VAZ 2105 suspension occurs as a result of prolonged physical exertion. Not the least important role here is played by driving style, the quality of the road surface and the regularity of preventive inspections at service stations. Each of these points or their combination is the reason for lengthy and expensive repairs.
Components of driving safety
It is impossible to delay its implementation, otherwise traffic safety will be in question. The main task of the 2104 or model 05 suspension is to ensure the smooth running of the “iron horse”. At the moment of making a maneuver or turning, the suspension acts as a controller for the resulting roll. That is why, at the slightest malfunction in its operation, driving becomes difficult.
Drivers who are forced to travel on the highway for a long time need to pay special attention to the front suspension. The better the unit is adjusted, the more stable the 2105 or 04 behaves on the highway in any weather conditions. In order to monitor its technical condition, you need to know the main components:
- body spar;
- bracket securing the rod;
- lower arm axis;
- protective cover for the ball pin;
- adjusting nut;
- hub cap;
- race liner, bearing and lower ball joint pin;
- front wheel hub bearing;
- lower spring support cup;
- shock absorber securing bolt;
- spring suspension;
- seals and washers;
- adjusting nut;
- rubber bushing of the hinge.
The rear and front suspension of a vehicle is an important link between the body and the wheels. It is thanks to them that the wheel receives a driving moment, forcing the “iron horse” to move from one point to another.
DAAZ carburetor design
DAAZ carburetor design
Adjusting the VAZ 2105 carburetor is not difficult if the car owner knows its structure and is familiar with the location of the main components. The device of the DAAZ 1107010 model is a symbiosis of several main systems, subordinate to each other and operating sequentially.
- Fuel level maintenance system. Performs the function of a constant fuel level in a special chamber.
- Warm-up starting system. Necessary for reliable starting of a cold engine. Here a mixture highly enriched with liquid fuel is prepared.
- Idle system. Necessary to ensure idle operation at minimum crankshaft speed. Provides a uniform and stable supply of liquid fuel at low speeds. The main DS does not work.
- Accelerator pump system. Designed for short-term enrichment of the fuel-air mixture with fuel at the moment of sudden opening of the throttle valve (for example, during sudden acceleration of the car). Thanks to it, the engine runs evenly, without interruptions during acceleration.
- Fuel dosing system (main). Regulates fuel supply while the vehicle is moving and at different engine loads.
- Econostat system. This is an additional system for enriching the fuel mixture in case of full engine load.
All these systems are consistently supplied with fuel through a special device - fuel nozzles. The jets determine the amount of fuel required for mixing the fuel assemblies. That is, the nozzle is a kind of calibration mechanism that regulates the size of the liquid fuel supply channel.
Front suspension of VAZ 2105 Zhiguli
- Repair manuals
- Repair manual for VAZ 2105 (Zhiguli) 1980-1992.
- Front suspension
6.1.1 Front suspension Front suspension 1 – front wheel hub bearings; 2 – hub cap; 3 – adjusting nut; 4 – washer; 5 – steering knuckle axle; 6 – wheel hub; 7 – oil seal; 8 – brake disc; 9 – ball pin of the upper support; 10 – steering knuckle; 11 – protective cover... 6.1.2 Possible malfunctions, their causes and methods of elimination CAUSE REMEDY METHOD Noise and knocking in the suspension when the car is moving The shock absorbers are faulty Replace or repair the shock absorbers The bolts securing the stabilizer bar have become loose Tighten the bolts and nuts securing the bar; when rubber tires wear out...
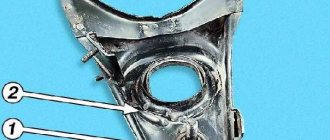
6.1.3 Determining the condition of the front suspension parts Checking the condition of the rubber-metal hinge of the front suspension arm 1 – rubber bushing of the hinge; 2 – outer bushing of the hinge; 3 – nut securing the suspension arm axis; 4 – suspension arm axis; 5 – thrust washer of the hinge; 6 – internal bushing of the hinge Measuring the gap in the top...
6.1.4 Checking and adjusting the wheel alignment angles Checking and adjusting the front wheel alignment angles is carried out on special stands in accordance with the instructions for the stand. Warning Checking the wheel alignment angles is mandatory if suspension parts are being replaced or repaired, which may result in a change in the alignment angles...
6.1.5 Checking and adjusting the clearance in the front wheel hub bearings Checking the axial clearance of the front wheel hub bearings using tool 02.7834.9505 1 – indicator; 2 – bolt; 3 – bracket; 4 – wheel hub PERFORMANCE ORDER 1. To check the clearance, lift the front part of the car, rest it on a stand and remove...
6.1.6 Replacing the grease in the front wheel hub bearings PERFORMANCE ORDER 1. Remove the decorative caps and loosen the wheel bolts. 2. Raise the front of the car and support it on stands, unscrew the bolts and remove the wheels. 3. Having bent the petals of the locking plates, remove the bolts securing the brake caliper; remove...
6.1.7 Wheel balancing Wheels are balanced on special stands according to the rules described in the instructions attached to the stands. After balancing, the maximum permissible imbalance of the wheel and tire assembly is 25.4 N mm (2600 g mm). This imbalance value corresponds to a weight of about 15 g. The wheel imbalance is eliminated...
6.1.8 Removing and installing the front suspension PERFORMANCE ORDER 1. Place the car on a lift or inspection ditch; holding the end of the rod by the flats with a wrench A.57070, disconnect the upper end of the shock absorber. Remove the front wheels. 2. Having straightened the locking plates, unscrew the bolts securing the caliper to the bracket. Take...
6.1.9 Dismantling and assembling suspension units Left wheel suspension unit, mounted on a workbench for disassembly 1 – nuts securing the steering knuckle arm, caliper mounting bracket and protective casing to the steering knuckle; 2 – caliper mounting bracket; 3 – brake disc protective cover Disconnecting the upper…
6.1.10. Checking technical condition and repairs
6.1.11 Suspension springs Checking the front suspension cross member 1 – hole on the cross member for the installation pins of the device; 2 – cross member; 3 – control bushings of the device; 4 – device A.78124/R; 5 – control holes for installing bolts on the cross member Check ORDER...
6.1.12 Replacing rubber-metal hinges of levers on a car Scheme for pressing out the hinge of the lower lever using the device 02.7823.9500 1 – screw; 2 – nut; 3 – glass; 4 – lower lever; 5 – hinge; 6 – lower arm axis Scheme of pressing the lower arm hinge using device 02.7823.9501 1 – nut; 2 – ring...
↓ Comments ↓
1. Vehicle operation
1.0 Vehicle operation 1.1. Starting the engine 1.2 Controlling the gearbox 1.3 Driving the vehicle 1.4 Braking and parking 1.5 Operating a new vehicle 1.6 Adjusting the ignition timing 1.7 Precautions when operating the vehicle 1.8 Caring for the body 1.9 Storing the vehicle
2. Car maintenance
2.0 Vehicle maintenance 2.1 Maintenance operations
3. General information
3.0 General data 3.1 Technical characteristics of vehicles 3.2. Controls 3.3. Control of interior ventilation and heating 3.4 Tightening torques for threaded connections 3.5 Tools for repair and maintenance 3.6 Used fuels, lubricants and operating fluids 3.7 Basic data for adjustments and monitoring
4. Engine
4.0 Engine 4.1 Possible malfunctions, their causes and methods of elimination 4.2 Removing and installing the engine 4.3 Disassembling the engine 4.4 Assembling the engine 4.5 Bench tests of the engine 4.6 Checking the engine on the car 4.7. Cylinder block 4.8. Pistons and connecting rods 4.9. Crankshaft and flywheel 4.10. Cylinder head and valve mechanism 4.11. Camshaft and its drive 4.12. Cooling system 4.13. Lubrication system 4.14. Power system 4.15. Carburetor 2105-1107010 4.16. Carburetor 21051-1107010
5. Transmission
5.0 Transmission 5.1. Clutch 5.2. Gearbox 5.3. Cardan transmission 5.4. Rear axle
6. Chassis
6.0 Chassis 6.1. Front suspension 6.2. Rear suspension 6.3. Shock absorbers
7. Steering
7.0 Steering 7.1 Possible malfunctions, their causes and methods of elimination 7.2. Inspection, check and adjustment of the steering 7.3. Steering gear 7.4 Steering gear rods and ball joints 7.5 Bracket for pendulum arm
8.0 Brakes 8.1 Possible malfunctions, their causes and methods of elimination 8.2. Checking and adjusting the brakes 8.3 Clutch and brake pedal bracket 8.4 Vacuum booster 8.5. Main cylinder 8.6. Front brakes 8.7. Rear brakes 8.8. Rear brake pressure regulator 8.9. Parking brake
9. Electrical equipment
9.0 Electrical equipment 9.1 Possible malfunctions, their causes and methods of elimination 9.2 Circuits protected by fuses 9.3. Battery 9.4. Generator 9.5. Starter 9.6. Ignition system 9.7. Lighting and light signaling 9.8. Sound signals 9.9. Windshield cleaner 9.11. Heater fan electric motor 9.12. Control devices 9.13. Carburetor pneumatic valve control system
10.0 Body 10.1 Possible malfunctions, their causes and methods of elimination 10.2. Doors 10.3. Hood, trunk lid, bumpers 10.4. Body glazing, windshield and headlight glass washers 10.5 Instrument panel 10.6. Seats 10.7. Heater 10.8. Body frame repair 10.9. Paint coatings 10.10. Body anti-corrosion protection
11. Car modifications
11.0 Vehicle modifications 11.1. Features of repair of VAZ-21051 and VAZ-21053 cars 11.2. Features of repair of VAZ-2104 and VAZ-21043 cars 11.3 VAZ-21044 cars with a fuel injection system 11.4. Central fuel injection system design
12. Electrical circuits
12.0 Electrical diagrams 12.1 Interactive electrical diagram of the VAZ-2105 car 12.2 Electrical diagram of the VAZ-2104 car 12.3 Electrical connection diagram of the injection system 12.4 Connection diagram of the instrument cluster 12.5 Connection diagram of the brake system warning lamps 12.6 Connection diagram of the headlight cleaners and washers 12.7 Connection diagram of the heater fan motor 12.8 Diagram inclusion windshield cleaner and washer 12.9 Diagram for switching on direction indicators and hazard warning lights
Will the repair and operating manual help when disassembling a car?
The VAZ 2104 repair and operation manual is an indispensable source of information about your car. Where else can you find out how much oil is poured into the VAZ 2104 engine and with what frequency and what oil is suitable for your “four”. The manual says how much luggage is loaded into the trunk of a VAZ 2104, what fuel consumption is used when driving in the city and on the highway, how much anti-freeze is poured into the windshield washer reservoir, and to what pressure the tires are inflated. This information is given in the section on operating the VAZ 2104. And the more accurately you follow the recommendations from this section, the less often you will have to refer to the repair section.
The VAZ 2104 wiring diagram contains a lot of information. The manual contains an electrical diagram indicating the color of the wires that lead to electricity consumers and the current ratings for which the fuses are designed. This information is indispensable when troubleshooting problems related to electrical repairs of a VAZ 2104 car.
It is important that the repair and operation manual that you purchased along with the car contains information specifically about your modification and configuration option of the VAZ 2104. Information obtained on the Internet often refers to a version of the VAZ 2104 that is different from yours and may not be suitable for you personally
If you rely on information obtained from the Internet, you are responsible for the result. If you find a typo in the official repair manual, you can submit a claim to the manufacturer of the VAZ 2104, and he will respond.
The official manual is important when disassembling and even more important when assembling the VAZ 2104
Carrying out technical inspection
The list of common technical malfunctions of the VAZ 2104 suspension opens with a violation of the steering function. As a result of mechanical damage or physical wear, maneuverability and lateral stability deteriorate. As the crack grows, the transmission of torque from the engine to the wheels deteriorates.
If we talk about the position of the wheels of the VAZ 2104 relative to the road surface, then here, too, an incorrectly adjusted suspension will negatively affect the quality of driving. To carry out initial diagnostics, you need to drive onto the overpass. An inspection is carried out using a flashlight. If the problem could not be detected, but external manifestations make themselves felt, you should seek qualified help at a service station. The suspension is inspected using high-precision equipment.
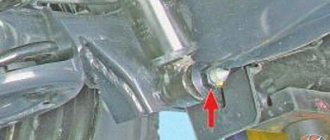
Often the front suspension works worse due to a broken upper control arm connection. In the place where it approaches the front body pillar, large and small cracks often form. The speed at which they appear depends on the intensity of loads on the chassis of the VAZ 2104. If you regularly visit a service station, a problem of this kind will not cause long-term downtime.
Deformation of the ball joint or individual elements of its fastening. Such a malfunction manifests itself with a characteristic knocking sound. Then the knocking will be supplemented by more complicated control of the car using the steering wheel. This all ends in an accident that arose as a result of the inability to control the position of the car in space.
Manufacturing defects in the lower ball joint. This may include the results of poor quality repairs. The problem does not manifest itself immediately. That is why it is quite difficult to take the necessary measures. Regular visits to a service station will help you get out of this situation.
Computer diagnostics allows you to see the microscopic structure of the material. As a result, defects are immediately visible. In this case, there is no point in delaying repairs, as has already been said.
Will the repair and operating manual help when disassembling a car?
The VAZ 2104 repair and operation manual is an indispensable source of information about your car. Where else can you find out how much oil is poured into the VAZ 2104 engine and with what frequency and what oil is suitable for your “four”. The manual says how much luggage is loaded into the trunk of a VAZ 2104, what fuel consumption is used when driving in the city and on the highway, how much anti-freeze is poured into the windshield washer reservoir, and to what pressure the tires are inflated. This information is given in the section on operating the VAZ 2104. And the more accurately you follow the recommendations from this section, the less often you will have to refer to the repair section.
The VAZ 2104 wiring diagram contains a lot of information. The manual contains an electrical diagram indicating the color of the wires that lead to electricity consumers and the current ratings for which the fuses are designed. This information is indispensable when troubleshooting problems related to electrical repairs of a VAZ 2104 car.
It is important that the repair and operation manual that you purchased along with the car contains information specifically about your modification and configuration option of the VAZ 2104. Information obtained on the Internet often refers to a version of the VAZ 2104 that is different from yours and may not be suitable for you personally
If you rely on information obtained from the Internet, you are responsible for the result. If you find a typo in the official repair manual, you can submit a claim to the manufacturer of the VAZ 2104, and he will respond.
The official manual is important when disassembling and even more important when assembling the VAZ 2104
Chassis
The front suspension is independent, on two wishbones on each side, with coil springs, telescopic shock absorbers and a stabilizer bar.
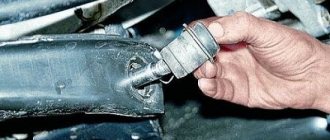
The upper 13 and lower 36 suspension arms are connected to the steering knuckle by 10 ball joints. The upper ball joint 14 is attached with three bolts to the upper suspension arm. The hinge body contains a bearing 12, the base of which is resin, and the friction surface is Teflon fabric, tightly fitting the spherical surface of the pin 9. The hinge parts are protected from contamination by a reinforced cover 11. The conical part of the pin fits into the conical hole of the steering knuckle and is secured with a self-locking nut.
The lower ball joint 45 is connected to the steering knuckle and suspension arm in a similar manner to the upper joint. In the hinge body 46 there is a pin 49 with a hemispherical head. A metal-ceramic bearing 48 with a hemispherical surface is mounted on the pin rod. An insert 47 made of oil-resistant rubber is inserted into the lower part of the housing with interference fit. A plastic layer (a mixture of nylon and molybdenum sulfide) is applied to the surface of the liner in contact with the hemisphere of the finger 49. There is a hole in the lower part of the hinge housing through which the hinge is lubricated. It is closed with a stopper.
The upper arm 13 of the suspension is connected by an axis 22 to the front pillar, and the lower arm 36, by means of an axis 35, is suspended by bolts 37 to the cross member 30 of the suspension, which is attached to the side members by brackets 29. Spacer 28 and adjusting 27 washers are installed between the axis of the lower arm and the cross member. By changing the number of washers 27, the longitudinal angle of inclination of the turning axis and the camber angle of the front wheels are adjusted. Both suspension arms are connected to the axles through rubber-metal suspension joints, ensuring a backlash-free connection of these parts. Such a hinge includes a rubber bushing 25, an outer 24 and an inner 23 metal bushing. A thrust washer 26 is installed between the hinge and the nut.
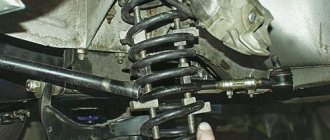
Spring 38 with its upper end rests through the support cup 21 with rubber gasket 20 on the front pillar of the body. The lower end of the spring rests on the support cup 44 of the lower arm. According to their length under a load of 435 kgf, the front suspension springs are sorted into groups A and B. Springs of group A are marked with yellow paint on the outside of the coils, and springs of group B are marked with green paint. The upward travel of the front wheel is limited by the stop of the upper lever 13 in the rubber buffer 15 installed in the bracket 16.
The lateral roll of the body when turning the car is reduced by a stabilizer bar made in the form of a rod 33 made of spring steel. The ends of the rod are attached to the brackets of the lower suspension arms with clips 39 through rubber pads 32. The rod itself is attached to the side members 34 by two brackets 31, in the holes of which rubber bushings are located. Shock absorbers 40 are attached to the lower suspension arms. The shock absorber rod passes through the hole in the support cup 17 and is secured with a nut. Rubber cushions 18 are installed between the shock absorber casing and the cup, as well as between the support washer 19 and the cup. The shock absorber is attached to the lower arm using a bracket 43 and bolts 41 and nuts 42.
Replacement of rear suspension rods on a VAZ 2105 car is carried out in case of mechanical damage from corrosion or deformation due to impacts. The rods are also removed to replace the rubber bushings. To carry out repair work, the vehicle must be driven onto an inspection pit, overpass or lifts. Prepare a standard set of tools, and then perform the following sequence of actions: Using a wrench […]
VAZ 2105 - replacing rear suspension shock absorbers
07 September 2013
Replacement of rear shock absorbers on a VAZ 2105 car is carried out in the event of a violation of its tightness, when oil begins to leak, any mechanical damage or due to temporary wear. Depending on the brand of shock absorbers installed, they are either replaced immediately with new ones, or their functionality is restored with a repair kit if they are dismountable. It is also removed to perform other work in which [...]
VAZ 2105 - replacing rear suspension springs
06 September 2013
The main reason for removing and subsequently replacing rear suspension springs on a VAZ 2105 car is their mechanical damage, subsidence, or when performing various repair work in which their presence will interfere, for example, when replacing rear shock absorbers. New springs vary in length, thereby grouping them into classes, so when purchasing, check which ones you need. […]
VAZ 2105 - replacing the front wheel hub bearing
August 11, 2013
If the adjustment cannot be made, then it is necessary to replace the front wheel hub bearing on a VAZ 2105. We also carry out replacement if a lubricant leak is detected from under the hub nut, which indicates a failure of the oil seal. It is also worth keeping in mind that bearings are replaced in pairs on each side. To carry out repair work, prepare a standard [...]
VAZ 2105 - adjusting the wheel bearing
August 10, 2013
Adjustment of the front wheel hub bearings on a VAZ 2105 car is carried out in the case of increased play in the bearing, when it wears out until it is completely replaced. A characteristic sign indicating the need for adjustment is the presence of play in the front wheels, which is felt when simply rocking the wheel. If the play is not eliminated in time, this will lead to rapid wear [...]
VAZ 2105 - replacing anti-roll bar bushings
August 10, 2013
During the operation of the car, natural wear and tear occurs on the elements of the anti-roll bar on the VAZ 2105, namely the rubber bushings and brackets. The rod itself also wears out under the bushings, which manifests itself in the form of wear. In addition, the stabilizer is replaced in case of deformation due to strong impacts. To carry out repair work to replace stabilizer elements and […]
VAZ 2105 - replacing the silent blocks of the upper suspension arm
August 10, 2013
Removing the upper front suspension arm on a VAZ 2105 car is performed either to replace worn silent blocks, arm fastening elements, or to completely replace it in case of serious mechanical damage. To carry out repair work, prepare a standard set of tools, and then perform the following sequence of actions: Set the car on the parking brake and, for prevention, place wooden […]
VAZ 2105 - replacing front suspension springs
Replacement of front suspension springs on a VAZ 2105 car is carried out in case of mechanical damage, subsidence or to replace rubber cushions. Dismantling also takes place when performing various repairs, in which their presence will interfere with the progress of its implementation. To perform repair work, prepare a standard set of tools and perform the following sequence of actions: Drive the car […]
VAZ 2105 - replacing front shock absorbers
Before replacing the front shock absorbers on a VAZ 2105, you need to check their performance. As a rule, in the event of a shock absorber failure, the springs take on the entire load and, as a result, the damping of body vibrations stops. To check, you need to swing the front side from the side being checked vertically with all your might, that is, with all your might [...]
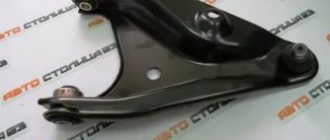
VAZ 2105 - replacing the silent blocks of the lower arm
During the operation of the car, it is periodically necessary to replace the silent blocks of the lower arm of the front suspension on a VAZ 2105 car. The main sign indicating the need for this repair is the presence of cracks on the surface of the blocks when the rubber has dried out or become very compressed. To carry out repair work, prepare a standard set of tools and perform the following sequence of actions: After the lever […]
VAZ 2105 - replacing the lower front suspension arm
Removing the lower front suspension arm on a VAZ 2105 car is performed either to completely replace it in case of any serious mechanical damage, chips or cracks, or to replace its fastening bolt, bushings and silent blocks. To carry out repair work, prepare a standard set of tools and perform the following sequence of actions: Secure the car with the parking brake and place it under the rear wheels […]
VAZ 2105 - replacing ball joints
A characteristic sign indicating the need to replace ball joints on a VAZ 2105 is the appearance of a dull metallic knock in the front part of the suspension. This knocking noise occurs due to increased play in the ball joint, which means replacement is required. It is recommended to carry out this repair on both sides, changing the upper and lower supports. To carry out the work, prepare a standard set of tools, so [...]
Theme Options
- Subscribe to this topic...
Search by topic
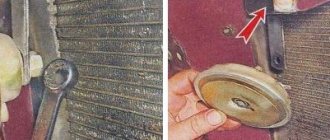
How to remove the coolant temperature gauge sensor?
Before removing the coolant sensor, remove the air filter, it will interfere with its unscrewing. And first of all, drain the antifreeze (antifreeze). We will merge as follows:
- The engine must be cool.
- You will need spanners for 8, 13, 17.
- Prepare a container for the coolant to drain!
- We remove the engine protection, use a wrench to unscrew the radiator mounts
- We set the heater to maximum, then open the heater tap and the cap of the expansion tank.
- We place the container under the radiator and SLOWLY (if you do it quickly, you will flood the generator) unscrew the drain plug.
- Let him run away for about 10 minutes.
- Let's move on to the engine itself: similarly, we place the container under it and unscrew the plug (under the ignition module) on the cylinder block.
- Let it flow again for 10 minutes.
Before closing all the plugs, wipe the neck of each of the holes!
We remember where the coolant temperature sensor is located on the VAZ 2114, and begin to remove it:
- found it, removed the protective rubber layer;
- we look at the body, look for the markings (on one of its 6-sided parts), remember it, so that later we can put everything in accordance with the system;
- unscrew the meter with the twenty-first key;
- install a new one.
How to change the temperature sensor on a VAZ 2114:
- bought a new one;
- Using the same key number 21, we turn the new one into its rightful place;
- remember the markings;
- add a little heat sealant to the threads just to be sure;
- pour coolant (antifreeze or antifreeze) back into the heating system (radiator) and the engine cylinder block.
If the VAZ 2114 coolant temperature sensor still does not work, then carefully check the following:
- Its quality may be defective (take it to the store and ask for a replacement), therefore, always keep the receipt for any spare parts purchase. parts!
- There may be a coolant leak, or perhaps you have splashed the generator after all.
- You just might not have refilled the antifreeze.
- The sensor is not screwed in tightly enough
We checked everything, but the meter still does not show the temperature of the VAZ 2114 engine. Then you should contact a service center. As with any vehicle, everything in the fourteenth is interconnected. The system may fail for a related reason: for example, when you removed the DTOZH, you decided to remove the ignition module so as not to interfere. The decision is correct, however, removing the module and putting it in its place is also an art.
The second point related to the temperature sensor: coolant level. It may be unstable, it may be that the meter for this level (also a sensor) has failed, and so on. Keep an eye on the antifreeze and save your nerves and your coolant temperature meter.
The service will replace the sensor for you and guarantee a high-quality replacement with proper high-quality assembly of all parts in their places. Naturally, you can buy a coolant temperature sensor on the spot, and the cost of replacement work will be twice the cost of the device.
How much a VAZ 2114 coolant temperature sensor costs should be judged based on geographic location: from 80 to 400 rubles in any store that sells auto parts. The pleasure, in principle, is not expensive, but, given the fact of fairly frequent breakdowns (the car stopped being produced in 2013, breakdowns are a natural process), it is still expensive. Therefore, you should not bother with the service, you need to try to figure out the situation yourself. Moreover, now the Internet is saturated with all sorts of useful links, forums, photographs, diagrams and even videos on replacing one or another auto part.
Despite its importance, DTOZH is a relatively simple sensor; its task is to monitor the condition of the coolant (coolant) in the cylinder block jacket. The temperature sensor promptly reports changes in coolant temperature, after which it transmits this information to the electronic control unit (ECU).
DTOZH is often confused with DTUOZH (coolant temperature gauge sensor)
The difference is that the second displays information on the instrument panel in order to keep the motorist informed about what is happening in the engine, essentially about the coolant temperature. While the DTOZH works with the ECU, which, after receiving information about the high coolant temperature, turns on the fan.
DTOZH is often confused with DTUOZH (coolant temperature gauge sensor). The difference is that the second displays information on the instrument panel in order to keep the motorist informed about what is happening in the engine, essentially about the coolant temperature. While the DTOZH works with the ECU, which, after receiving information about the high coolant temperature, turns on the fan.
VAZ 2105 - 07 All about suspension repair for a beginner
I created a separate topic so as not to search for a long time in different branches. The first problems with the VAZ 2105 began - the suspension. First question: I bought SAAZ front shock absorbers. I looked on the Internet how to “pump” them before installing them, but everywhere they say that you need to press the rod, push it in, and so on several times. Why is the rod already recessed on my shock absorbers? How then will they work? The rod pulls out with difficulty, but goes back in without much effort. I do not understand something? Tell me how it should be?
There is no need to pump anything... leave it as is.
Apparently the spring will create force in the opposite direction.))
That's how shock absorbers work. One way is easier, the other is heavier. When an impact occurs, the spring is compressed - the stroke is easier. The reverse stroke (decompression) is slowed down by a shock absorber.
Thank you, everything worked out, everything works. But the problem remained - a metallic squeak if you press on the wing and then slowly lift it with your hands. Done: 1. Replacement of balls and upper and lower 2. Check of spring position. 3. Replacement of all silent blocks. 4. Replacing shock absorbers. 5. Replacement of stabilizer bar bushings, but only external ones. At first the creaking disappeared, after 7 km. appeared again. It appears precisely when you start to move away slowly, or slow down at a slow speed. Speed bumps, like standing ones, no problem. The creaking is precisely metallic-clicking, as if iron is catching on iron. Auto – VAZ 2105 injector 2009 Mileage 38 thousand. What else could it be? This problem has been bothering me since winter.
Last edited by VladimirV72; 04/25/2013 at 19:46.
Is there lubrication in the balls? Check it out.
I wrote that the balls were replaced, and accordingly, lubricant was added to the new balls. The change was helped by a man who had been climbing under Zhiguli for 20 years. But he also cannot understand where this sound comes from.
don't be angry. It just really happens that the cat cried in the ball lubricants purchased for the classics.
Maybe the springs just didn't line up properly. shuffle. "2. Checking the position of the spring." -The point is not very clear.
I'm not mad at anyone at all, I'm just trying to understand. Thanks for answers. One more thing - there was a creaking of this nature even before replacing all of the above. Only in the last few days has the creaking become constant. After the replacement, it decreased, but remained as it was at the beginning - when you press on the wing, there is no squeak. You begin to slowly pull up, and almost at the end of the process, i.e. When you can’t raise your arms anymore, these clicks and creaks are heard. The same goes for the jack. When the wheel lifts off the surface, it squeaks at certain moments. At the moment the wheel is lowered and touches the ground, approximately in the middle of the process until the jack is completely released, these clicks occur again. The sound is as if a coiled spring is touching something. But the sound is loud. The spring alone did not reach the stop at the bottom by 1 cm. We turned it. Result "0". The sound comes from one side - the left wheel. Could something be creaking like that in the area where the stabilizer bar is attached, where it is attached to the body? It feels like the sound is coming from there. At least the vibration when clicking on it is felt.
Last edited by VladimirV72; 04/25/2013 at 20:06.
The chassis of a car is a complex of various mechanisms and components that allow the car not only to move on the surface, but also make this movement as comfortable and safe as possible for the driver. The rear-wheel drive “Seven” has a simple chassis design, but in case of damage or defects, the help of a specialist may be required.
DIY generator repair
A common type of repair of VAZ 2104 units is the elimination of breakdowns associated with the car’s generator. Malfunctions are divided into three groups.
- Incorrect belt tension adjustment.
- Belt failure.
- Damage to the generator itself.
The belt in the VAZ 2104 engine passes through 3 pulleys: the generator itself, the crankshaft and the coolant supply pump shaft. The correct degree of belt tension can be checked by measuring the free deflection of the belt between the crankshaft and water pump pulleys. The deflection is measured with the engine not running, in the middle of the belt span between the pulleys. The standard value is 10–12 mm. If the deflection is higher than normal, repairs are necessary: the belt is tightened.
You can do this kind of work yourself. To do this, loosen the nut securing the generator to the adjusting bar. Move it away from the engine crankcase until the belt tension is restored to normal.
To repair the generator yourself you will need:
- portable multimeter;
- three-jaw puller;
- a soft metal drift for pressing out the front and rear bearings;
- mandrel for pressing bearings;
- set of keys and screwdrivers.
During the repair, you will probably have to grind off the pierced ends of the bolts securing the front bearing cover with a grinder. You will need a fully equipped locksmith workshop. There are craftsmen who can rewind a burnt-out stator winding, but this is an activity for fans of VAZ 2104 repair. You will spend more money on the wire than on purchasing a used generator from disassembly. And you don’t need a new one: your car is “old,” well-worn. It's unlikely to survive the new generator.
Chassis of VAZ 2107
The chassis of the VAZ 2107 consists of two suspensions: on the front and rear axles. That is, each axis of the machine has its own set of mechanisms. An independent suspension is mounted on the front axle, and a dependent suspension is mounted on the rear axle, since the car is equipped with rear-wheel drive.
The operation of these components is designed to ensure a smooth and soft ride of the car . In addition, it is the suspension that is responsible for the integrity of the body while driving on uneven roads. Therefore, the performance of any element is very important - after all, the slightest inaccuracy in the function of any part can lead to serious damage.
Front suspension
The front suspension on the “seven” is completely independent. It includes:
- upper position lever;
- lower position lever;
- stabilizer unit responsible for the stability of the machine;
- small auxiliary parts.
Roughly speaking, it is the lever elements and the stabilizer that are the connecting passage between the wheel and the body shell. Each of the wheels of the front pair is mounted on a hub, which rotates easily and without friction on bearings. To ensure that the hub is held securely, a cap is placed on the outside of the wheel. However, this equipment allows the wheel to rotate only in two directions - forward and backward. Therefore, the front suspension necessarily includes both a ball joint and a steering knuckle, which help the wheel turn to the sides.
The ball joint in the design of the VAZ 2107 is responsible not only for turning, but also for minimizing vibration from the road. It is the ball that takes on all the impacts from the wheel falling into a hole or when hitting a road obstacle.
To prevent ground clearance from decreasing while driving, the suspension is equipped with a shock absorber. To adapt the “Seven” to Russian roads, the shock absorber is additionally equipped with a spring. The spring “winds” around the shock absorber, creating a single whole with it. The mechanism is installed strictly vertically to ensure maximum ground clearance in all driving conditions. This mechanism perfectly withstands all road troubles, while the body does not experience strong vibrations and shocks.
The front part of the chassis also includes a cross member. It is this part that connects all the suspension elements and brings them to work with the steering column.
The front suspension takes on the weight of the engine and therefore experiences increased loads. In this regard, its design is supplemented with more powerful springs and weighty rotating elements.
Rear suspension
All elements of the rear suspension on the VAZ 2107 are mounted to the rear axle of the car. Just like the front axle, it connects a pair of wheels and allows them to rotate and turn.
The wheels of the rear pair are mounted on hubs. However, a significant difference from the front suspension design is the absence of rotary rotating mechanisms (cam and support). The rear wheels of the car are driven and completely repeat the movements of the front wheels.
On the reverse side of each hub, a brake cable is connected to the wheel. It is through the cable that you can block (stop) the rear wheels by simply lifting the handbrake in the cabin towards you.
To protect against road impacts, the rear suspension is equipped with shock absorbers and separate springs. In this case, the shock absorbers do not stand straight vertically, as on the front part of the chassis, but are slightly inclined towards the rotation gearbox. However, the springs are strictly vertical.
Immediately under the springs on the inside of the axle there is a fastener for the longitudinal rod. A gearbox is located there, which ensures transmission of rotation from the gearbox to the rear wheels. To ensure that the gearbox maintains its functionality for as long as possible, AvtoVAZ designers assembled the rear suspension together with the driveshaft: while driving, they move synchronously.
On VAZ 2107 models produced after 2000, special shock-absorbing systems are installed instead of shock absorbers. This system includes springs, cups and hydraulic shock absorbers. Of course, modern equipment makes the “Seven” ride smoother even on the most congested roads.
Differences in the repair of carburetor and injection versions
From a repair point of view, the carburetor and injection versions of the VAZ 2104 engine differ in that:
- a carburetor engine is easier to repair in the field, but it breaks down more often;
- The VAZ 2104 injection engine fails less often, but it is more difficult to repair without the appropriate infrastructure.
The carburetor engine of the VAZ 2104 has a device that has been familiar to consumers of domestic automotive products since pre-war times. The air-fuel mixture is prepared in the carburetor, enters the engine cylinder, ignites from the spark plug and pushes the piston. If the VAZ 2104 engine stalls while driving, if the idle speed fluctuates, if the engine reacts sluggishly to pressing the accelerator pedal, there is only one recipe. I pulled the suction towards myself and off to repairs. Gasoline consumption will increase, but you will get to the nearest auto repair shop in a VAZ 2104 with a carburetor engine.
When an engine with multiport injection needs to be repaired, things are not so simple. The operating modes of the injection engine are controlled by the electronic control unit (ECU). To understand what exactly the fault is that requires repair, you need computer diagnostics, reading error codes from the computer. This is not the case on the road. Get the cable, ask for a trailer or call a tow truck.
Both versions of the VAZ 2104 engine have pros and cons. The trend in the global automobile industry is the transition from carburetor to injection engines. Our time is the time of the injector. So, compared to a carburetor engine, an injection engine has more advantages than disadvantages. And it's not just a matter of repairs.
How to check the chassis on the "seven"
Self-checking the chassis of a VAZ is a relatively simple and quick procedure. No special tools are required, but you need to drive the car onto an overpass or pit.
Checking the chassis involves a visual inspection, so you will need to take care of good quality lighting. During the inspection, it is necessary to carefully examine all suspension components, paying special attention to:
- the condition of all rubber elements - they should not be dry or cracked;
- the condition of the shock absorbers - there should be no traces of oil leakage;
- integrity of springs and levers;
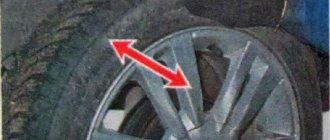
- presence/absence of play in ball joints.
This check is quite enough to find the problematic part in the chassis of the car.