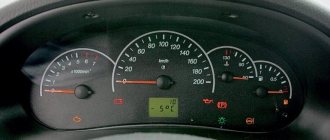
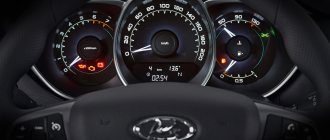
Detailed description of the Lada Vesta instrument cluster
- Tachometer. Shows the engine crankshaft speed (x1000 min-1). The presence of the tachometer needle in the red scale area warns of increased engine speed. To prevent damage to the engine, its maximum speed is limited by the electronic engine management system software. Above approximately 6200 min-1 the fuel supply will be limited. Possible interruptions in engine operation and jolts in the movement of the vehicle are not a malfunction. When the rotation speed decreases, the fuel supply will resume. Also, do not allow the engine to operate when starting and while driving at an engine speed below 800 min-1. (ATTENTION! It is prohibited to operate the engine in a dangerous mode (at engine crankshaft speeds above 6200 min-1 and below 800 min-1).
- "Seat belt" warning light
- Warning light "Airbag system"
- Brake failure indicator
- "Electric power steering" warning light
- "Engine fault" indicator
- Battery indicator
- ABS warning light
- Speedometer
- Warning light "Unclosed hood"
- Signal indicator "Hazard alarm"
- Signaling device "Unclosed doors"
- Right and left turn signal indicators
- LCD indicator with functions
- Index "Coolant temperature". Operating a vehicle with a faulty warning light is prohibited. When the operating temperature of the coolant is exceeded (more than 115 °C), the indicator lights up red constantly, and a short-term intermittent buzzer sounds. Do not allow the engine to operate in overheating mode. (WARNING: Do not operate the vehicle with an overheated engine. The vehicle must be taken to a dealer to determine and correct the cause of the engine overheating.)
- Fuel level indicator and indicator
- Signal indicator "Parking lights"
- Signal indicator "Low beam headlights"
- Signal indicator "High beam headlights"
- Signal indicator "Front fog lights"
- Signal indicator "Rear fog lights"
- "ESC" indicator
- "ESC OFF" indicator
Automotive Dashboard - allows the driver to receive information about the status of vehicle components. The more complete this information is, the more comfortable it will be to drive the machine. The dashboard of the Lada Vesta car works efficiently - all icons are in plain view of the driver. The entire instrument cluster is harmoniously combined and distinguishes Vesta from its predecessors. The latest cars have a new instrument panel (control), it has undergone improvements and changes - you will find its article number below. The instrument panel of the Lada Vesta sometimes breaks down; in the article you will find a checklist of 11 instrument malfunctions. The price of a standard Vesta car panel is on average 6 times lower than that of analogues, for example ferrum gf-890LV
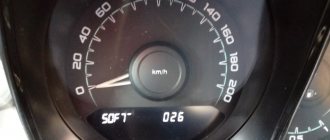
for Lada Vesta it costs from 32,000 rubles. Sometimes there is a need to remove the instrument panel in order, for example, to install an analogue one; in the article you will find disassembly instructions. On the first Vestas, the panel light turned on only when the headlights and low beams were on; later, dealers began flashing the Vesta panel with new firmware; of course, you can do this yourself. The factory version 1 of the dashboard firmware was numbered 026. Then version 038 came out, which was blinding at night, now there is a normal version 028, which lights up, less brightly, when the low beam is turned on. In the article you will find a checklist for flashing the device.
Benefits of fog lights
These headlights got their name because they are able to provide visibility in foggy conditions. This natural phenomenon minimizes visibility and can easily lead to an accident. It is also difficult for the driver to do without fog lights in rain, snow or blizzard conditions.
The design of such lighting devices as dimensions, low and high beams does not allow leveling the effect of fog. This fact remains evident even when installing the most powerful types of lamps (LED, xenon). The action of the above light devices does not help due to the fact that the rays collide with microscopic drops of H2O in the form of steam or snowflakes, and are reflected or scattered from this. As a result, a translucent veil is formed and significantly impairs visibility. In addition, a dazzling effect is created. Fog lights have trump cards and advantages over main lighting. After all, PTFs are located almost at ground level. But the fog condensate does not reach this level. Therefore, we get the effect that the headlights are directing light under a veil of fog. In addition, the upper beam received from the PTF light has a clear boundary horizontal level and does not allow reflection at all from drops of fog that fall into the driver’s field of vision.
Another advantage of fog lights: they have a wide lighting spectrum. Due to this, the side of the road remains illuminated even during fog, which makes driving on roads with sharp turns much easier. Also, these lighting devices allow drivers of oncoming vehicles to see the dimensions of the car during bad weather. The color of the flashlight does not affect the quality of dispersion, because during fog all colors from the spectrum are scattered similarly. Because of this, the fog appears white or gray in sunlight.
Due to the above advantages, we can conclude that the presence of fog lights is practically necessary for every car. Two main advantages from installing this lighting equipment:
- improving driving safety;
- exterior decoration.
The driver drives calmer and more confident, knowing that in case of bad weather visibility will not be limited. PTFs also help with night driving. They can be used as an additional lighting device. And the fact that fog lights decorate the exterior of a car is especially relevant in the case of the Lada Vesta. After all, with them the design of the sedan is solid and complete.
Most Vesta consumers, when purchasing a non-top version, tend to equip the car with foglights.
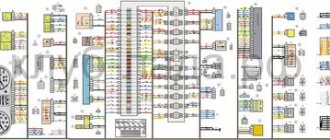
Designation of light bulbs and sensors
The tachometer is located on the left side of the instrument panel. Inside its scale, starting from the top center, there are eight indicators. If you list them from the top clockwise, it will look like this:
- pedal adjustment;
- seat belt indicator, which will light up if the driver or passenger is not fastened;
- airbag icon;
- backup indicator light, connected when installing additional devices and systems;
- brake failure icon;
- battery charge indicator;
- sign of engine malfunction;
- low oil pressure sign.
Behind the tachometer scale there are four indicators:
- turning on ABS;
- low tire pressure, receives data from tire sensors;
- gearbox malfunctions;
- electric power steering controller.
The speedometer is located in the center. Inside its scale, at the top, there are six indicators:
- trunk open icon;
- open hood indicator;
- alarm indicator;
- open door icon;
- cruise control indicator;
- speed limit icon.
Below the speedometer there is a liquid crystal display displaying the main functions and parameters. There are arrows to the right and left above the display that indicate the turn signals are on.
In the right block of the shield, at the top, there is a coolant temperature scale.
Important: It is prohibited to operate the vehicle if the temperature sensor is faulty.
It is also prohibited to drive a car with an overheated engine. When the 115 degree mark is exceeded, the indicator will remain constantly red and the driver will hear an intermittent beep. Below the scale is the immobilizer icon. Just below are two icons indicating whether the electronic stability control system is on/off. At the bottom of this part there is a fuel level scale in the tank. To the left of which there is an indicator for turning on the reserve fuel volume.
On the right, between these scales, from top to bottom are:
- indicator for turning on dimensions;
- low beam icon;
- front PTF turn-on indicator;
- rear PTF activation icon.
Is it possible to install xenon in the standard PTF on Vesta?
They demanded to include a phrase stating that the re-equipment would be carried out in accordance with technical regulations.
How could it be otherwise? I had to go again to NAMI PTIA-Fond, then back to the traffic police - and these organizations are located at different ends of traffic jammed Moscow.
And again stand in line... But finally the coveted approval has been received - let's start re-equipment! A simple matter is to buy components for installing xenon. There would be money. But the acquisition of each element was a struggle.
We simply turn off the original PTF through the windows (the ones that everyone loses) in the wheel arch, remove the bumper, lay a sheet on the overpass and put the bumper on top, we get the following picture: Next we go to the bumper and unscrew 2 torexes each (there are four holes, and the torex two at a time - savings) and remove the standard PTFs and... leave them, you never know - they will come in handy around the house.
Main 11 faults of the Lada Vesta instrument panel
While operating the car, problems may arise with the functioning of the instrument. An approximate list of main faults looks like this:
- Poor contact of the panel with the on-board network due to damage to the connector or its contacts;
- Failure of one or more sensors supplying information to the panel;
- Mechanical damage to the shield due to strong vibrations or strong impact;
- Lack of lighting due to burnt out light bulbs;
- Failure or malfunction of the main motherboard - if the motherboard fails, there is no point in removing or disassembling the instrument panel. You cannot repair this part yourself. It is better to entrust this matter to service station specialists;
- Burnt-out warning lights - There is a simple test to make sure the lights are burnt out. When you turn the ignition key, all devices start and all lamps light up. At this time, the operation of the lamps is checked. Particular attention should be paid to the red lamps, which indicate critical problems with the vehicle;
- The arrow indicators do not work - this may occur due to a failure of either the device or the sensor. Operation is checked with the engine running;
- The tachometer does not work - the reason is in the device itself;
- The speedometer does not work - the speed sensor has failed. This is indicated by the ABS lamp;
- The antifreeze temperature does not change - the reason is a malfunction of the temperature sensor;
- The fuel level is not displayed - the unit with the fuel pump is faulty.
conclusions
This article discussed the simplest, but most expensive method of installing anti-fog equipment.
In practice, especially if your Lada Vesta is no longer under warranty, everything can be done at much lower cost using plastic corrugation, simpler wiring, a 16-amp fuse, and a 4-pin relay. In general, the installation sequence will not differ.
By choosing the most suitable method, you can equip your car with enough light for comfortable driving in the dark, when visibility is very limited.
Fog lights, like the main optics of a car, play an important role in creating high-quality lighting. Fog lights are especially important in poor visibility conditions. For example, during rain, heavy fog or snowfall. As for the Lada Vesta, the situation here is such that fog lights are provided only in the “luxury” configuration. Therefore, installing PTF is relevant for this family of cars. If you are determined to install fog lights yourself, then this review is for you.
It must be said that installing PTF on Vesta yourself is somewhat more difficult than on other Lada cars. On the other hand, you will thus save quite a decent amount. So, for example, an official dealer can charge you up to 10 thousand rubles for installation, depending on the region. If you do not have such an amount, then it is better, of course, to carry out the installation yourself. Therefore, be patient and have enough time.
To install fog lights on Vesta you will need to purchase:
- The fog lights themselves - here you have a choice: take Original Valeo PTFs or a good quality analogue or Tune-auto PTFs (and look for bulbs) or take Chinese ones of dubious quality (there were precedents when they simply melted).
- Brackets for installing PTFs are actually what the fog lights are directly supported on. It is very difficult to find original brackets; AvtoVAZ does not release them on the free market. Analog brackets are very suitable; they are of decent quality, completely replicate the geometry of the original ones, and they are always in stock.
- PTF facings. Here the situation is simpler - you can cut holes in your trims for fog lamps with a diameter of 76 mm, or purchase luxury trims for fog lights.
- Wiring. You will need a set of wires to connect PTF Vesta. Everything is more complicated here, since there are no special buttons or space for a button to turn on the PTF in the cabin.
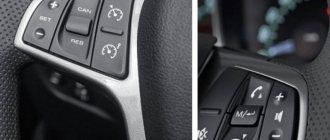
The first thing you will encounter when connecting is the electrical circuit, which is completely different from Grants or Priora. First of all, on Vesta the foglights are controlled via a steering column switch, which does not have a fixed position for turning off the PTF. At the same time, the signal to turn on the fog lights does not go directly to the headlights, but through a special unit, which is present only in luxury cars. Therefore, in order not to damage the car and not waste an extra couple of hours, we recommend adding a separate button for the PTF.
Now you can proceed to the direct installation of the PTF. First, remove the bumper and replace the existing PTF trims with “luxury” ones or carefully cut out the plugs using a utility knife or a 76 mm crown. Then take the fog lights and secure them to the brackets using self-tapping screws, and the bracket directly to the bumper.
Connection is the next and very important point. To do this, stretch the existing wires from the kit to each of the fog lights, the free end is connected to the relay (it can be installed in the mounting block or in the engine compartment). Now we connect according to a universal scheme, like Kalina or Priora. Take the “+” from the battery to the relay, and you must use a fuse. There you can take the “-” mass directly from the “negative” terminal, or it is better to find a nut nearby and screw it to it. The control plus on the relay comes from a button from the passenger compartment. Now stretch the wire for the button into the interior and install the button (the most convenient button for turning on the PTF 2109) on the decorative cover of the fuse box next to the headlight adjustment unit.
Finally, do not forget to check the functionality of the PTF and put the bumper in place.
Using such a circuit, you will minimally interfere with the electronics of the Lada Vesta, which means you will not harm it. The basic rule for installing PTF is to try to be as careful and attentive as possible, then you will get a positive result. Properly installed fog lights will provide you with not only proper visibility on the road, but also safety.
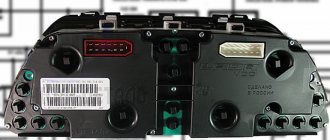
How to remove the dashboard of Lada Vesta
Removing the panel will be necessary if you are sure that its elements are faulty, or for flashing. To do this, you will need a flat and figured screwdriver, and a hex key. This is done like this:
- Disconnect the power terminals from the battery to prevent short circuit;
- Unscrew two screws at the top;
- Pull the top of the shield towards you until the latches snap off;
- Unscrew the two screws that secure the devices. This must be done without touching the wires;
- Pull the part towards you and disconnect the connector with wires from it, remembering the pinout.
Recommendations for selection
The first step is to make sure the quality of the products you purchase:
- The product body must be tightly fastened and assembled. The tightness of the fog lamp increases its service life and avoids unnecessary visits to dealerships. The material of the part must be resistant to severe weather conditions.
- High-quality fog lights are equipped exclusively with glass lenses. Plastic is a very brittle material and will break if hit by the smallest stone while the vehicle is moving.
- The color filter recommended for the part is yellow, which best cuts off the long waves of light produced during thick fog. If you feel that such a solution spoils the appearance, you can opt for specific lamps.
- Last, but not least, the criterion will be the possibility of parsing the PTF. In this case, if it breaks down, it will be enough to change the lamp rather than purchase a new one.
Fog lights
Purchase accessories by prior agreement with service station specialists and auto store managers. An exception is cases of purchasing original products, when the article numbers for the Lada Vesta fog lights are identical to the original ones.
Check the integrity of the packaging, the presence of holographic elements, barcodes, dates, and batch numbers. Keep your receipt until the warranty expires.
Install lighting fixtures only if you have experience in servicing the equipment. Otherwise, you risk causing damage and connecting the limit switches incorrectly.
Which fog lights are better for the Lada Vesta is an individual choice. It largely depends on the size of the allocated budget. It is advisable to give preference to foreign analogues.
If you are the owner of a non-luxury Lada Vesta model and decide to install fog lights, then choose from more expensive analogues. If you are the owner of a luxury version of Lada Vesta, which is equipped with fog lights by default, consider replacing the lenses and diode elements. In any case, it will be cheaper than buying and installing accessories as a kit.
Lada Vesta dashboard firmware
Before installing the firmware, remember that it is quite possible that it will not work correctly. Therefore, it is better to do this from official dealers. If you decide to do it yourself, then you will need a Usbdm OSBDM V4.95 programmer and a computer or laptop.
Here are 12 step-by-step instructions for installing the firmware:
- Install the driver and firmware program on the PC from the disk that comes with the device.
- Remove the instrument panel, peel off the factory warranty seal and open the back cover.
- Open the device and set the switch to 3.3 volts.
- Connect the device to the panel and computer.
- Launch the HCS12 Programmer program on your PC and click on Detected.
- In the Target item, specify the folder in which the firmware is located. Check the Auto Reload box and click Detect Chip. In this case, the chip type is determined automatically.
- On the Security tab, check the Unsecure box.
- On the Advanced tab, check the Enable box.
- Go to the Device Operations section, on the Target tab, select Erase Selective. With this choice, mileage and immobilizer data are saved.
- Click on the Program Flash button to launch the firmware. This will take a few seconds.
- Refuse to connect the panel in the program.
- Now you can turn off the device and install the device in its place.
Important: For flashing, use firmware suitable for this version of the device. You cannot install an older version on a newer socket and vice versa to avoid malfunctions.
Beginning the installation of the lighting kit
We remove the front bumper, carefully cut out holes with a diameter of 76 millimeters in the places where the plugs are located.
Requires a 76 mm cutter
A sharp knife with a harder blade or a metal crown of the appropriate size will come in handy. We insert the headlights into the holes, securing them to the right and left brackets using self-tapping screws 15–20 millimeters long.
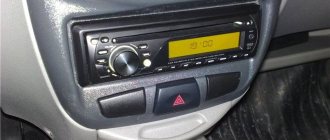
We install a switch button inside the car; you can use a standard VAZ one from LADA 2114, placing it next to the vertical adjustment wheel for the optics. You can draw a conclusion to the standard switch from Vesta, which will be without fixation, located just below the audio system.
Installation of PTF lamp wiring.
We lead the wiring from the headlights through a metal corrugated box to the hole located in the area where the pedals are located. From there we draw output to the button.
Disassembly procedure
Many people are interested in whether it is possible to remove the dashboard of a VAZ 2110 without “demolishing” the floor of the cabin?
It's probably possible, but it would be very inconvenient. Therefore, we act according to this plan:
- Let's prepare a marker and self-adhesive labels (which are usually glued to the product). They can be bought at points where all sorts of small things are sold such as napkins, bags, etc., as well as in stationery stores;
- We remove the front seats from the interior;
- We unscrew the screws on the sides, remove the tunnel (first its upper part, then the lower);
- We disassemble the steering column casing, remove it and the steering wheel. To do this, you need to unscrew 3 self-tapping screws and 4 screws. Please note that the VAZ 2110 steering wheel sits quite tightly on the splines, so you need to remove it by rocking and tugging, but being careful of a sharp blow to the face, if you suddenly overdo it and it will fly out;
- Next are the steering column switches. They also need to be removed;
- Don’t forget to mark everything and write down on a piece of paper what we are filming;
- We unscrew the glove compartment (in “understandable” language - the glove compartment) and also take it out;
- Next comes the disassembly of the mounting block and its cover. To do this, disconnect all connectors and relays;
- Now we have almost opened the instrument panel on the VAZ 2110. All that remains is to remove the strut covers, unscrew the headlight hydraulic adjustment and push it inward;
- Now the main task is to unscrew the screws securing the instrument panel to the body. To remove it completely, you need to unscrew the two studs located under the covers of the tunnels for supplying air to the side windows.
After all these manipulations, the panel hangs, and is held in place only by the steering shaft and the lower air duct.
An article discussing the process of replacing the panel overlay is located here: https://vazweb.ru/desyatka/salon/nakladka-na-panel.html
Lada Vesta Snow White neVESTA › Logbook › Installing PTF
Finally got some free time to work on the machine. My car does not have fog lights, so I definitely decided that I would install PTF in any case. We practically never have fogs, but I like how the fogs illuminate the side of the road, I appreciated this even on the grant. So, immediately after the purchase, I decided that I would install PTF. There is never too much light, and the appearance of a car with fog lights changes for the better.
I started thinking about installing a PTF on the Vesta, and, accordingly, studying this issue long ago.
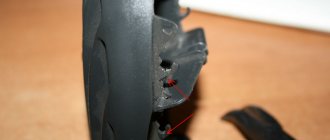
I started from the very beginning - PTF buttons in the cabin. I immediately determined the best option for myself - to install a button instead of one of the plugs on the “beard” of the panel, next to the esp on/off button. I ordered the button itself with engraving. I contacted the seller, paid 190 rubles on the card and after 10 days the button was in my hands
Full sizeReady button with PTF engraving
They make them using their own plugs, the workmanship is excellent, so I can confidently recommend them for purchase.
Then I started tinkering with the electrics of the buttons. There is a lot of information on this issue. In short, you need to remove the board, solder a clock button onto it, LEDs - one white to illuminate the icon itself and the second (if needed) directly to indicate on/off + solder resistors and solder the button leads to ground and power supply for the LED.
All the necessary SMD components were purchased from the radio store:
- tact button. I didn’t get it right with the size, I bought a button slightly higher than the standard one and the button travel is longer than the original one - white LEDs, size 0805 - red LEDs, size 0805 I wanted orange ones, but I didn’t find them in stock, so for now it will be red - resistors 1.2 kOhm and 15 kOhm of standard size 1206 Everything turned out to be mere pennies.
To deliver goods to other cities, we cooperate with transport companies.
SDEK courier service: express delivery in Russia and abroad.
We deliver the goods to the warehouse FREE OF CHARGE. The most convenient and fastest delivery method, since you independently select the order pick-up point from more than 1,400 offices in Russia and the world and see the final delivery cost.
Dispatch is made from Monday to Friday. Orders paid before 15:00 are dispatched on the same day; orders paid after 15:00 are transferred to the next day of dispatch.
After sending the order, you will receive a shipment identification number, by which you can also find out about the progress of the order on the company website https://www.cdek.ru
We deliver goods to the warehouse FREE OF CHARGE.
One of the most affordable transport companies.
The order is completed within two working days, after you have paid the invoice price in full in advance. As soon as your order is delivered to your city, an employee of the transport company will contact you to inform you where and at what time you can pick up your order. The company does not limit the volume and weight of cargo. Upon receipt of the order, the client must pay for the services of the transport company for preparing the cargo for shipment and for its delivery to the selected location.
Important! By default, the transport company packs all goods using a special wooden crate, which allows the goods to be delivered in perfect condition. This increases the cost of delivery, so we ask you to inform us in advance about refusing the additional cargo protection service if you want to save on it.
The list of settlements to which you can order delivery, as well as the cost of delivery, can be found on the website: https://nrg-tk.ru
We deliver the goods to the warehouse FREE OF CHARGE.
The order is fulfilled within two working days, after full payment of the cost of the goods on the invoice. As soon as your order is delivered to your city, an employee of the transport company will contact you to inform you where and at what time you can pick up your order. The company does not limit the volume and weight of cargo. Upon receipt of the order, the client must pay for the services of the transport company for preparing the cargo for shipment and for its delivery to the selected location.
Important! By default, the transport company packs all goods using a special wooden crate, which allows the goods to be delivered in perfect condition. This increases the delivery cost by at least 200 rubles. Therefore, we ask you to inform us in advance about refusing the additional cargo protection service if you want to save on it.
The list of settlements to which you can order delivery, as well as the cost of delivery, can be found on the website: www.dellin.ru
We deliver the goods to the warehouse FREE OF CHARGE.
The order is fulfilled within two working days after full payment of the cost of the goods on the invoice. As soon as your order is delivered to your city, an employee of the transport company will contact you to inform you where and at what time you can pick up your order. The company does not limit the volume and weight of cargo. Upon receipt of the order, the client must pay for the services of the transport company for preparing the cargo for shipment and for its delivery to the selected location.
Important! By default, the transport company packs all goods using a special wooden crate, which allows the goods to be delivered in perfect condition. This increases the delivery cost by at least 200 rubles. Therefore, we ask you to inform us in advance about refusing the additional cargo protection service if you want to save on it.
The list of settlements to which you can order delivery, as well as the cost of delivery, can be found on the website: https://pecom.ru