VAZ-21213 (Niva). Heater
VAZ-21213 (Niva). Removing and installing the heater
| 1 – air distribution cover; 2 – lever of the air distribution cover; 3 – damper for the windshield heating air duct; 4 – control handle for the heated windshield damper; 5 – air supply cover control handle; 6 – crane control handle; 7 – control lever bracket; 8 – flexible rod; 9 – air duct for body ventilation; | 10 – side window heating air duct; 11 – air duct for heating the windshield; 12 – air supply cover; 13 – air supply box seal; 14 – air supply box; 15 – radiator; 16 – inlet and outlet pipes; 17 – tap; 18 – fan casing; 19 – spring bracket; 20 – fan motor |
EXECUTION ORDER
1. Move heater valve 17 control handle 6 all the way to the right and drain the liquid from the engine cooling system. 2. Disconnect the ground cable from the battery. 3. Remove the fastening screws, remove the instrument panel shelf and the radio panel, and disconnect the electrical wires. 4. Loosen the clamps and disconnect the rubber hoses for supplying and discharging fluid from pipes 16 of the heater. 5. Unscrew the two mounting bolts inside the engine compartment and remove the heater radiator pipe seal. 6. Loosen the bolt of the bracket securing the flexible rod shell on the tap and remove the rod from the tap. 7. Remove the heater fan motor switch and disconnect the wires from it. 8. Remove the four spring holders and the fan casing 18 assembled with the electric fan. 9. Remove the instrument panel panel, through the opening for it in the panel, loosen on bracket 7 the screws of the brackets of the flexible rods of the air inlet cover 12 and the damper 3 of the windshield heating air duct. Remove the rods from the control levers. 10. Unscrew the nuts securing the radiator casing 15 to the air inlet box 14, disconnect the ground wire secured under one of the nuts, remove the casing and the air inlet box. 11. Install the heater in reverse order. Pay attention to the correct position of the sealing gasket between the radiator casing and the body, and to the reliability of tightening the rubber hose clamps. 12. After installing and connecting the hoses, fill the engine cooling system with liquid and check the tightness of the connections.
VAZ-21213 (Niva). Disassembly and assembly of the heater
| 1 – air distribution cover; 2 – fan casing; 3 – resistor; 4 – guide casing; 5 – radiator casing; 6 – air supply cover gasket; 7 – air supply cover; 8 – spring bracket of inlet and outlet pipes; | 9 – spring holder of the fan casing; 10 – radiator gasket; 11 – radiator; 12 – inlet and outlet pipes; 13 – tap; 14 – fan impeller; 15 – electric motor; 16 – spring bracket; 17 – electric motor mount |
Interior ventilation
Outside air can enter the vehicle interior:
- through open door windows;
- through nozzles 2 (Fig. 1-6) for blowing the windshield, if you move distribution lever 8 and lever 7 for controlling the air supply hatch cover to the right;
- through the side nozzles 1 for blowing the door windows, if you move lever 7 to the right and lever 8 to the left;
- through holes 9 of the heater casing into the driver's and front passenger's foot area, if you open the heater cover with lever 10 and move lever 7 to the right;
- through the central nozzles 5 directly from the air supply box when the car is moving, if the regulators 3 open the nozzle flaps (summer airflow). By moving lever 4 in the horizontal and vertical directions, the direction of the air flow from the nozzle changes.
In the middle position of lever 8 and in the right extreme position of lever 7, air will flow through nozzles 1 and through nozzles 2.
If the car is moving at low speed, you can increase the amount of incoming air by turning on the electric heater fan with switch 12.
Improvement No. 3. Installing the grille on the air intake
When disassembling the heater, a large number of tree leaves and insect remains were found in the air intake casing and in the honeycombs of the heater radiator grille, which also reduced the efficiency of the heater. Therefore, after cleaning and flushing the heater core, I took measures to prevent the radiator from clogging.
To do this, I bent a wire frame to the size of the air intake inlet, covered it with a nylon mesh with a 1x1 mm cell, and installed it at the bottom of the rubber seal of the air intake inlet. It was perfectly fixed there in the fold, like an accordion, without additional fastening.
All work to modify the heater took me about 4 hours of time and did not cost a penny of additional costs. Unfortunately, during work I didn’t think to take a photo, but from the attached drawing and picture everything should be clear. I'm happy with the result, now the stove heats better.
Interior heating
To heat the interior and protect the windshield, door windows and rear window from fogging and freezing:
- move levers 6 and 7 to the right;
- set lever 8 to the middle position;
- open the heater cover with lever 10;
- turn on switch 11 heated rear window;
- If necessary, turn on the electric heater fan with switch 12.
Warm air will be directed both to the driver’s and passengers’ footwells and to the windshield and front door glass. For faster heating of only the windshield, close the heater cover with lever 10 and move lever 8 to the right.
Do-it-yourself modification of the stove on Niva 21213 is necessary if the car’s heating system malfunctions. There is no point in delaying this, because uneven thermal regulation leads to foggy windows or icing. In any of these cases, the view of what is happening on the road deteriorates. The malfunction causes wear of individual elements of the device or manufacturing defects.
What did you improve?
The modernized stove has a number of advantages:
- Quiet, and at 1st speed silent.
- Productive, at speed 1 it blows at the level of speed 2 of the old fan. At maximum speed, dust will fly out of the air ducts.
Such tuning of the heating system is mandatory for drivers of northern cities.
Where can I buy
: in our online store (category Lada 4×4 stove).
Have you improved the Lada 4×4 stove in this way? Write reviews and additions on this modernization, take part in the survey. Let us remind you that other modifications to the SUV are published in this category.
Photo: Flea in-flight magazine
Keywords: stove 4x4 | 4x4 air ducts
0 0 3 0 0 0
Share on social networks:
Fault Diagnosis
The stove supplied as standard will need to be modified for preventive purposes. The procedure will not take much time, but it will prevent many problems in the future. Driving experience suggests that the first severe frosts will undermine the “health” of the device. The list of main weaknesses is as follows:
- the optimal operating temperature range for model 2121 is from -5 to +10°C;
- inability to warm up the air in the cabin if outside is -8°C or lower;
- when the blowing power increases, the temperature does not increase;
- When driving in 2nd gear, the noise from the Niva's stove becomes significant.
That is why it is better to take the necessary measures in advance. The driver has few alternatives. On the one hand, everything remains in its place. The heating device is used at minimum power. During mild winters this is still tolerable, but with the onset of real cold weather the conditions will become unbearable. On the other hand, it's easy to spend a few hours rectifying the situation.
Further developments proceed as follows. If the heating in the car is running at ½ power, you can limit yourself to minor repairs. The main thing is to make sure that there are no noises or extraneous knocks, otherwise the Niva 21213 should immediately go for a technical inspection.
The presence of an unpleasant sound indicates the need to replace the device. A specialized retail network offers ready-made options for heating mechanisms for Niva. If desired, it can be assembled independently.
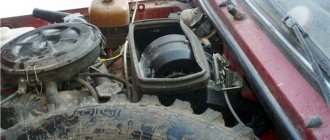
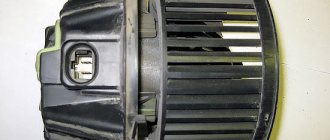
Fan replacement
The main reason for the low temperature in the car is the poor performance of the heater fan, which forces warm air through it into the cabin. In addition, being directly inside the car, it operates quite loudly at high speeds and whistles unpleasantly, especially in winter. Therefore, it is replaced with a fan from a VAZ-2108 (“eight”) car, which together with the casing is often called a “snail”. Their sizes differ slightly, so installing a new one is quite simple, with minor design modifications. Place the fan in the engine compartment, inside the air intake. This significantly reduces the noise from it. The heater radiator shutter needs to be removed.
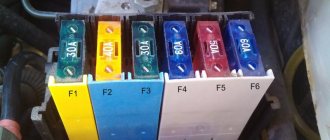
You can leave the standard two-speed airflow mode switch
or replace it with a three-position (and, if desired, four-position) installed on 2108, adding an additional resistor from the “eight” to the fan circuit.
They place it inside the air duct, since it needs airflow.
The cross-section of the wires suitable for it needs to be increased, since the new motor consumes more power.
The outer openings for air passage in the hood must be sealed to reduce the flow of cold air through them to the stove by half.
Technical details of the procedure
The efficiency of the new heating system on Niva will be determined not by the cost of the purchased parts, but by their quality. To operate, you will need the following elements: a car resistor, a figure-eight heater and a “snail”. It is a mistake to believe that only “original” spare parts are suitable for repairing a heating device. The main requirement is technical compatibility.
If in doubt, a drawing of the heating system will provide clarity. The further procedure is as follows:
- Cut a new mounting hole. This is done carefully, because the reliability of the heating system’s operation depends on the quality of the preparatory process. It is recommended to place the engine as low as possible in the air duct, otherwise the device will rest against the hood. This should not be allowed to happen, otherwise the stove fan will not last long.
The heating system of a new model is checked by test switching on. It is recommended to switch modes smoothly. The device must remain on each of them for at least 5-7 minutes. The driver’s task is to make sure that the operation of the system is not accompanied by extraneous noise and vibration.
The process of refining the heating system
It is useful to note that modification of the VAZ-2121 stove is not accompanied by high problems. Even a car enthusiast who does not have special technical and repair skills can eliminate such technical defects.
In addition, modification of the Niva-2121 stove may involve performing a variety of actions, including the most basic ones.
Heating in your car can be improved by even just slightly upgrading the air ducts. If you want to radically improve the heating system and increase comfort, then, of course, you will have to tinker a little more.
Removing the radiator of the VAZ-2121 stove
The procedure for removing the heater radiator on a VAZ Niva does not require any special skills or abilities. It is important to prepare the necessary materials and tools in advance. Most instructions for repairing car heaters contain a recommendation to drain the coolant before starting work. In practice, many car enthusiasts limit themselves to draining only that part of the antifreeze that is located in the radiator itself and the nearby pipes of the cooling system.
Preparing tools
To replace the radiator, you will need the following tools:
- pliers;
- slotted screwdriver;
- Phillips screwdriver;
- a set of markers for identifying wires;
- spanner set to “7”;
- socket wrench set to “10”;
- socket wrench set to “7”;
- socket wrench set to "10".
Procedure for dismantling the radiator
All operations must be performed in the following sequence:
- Unscrew the left self-tapping screw securing the storage shelf.
The self-tapping screw is unscrewed with a Phillips screwdriver
The right side of the shelf is attached to the upholstery
The central part of the shelf is unscrewed from the front panel
The right edge of the shelf moves down freely
There is a special spike on the left side of the shelf
The lower part of the panel is also fixed with a self-tapping screw
The process is shown on the right side, the left side is similar
The panel is moved to the side
The wire blocks are detached to remove the entire radio panel
After disconnecting the wires, the panel can be easily removed
Loosening the clamp is shown using the example of the lower pipe; a similar operation is performed with the upper
The screws are unscrewed with a socket wrench with a “7” head
The removed seal allows you to remove the radiator pipes from the engine compartment
The fastening nut is unscrewed with a “7” key
The rod is removed from the crane lever
The rod is disconnected from the fan casing
The staples are pryed off with a slotted screwdriver
The casing with the fan is moved to the side
After removing the fan, the radiator is carefully removed from its compartment
The tap and pipes are turned off with a key to “10”
The removed tap is checked for leaks
The bottom nut often falls out and gets lost
Disconnect the outgoing pipe.
The two fastening nuts are unscrewed with a “10” wrench
After dismantling, you should carefully inspect the radiator for blockages in the grille and leaks from the tubes. Based on the results of the inspection, a decision is made on the possibility of repair or installation of a new radiator.
Original parts vs analogues: practical advice
As mentioned earlier, such a choice does not affect the quality of the heating system. At the same time, car mechanics make several reservations. For those who plan to use VAZ stoves, it would be useful to check the power system. It is different for some modifications. That is why all actions are consistent with the drawings.
It is permissible to use the VAZ 2108 heater, provided that two recommendations are followed. Firstly, the mounting socket is 1-2 cm larger than the size of the device. The additional area will reduce the vibration impact. Secondly, the switch is installed taking into account the specifics of the VAZ heating system. You will have to tinker less when minor modifications to the system are needed.
The ventilation system is updated in 1-2 hours, depending on the degree of wear of the engine.
If the factory-installed “snail” has no signs of physical wear, you only need to replace the heater “engine” itself.
It’s worse if the factory equipment of a Chevrolet model has manufacturing defects. A complete replacement of the device is recommended. This will save time.
The operation of the heating system determines the comfort and safety of driving. The driver constantly monitors the system's performance. If extraneous noise appears, it is necessary to urgently carry out a technical inspection.
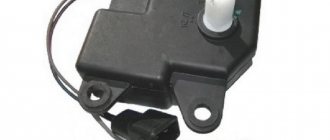
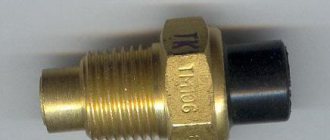
Replacing the heater tap
The standard heater tap on Niva 21213 does not do its job. Since it has a small cross-section, coolant flows quite slowly through the radiator. In addition, it often becomes a place for coolant to leak into the cabin. Therefore, car owners prefer to exchange it for similar models from other AvtoVAZ, Volkswagen, Toyota or Opel cars. For example, the ceramic faucet installed in 2108 has a large diameter passage opening, which increases the performance of the stove. It is better to install it in the pipe that supplies coolant to the stove, otherwise even if it is closed in the warm season, heated air will still flow into the cabin.
Improvement No. 1. We take air from the cabin
The main disadvantage of the Niva heater is that all the air into the heater radiator comes from the street, and when the air intake flap is closed, air circulation and heating stop completely. To eliminate this drawback, I disassembled the heater (I had to drain some of the antifreeze and disconnect the heater radiator pipes), and in the side wall of the heater housing, opposite the wall where the radiator tubes exit, I made a hole in the shape of a rectangular trapezoid. I did it in such a way that there was 1.5-2 mm of the body wall left to the boundaries of the plane in which I made the hole, and 6-8 mm from the side of the stiffener for attaching the petal valve. I made the hole using a drill, marked it, drilled along the contour of the small diameter holes, then connected the holes using a knife, then filed the edges of the resulting hole, giving it its final shape. The area of the resulting hole was approximately 25 square centimeters. It is through this hole, when the heater air intake flap is closed, that air is drawn from the passenger compartment.
Since the salon is a closed space, air circulation occurs in a closed circle, and the warming up air of the salon, passing through the heater radiator, becomes increasingly hotter at the exit. Despite the small size of the hole, due to the absence of a supply of icy air from the street, the time for warming up the interior to a comfortable temperature and melting icy glass is reduced by 4-5 times, and it is possible to achieve a comfortable temperature even in severe frost.
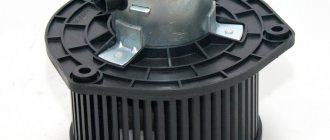
Heater snail from 2108 on Niva 2121, VAZ 2131
The stove in Niva is frankly bad! One of its most important problems is the fan itself, which is installed under the radiator, and also vertically. Hot air passing through it heats it up greatly and all the lubricant gradually drains from the rotor. As a result, the motor starts to squeal! Probably everyone knows this problem! Well, the productivity there is generally zero.
The problem is solved! We install the “snail” from the VAZ-2108 and get increased productivity, silence, and, if desired, three control speeds. The idea is not new, I borrowed it from other sites. But everyone does it in their own way - that’s how I did it.
With all this, after remaking the stove motor, you can’t hear the stove at all, since the motor itself is now located in the engine compartment!
We completely disassemble the entire heater!
If you want to have three speeds, we embed a heater resistor from a VAZ-2108/M2141 into the lower part of the body, on the driver’s side.
We glue all the joints of the body, and especially the installation location of the VAZ 2121 radiator, with a rubber seal (available in any hardware store)
We assemble the lower part, the VAZ 2131 engine with the fan is simply thrown out from there! We don't need him anymore!
We disassemble the upper part of the heater, remove the grille from the air intake of the Niva 2121.
And carefully, with minimal gaps, we cut out a place for the “snail” from the VAZ-2108. We install it as shown in the photo (bottom view)
Improvement No. 2. Increasing fan performance
I also slightly increased the efficiency of the standard heater fan. The fact is that the gap between the fan blades and the diffuser is about 3 mm, and the width of the diffuser is no more than 15 mm, while the width of the fan blades is more than 30 mm. Therefore, some of the air leaks back between the blades and the diffuser, preventing a large pressure difference from being created between the suction area and the discharge area.
According to my estimates, the efficiency of the fan increases by 10-15%, so you don’t have to bother with this problem.