What is hidden under the panel in the car interior?
The “refrigerator effect” becomes most noticeable if you still continue to use old VAZ models with front-wheel drive: 2108, 2109, 21099. Let's try to figure out whether there is any possibility of replacing the heating system yourself. Despite the visual identity of the car models, there is still some difference in these VAZ units of the 8th and 9th models.
This difference is not fundamental. It’s just that in the process of evolution, unnecessary air ducts were removed from the design, the shape of the damper and the location of the radiator were changed. But this does not change the principle of operation. The interior is heated by air, a radiator connected to the engine cooling system is responsible for heating it, and the heater itself is located under the instrument panel in the car, which is higher in the VAZ 21099 due to some design features of the stove. With the help of connected air ducts, heat flows into the interior.
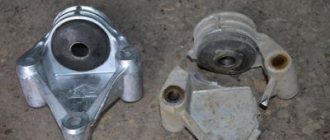
Radiator in the engine cooling system
To force heated air into the cabin, a fan is located at the top of the heater, which rotates using an electric motor. The easiest way to access it is from the engine compartment. The heater radiator, mentioned above, is located in the VAZ 2109, 2108 and 21099 models near the heater itself. It has a seal in the form of a polyurethane foam gasket and consists of two plastic tanks, cooling plates and tubes arranged in two rows.
Since heating is connected to the car’s cooling system, fluid circulation through the radiator occurs using the pump of this system. You can regulate its flow using the heater tap and various levers that affect the position of valves and dampers. Warm air enters the cabin through two central and two side nozzles, inside of which there are dampers that regulate the intensity of heating. The direction of flow is also changed by blades-blinds using levers in the cabin.
After the air in the cabin is heated, it is necessary to circulate it and maintain the set temperature. It is necessary to release the waste stream outside. In this regard, on VAZ 2108 models, hot air flows out through holes located in the central body pillars. On 9-model cars, these holes are located in the corners of the rear side windows and have rubber valves that prevent atmospheric air from entering the air ducts.
How to repair a VAZ 2109 stove
To ensure a comfortable temperature, a heater is installed in the car. The controller maintains the desired microclimate inside the car in the mode specified by the owner. The maximum deviation should not be more than 2 degrees Celsius. Deviation from these values indicates a malfunction.
This article explains how to repair the stove on a VAZ-2109 yourself.
The air supplied to the cabin is heated by a radiator built into the cooling system. It is then pumped by a fan through deflectors. A special regulator located on the panel is responsible for the intensity of heat supply.
Features of the heating system
Both in more modern models of the “nine” (where a high instrument panel is installed), and in earlier ones (where it is low), the ventilation is of the same type: supply and exhaust. Air enters through special openings installed in the windshield area by gravity or by force when the heater fan is running.
He leaves the cabin through the cracks in the doors. There are valves that allow air to escape outside, but prevent it from entering from the outside.
The heater is built into the engine cooling system and consists of:
- heater radiator installed near the main one;
- faucet;
- pump;
- fan
If this element needs to be removed, then this must be done from the engine compartment.
The heater tap is connected to two pairs of tubes extending from the cooling system. Directly in its body there is a valve that allows antifreeze to pass through. Its lever is driven by a rod using a handle located in the cabin.
The pump causes coolant to circulate in the radiator.
Opening (full) of the damper and tap occurs if the regulator is moved to the right all the way. At the same time, the fan forces air into the radiator, and the pump activates the movement of coolant.
The operation of the lower sleeves, which supply heat to the feet of people sitting in the cabin, is controlled by the upper regulator, which sets the damper in motion.
A normally operating stove allows you to maintain a comfortable 20 degrees of heat in the cabin at 20 degrees below zero.
Basic faults
As a rule, a heater failure occurs due to the fact that its electric motor stops functioning.
There are several reasons for this:
- combustion of the fuse link;
- breakage of the electrical circuit wires responsible for its operation;
- switch failure.
The regulator, in turn, usually does not work properly when its contacts burn out. A broken pusher also causes a similar result. The serviceability of this element is determined by measuring the voltage at its side contacts. Its presence when switching the toggle switch indicates operability. Otherwise, this unit will need to be replaced.
In addition, the motor itself may fail. The most common reasons are:
- breakage of armature winding wires;
- brushes sticking;
- collector oxidation.
If eliminating these causes does not correct the problem, then the engine is completely changed.
Sometimes a malfunction occurs due to a break in the wires supplying the mounting block or due to a burnout of the current-carrying track in it.
And finally, destruction of the resistor circuit may also occur - it is checked and the element that has become unusable is replaced with a serviceable one.
Repair
The procedure is performed after draining the antifreeze, in this order:
- from the interior side, disconnect 2 tubes leading to the faucet (you will need to loosen the fixing clamps);
- the remaining two are turned off in the engine compartment;
- unscrew the nuts on the faucet itself (from the bottom) and remove it (from the front);
- the rod is dismantled (you will need to disconnect the holder);
- the protective housing of the gearshift lever is removed;
- unscrew the screw in the gearbox tunnel and remove the floor covering;
- the ventilation hose is disconnected from the heater;
- the wires supplying them are removed from the resistor and the stove motor;
- To the right of the heater there are nuts securing it - they are unscrewed and the device itself is dismantled along with the control panel.
A faulty heater should be sent to a service center for repairs, since attempts to repair it on your own will most likely lead to undesirable consequences.
Other problems
This is not difficult to do: you just need to arm yourself with pliers and patience. Using this tool, tighten the cable located near the gas pedal drive. Moving it to the right will open the damper and hot air will enter the cabin.
In addition, cold temperatures in the car often indicate a radiator failure. There is no need to repair this unit - it is replaced with a new one.
You should proceed as follows:
- the car is parked on a level surface;
- open the stove faucet and drain all the liquid there from the cooling system;
- dismantle the instrument panel.
The last point is performed in this order
- the negative terminal is disconnected from the battery;
- remove the drive cable and damper rod;
- remove all handles that control the heater and fan;
- pull out the protective cover;
- disconnect all connectors of wires leading to the panel;
- all instruments installed there are dismantled, as well as the steering wheel and ignition switch;
- Unscrew the screws holding the panel in place and remove it.
This gives access to the radiator. To remove it, you will need to disconnect the hoses from it and unscrew the fixing screws.
If the problem is only contamination of the radiator, then it will need to be cleaned. If a leak is detected, the entire assembly is replaced with a new one.
Bringing the radiator to life
As a rule, it is not the entire system that becomes unusable, but only some part of it. The first signs that it is necessary to intervene are a specific smell in the cabin, the appearance of steam from the exhaust vents, and very rapid evaporation of coolant. First of all, you need to check the radiator. You should not bother with checks when the engine is running or has not yet cooled down. The problem most often lies in the radiator, in the area of the heater tap or in the electrical circuit. Let's look at these weak points in more detail.
Replacing a faucet or electric motor is not the first step; first you need to carefully inspect the radiator for leaks. Then you will have to remove it and check the tightness. The radiator is removed in the following order. First you need to disconnect and (preferably) remove the car battery, completely drain the antifreeze from the cooling system and disconnect the wires from the sensor that turns on the fan motor. Then you will have to remove the fan casing fasteners, disconnect its bracket and wires, and tilt it to the side. This will allow you to remove the protective cover. All that remains is to disconnect all the hoses, slightly tilt the radiator to the side and remove it out.
Replacing the electric radiator motor
It should be noted that it would not be superfluous to replace the rubber shock absorbers located on the radiator holders.
After the unit is removed, it is necessary to put tight plugs on the pipes or holes (except one) to which they are connected. Through the remaining inlet it is necessary to pump air into the radiator. Just be careful: do not allow air pressure to exceed 0.2 MPa. After this, lower the radiator into a bath of water, preferably so that it completely covers it. If air bubbles appear, the seal is broken and replacement is necessary. If there are no bubbles, there is a chance that it is simply clogged. In this case, it is necessary to flush the device.
Replacement instructions
In most cases, the reason lies precisely in the radiator device, so below we will talk about how to replace the VAZ 2109 heater radiator.
How to change the unit on cars with a high or low panel, read on:
- The device itself is located at the passenger’s feet, under the glove compartment. The replacement procedure will be identical for cars with a high and low panel, only in the first case you will have to remove the passenger seat. After removing the chair, you can see the screws on the right that secure the panel; they need to be unscrewed. The panel itself needs to be slightly pulled towards itself; insert some kind of spacer, for example, a wooden beam, into the gap that appears.
- Fully tighten the tap, and place a rag under possible coolant leaks.
- Then open the engine compartment and unscrew the cap on the radiator unit. The last unit is located between the glove box, as well as the lower shelf below it. The steps you need to follow next must be completed as quickly as possible, otherwise the coolant may spill. The lines that come from the radiator device must be closed; this will require plugs. Reach your hand through the detached center console, disconnect the lower line and plug the hole with a plug as quickly as possible.
- Repeat similar steps with the upper hose.
- The radiator is removed after all consumables have been drained. A new device is being installed.
Some car owners believe that if the backlight on the center console in the heater area disappears, this is due to the operation of the stove. Remember that the backlight of the stove has nothing to do with the operation of the unit as a whole, so if the backlight has disappeared, you need to find an open circuit and repair it.
Sorry, there are no surveys available at this time.
Replacing the faucet and fan motor – can we do it ourselves?
If checking the radiator does not fix the problem, the cause is in the heater itself. The next common breakdown is a malfunctioning faucet. But even in this case, you will have to remove the entire device, since it is unlikely that it will be possible to determine the nature of the problem, and, most likely, only a replacement can help. First you need to disconnect the hoses from the pipes on the heater tap, unscrew the faucet fastenings and remove it. Then you should dismantle the rods going to this part, remove the facing panel on the floor and disconnect the air duct located in the tunnel. Next, all that remains is to remove the heater wires, unscrew the mounting nuts and remove the device. Naturally, replacement and installation are done in the reverse order.
Malfunction of the heating device tap
Of course, it is advisable to carry out all the operations described above for the first time under the guidance of an experienced comrade (if there is one, of course). Because it is very easy to miss some little thing in the circulation of pipes and nuts, therefore it will not be easy to find an error. By the way, if your friend is a good specialist in the field of heating systems, he will probably be able to give advice on how to get rid of the old-fashioned way of saving a car radiator by wrapping it in cotton vests or cardboard boxes. The fact is that the VAZ 2108 and 9 models have a drawback in the heating operation when the engine is cooled too much. And such an unusual radiator lining can, on the contrary, lead to overheating.
A more rational approach: an additional pipe is cut into the thermostat housing and at the same time a plug is placed on the opening of the water pump. Thanks to this engineering solution, the liquid from the heater flows to the thermostat, and then continues to move through its cycle. The thermostat will be part of the automatic cooling system, and you won’t have to worry about engine overheating in the summer or excessive cooling in the winter. This method has received a patent, and therefore such “tuning” can be officially ordered at a car service center if you decide to entrust the replacement of the system to him.
The motor in the heater, which is responsible for circulating heated air (via fans), can also break down. Replacing it is easier than repairing it, so you just need to buy the right one. Installation will not be difficult, since we have already disassembled the entire system according to the above instructions.
The VAZ 2108 stove fan, like other important parts, is the key to the car’s heating system. Like any other system, this one has its own nuances and can suddenly break down. The solution to some popular problems, even those related to replacing the product, can be found below in the article.
Tap selection
Before you start replacing, it is important to choose a new, high-quality faucet that can reliably serve the heating system of your VAZ 2109. Factory. Factory
Factory
| Crane type | Peculiarities |
| Factory | This is a standard type of faucet that the VAZ 2109 is equipped with from the factory. Its main advantage is its affordable price. As for the reliability and frequency of jamming, here we are talking about obvious shortcomings. It is worth taking such a faucet as a replacement only if you could not find others |
| Ceramic | It is more expensive than the factory device, has high strength, but its throughput is lower compared to the third option. Low throughput rates can lead to the fact that the efficiency of the stove in winter will leave much to be desired |
| Ball | Excellent throughput, high reliability and durability. Alas, even such faucets turn sour, although their prices are higher than their analogues |
Considering the features of the presented taps, the optimal solution would be ball or ceramic. The second option is more suitable for those who live in regions with not very severe winters.
Ball
Car heating system design
The 2108 heating system consists of the following components:
- draft, which affects the heater valve of the VAZ 2108;
- damper control lever;
- additional resistor;
- a motor that affects the rotation of the fan;
- system operating mode switch.
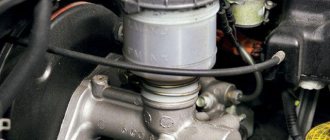
Heater valve VAZ 2108
Operating principle of the stove
- The liquid is heated to a certain temperature and enters the radiator of the VAZ 2108 stove.
- To ensure constant circulation, rubber tubes are installed between it and the liquid cooling system, fixed for better fastening with clamps.
- Warm air enters the car interior through several openings. The heater motor with its own fan is designed to distribute air evenly.
- The air flows directly to the feet of the driver and passengers, and also exits to the panel. The heat flow is then delayed by the dampers, and therefore the air is cooled. Thus, cool air is supplied to the windshield.
If the operation of the furnace is not satisfactory, it can be modernized. This is done by installing fiberglass.
The action goes like this:
- It is necessary to disassemble the stove, wash all parts and begin assembly. This action can also be used to visually inspect parts for damage. For example, the casing ear often breaks.
- After this, you need to glue all the flaps and fill the seams with sealant. Glue the casing and wait a while until the sealant is stable.
- Assemble the “insides” of the heating system and cover it with fiberglass. Thanks to this, the temperature will increase to 10 degrees.
Why do breakdowns occur?
As noted above, the shut-off valves of the heater are a very vulnerable element of the VAZ-2109. If it fails, then it will not be possible to ignore the breakdown. First of all, on the floor, at the base of the passenger seat in the first row, a puddle forms under the carpet. In addition, leaking antifreeze emits a very characteristic odor, which should also suggest a malfunction of the stove.
Leakage occurs for three main reasons:
- use of low-quality cranes by a domestic automaker;
- oxidation;
- mechanical destruction.
The Volzhsky plant supplies its products with membrane-type locking fittings. This system has one inherent drawback - poor tightness. Even with careful use, such taps break very quickly.
Typical faults
As with any mechanism, problems can occur in the heating system (video author - Andrey Kuzemsky).
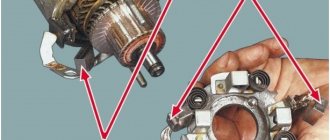
If the VAZ 2108 heater motor is broken, you can understand this by comparing some symptoms:
- If the motor does not work when switching operating modes, the cause of the breakdown may be hidden in the resistor. When repairing, you need to replace the resistor with a new one, because it cannot be repaired.
- If the fuse is blown, you need to check the insulation of the armature located on ground. There may be a short circuit.
- If, when switching modes, the VAZ 2108 heater fan rotates at the same speed, this may be a consequence of contamination or oxidation of the collector. In case of repair, it is worth cleaning the collector and, if nothing has changed and the fan continues to act up, you can replace the bearings.
If the VAZ 2108 stove motor does not even show signs of life, then the reason is not in its design, but in a broken circuit. To find out if this is true, you can use a voltmeter.
VAZ 2109Vyacheslav. Where is the heater valve located and how do I open it all the way? | Topic author: Denis
Vladimir Kranik is located just above the passenger foot area, and closer to the central tunnel, on the shield separating the passenger compartment and the engine compartment. It's easy to see if you look underneath on the passenger side. It is made according to the principle of a regular valve, where the cable fits to the lever, this is the opening and closing) you can try to manually help the cable.
Pavel, what’s easier, look where the hoses from the motor to the cabin go and they go to the engine panel and are put on the tap Sergei, one pipe is a through pipe, the second with a valve, here the cable goes to it and adjust it, but in general, I threw it out at one time when the first 08 went in 1985 and everything was in short supply; I threw out the faucet by pushing the tube into a pipe with a damper; there was no difference in the operation of the stove; what is a faucet and what is not
DIY repair
To carry out repairs yourself, you need to use the following tools:
- a Phillips head screwdriver;
- 10mm wrench.
When dismantling, you need to remove the plastic trim, which is located on the outside of the windshield. To remove it, you need to open the hood and remove the 5 bolts that secure the trim to the body. Remove the rubber seal from the engine compartment and pry the casing with a screwdriver to get to the motor and oven fan. Now you can remove the motor. It is attached to the body of the VAZ 2108 with two bolts.
When the clamps are disconnected, you can turn off the power and disconnect the positive wire of the furnace under the dashboard. The negative one is attached over a special thread and pressed down with a special nut. You need to unscrew the nut by touch and fold back the negative wire. By disconnecting the wires, you can remove the motor and install a new fan. The entire structure is assembled in reverse order.
It is important to note that breakdowns associated with the stove also depend on which panel is installed on the VAZ - low or high. Both have their downsides. For example, on a high one the central flap does not open completely. It is she who is responsible for supplying cold and hot air to the car interior. To solve this, you need to adjust the damper. And to get to it you need to disassemble the dashboard.
If we talk about the low panel, this is where the thermostat often breaks. Of course, if it wears out, the oven will not work. It is recommended to change it every two or three years. And if replacement does not solve the problems, it is worth replacing the hoses that connect the stove and radiator.
Photo gallery “Stove removal and repairs”
In the photos provided below you can see in more detail how the furnace repair scheme occurs.
Checking the functionality of the heater tap
If the cold or hot air supply modes do not switch, the cause may be a loose damper control cable or souring of the mechanism itself. How to open the tap of the VAZ-2109 stove in this situation?
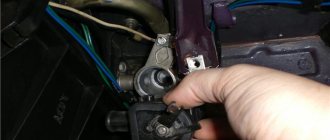
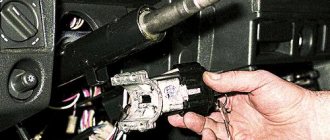
To do this, you need to remove the side panel of the dashboard on the passenger side. Then check the condition of the cable and if this is the reason, then connect it back into place. You can also, without removing the panel, put your hand under the dashboard, where the VAZ-2109 heater tap is located, and move the VAZ-2109 heater damper lever to the desired position. If the lever does not give in, then most likely it has gone sour and must be replaced.
Removing and replacing the heater valve
To replace the VAZ-2109 heater tap, you need a set of tools available to most drivers:
- a set of Phillips and slotted screwdrivers;
- a set of open-end wrenches No. 10 and No. 13 or socket heads of these sizes, as well as a wrench with a ratchet mechanism and a cardan;
- silicone sealant;
- container for draining coolant;
- metal brush;
- universal penetrating lubricant WD-40 or its equivalent;
- inspection hole, overpass or lift;
- rags to protect the interior flooring from antifreeze.
Ceramic, ball, and electric valves for the VAZ-2109 stove are available for sale. Which heater valves for the VAZ-2109 are better than those listed? With rare use, ball mechanisms are more susceptible to souring, and the electronic automatic heating control system “SAUO” is much more difficult to install. Ceramic mechanisms produced in Russia or “LUZAR” are free of these shortcomings.
Many experienced drivers advise simply replacing the heater taps with water taps. The benefit of this solution is not only in cost, but also in reliability - the coolant either constantly circulates or is easily closed manually at the pipe. Another way to make it easier to change the heater faucet of a VAZ-2109 is to abandon it altogether; the cabin temperature in this case is regulated by air dampers.
Instructions on how to change the heater tap of a VAZ-2109:
- Before replacing the valve of the VAZ-2109 heater, place the car on an overpass and, unscrewing the cap on the radiator, drain the coolant into a container prepared in advance.
- When the radiator is empty, use a screwdriver to loosen the clamps on the pipes going from the engine to the heater, then use WD-40 and a metal brush to clean the threads on the studs securing the part to be replaced. When finished, completely unscrew the clamps.
- Carefully remove the hoses one by one; they may contain residual antifreeze that needs to be drained.
Important! Do not skip this step, because it will not be possible to remove the valve of the VAZ-2109 stove with the hoses connected.
- Having removed the side trim of the torpedo from inside the cabin, check the condition of the pipes and change them if necessary.
- Then, under the car, using a socket wrench No. 10, unscrew the nuts securing the part to be replaced on the VAZ stove
- Returning to the car interior, pull the faucet towards you (where the right passenger seat is), remove the spring clamp and disconnect the control cable from the part being replaced.
- We take a new spare part and reassemble it in the reverse order.
Important! To prevent future leakage of coolant at the joints of the pipes, it is necessary to treat it with silicone sealant, and also to increase the service life, install rubber seals where the heater faucet is located on the VAZ-2109.
We make sure that the radiator plug is in place and fill it with coolant to the required level. Then we start the engine and, having gotten rid of air pockets, check the proper operation of the heater modes. This completes the replacement of the VAZ-2109 heater valve.
Video “Heater fan VAZ 2108”
You can learn how to remove the named part from the video from the author Alexander Tselovalnikov.
Self- replacement of the VAZ-2109 stove tap, high and low panel
the heater valve usually needs to be replaced if it starts to leak or gets stuck so that its regulator stops moving. It does not seem likely to repair the old one, and it cannot be restored. Meanwhile, without this element, interior heating is not able to work normally.
How exactly to replace a damaged heater tap on a VAZ-2109 car is done is described in this article.
Why do you need to change the valve on the VAZ-21099?
In most cases, the VAZ-21099 heater valve is replaced if it has serious malfunctions. In this case, two potential malfunctions are noted.
- The faucet turned out to be “sour”. As a result, it is impossible to open or close it. In this case, you can postpone carrying out repair activities.
- The second reason is that the stove faucet is leaking. This malfunction can cause significant trouble, so it should be eliminated urgently. If nothing is done, a serious leak of antifreeze into the car interior cannot be avoided. Despite the fact that the VAZ-21099 heater valve is hidden by a high panel, there is a risk of undesirable changes that will appear even in the situation in the car showroom.
For the reasons described above, you need to understand why you should change the faucet of the VAZ stove.
Malfunction - characteristic symptoms
The following signs indicate that the faucet is leaking:
- traces of water are found on the floor in the cabin;
- There was a corresponding smell of antifreeze in the car.
Having found one of the above symptoms, you must certainly examine the failed unit. It is important to realize that if the damage is not repaired on time, then the repairs will cost even more money, and it will most likely not be possible to do it yourself.
How to perform an inspection? It will be useful to get under the hood from the engine side. It must be emphasized that leaks can occur in different places in the cooling system, so it is useful to examine the entire system. It is more convenient to do this with a flashlight. Coolant, namely, often drips from:
- radiator;
- joints of hoses and pipes.
When it turns out that the faucet is the culprit of the malfunction, the owner needs to start replacing it as soon as possible.
See:
This requirement is even more pressing if it’s winter, because without heating in a car it will be very uncomfortable to move around and also unsafe if you have a long trip through a sparsely populated area.
Tap selection
Before you begin replacement, it is important to select a new, high-quality faucet that can reliably serve the heating system of your VAZ 2109. Factory
Factory
| Crane type | Peculiarities |
| Factory | This is a standard type of faucet that the VAZ 2109 is equipped with from the factory. Its main advantage is its affordable price. As for the reliability and frequency of jamming, here we are talking about obvious shortcomings. It is worth taking such a faucet as a replacement only if you could not find others |
| Ceramic | It is more expensive than the factory device, has high strength, but its throughput is lower compared to the third option. Low throughput rates can lead to the fact that the efficiency of the stove in winter will leave much to be desired |
| Ball | Excellent throughput, high reliability and durability. Alas, even such faucets turn sour, although their prices are higher than their analogues |
Article on the topic: Diagram and design of the front suspension on the VAZ 2109
Considering the features of the presented taps, the optimal solution would be ball or ceramic. The second option is more suitable for those who live in regions with not very severe winters.
Ball
How is the replacement made?
If the tap does not open and you find a problem in the summer, then there is no need to rush, but the leak requires prompt elimination - after all, the cooling system is constantly losing antifreeze, and this, in turn, calls into question the normal functioning of the power plant.
You need to know that in both the older and new 2109 , the tap is located opposite the front passenger seat, under the panel.
To replace the node in question you will need the following:
- new tap ;
- a set of gaskets (usually it is sold complete with the above unit);
- a can of WD40 or its equivalent;
- wire brush;
- wrenches for 13 and 10 (both socket and ring);
- screwdrivers;
- container for antifreeze;
- new coolant.
Which one is better to choose?
Both the duration of its operation and the reliability of the entire system largely depend on the quality of the new crane.
In total, there are three types of this unit on the Russian market. This means:
- standard, that is, native, used by the manufacturer;
- ball valve;
- ceramic.
The first one is very inexpensive, but usually lasts a fairly short period of time. For this reason, it is worth choosing it only when the car enthusiast does not have extra money or if he was unable to buy anything else.
The ceramic model is more expensive and quite durable, but its disadvantage is its relatively low throughput. If you live in the southern regions, then feel free to take this option. Otherwise, a ball valve is ideal.
This type of locking fittings is different:
- great reliability;
- strength;
- good throughput.
However, the latter option may also turn sour over time.
Execution of work
The car must be placed on a pit or ramp. Its wheels are fixed with stops. You should start working no earlier than the engine has cooled down. Don't forget to apply the handbrake! You will also need to disconnect the battery - it will be enough to remove the negative wire from it.
It will not be possible to do without draining the antifreeze. Therefore, the prepared container is placed under the hole intended for this purpose and, unscrewing the plug, wait until the coolant drains out completely.
Next, you need to disconnect the pipes connecting the engine directly to the mechanism that has become unusable. The fastening clamps on them are loosened. Use a brush to clean the threads on the two studs that hold the heater tap itself. As reviews indicate, without WD40 it is most likely impossible to easily remove a faulty unit.
Which to choose
Every driver wants his car's heater to work flawlessly. Therefore, when a faucet breaks down, a person begins to think about which one is best to choose as a replacement.
There are three main types of shut-off valves on the market. They are distinguished not only by price, but also by design features.
The most budget-friendly faucet option is the previously mentioned membrane faucet. The stove is equipped with it at the factory. The unit will cost about 400 rubles. There is nothing cheaper in nature. The trouble is that the savings are often quite conditional, because the unreliability of membrane models is already legendary.
Ball valves are often used for replacement. They are much more convenient than membrane ones, but slightly more expensive - for one piece you will have to pay at least 550 rubles. At the same time, in cheap options, the locking ball is made of ordinary steel, which is relatively easy to corrosion.
Ceramic stove models are considered the most reliable. They are not afraid of aggressive environments and do not turn sour. The price of the crane is about 750 rubles. This option is recommended by everyone who has used it.