Tuning does not always mean installing a new body kit or shortening the Priora springs. Sometimes modernization helps improve driving comfort. An excellent example would be a short-throw rocker. VAZ owners know the “features” of the gear shift lever (GSL), which is not so easy to direct to the desired gear. The short-throw rocker on the Priora solves this problem, but we will tell you how to install it on the Priora and adjust it correctly.
The instructions in our material are also relevant for motorists who want to know how to repair and replace a conventional rocker. The instructions describe in detail the process of dismantling and adjustment, which is carried out for a factory part according to exactly the same principle.
What is a backstage
The term appeared along with the first multi-speed gearboxes. It meant some kind of hidden mechanism connecting the driver and the transmission, with the help of which the driver gave a signal to the manual transmission about the need to change to the next or previous speed.
The term “scene” is not specified in any regulatory documents. This is the popular name for a mechanism or a specific part. Even drivers with many years of experience often use it differently. Some call this the gear selection mechanism located under the bottom of the car and connected to the gearbox by a lever (sometimes two levers) or cables. Others are the rod connecting the gearbox lever and the gearbox.
We propose to call the entire mechanism connecting the gear lever and transmission a “slide”. This makes it somewhat difficult to divide mechanical transmissions from AvtoVAZ into rocker and cable ones, but it allows us to perceive the gear shift mechanism as a single unit.
Principle of operation
Study the diagram below to understand how the short throw rocker works. The lever is installed in the neutral position, here it is indicated by the points “O” and “F”. To start the transmission, you need to move the rod - it will connect to the control gear at point “B” - at point “A”. After this, the handle will move to point “E”. Repairs and subsequent replacements are carried out in order to reduce the distance.
This can be done if the lever extends to point “H”. This move will increase the distance. On the diagram, "A" and "B" will become points "C" and "D". Replacing the standard rocker with a short-stroke one allows you to reduce the movement of the handle. We've sorted out the theory, now we can start the repairs.
How does the backstage work?
The principle of operation of any scene is the same: moving the manual transmission lever in two planes (forward - backward, left - right) through a system of levers and rigid or flexible rods leads to the movement of the corresponding forks inside the gearbox. In turn, the forks displace the clutches of one or another gear, due to which they engage with the secondary shaft, forming a full-fledged gearbox with a given transmission ratio.
Backstage on the Priora
In first gear, the ratio of the rotation speed of the secondary and primary shafts is minimal, due to which 3-4 revolutions of the primary shaft account for 1 revolution of the secondary. In direct (fourth) gear, the rotation speeds of both shafts are approximately the same. But at the highest gearbox it turns from a reduction gearbox into a step-up gearbox, because for 2 revolutions of the primary shaft there are approximately 3 revolutions of the secondary shaft.
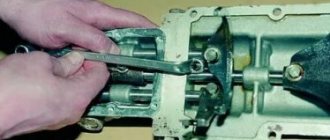
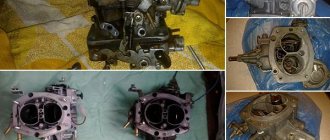
Repairing the box
Tuning door cards on Prior
In the event that this kind of adjustment work did not bring much results, you will have to remove and disassemble the gearbox of your VAZ 2110
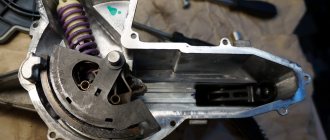
The main attention should be paid to the gears, as they are most often knocked out. This is especially true for first and second speeds.
It will also be important to check the latch. There are three latches in total in the gearbox.
The very first of them is very long and is responsible for 1st and 2nd gears. Next comes the clamp for third and fourth gears, and the shortest of the clamps is intended for 5th gear
There are three latches in total in the gearbox. The very first of them is very long and is responsible for 1st and 2nd gears. Next comes the clamp for third and fourth gears, and the shortest of the clamps is intended for 5th gear.
complete gearbox assembly
Often, VAZ 2110 owners voice a problem regarding the switching or departure of first gear. Most likely, the reasons lie in the following:
- synchronizer problems;
- damage to the retainer spring when the lever dangles and the gears are switched on randomly;
- damaged rod and fork.
A common problem is when the second gear is reluctantly engaged, or it is simply knocked out. The most likely causes of the problem:
- poor engagement of the gear and clutch that engages the gears;
- wear of gear teeth and coupling;
- problems with the clutch.
What kind of scenes were installed on the Priora?
Three types of scenes were installed on the Lada Priora (one for each box):
- long-stroke with rigid rod and flat lever (for 2170 (aka 2110));
- short-stroke with rigid rod and round lever (for 2180);
- cable (2181).
The gearbox 2170, which Priora inherited from the tenth family (the entire VAZ 2110 line), was distinguished by a large lever stroke: it was difficult to quickly change gears. When developing the gear shift drive for the 2180 gearbox, engineers took into account the criticism of car owners and created a short-throw mechanism that made it possible to change gears much faster. In addition, both scenes inherited from the “ten” a not very reliable mechanism for transmitting force to the box, which is why it had to be adjusted from time to time. Another common problem was the vibration of the lever, which irritated many owners of this car.
Also, a common disadvantage of both transmissions was the lower location of the gear shift mechanism, because this led to:
- leaks of the gear selector rod seal;
- Difficulty switching gears in the cold.
When developing a new type of gearbox switch (2181) for the Lada Priora, engineers took into account previous mistakes. The gearshift mechanism was moved to the top, and Bowden cables were used as rods. This immediately solved many of the problems of the previous units. But the price for this improvement was the low reliability of the mechanism connecting the lever and the cables, because it is made of plastic. However, with careful operation, its service life exceeds 100 thousand km.
Alternative supports
Replacement cushion for VAZ 2110
Considering the long-standing problem of Samara and a dozen, the manufacturer immediately released a whole series of alternative pillows:
Let's now consider their features:
- The support of JSC-BRT and the peculiarity of its structure is contained in a hinged product, which replaced the bearing in this place. At first glance, it looks like a panacea, since the general principle of operation seems to be clear: the creators of this technical innovation used an element that has increased rigidity in the radial direction. At first glance, the sounds should disappear and the car should become silent on uneven roads, however, conflicting reviews from the motorists themselves do not allow us to completely agree with this fact.
- An alternative to OAO-BRT is SS-20, where a steel bushing was installed in place of the standard bearing, which was completely welded into a rubber damper. The manufacturer of this new product claims that the SS-20 will completely eliminate the appearance of elevators and extraneous sounds. Moreover, the manufacturer directly promises that the SS-20 will be able to guarantee the classic behavior of the rocker (see Replacing the rocker on a VAZ 2110 on your own): regardless of the topography of the road surface, the lever will be stable and without extraneous sounds.
- The developers of "Assomi" boldly claim that the use of a special prescription rubber mixture will completely smooth out all impacts and sound noise, thereby significantly increasing the overall level of comfort of the car.
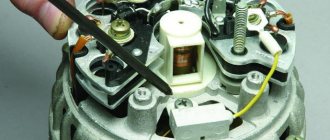
VAZ 2110 gearbox rocker
So, you need to choose who to trust, because there are a huge number of manufacturers to choose from, who all guarantee the high quality of their products. And most importantly, they guarantee that they managed to create a universal high-tech product that is most effective from a practical point of view.
Note. But it’s not entirely clear why some manufacturers of backstage cushions use rubber ears that quickly break?
Practical Feature of Alternative Choice
Unfortunately, “Assomi” and SS-20 are quite difficult to find in local stores; in the future they will go on wide sale, however, it is impossible to answer exactly when this will happen. It all depends on the store owners. The motorist is mainly offered imported products, as well as from national manufacturers, but only standard ones. It should be objectively understood that the quality of imported products varies significantly in comparison with national standard factory models, as does the price. Therefore, if you are pressed for time, it is best to order your own national alternative via the Internet, which is much lower in price than its foreign counterpart, and the quality is almost identical.
Main malfunctions of the scenes
All malfunctions of the Lada Priora gearbox and how to eliminate them:
| Symptom | Malfunction | Gearbox model | Way to solve the problem |
| Unclear gear shifting | Worn bushings | 2170–2181 | Replace all bushings |
| Damaged pillow | 2170–2180 | Replace pillow | |
| Cables stretched | 2181 | Replace cables | |
| The tension of the traction clamps is loose | 2170–2180 | Adjust then tighten | |
| The lever has failed | The pillow tore | 2170–2180 | Replace pillow |
| Lever travel too long | Worn bushings | 2170–2181 | Replace all bushings |
| Cables stretched | 2181 | Replace cables | |
| The tension of the traction clamps is loose | 2170–2180 | Adjust then tighten | |
| One or more speeds do not turn on the first time | Forks are deformed | 2170–2181 | Replace plugs |
| The tension of the traction clamps is loose | 2170–2180 | Adjust then tighten | |
| Cables stretched | 2181 | Replace cables |
The main malfunctions of the Priora gearbox are the same for any transmission and are determined by their design. The lever and rigid drive are made of steel, so they do not break. The remaining parts, all kinds of plastic bushings and cables, clamps that secure the rods, often fail (their nuts have a bad habit of becoming loose). In addition, on the so-called rocker boxes, that is, gearboxes 2170–2180, the rubber band (the rubber support of the lever) often fails, which also leads to problems with switching on the required speeds.
One of the rare defects is the rattling of the 2014 Priora gearbox, although it also occurs on cars of other years, but always with a rocker transmission. It is caused by contact between the torque rod and the gear shift rod. Due to the running engine, the contact becomes vibrating, and the collision of parts generates ringing. To eliminate it, just slightly move both rods away from each other.
It's no secret that the Priora has a congenital problem - the rattling of the gearbox driveshaft.
In almost all Priors, the rubber boot of the gearbox driveshaft is destroyed after some time. One glance is enough to give a verdict: the boot is made of burnt rubber, so it doesn’t last long! The markings on the cardan shaft boot were not Balakovsky.
It was decided to replace the Priora boot with a Viburnum boot, and also replace the Priora gearbox driveshaft itself with a Kalina driveshaft - it is too praised on various forums.
| The original boot of the gearbox driveshaft was cracked, and there was even a hole in its “accordion” |
| I purchased a Balakovo-made boot and a Tolyatti gearbox driveshaft, all from Kalina |
| I had to tinker a little with the Kalina gearbox driveshaft: the Kalina driveshaft rod is longer than the Priora rod by about 2 cm. Since I didn’t have the opportunity to compare the Kalina driveshaft with my own driveshaft (it was still on the car at that time), I had to cut it “blindly”. I measured 1.8 cm from the edge and started sawing |
| I don’t have a grinder, I sawed with a hacksaw for metal - it took about 40 minutes of time, 2 hacksaw blades and a slightly ground corner on the emery))) It’s very difficult to saw, because the metal is strong! After sawing off part of the rod, I made a conical chamfer using sandpaper and a file. |
| Let's start removing the original gearbox driveshaft. We loosen the clamp and tighten the torn boot. Next, we unscrew the fixing bolt, but unfortunately this is not so easy to do: the bolt is coated with red thread locker and there is no way to unscrew it. The open-end wrench turned, “licking” the edges, but the powerful socket head did not fit; the gearbox housing interfered with it. In general, in order to remove the fixing one, stock up on spanners. Replacing the boot and drive shaft itself takes about 10 minutes |
| I sawed at random, but the size was amazingly accurate - the length of the rod of the original Priora gearbox driveshaft and the Kalina gearbox driveshaft are the same! |
| The original driveshaft of the Priora gearbox is essentially not a driveshaft at all: it bends only in one plane, while the Kalinov gearbox driveshaft bends in 2 planes. In addition, the photo clearly shows a huge gap of 2-3 mm on the original Priora driveshaft |
| The anthers differ slightly, but the Kalinovsky anther has better workmanship than the original Priora anther |
| A little about adjustment. While unscrewing the fixing bolt, the reverse gear jumped out. We had to manually select the desired gear using pliers, but we couldn’t do it the first time. Having assembled the mechanism, it turned out that in place of the reverse gear it turned out to be the first, and the second could not be engaged due to the reverse speed limiter. I had to redo everything. The repeated adjustment turned out even worse, only 3, 4, 5 gears remained. It was possible to adjust it normally only the 4th time, using pliers to find the reverse gear. And we found it this way: having removed the link and clamped the cardan shaft with pliers, turned it counterclockwise until it stops and pushed the hinge forward. In order to make sure that we had engaged reverse gear, I started the engine and carefully moved off - the car went backwards! Let me make a reservation right away: absolutely nothing will happen to the box, nothing will fly out or break. |
| We install the gearbox driveshaft in place. Having straightened the clamp clamp a little, we connected the gearbox driveshaft to the rocker, set the lever to the reverse gear position and tightened the clamp clamp! The check showed that all the gears are there and they work perfectly. The feeling is very pleasant, the gears are engaged very softly and smoothly, no snagging. The lateral play of the lever has not changed, the longitudinal play has become smaller, but this difference is not noticeable either while moving or standing still. The position of the lever has changed a little, it has become a little closer to the driver’s seat, but it doesn’t touch anything, and it’s not noticeable from the outside, just by feeling it! But now you don’t have to reach so far for fifth gear |
Spare parts and repair kits
AvtoVAZ does not offer ready-made repair kits for repairing gear selection mechanisms: you can purchase a repair kit for the Priora gearbox rocker from third-party manufacturers or assemble them yourself.
List of parts for each box that most often fail:
| checkpoint | Detail | vendor code | Quantity | Price, rubles per piece |
| 2110 and 2170 | Gearbox ball lever support cage | 2110-1703190/86/91 | 1 | 500 |
| Lever axis | 2110-1703219 | 1 | 80 | |
| Lever axis bushing | 21100-1703226-00 | 2 | 7 | |
| Remote gearshift lever axis bushing | 2110-1703227 | 1 | 40 | |
| Overlay | 2110-1703317 | 1 | 60 | |
| 2180 | Gearbox ball lever support cage | 2110-1703190/86/91 | 1 | 500 |
| Lever axis | 21700-1703219 | 1 | 80 | |
| Thrust washer | 21700-1703371-00 | 2 | 20 | |
| Bushing (spacer, gasket) of the hinge | 21700-1703226-00 | 2 | 20 | |
| Remote bushing | 11180-1703227-01 | 1 | 45 | |
| 2181 | Rocker assembly with lever | 21901-1703010-20 | 1 | 2000 |
| Transmission shift cables (set) | 21901-1703113-00 | 1 | 4000 |
Recommendations
Drivers have accumulated extensive experience in servicing and repairing gearboxes. A gearbox is a complex and important mechanism, especially for a unit with automatic shifting. The main advice is to be careful and attentive.
Recommendations:
- Keep an eye on the oil level.
- Avoid sudden starts and accelerations.
- Engage reverse gear after the vehicle has come to a complete stop.
- Do not carry trailers on a car with a robotic gearbox, do not push start the car.
- Follow the rules for towing your vehicle.
- Don't skip maintenance.
- Carry out a daily inspection of the unit, listen to the operation of the motor.
Priora gearbox
For self-diagnosis and repair you need special precision equipment. Knowledge and skills of dismantling and assembly are important. For example, how to correctly measure the gap between a pair of meshed gears. If you are not a professional car mechanic, it is better to entrust the box to service companies.
Backstage repair and adjustment
In this section we will describe the replacement of all consumables, as well as all the adjustments to the Priora gearbox that can be carried out on a particular transmission.
Backstage repair kit
To repair a Priora gearbox of any type, you will need:
- pit;
- overpass;
- lift;
- jack with safety stands.
In addition, you will need the following tools:
- a set of spanners and open-end wrenches;
- flat and Phillips screwdrivers;
- ratchet with extension and set of bits.
If you work from a jack, be sure to use safety stands. And after installing the car on them, shake it strongly in all directions. If it falls off the stands, it means you installed them incorrectly. But it’s better if the car falls while you’re not under it.
Principle of operation
Study the diagram below to understand how the short throw rocker works. The lever is installed in the neutral position, here it is indicated by the points “O” and “F”. To start the transmission, you need to move the rod - it will connect to the control gear at point “B” - at point “A”. After this, the handle will move to point “E”. Repairs and subsequent replacements are carried out in order to reduce the distance.
This can be done if the lever extends to point “H”. This move will increase the distance. On the diagram, "A" and "B" will become points "C" and "D". Replacing the standard rocker with a short-stroke one allows you to reduce the movement of the handle. We've sorted out the theory, now we can start the repairs.
Rigid traction mechanisms
For both “screw” mechanisms, the procedure is completely identical. So do this:
- Raise or hang the machine.
- Remove the cover and gearshift lever knob.
- Unscrew the nuts and bolts securing the reverse lock plate (bracket), then remove the bracket.
- Unscrew the lever axle nut. Be careful not to lose the nut and lock washer.
- Unscrew the bolt securing the lever axle, then pull out the axle.
- Go down under the car and unscrew the nuts of the rocker pad bracket (this is convenient to do with a ratchet and an extension).
- Unscrew the bolts securing the torque rod to the car body.
- Pull down the pillow with the lever.
- Remove the retaining ring from the cushion.
- Lubricate the ball joint of the new cushion with any grease.
- Insert the lever into the pillow and make sure that it rotates freely and does not fall out of it.
- Place the pillow with the lever in place and secure it.
- Lubricate the new bushings and insert them into the lever.
- Replace the lever shaft.
- Have an assistant sit behind the wheel and go under the car yourself.
- Ask an assistant to engage first gear. If the lever is where it should be, then the repair and adjustment is complete. If not, then loosen the nut and bolt that tighten the clamp on the rod next to the driveshaft. While holding the rod, have an assistant place the lever in place corresponding to first gear and tighten the clamp.
Ask an assistant to engage all gears in order. If they turn on clearly and there is no strong play in the lever (on the rocker boxes), then you have done everything correctly and the repair and adjustment are completed.
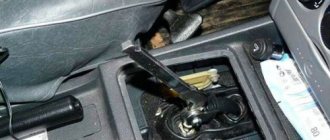
Gearbox control drive Lada Priora Lada Priora
Adjustment may be required after removing and reinstalling the VAZ 2170 gearbox, as well as in case of unclear gear shifting during operation of the Lada Priora. You will need two “13” keys.
1. From below the car, loosen and unscrew the nut of the clamp bolt on the transmission control rod by 3–5 turns.
2. Use a screwdriver to slightly widen the groove of the clamp and the groove at the end of the rod to ensure free movement of the rod relative to the gear selection rod, and set the rod to the neutral position.
Scheme for adjusting the position of the Lada Priora gear shift lever: 1 – reverse lock bracket; 2 – axis stop; 3 – gear shift lever axis; 4 – axle bushings; 5 – gear shift lever; 6 – spacer sleeve; 7 – spherical washer of the ball joint; 8 – spherical pin of the gear shift lever; 9 – body floor; 10 – ball joint; 11 – buffer; 12 – spring; 13 – template 67.7834.9527; 14 – bracket cover
3. Inside the car, remove the gear shift lever cover from the handle, lower the cover down along the lever and install the lever so that its lower (non-bent) end is approximately vertical. If you have template 67.7834.9527, position the gear shift lever as follows: with the lever cover removed, install the template in the window of the lining 14 of the reverse locking bracket. Insert the stop 2 of the axis of the lever 5 into the groove of the template 13 and press it against the template in the transverse direction without causing elastic deformation of the bracket 1. Fix the lever 5 in this position.
4. From the bottom of the VAZ 2171 car, with light hand movements (so as not to move the levers of the VAZ 2172 gear selection mechanism), select the axial play of the rod in the rearward direction and its angular play in the counterclockwise direction.
5. Tighten the nut of the clamp bolt, placing the clamp at a distance of 1–3 mm from the end of the rod.
Gearbox and gearbox Lada Priora
Gearbox Lada Priora |
Lada Priora gearbox malfunctions, their causes and solutions |
| Removal and installation of the Lada Priora gearbox |
Disassembly and assembly of the Lada Priora gearbox |
| Disassembly and assembly of the secondary shaft Lada Priora (Lada Priora) |
Disassembly and assembly of the input shaft Lada Priora (Lada Priora) |
Dismantling and assembling the Lada Priora gearbox synchronizer (Lada Priora) |
Assembly and disassembly of differential Lada Priora (Lada Priora) |
Selection of differential bearing adjusting ring for Lada Priora |
Assembly and disassembly of the gear selection mechanism Lada Priora (Lada Priora) |
Removal and installation of gearbox seals Lada Priora (Lada Priora) |
Replacing gear shift lever axle bushings for Lada Priora |
Assembling and disassembling the gear shift lever Lada Priora (Lada Priora) |
| Gearbox control drive Lada Priora |
Replacing the oil seal
On a Lada Priora car, replacing the gearbox seal does not cause serious difficulties. Since we have already talked about performing this operation in the article (Replacing the Kalina gearbox oil seal), we will repeat here only the general principles.
To replace the oil seal, do the following:
- Place the machine on a pit, lift, overpass or jack, observing all safety measures.
- Disconnect the jet rod from the box.
- Disconnect the gear shift rod from the driveshaft.
- Remove the boot.
- Disconnect the driveshaft from the gear selector rod.
- Pull out the bushing with the oil seal.
- Clean the seat in the transmission housing.
- Replace the seal in the bushing.
- Insert the bushing into the box, seating it on the sealant.
- Assemble the car.
Check the gearbox oil level and, if necessary, add the appropriate transmission fluid.
Attention!
If you first assemble the reverse gear locking mechanism, the long rod will not allow you to put the rod on the cardan shaft. The problem can be solved by shortening it. It is important not to forget to put the boot on the driveshaft.
Adjust the reverse gear locking mechanism, since the consequence of adjusting the scenes is that the mechanism does not match the plate to which it clings. The problem can be solved by removing the plate and adjusting the hook (it is a cutout on the mounting bracket). You can sharpen it with sandpaper or a file.
The photo shows the adjusted toe.