Most owners of VAZ-2107 cars have encountered the problem of engine overheating due to untimely activation of the radiator fan. Such a malfunction poses a serious threat not only to the cooling system, but also to the entire power unit. An increase in coolant temperature to critical levels can damage the cylinder head gaskets, valve cover, and also cause jamming of the moving parts of the engine.
Most often, the radiator fan does not work due to problems with its activation sensor. This can be either a banal lack of contact on the connectors or failure of the device as a whole. In this article we will talk about what measures can be taken if the fan switch on the VAZ-2107 has lost its functionality, and we will also consider the process of checking and replacing it.
Signs of engine overheating and precautions
If you, while driving a car, find that the arrow on the instrument indicating the coolant temperature has moved into the red sector and continues to deviate in the direction of increasing it, it would be better to stop on the side of the road and immediately turn off the engine. If this is not done, the antifreeze or antifreeze will simply boil and try to escape, breaking the tightness of the system. Continuing to drive in such a situation is quite dangerous. Having stopped, it is necessary to check the functionality of all elements of the cooling system and determine the cause of overheating. Then, if possible, it should be eliminated. And if this is not possible, tow the car to the nearest service station.
Video “Visual diagnostics and replacement of DV on your own”
The procedure for diagnosing and replacing the fan switch on the domestic “Seven” and other classic VAZs is given in more detail in the video below (the author of the video is Engine Repair! And interesting!).
The VAZ 2107, like the representative of the VAZ “classic”, has a rather noisy cooling fan. You can't miss the moment of his connection. Body vibration increases, a hum is heard from under the hood, if the ignition timing coincides with an increase in the load on the electrical network (blinking turn signals when the low beam is on, heated rear window) - this means the load arrow on the power supply begins to slide into the red zone.
And also (if the carburetor is poorly adjusted), the emergency oil pressure warning lamp may begin to burn out. The cooling scheme of the VAZ 2107 is such that under normal conditions the fan does not turn on immediately, but only when a certain temperature in the system is reached. To determine this “convenient temperature point” there is a sensor or fan on/off controller.
The location of the controller on the radiator is not accidental: after all, first the “circle” of antifreeze is heated, then the cooling scheme involves the passage of liquid through the radiator, the work of which is intensive heat exchange. And only when the temperature exceeds 92°C does the fan switch turn on.
What's wrong with the fan?
If you suspect a faulty radiator fan is overheating, first check that it is working. This is not difficult to do. Disconnect the electrical connector from the electric motor, and supply electricity from the battery to its contacts. Do not mix up the polarity!
If the fan does not work when connected directly, the reason must be sought in the electric drive. If the electric motor starts working, the problem most likely lies in the elements that ensure its activation. This could be a fuse, relay, wiring, or sensor.
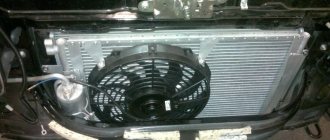
Electric cooling fan operation
The design of the “classic” cooling system does not provide for constant fan operation. It should turn on only after reaching a certain coolant temperature, we discussed this in more detail in this article. The fan switching sensor for the VAZ 2107 injector is installed in the radiator. Therefore, the fan turns on after the radiator itself can no longer cope with the cooling task. This is implemented as follows:
- After heating the antifreeze in the “small circle” of cooling, the thermostat opens.
- The coolant circulates in a “large circle” through the radiator, which ensures effective heat exchange with the environment.
- If the radiator does not “cope” with cooling, the contacts of the fan sensor close and it begins to intensively drive air flow through the radiator, increasing heat transfer.
If the sensor fails, the fan turns on when it overheats and the coolant may boil.
Further check
Further testing should be carried out according to the scheme “from simple to complex”. Diagnosing wiring without the appropriate tools and skills is almost impossible. The situation is similar with relays. It is unlikely that you will be able to check it yourself, especially in the field. The only thing you can do is pull out a similar device from a nearby socket or another car and insert it into the corresponding socket. It works - the reason is established, the fan does not work - we move on.
There will be no problems checking the fuse. We find the required insert in the mounting block, check it with a regular tester or a homemade probe made of two wires and a lamp, and the result is obvious. If necessary, change the fuse and continue driving. But if this time we were wrong, the problem should be looked for in the fan switch sensor.
Troubleshooting algorithm
If the electric cooling fan does not work on your VAZ 2107 (carburetor), you need to do the following:
- Turn off the engine and turn on the ignition.
- Use a flat-head screwdriver to short-circuit the terminals of the fan switch sensor. Please note that all control is based on mass. If the fan turns on, the sensor is faulty. If it doesn’t work, then the reason lies deeper.
- Disconnect the block from the electric fan and supply power from the battery directly. A rotating rotor indicates that the engine is running. If the electric fan does not work even this way, you will have to think about replacing it.
- If the fan and sensor are working properly, you need to check the electromagnetic relay (if present in the circuit).
- The wires are checked last. Oxidation very often occurs at the joints with the car body. And sometimes a banal break even happens.
The same algorithm can partly be applied to cars on which an injector is installed.
But in order to compare and appreciate the difference, it is worth considering such machines.
Where is the fan switch located?
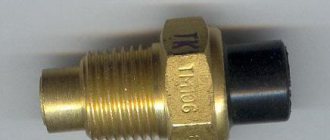
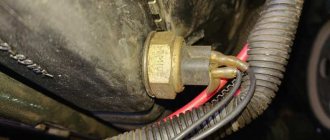
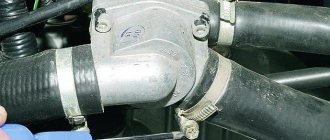
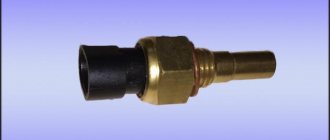
For all outdated modifications of the “classic”, the sensor is located on the cooling radiator housing. Bottom right to be precise. From the outside, it looks like a brass nut “30” with two contacts out. Lift the hood, look at the back of the radiator - you will definitely see it. The principle of operation of the sensor is very simple. The thermocouple reacts to an increase in temperature, closes the contact, and voltage is supplied to the fan. For vehicles with controlled fuel injection, the fan is turned on by a command from the electronic unit based on data received from the sensor. In other words, the ECU itself controls all processes. But where is the fan switching sensor located on injection-powered “sevens”?
As already mentioned, they do not have such a device at all. Don't look for it on the radiator or anywhere else! But pay attention to the thermostat. A coolant temperature sensor is installed on its body. It then transmits to the electronic control unit all the necessary information about the coolant temperature.
How to remove/install a new sensor
After purchasing and checking the controller, you need to do the following:
- Disconnect the negative terminal from the battery;
- Remove the cover of the cooling distribution tank and the cap from the radiator;
- We substitute the container, turn off the tap on the radiator and drain the antifreeze;
- Having removed the wires from the sensor, use a 30mm wrench to unscrew the sensor by the large brass nut;
- Next, the sensor is removed. Be careful not to drop the copper O-ring on the sensor.
After this, the sensor is replaced with a new one. When installing, do not forget to coat the contact areas of the sensor and radiator with a layer of high-temperature sealant before screwing the sensor. This must be done dry. This scheme of action allows you to avoid leakage of antifreeze.
- Now you need to tighten the cap on the radiator, fill in the collected antifreeze, and, by connecting the negative terminal to the battery, check the operation of the sensor and fan. Do not forget to push through the air pockets in the cooling lines of the VAZ 2107.
That's it, you can hit the road! The fan will run.
Sensor check
Now let's talk about how to check the fan switch sensor (VAZ-2107). Let's start with the carburetor engine. Everything is very simple here. All you need to do is disconnect the wires from the sensor. To do this, remove the electrical connector from its terminals. To determine whether the device is working properly, turn on the ignition and close the contacts on the connector. If it's all about the sensor, the fan will definitely turn on.
It may also happen that the fan switching device does not respond correctly to temperature. In other words, the contact closure mechanism works, but at a higher value. So, for carburetor VAZ-2107 cars, the fan switch sensor should close the circuit when the coolant reaches a temperature of 92 degrees, and open it at 87 ºС.
For engines with variable fuel injection, the inspection process is slightly different. Since VAZ-2107 injection cars do not have a fan switch sensor, you need to check the temperature controller. But first you should check the presence of voltage at the connector contacts. Take the tester and turn it on in voltmeter mode. Connect the negative wire of the device to ground, and connect the positive wire to contact “A” on the connector. Turn on the ignition. The tester must show a voltage of at least 12V. If its value is reduced, the problem must be looked for in the control unit. But if the voltage is okay, unscrew the temperature controller from the pipe for further checking.
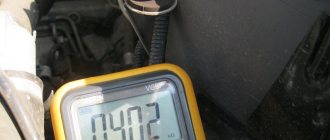
Testing the sensor involves measuring its electrical resistance at different temperatures. Switch the tester to ohmmeter mode and measure the resistance at its contacts. It is noteworthy that it rises and falls in inverse proportion to the coolant temperature (20 ºС – 3.5 kOhm; 40 ºС – 1.5 kOhm; 80 ºС – 340 Ohm; 90 ºС – 250 Ohm). While measuring resistance, the controller can be heated by placing it in a container of hot water. The temperature of the fan switching sensor (VAZ-2107, injector) for different versions of ECU firmware can be 92-95 ºС. Its resistance is close to zero.
It should be noted that the fan activation and coolant temperature sensors cannot be repaired. Therefore, if the slightest malfunction is detected, they must be replaced. Let's consider the replacement process for each engine separately.
Controller diagnostics
To diagnose the controller, you will need a calibrated thermometer capable of operating at the boiling point of water. The diagnostic procedure is performed as follows:
- Often the sensor facing the inside of the radiator has to be immersed in water.
- In addition, the tester probes are connected to the controller contacts and adjusted to have no resistance.
- When the liquid begins to heat up, the resistance disappears at approximately 87-92 degrees. If so, the controller is working and will work as expected.
The process of replacing a sensor on a carburetor engine
This is where the process may seem more complicated. After all, given that the sensor is located at the bottom, you will have to drain the coolant. And to do this you need to look for an inspection hole, remove the engine protection, etc. But you don’t have to do this. You just need to quickly screw the new sensor in place of the old one. Naturally, some coolant will spill out, but its amount will be limited to 20-30 ml. In addition, you can always place a properly cut plastic bottle under the connection point.
So, prepare a new sensor and a “30” wrench. Disconnect the wires from the device. Carefully unscrew the sensor using the key. Continue unscrewing it by hand, pressing it against the radiator body. When the sensor comes off the thread, you can pinch the hole with your finger and start screwing in the new element with your other hand. Do not manage to lose the O-ring that is placed on the threaded part of the device. That, in fact, is the whole process. All that remains is to connect the wires to it, start the power unit and check if everything works.
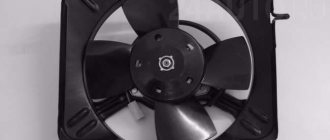
Fan motor
The electric motor is the main component of the device. The VAZ 2107 used two types of engines: ME-271 and ME-272. In terms of characteristics, they are almost identical, but as for the design, it is somewhat different. The ME-271 engine has a stamped housing, i.e., non-separable. It does not require periodic maintenance, but in case of malfunction, it can only be replaced.
Not every fan motor can be disassembled
Structurally, the motor consists of:
- housings;
- four permanent magnets glued around the circumference inside the case;
- armatures with winding and collector;
- brush holder with brushes;
- ball bearing;
- support sleeve;
- back cover.
The ME-272 electric motor also does not require maintenance, but unlike the previous model, if necessary, it can be partially disassembled and attempted to be restored. Disassembly is carried out by unscrewing the tightening bolts and removing the back cover.
ME-272 has a collapsible design
In practice, repairing an electric fan is impractical. Firstly, you can only buy used spare parts for it, and secondly, a new device complete with impeller costs no more than 1,500 rubles.