DIY valve repair VAZ-2112 16 valves step by step instructions
The advantages of the 16-valve engine that the VAZ-2112 is equipped with over its 8-valve counterpart are obvious:
- increased power (up to 90 hp versus 76 hp);
- increased resistance to detonation (due to adjustment of the combustion chamber);
- extended service life (due to optimization of the cooling system);
- simplified installation system for intake and exhaust manifolds.
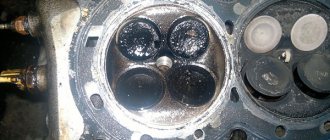
However, operation of any system without proper prevention sooner or later leads to its wear and failure. The main symptom of valve failure is the engine starting to stall. The most common problems associated with 16-valve engines are broken timing belts, burnt valves, and broken hydraulic lifters.
Advantages of a 16-valve engine
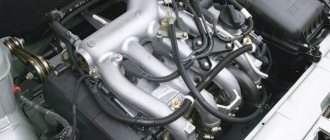
The VAZ 2112 with 16 engine valves has a number of advantages over cars of the same brand, but with fewer valves. Its main advantage is the ability to achieve maximum engine power, regardless of the type of the latter. (see picture).
DETAILS: Changing the oil in a VAZ 2110 engine. Video instructions for changing engine oil on a VAZ 2110 with flushing
For comparison:
- VAZ 2112 with a volume of 1500 cubic cm, has 77 horsepower.
- A VAZ 2112 of the same volume can have a power of up to 90 horsepower.
This difference is possible due to the fact that in the second case the filling of the cylinders with the warm-air mixture is much higher.
In addition, the advantages of the 16-valve engine:
Better performance of the cooling system and, as a result, greater strength of the unit. Possibility of increasing engine knock resistance
This is especially important if low quality fuel is used. If there are 16 valves, the intake and exhaust tracts are located on opposite sides of the cylinder head, which facilitates their installation, repair, etc. The main reason for the failure of VAZ-2112 valves with 16 such elements is strong heating, which leads to burnout of the pump components
Car enthusiasts do not encounter this problem too often, but it arises due to:
The main reason for the failure of the VAZ-2112 valves with 16 such elements is strong heating, which leads to burnout of the pump components. Car enthusiasts do not encounter this problem too often, but it arises due to:
- Filling the car with low-quality gasoline.
- If the vehicle is fueled with propane and the controller firmware has not been properly modified.
- The VAZ-2112 with 16 valves does not have the required number of spark plugs.
- The engine constantly detonates the injectors.
- The vehicle is operated at speeds higher than permitted, as a result of which the clutch readings begin to deteriorate and the parts are subject to increased load.
How to properly remove valves
Which VAZ engines bend valves.
3, when the timing belt breaks, does the engine bend the valve or not? Before you start working, you need to prepare the appropriate tool. In particular, to replace you will need:
- Set of socket and open-end wrenches.
- Torque wrench.
- Spare parts for replacement (new set of valves, gaskets if oil seals need to be replaced, etc.)
- Container for draining antifreeze.
It will not be very convenient to disassemble on the ground, so experts advise installing the car on an inspection hole or overpass. The step-by-step procedure is as follows:
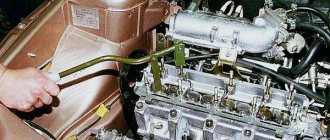
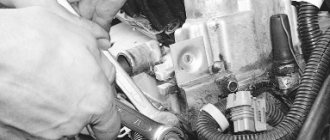
Initially, the machine must be de-energized. This is done by removing the negative terminal from the battery; the next step is to free the cooling system from antifreeze. Drain the coolant into a specially prepared container; releasing pressure in the fuel system. To do this, you need to unscrew the fuel hose fittings. To do this you will need a 17 key; disconnecting the exhaust pipe from the exhaust manifold and dismantling the thermostat; retraction to the side of the bracket. It is held on by several nuts that will need to be unscrewed; removing the cylinder head along with bearings and fuel rail; desiccation. When dismantling the crackers, you must be extremely careful, since they are under high tension on the springs. Therefore, they can simply “shoot” at you; dismantling the valve plate along with the springs
Please note that removing the lower plates may require removing the seal, and this also requires a special tool.
That's all, actually. The procedure is completed, and then you can begin repair and maintenance work. If you intend to change valves, do not rush to install new ones. Inspect them carefully, because it is quite possible that you will be able to restore them, and they will still serve. At the same time, as a rule, restoration is more often practiced on old cars; on a VAZ-2112 this is not always possible. The reason for this is the quality of old parts, which is considered higher than the current one.
If you do intend to restore a damaged part, it is best to mark the cylinder on which it sat. You should also evaluate the condition of the device guide bushings. After an initial assessment of the condition has been made, repair or maintenance can begin.
The procedure for disassembling the fuel system will take you a certain amount of time, but it is quite doable with your own hands. You only need to do it once, after which subsequent dismantling of the valves will no longer be such a difficult procedure for you. Reassembling the system is carried out in reverse order. Try to periodically look under the cover of the BC, because in this case you will save yourself from a number of troubles.
Techniques for working with the device
Working with a desiccant is not difficult, but it requires some dexterity and skill. Also, before desiccation, it is necessary to carry out a number of preparatory measures:
— If the cylinder head is not removed from the block, a rope can be inserted into the combustion chamber through the spark plug hole, then bring the piston to TDC - this prevents the valve from releasing into the combustion chamber when the springs are compressed; — If the head is removed, you need to place a wooden block under the valve or simply fill the space under it with a rag; — It makes sense to place a thin plastic gasket between the spring and the head; — If you plan to install the valves in their places, during disassembly all parts must be laid out so that they are not mixed up during reassembly.
The desiccation process itself boils down to the following:
- Install the device over the spring plate;
- Apply force to the device, as a result of which the springs will compress and the crackers will open. In this case, the crackers may “stick” to the valve stem due to the presence of oil, but very often they fall out and sometimes bounce off - in any case they need to be removed;
- Remove the force from the device and disassemble the valve.
When installing crackers, the operations are carried out in the reverse order, but first you need to do a few simple things:
— Be sure to replace the valve stem seals; — Lubricate the valve stem with oil - this will help the crackers “stick”, which will simplify installation; — To protect the stem from damage, you can put a thin-walled plastic sleeve on it or wrap it with adhesive tape, which is then removed.
After installing the nuts, use a soft-faced hammer or other non-metallic tool to give several light blows to the top of the valve stem - this will help the nuts fall into place.
A special device greatly simplifies the process of removing and installing crackers, saving time, effort and, most importantly, nerves. Those who have ever changed crackers will understand.
The warm season, especially spring and summer, is the season for cycling, nature walks and family holidays. In the AvtoALL.RU online store you will find everything to make your vacation enjoyable and useful.
The May holidays are the first truly warm weekend, which can be usefully spent outdoors with family and close friends! The range of products from the AvtoALL online store will help you make your outdoor leisure time as comfortable as possible.
It's hard to find a child who doesn't like active play outside, and every child has dreamed of one thing since childhood - a bicycle. Choosing children's bicycles is a responsible task, the solution of which determines the joy and health of the child. Types, features and selection of a children's bicycle is the topic of this article.
The warm season, especially spring and summer, is the season for cycling, nature walks and family holidays. But the bike will be comfortable and bring pleasure only if it is chosen correctly. Read the article about the choice and features of buying a bicycle for adults (men and women).
Swedish Husqvarna tools are known all over the world and are a symbol of true quality and reliability. Among other things, chainsaws are also produced under this brand - read all about Husqvarna saws, their current model range, features and characteristics, as well as the issue of choice in this article.
Heaters and pre-heaters from the German company Eberspächer are world-famous devices that increase the comfort and safety of winter operation of equipment. Read the article about the products of this brand, their types and main characteristics, as well as the selection of heaters and preheaters.
Design and principle of operation of the desiccant
124 and 126 engines on which valve bending. 124 does the engine bend the valves?
The valve depressurizer is needed in order to smoothly compress the valve spring, hold it in a compressed position, thereby moving the spring mounting plate down and releasing the cracks. After removing the crackers, use a desiccant to gently release the spring so as not to damage anything. It's simple!
Valve seals have many designs, to the point that each series of Mercedes engines requires its own seal. But any desiccant cannot do without the following mandatory elements:
- An annular stop for pressing on the valve plate - most often in the form of a tube with large cuts in the walls to remove crackers through them;
- Depressurizer frame - with which the valve spring is held in a compressed position;
- Handle or screw - which creates the force to compress the valve spring.
How to desiccate and dry valves without a desiccant, and so it’s not difficult
Do valves bend on Grant 8 valve engine 11186
How to desiccate and dry valves without a desiccant, and so that it’s not difficult??
- It’s easy to replace a burnt-out valve yourself at home; the only thing you need to know is how to remove the head from the engine. And I will explain all the work involved in replacing and lapping the valve. I will assume that you have never replaced a burnt-out valve or you have changed the valve but not successfully (the valve does not hold and the engine suffers). This method of replacing and grinding in a valve is suitable for any brand of car, UAZ, Zhiguli, Gas, etc. all valves are basically the same and the only difference is in size and location in the engine head, and they all grind in the same way. The first thing you need to do before replacing and lapping the valve is to buy lapping powder (the powder can be different, dry and ready-to-use). The dry lapping powder will need to be diluted with any machine oil (it’s easier to take the oil that you pour into your engine), the ready-made lapping powder has already been diluted. To dilute the lapping powder for valves, pour it into any small container, even a bottle cap (you don’t need a lot of it, but you can always add it) and fill it with oil to make a medium-thick porridge. There are many types of lapping powder; in principle, any one will do, but it is better if it is smaller. Also, do not forget to buy a new head gasket and valve seals, even if you recently changed the valve seals, it is still better to install new ones after grinding in the valves. Usually exhaust valves burn out, I have never seen an intake valve burn out. Therefore, buy a replacement valve or valves; if there is a good working valve, then you can install it. Valves burn out for various reasons: the valve was pinched, a very lean fuel mixture (especially if the engine runs on gas), a lot of wear on the valve guide (the valve dangles heavily in the guide), or wear on the valve stem itself (abrasion of the valve stem). Let's start replacing the burnt-out valve. Advice, do not remove the carburetor and manifold from the head, they do not interfere and you have less hassle with disassembling unnecessary parts. The first thing you need to do is dry out the valve, most likely you don’t have a valve puller, if you do, that’s great, but you can do without a valve puller. Place the head on a flat surface, preferably a strong table or wooden shield; you can also lay a rubber mat under it. Place any piece of iron under the valve that needs to be dried, the main thing is that the valve rests against it, take a tube with an internal diameter of 13 mm or more, the main thing is that it is no larger than the valve spring plate (for Zhiguli), for UAZ and GAZ the tube should be at least 16 mm. Place this tube on the valve so that the valve crackers are inside the tube, and hit the tube with a hammer, usually on the 3rd or 5th blow, the valve cracks and the crackers remain in the tube and are not lost, just press the tube tightly against the valve plate so that it does not jump off the valve plate upon impact . I’ll tell you right away, don’t be afraid, the spring won’t fly away and won’t hit your hand. The valve is dry, pull it out, insert a new valve and shake it; if the runout is about a millimeter, then it is still tolerable, you can leave this valve guide, but if the valve dangles too much to the sides, it is advisable to replace the valve guide with a new one. How to Replace a Valve Guide
In order to knock out the valve guide, you need a special mandrel, which you most likely don’t have, well, we won’t knock it out without it, take a round piece of millimeters #510;12-13.5 or a long bolt #510;12mm for the Zhiguli head, for the UAZ and Strip round timber #510;15-16mm or bolt 16mm
But there is a very important point on which I want to draw your attention, you need to knock out the guide sleeve from the inside towards the camshaft (from bottom to top) and it is very important to knock it out with a very heavy hammer with a half-hammer, the blow should not be very strong, the main thing is it must be heavy (the guide sleeve is easy will come out and won't crumble). If you start knocking out the valve bushing with a light hammer, the bushing will crumble and you will only suffer
dry it out, set the socket wrench to about 17 and hit it sharply with a hammer. The crackers pop out. It’s more difficult to dry, I used a large screwdriver to press out the spring and put in the crackers with tweezers, some the first time, and some the same. You can dry it out... but put it back together. What a car. . ? No way
What you need to make your own desiccant
To make this device, you will first need suitable materials. For the clamp option you need to have:
- Metal profile or sheet metal 10-15 mm thick;
- A couple of large bolts or studs (screws will be made from them, so the length of each is at least 15 cm);
- Two nuts comparable to the bolts.
For the lever option, you must stock up on the following elements in advance:
- A metal pipe or rod with a diameter of about 15 mm and a length of up to 40-50 cm;
- Two steel strips 20-30 mm wide and 5 cm long. Thickness about 3 mm.
- Two strips 20-30 mm wide, up to 3 mm thick, 15 cm long;
- Two 6x25 mm bolts with nuts and washers;
- Two steel washers (you can make your own). The first has a diameter of 25 mm, a thickness of about 3 mm, and an internal hole of 8 mm. The second has a diameter slightly larger than the spring plates. Its thickness is at least 5 mm.
Of course, it will not be possible to make a valve desiccant without available tools. Required:
- Grinder or hacksaw for metal;
- Welding machine (you will have to make several seams of 2-3 cm each);
- Vise;
- Drill and drill bits for metal;
- Spanners.
Manufacturing of screw desiccant
- Making a frame bracket. This is the main part of this type of desiccant. It can be cut from a single sheet of metal, but it will be much more convenient to weld it from several pieces of profile or thick steel strips. The dimensions depend on the specific car model, but the average internal indicators are as follows: length of at least 210 mm, width of at least 150. The result is a frame in the form of a large printed letter C.
- After the bracket is ready, nuts are welded onto the ends of the short sections.
- A piece of pipe is also welded to one of the bolts. Either a large washer or a valve plate is welded to the second one - this will be a support.
- The bolts are screwed into the welded nuts so that when screwed they move towards each other and towards the center of the bracket.
When and why is replacement needed?
Valves on different parts of the car wear out at different rates. Of course, cylinder head devices will last significantly less than their stove-mounted counterparts. Timely installation of new valves allows you to avoid losses in engine power, stabilize its operation, and improve dynamic performance, which will significantly deteriorate with wear.
First of all, this is a characteristic knocking sound in the engine, caused by an increase in the gap between the camshaft and the crankshaft cams. The causes of malfunctions may be as follows.
- Timing belt break.
- Unscrewing the crankshaft mounting bolt.
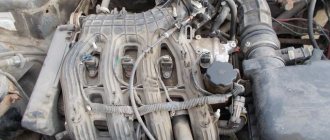
- The valves come out of their seats, which will become noticeable immediately after you remove the cylinder head cover.
- Wear and thinning of device legs, which is determined using a special measuring tool.
- Depressurization of the structure, appearance of dents, cracks, and chips on it.
It is recommended to check valves not only after detecting characteristic signs of damage. AvtoVAZ advises installing new units after a certain mileage. If your Lada 2112 is already approaching the limit value for this indicator, then it’s time to look under the cylinder head cover and see what condition the valves are in. Next, we’ll talk about how to dismantle devices to assess their performance and possible replacement.
Other cases in which dismantling of the cylinder head is required
Of course, it is not necessary to remove the cylinder head for every breakdown. This is only necessary if major repairs are needed. Such “major” cases include:
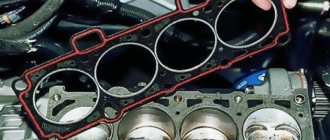
- Gasket wear.
- Formation of carbon deposits on parts.
- Valve deformation.
- Need to replace guide bushings.
- Failure of the camshaft, etc.
Of course, repairing it yourself or through a service in any case involves certain financial costs. To ensure smooth operation of the engine, regular diagnostics of the cylinder head are necessary. It is recommended to use high-quality fuel. In addition, try to prevent the car from overheating - because of this, the cylinder head may lead.
If some points remain unclear to you, then you can visually familiarize yourself with the process of replacing valves by watching the video:
Valve desiccant.
When repairing a vehicle, a mechanic uses a large number of tools. And in some situations it becomes necessary to use such a special device as a valve depressurizer. Its main task is already clear from the name - to help a specialist remove the valve cotter.
What is a valve desiccant?
Therefore, first of all, we will understand what a cracker is, where exactly it is located on the valves and why its removal can only be done using a special tool.
So, as you know, the main task of the exhaust and intake valves is to tightly close the engine cylinder window, as well as to open it at the right time.
The implementation of this process is possible thanks to two return springs: they press on the plate, which in turn is connected to the rod using crackers. They, together with the force of the springs, hold the valve firmly in the seat when performing its main function.
These crackers look like a small cylinder divided into two halves. Inside its surface there is a spike that fits into the valve groove. The outer diameter of the crackers is larger than the inner diameter of the plate. Consequently, they are held very securely and strongly - so strongly that they can only be removed with a desiccant.
The latter, by the way, is a fairly simple structure that you can build yourself. To do this, you only need 3 elements: a lever, a bracket for pressing on the plate and a holding bracket.
The first can be made from a metal pipe (its length should not exceed half a meter), with a diameter of one and a half to three centimeters, and the last two can be created according to the same pattern, only one should have a hole for attaching it to the head pin, and the second should have a persistent a washer with an internal diameter smaller than the valve plate, but larger than its internal hole.
How to dry valves correctly?
In fact, the technology for dismantling cracker cylinders is a simple task that any non-professional can handle. To do this, you just need to get a technological map and a desiccant.
So, in order to do desiccation, you will need to perform the following steps. First of all, you need to screw the desiccant bracket with the hole onto the head stud using a nut or screw it with a bolt. And install the second bracket on the valve plate and apply gentle pressure on the end of the lever. Thus, moving down the valve, the plate will release the crackers, which are then carefully removed. Next, after them, you can remove the spring and valve.
Of course, you can remove the crackers with any other handy tool, but you are unlikely to be able to put them back in their place without a special device. Therefore, before starting repairs, you need to prepare, that is, purchase or make your own desiccant.
https://youtube.com/watch?v=r8fb-I9gF4I
How to remove crackers incorrectly?
Many people use pieces of pipe or a spark plug wrench to dismantle the crackers: one end of the pipe is placed on the valve plate, and the other is hit hard with a hammer. As a result of the impacts, the crackers are released from the plate, and they jump out of their seats.
However, sometimes sticking may occur during this process, which can result in a bent valve plate or valve stem. Therefore, if you don’t want to “run into” extra financial costs, don’t tempt fate - use a valve desiccant.
Necessary parts and tools for repair
Troubleshooting the cylinder head begins with the purchase of original parts and various consumables, the list of which is as follows:
- Fuel intake system valve 8 pcs. (art. 21120-1007010).
- Exhaust gas valve 8 pcs. (art. 21120-1007012).
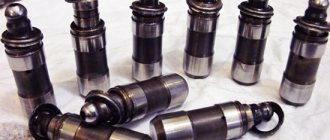
- Set of hydraulic compensators 16 pcs. (art. 21120-1007300).
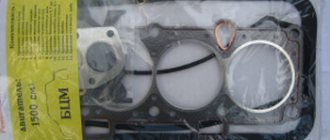
- Gaskets for valve cover, cylinder head, intake manifold, exhaust manifold (all come as a set art. 21120-1002064-86).
- Bolts securing the cylinder head to the engine crankcase (art. 21120-1003271-018).
- Timing belt (art. 2112-1006040-02RU), timing tension roller (art. KT100507/100513), drive belt for mounted units (art. BP638).
- Engine oil and oil filter.
- Cooling system fluid.
Installation of valves on a VAZ 2112 is carried out using a standard set of tools, as well as several specialized types of keys:
- standard set of spanners from 8 to 24 mm;
- socket sockets in a set from 8 to 27 mm;
- end internal hexagons;
- mechanical valve retaining ring remover (depressurizer);
- torque wrench for tightening the cylinder head and camshaft bolts;
- paste for grinding valves (set for rough and fine grinding);
- metalworking cloth gloves to protect hands while working.
The work of replacing 16 valves on a VAZ 2112, the price of which as of this fall is about 50 thousand rubles at AvtoVAZ dealerships (or approximately 35-40 thousand rubles at ordinary car repair shops), is not a very complicated process. You can carry out the work yourself, for which it is enough to purchase the above-described spare parts and the necessary tools.
How to dry valves correctly?
In fact, the technology for dismantling cracker cylinders is a simple task that any non-professional can handle. To do this, you just need to get a technological map and a desiccant.
Manufacturing of a lever desiccant
Making a universal valve desiccant with your own hands is also not difficult.
- Making a lever. To do this, the rod or pipe must be bent so that it takes the form of lightning. In this case, the bend should be shifted to one side. It turns out that the length of one end is about 15 cm.
- Two through transverse holes are drilled at the short end. The first is at a distance of 1 cm from the edge, the second is at a distance of 12 cm. The diameters correspond to the existing bolts.
- A U-shaped bracket is made from short strips. Holes for the bolt are drilled at the free ends. The partition is made of a washer with a diameter of 25 mm with a hole in the middle. The bracket is screwed to the outer hole in the lever.
- A similar bracket is made from long strips and is also attached to the lever using a free hole.
Finally, we would like to add that in a number of cases, a high-quality and competently manufactured homemade valve desiccant is in no way inferior to its factory counterpart, and sometimes even surpasses it in a number of indicators. And, of course, the cost of the tool will be noticeably lower compared to similar finished products.
Grinding in valves: how to do it yourself. Why and when do you need to grind valves? How to grind valves, what grinding paste to choose. Recommendations.
How to determine a burnt engine valve yourself. The main symptoms of a burnt valve, exact clarification of the causes of engine tripping. Diagnostics, useful tips.
Valves knock on a cold engine or after warming up the engine: possible causes of valve mechanism knocking. Fault diagnosis, useful tips.
Why and when do you need to adjust the valves? Self-adjustment of valve clearances using a feeler gauge and shims. Recommendations.
Purpose of the exhaust valve of the engine timing mechanism. Manufacturing materials and design features, protection of exhaust valves from burnout.
Purpose of the timing valve. Inlet and exhaust valves, design and features of the part. Layout diagrams and valve drive of an internal combustion engine.
Top 5 universal desiccants
If you occasionally work on the cylinder head and depressurize valves, then you definitely need a valve depressurizer. Below I will describe the most popular and cheapest universal desiccants.
Homemade desiccant.
This option has the right to life. A lever-type desiccant is usually taken as a sample. The most important advantage of such a desiccant is that you can customize the tool to suit your needs. You can make several pressure rings of different diameters and lengths, or use the holes in the lever to create a wider range of adjustment. All in your hands.
Autom-2
The cheapest and most common desiccant on the Russian market. Its price fluctuates around 250 rubles. Which, you agree, is quite a bit. Produced in the city of Voronezh. It has proven itself to be a reliable and convenient tool. The disadvantages include the fact that it was created specifically for VAZ car engines. The use of this desiccant is difficult on engines of other concerns.
Licota ATA-1404
Universal desiccant from the famous company Licota. A wide range of applications have made it very popular. Most often used at small and medium-sized service stations that specialize in engine repair. The kit includes an adapter for supplying compressed air to the cylinder. A depressurizer can hold the valve spring in a compressed position, which will free your hands. The disadvantage is the price. The average price on the market is 5,500 rubles.
Licota ATA-0014
A universal desiccant with a hook on the lower coils of the spring from the same company Licota. A very convenient and relatively cheap desiccant. Allows you to very quickly and practically without preliminary preparation carry out the procedure for desiccation of valves. Disadvantages include difficult use on twin-shaft engines, lack of an adapter for supplying compressed air to the cylinder. The average price on the market is 2,400 rubles.
Licota ATA-0035
Universal desiccant for engines with central spark plug wells. A very convenient desiccant. Ask service stations that specialize in BMW what desiccant they use? The answer, with almost 100% probability, will be Licota ATA-0035. Ease of use, everything you need in the kit, made this universal desiccant the best for engines with central spark plugs. The average price on the market is 5,000 rubles.
What is a desiccant and why is it needed?
To begin with, it’s worth remembering how the valves are held in the gas distribution mechanism of any engine. So, the intake and exhaust valves are held closed by a spring. It, in turn, is fixed on the valve stem with a plate and crackers.
To remove the valve, you need to compress the spring and remove the crackers. The desiccant should cope with exactly this task.
There is a special tool to solve the problem. Desiccants are of two main types:
- screw (in the form of a clamp). They only work on the cylinder head removed from the engine;
- lever (universal). With them there is no need to remove the head;
The first option allows you to free the master’s hands by holding the spring in a compressed state. The second option requires the constant participation of at least one hand. It consists of a long lever, a stop and a bracket for fixing to the cylinder block.
Both one type of device and the other are sold in stores. But many products are either of low quality or high cost. Therefore, it is worth looking for drawings for a valve depressurizer in order to make a reliable, inexpensive tool yourself.
Why are there crackers in the engine?
Simple question: how to fix the valve in an internal combustion engine? The question ceases to be so simple if we remember that each valve - both inlet and exhaust - opens and closes with a frequency of 20-25, or even 40 times per second. Under such loads, the simple task of securing a valve becomes very difficult.
Is it possible to screw the valve to the spring with nuts? It is possible, but with constant shock and vibration, the nuts will tend to unwind, and even cotter pins will not give a reliable result. In addition, the threaded connection will be quite complex. It is also impossible to weld the valves “tightly” - in this case repair will be impossible.
That is why a special solution was found for fixing the valves - a crayon connection, which is as simple as it is reliable.
The structure of a crack joint generally comes down to the following. In the upper part of the valve stem (stem) there is an annular groove into which the inwardly directed annular projections of two crackers, shaped like a cylinder cut along the length, are inserted. When the cracks fit into the groove, a cylindrical thickening is formed at the top of the valve, which cannot move along the stem. The crackers rest against the plate that holds the springs and fix the valve in the closed position.
However, the crackers must be fixed so that they do not fall out due to constant vibration, but can still rotate freely in the groove. This is achieved very simply: there is a recess in the upper plate in which the crackers are located, as in a well, and cannot fall out provided that the valve springs do not weaken.
Depressurization of valves
Depressurization of K6A Jimny valves.
The engine capitalization begins with the cylinder head. In the near future I will have to disassemble my K6A, so in advance a cylinder head with a burnt-out valve was found in the bins of the Jimny Club. I decided to completely prepare the head so that I could then remove mine and immediately install a new one.
First, remove the camshafts from the head.
K6A jimny cylinder head camshafts
There is no need to be afraid that the camshafts will get mixed up later, there are marks on them and at the time of assembling the head everything will still fall into place, if you don’t forget about it. The camshaft bed covers are also signed. E exhaust, I inlet.
Under the camshafts there will be washers that regulate the thermal gap, you can simply pry them off with a screwdriver and carefully pull them out, it is advisable to put them all in order, each washer has its own size, so if they do not get mixed up, then it will be easier for us to adjust the gaps.
valve shim
Under the adjusting washers there will be valve plates, which we need to dry out.
Depressurization of k6a valves
In order to desiccate the valve, we need either a special desiccant or a regular candlestick with a magnetic tip. The magnetic tip will not allow the crackers to fly away in an unknown direction, since they are very small, finding them later will be very problematic.
The essence of the process is simple, you need to press the magnetic part of the candlestick onto the valve plate, and not just press it, but with force, so that the cracker flies into the inside of the candlestick and becomes magnetized. There is no need to hit the candlestick with a hammer, as vase industry experts write, it is enough to simply press until the end of the spring stroke.
candle holder with a magnetic tip for desiccation of valves
Then all the plates, crackers and springs need to be carefully placed in a box so that nothing gets lost or mixed up.
valve plates with crackers and springs
intake valves k6a
Some installation tips
The piston of cylinder No. 1 must be placed at its dead top point before installation. A 17 key will help with this. There are grooves in the pulleys, and spikes in the camshafts.
Each pulley has marks and they should face up. It’s better to place the crankshaft according to the mark that is on the gearbox unit.
When dismantling, it is necessary to note at what angles the tension rollers are fixed. The key plate must be set at the correct angle and the nut must be tightened with a force of 40 N*m.
The screws and their working part must be lubricated with engine oil and tightened in the correct order. Then you need to turn the screws 90 degrees during the second pass and 90 degrees again during the third pass.
Similar articles
How to change the timing belt on a VAZ 2110 (8 valves) yourself?
None Replacing valves on a VAZ-2112 (21120) 16 valves Link to main publication
Didn't find the information you are looking for? on our forum.
One of the most common signs of a malfunction of the valves on the VAZ 2110/2112 is a distinct knocking sound when the engine is running. Also, improper operation of the valves may be indicated by the engine stopping when starting the car, and a decrease in compression in the cylinders.
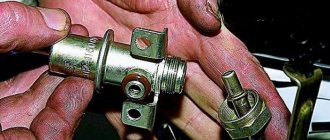
What is a valve spring retainer?
The valve spring retainer is a small part that consists of two identical parts; if you put these parts together, you get a conical cylinder. On the inside of the crackers there are fastenings, with the help of which the cracker is attached to the valve stem. The valve stem must have grooves into which the fasteners for the cracker are inserted.
The valve spring is always compressed. Trying to unclench, she pushes the valve plate up. The valve plate compresses the nut around the valve stem. The cracker, which holds onto the grooves on the valve stem, prevents the plate from moving upward and thereby decompressing the valve spring. This is what secures the valve to the valve seat.
Without desiccant
Without a valve desiccant, they try to remove the crackers as follows. Take a pipe of a suitable diameter, install it on the spring mounting plate and hit the pipe with a hammer. When struck, the plate moves down, compresses the spring and releases the crackers, which fall onto the surface of the plate. After this, the spring unclenches and the crackers fly away in different directions. I cannot call this method of removing crackers other than barbaric.
This method may damage the valve, spring, or spring retainer. Loss of crackers is also possible. I'm not even talking about the fact that crackers can fall into the oil passages of the engine, and then you are guaranteed to completely disassemble the engine and search for the cracker in it.
Useful tips
- There are additives for restoring seals. When you are tempted to use one of them instead of changing the caps, remember that there are no miracles in the operation of the internal combustion engine and natural wear and tear. These additives soften hardened rubber and supposedly restore the quality of the seals. Experience shows that these additives either have no effect on the rubber, or soften it too much, and as a result, the size of the working edge increases, and oil consumption after using the additive increases significantly. So you better think about how to change the valve stem seals. How much it will cost you depends on the type of internal combustion engine. But you will definitely be sure that the caps perform their function. Additives, alas, cannot guarantee you such an effect. You should not try such additives on your car.
- If you haven't found a device with a collet clamp for removing caps, but that hasn't stopped you. Remember that the landing step under the cap has a wall thickness of just over a millimeter and is very fragile, and when you try to remove the cap with pliers, this part of the valve guide is broken very often, and the repairs that are necessary after this (replacing the guide, milling the seat and lapping the valve) are much more expensive more expensive than replacing caps and related devices.