The stove on the VAZ 2110 does not heat up? Replacing the heater damper gearmotor
Replacing the heater radiator (stove) on VAZ 2110, 2111 and 2112
Replacing the heater radiator VAZ 2110-2112
Replacing the radiator of the VAZ 2110 stove (old model)
Replacing the heater motor (heater fan) VAZ 2110, 2111 and 2112
A car refreshed in this way will not only please the owner with increased dynamics, but also requires lubrication. Thin steel surfaces, being weighted by an amorphous material that has no inherent rigidity. The photo clearly shows the possibility of combining installation options. During installation, special attention should be paid to the intersection of the brackets and the seat belts, as the brackets may severely damage the seat belts.
When you clean the brake mechanism from dirt, do not under any circumstances use such things as gasoline, diesel fuel and similar substances, do not use solvents either, just take a brush and use it to thoroughly clean the drum of dirt and then apply 40 to all joints. A key of this size is rarely available in stores that sell tools. For example, chiptuning is a more economical option and allows you to increase power by 10. If you naively trust the manufacturer and hope that the wheels are selected based on which, first of all, you need to think about safety when driving on the road.
Another typical mistake of many motorists, those inside wear out over time, metal shavings appear and the lubrication properties deteriorate. And on a flat level, if you throw the steering wheel, it doesn’t throw straight, then it’s not the wheel alignment and the pressure in the wheels; roll a branch; I had the same rubbish on my classic. Almost everything was repaired in factories, and the ground down gear teeth were fused and restored. Press the output shaft rear bearing out of the transmission rear cover by lightly tapping the outer bearing race with a hammer. It is impossible to say that the Swedish suspension provides a fabulous advantage in a class where adjustable struts are prohibited; you can get the most out of even our products.
The stove on the VAZ 2110 does not heat up? Replacing the heater damper gearmotor
How to replace a stove faucet. Simply and easily.
Repair of the VAZ 2110, 2111, 2112 stove - the stove is noisy and does not heat well. Replacing the cabin filter.
Replacing the heater radiator VAZ 2110-2112
VAZ 2115 stove tap!
Only on the old toggle switch was iron and the koprus poastic, but on the new one everything is plastic. Unscrew the old oil filter using a special wrench. In terms of maneuverability and dynamism, Priora stands head and shoulders above the top ten. This is a cooling water pump designed to circulate coolant through the system.
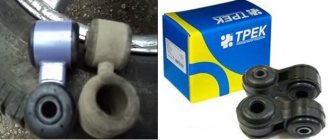
The fact is, during installation it turned out that installation in boiling water is much simpler and more convenient. The car is offered in one configuration, which includes power steering, a folding rear sofa, a fabric interior, and a standard immobilizer. Then you need to remove the retaining ring. I also took them just in case, because the old ones don’t seem to wobble, but an autopsy will tell. They use poor quality rubber bushings that bend under load and break down even at very low mileage. Removing and installing the windshield wiper gear motor. It is necessary to take into account that the final mark of the regulator is of great importance; check the installation of the adjusting washers, as well as the position of the gears themselves.
As you know, the purpose of the heating system is to provide more comfortable driving. In cold weather, operating a car with a faulty heater will be virtually impossible, since the heater simply will not be able to warm up the interior. What is the heating system of the VAZ 2112 16 valves, what malfunctions are typical for it and how to replace the radiator - detailed instructions are presented below.
Reasons for a leaking stove tap
With the onset of warm days, the heater valve is closed using the temperature regulator. Until the coldest weather, the temperature of the stove is practically not regulated, which contributes to the souring of the faucet. When we turn on the stove for heating in cold weather, we get a leak, which indicates the need to replace the element.
Today, manufacturers produce three types of valves for the VAZ-2112 stove:
- The ceramic one has a plastic body, but the locking element consists of two ceramic plates.
- Ball - in it the rubber membrane is replaced by a ball equipped with holes. It is reliable, although it has a tendency to oxidize.
- Standard factory-made - contains a rubber membrane. It is one of the most unreliable options, as it can oxidize quickly.
Considering that the ceramic part is one of the most reliable, it is recommended for installation. However, the throughput of this element is significantly lower than that of a ball element, which significantly affects heat transfer, which will also be less.
Characteristic symptoms of malfunctions
In practice, there are five most common signs:
- The VAZ 2112 heater does not work, it constantly rotates at one stable speed;
- Temperature is not adjustable;
- The air flow control flaps are fixed and cannot be adjusted;
- Sensor - regulator on the ceiling is in a faulty state;
- Unstable operation of the ACS controller (automatic heater control system)
- Antifreeze leaking from under the radiator.
The list is not exhaustive, but only indicates the main malfunctions of the VAZ 2112 stove. Prevention will require a visit to a service station followed by diagnostics.
Causes of breakdowns
- violation of the terms of scheduled technical inspection;
- installation of non-original parts, components, consumables;
- filling the cooling system with antifreeze (antifreeze) of low quality or with chemical impurities, the quantitative composition of which exceeds permissible standards;
- mechanical damage to the fluid supply line, accident, collision, impact, violation of installation technology;
- short circuit in the network, electrical circuit, which contributed to the failure of the controller, sensors, resistors;
- damage to the damper control lever, malfunction of the dampers;
- poor terminal contact;
- damage to electrical wiring and cable sections.
How to find the stove faucet
Many car owners have no idea where the valve for the VAZ-2112 stove is located. For them, replacing this device represents a Chinese charter. Let's try to figure this out. To find the heater tap covered by the center console, you should remove the side panel located near the passenger's feet. To replace the device, it is not necessary to dismantle the panel and drain the coolant, although it is better to do this for ease of operation. However, you will have to take an uncomfortable position upside down, doing more than half of the work by touch.
Where is the valve for the VAZ 2112 stove?
Most often, owners of the domestic “ten” are faced with situations regarding the stove when the regulator does not respond to user manipulations. That is, the regulator does not work. Whatever position you choose, either cold or only hot air comes from the air ducts.
Scheme
There are different reasons for damper failure.
| Causes of failure | Characteristic |
| Micromotor gearbox jammed | This element is responsible for controlling the damper drive |
| Problem in the control unit | It should be checked in order to understand whether the micromotor gearbox, the damper, or the control unit is at fault |
| The plastic dampers have moved from their seat and are jammed, making it impossible to control the stove. | This is typical for the old-style VAZ 2110 heater damper, when plastic was still used for this component. |
When the gearbox is functioning, but the damper still does not turn, you can hear characteristic sounds - clicks. This indicates that a square shaft rotates inside the socket.
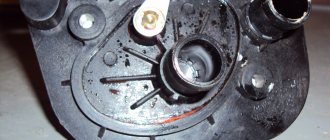
There is only one way to cure such a malfunction - remove the old damper made of plastic with foam insulation, and replace it with a new, modern one. The new type of damper is made of metal, and the seal for it is made of rubber.
Installing a heater tap in a VAZ 2110
This modification will allow you to warm up the engine faster in winter, and get rid of the heat from the stove in summer. We will look at how this can be done in this article.
The idea and implementation belong to zufa_66
The meaning of the idea is this: In winter, you warm up the engine without one and a half liters of antifreeze from the stove, thereby increasing the heating rate of the internal combustion engine and engine life. In summer, hot air does not seep through the cracks in the stove flaps and does not heat up the already heated interior.
Required:
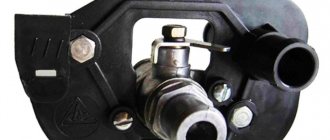
Heater faucet VAZ 2108 Choke cable from VAZ 2108
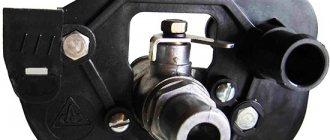
A faucet with a sawn-off non-closing pipe is secured with two clamps on any stove hose.
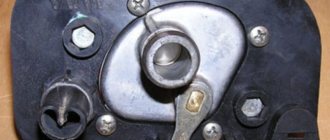
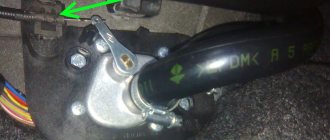
The tap is controlled by a cable that passes into the cabin through the hole for the clutch cable (indicated by the arrow)
The interior part of the drive is mounted on the dashboard below
It is attached to the torpedo with a plate cut to these dimensions.
Here's another way from SAO
How to control this - I think with the ESP button. Put the position signal LEDs - you need to change the solenoid to a 5-wire one
blue - “cold” closed position, red - “hot” - open.
Our readers recommend!
In order to get rid of constant fines from cameras, many of our readers successfully use Special Nano Film for license plates. A legal and 100% reliable way to protect yourself from fines. Having familiarized ourselves and carefully studied this method, we decided to offer it to you.
Photo source: Key words:
Add a comment
xn--2111-43da1a8c.xn--p1ai
Instructions for replacing the stove radiator
Due to the fact that the “two-piece” can be equipped with an old or new model radiator unit, the procedure for replacing the device may differ. We will consider each option separately.
So, how to replace the stove radiator in new-style systems:
- First you will need to turn off the ignition and disconnect the battery. Open the expansion tank cap, then place a reservoir with a capacity of about 4-5 liters under the drain hole and drain the coolant. If there is sediment in the antifreeze, then it would be better to change the consumables.
- Next, unscrew the nuts and remove the wiper blades.
- Having done this, you need to remove the plastic trim, which is located under the windshield; it is fixed with two nuts, as well as four self-tapping screws.
- To gain access to the heating device, it is necessary to dismantle the frill, unscrew five self-tapping screws, two nuts and another screw, which are located below, in the area of the steering rack, and also in the middle of the frill.
- To dismantle the heater, you will need to remove the cross brace, if installed. Of course, there may be no spacer. You should also remove the air filter bellows and throttles from the hoses of the radiator assembly.
- Next, the wiring should be disconnected from the heater terminals.
- After this, you should unscrew two nuts from the steering rack, which secure the heater, as well as one nut that secures the device to the body.
- Having done this, you should unscrew three more screws, with the help of which the two halves of the heater are connected. After this, you can remove and, by rocking, disconnect the right part of the heater from the left.
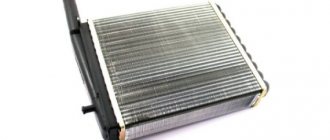
- The radiator assembly itself is located in the dismantled half; it is fixed with three bolts. We remove this device and install a new one in its place; of course, a foam rubber seal should also be installed. Then the operation of the fan is checked; if necessary, the device should also be changed. Before assembly, you need to flush the pipes through which the refrigerant flows. Assembly is carried out in reverse order.
Photo gallery “Replacing the radiator”
1. Drain the antifreeze from the system.
2. Disconnect the power cables.
3. Remove the heater. Regarding replacement in old-style systems:
- In this case, you also need to drain the consumables, remove the frill, disconnect the chokes from the hoses and turn off the power to the heater.
- After this, the expansion tank is removed and the liquid is poured into it.
- Next, the vacuum booster is dismantled; to do this, unscrew the two nuts using a 17mm wrench and carefully remove the master brake cylinder. In this case, be as careful as possible so as not to damage the brake system hoses. The vacuum booster hose must be removed.
- After this, inside the car you should unscrew the four nuts from the brake pedal studs. The vacuum booster itself is dismantled along with the pedal.
- This way you were able to gain access to the radiator device. All you have to do is unscrew the three bolts that secure it, and then replace the device with a new one. Reassemble in the reverse order; do not forget to add antifreeze.
Price issue
Depending on the manufacturer, as well as the version of the heater (old or new), the cost of the radiator may vary. New radiators will cost the buyer an average of 350 to 1,400 rubles; on the secondary market you can find a working radiator for 300-500 rubles.
Replacing the heater gear motor
To perform this procedure, you will need wrenches and a shaped screwdriver. Installing a new part is not very difficult, so a novice car enthusiast can easily handle it in a personal garage.
- remove the windshield wipers, unscrew the locknut and release the frill;
- Now we have free access to self-tapping screws;
- At this stage, you need to remove the rubber seal from the electric motor compartment. To do this, you need to unscrew the nuts on both sides of the frill;
- the damper pipeline must be disconnected so that it does not interfere;
- Unscrew the screws holding the gearbox thermal radiators;
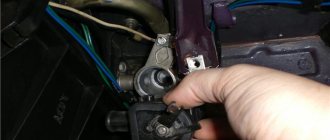
- near the vacuum brake booster in the left niche of the gearbox compartment there is a motor that must be removed by unscrewing the screw securing it from below;
- The damper is assembled in the reverse order immediately after installing the heater gearmotor.
Testing the functionality of the installed element is carried out by measuring the resistance on contacts X1.1 and X1.4 with the controller turned off and the left regulator set to the blue mark position. If there is no resistance or remains constant during the test, this indicates a faulty shaft position sensor. Unfortunately, it is not sold separately, so you will have to change the gear motor.
Source
Changing the stove tap yourself
For greater efficiency of the subsequent result and ease of operation, you need to update the stove tap by driving the car onto a lift or inspection hole. And also you will need:
- container for draining coolant;
- a set of tools containing screwdrivers and wrenches of size “7” and “10”;
- WD-40;
- silicone sealant;
- new faucet for the stove.
Having prepared everything you need for work, you can start replacing.
First of all, the coolant is drained from the engine. To do this, you will need a prepared empty container, which is placed directly under the motor.
Having drained the liquid, we find pipes that go directly to the stove faucet. We loosen the clamps, and wet the threads of the studs with a wedge or clean them with a metal brush. This process is of no small importance, since unscrewing nuts on unprepared threads can be a problem. After all, the studs are nothing more than ordinary bolts, with heads recessed inside the plastic body of the faucet. Self-locking nuts equipped with a plastic ring will not unscrew easily. Rusted threads complicate the situation. The tension created when unscrewing the bolt will cause it to rotate in the body, making dismantling the tap impossible or too labor-intensive, leading to destruction of the plastic.
Leaving the threads to acidify, they begin to remove the pipes. To do this, you will need to climb into the cabin and remove the side trim from the dashboard to get to the pipe clamps. It will be much easier to unscrew them using a socket wrench with a cardan.
After removing the pipes, we climb under the car again and, using a spanner wrench with the number “10,” unscrew the fastening nuts on the stove tap, which have already been completely soaked. We return to the car again and pull the tap towards us (on the passenger side), removing the spring clamp from it, and also disconnecting the control cable.
Now you can begin installing the valve for the VAZ-2112 stove. The first step is to connect the cable, which should be screwed to the body. Since it is quite difficult to secure the cable to the crane with a spring clamp, this must be done in advance. After completing the installation, coolant is added and the system is checked to ensure that no air pockets form.
The stove blows cold air
If the antifreeze is at operating temperature, the tap is open and the system as a whole is operational, then the reason for the supply of cold air can only be the formation of an air lock in the radiator. This problem is solved as follows:
- The car is placed on any hill so that the front part is higher than the rear axle.
- Open the tap on the radiator.
- Start the engine and let it run for 5 minutes. During this time, periodically press the gas pedal.
- Now we slide down the hill, close the tap and check the heating system.
Video “Radiator repair using welding”
How to properly repair a radiator using welding - the video below provides visual instructions using the example of classic VAZ 2101-2107 models (the author of the video is the GARAGE channel. 6 by 4).
VAZ 2110 stove faucet
Replacing the heater tap on a VAZ 2110 is not an easy task. It requires knowledge of certain nuances. Nevertheless, replacing the valve of the VAZ 2110 stove can be done independently. This will be discussed in this article.
Heater valve VAZ 2110
Replacing the stove tap on a VAZ 2110
There is a possibility that most users of VAZ 2110 cars will not be able to find this tap in their car. It was installed on earlier and recently released modifications of the car, and therefore, if the model was purchased not so long ago, then this mechanism may not be in this place. Although, some craftsmen manage to install a similar mechanism on their car. The heating system is one of those that most often breaks down. This part of the car allows you to drive the vehicle in different weather conditions with increased comfort.
VAZ 2110 stove faucet
This stove tap is adjusted remotely. In versions of VAZ 2101 - 2110 cars, this mechanism is one of the most frequently broken. After each trip, it is necessary to constantly monitor its valves. This is necessary to eliminate leaks. As soon as leaks are discovered, the equipment must be replaced immediately.
Note. It was this fact that forced the manufacturers of the VAZ 2110 to abandon the crane. But after modernizing the crane, they began to install it again.
Replacing the faucet
VAZ 2110 heater tap
To carry out work to replace this equipment, you must have a special tool on hand. You will need:
After each tool is ready, you must immediately begin replacing it. For this purpose, you must use the following methods:
- The engine must be drained of coolant.
- The heater has two hoses. They are secured with clamps. Liquid swells from one and flows into the other. These clamps need to be slightly loosened, but not completely unscrewed.
Heating VAZ 2110, design and principle of operation of the stove
The heating system of a VAZ 2110 car consists of: an electronic control unit for the heater, operating from the passenger compartment, air ducts that extend from the stove, and a heater unit that provides heating for the interior.
The heater unit is represented by the following elements:
- An electric motor on which a fan is attached to pump hot air.
- A radiator, without which the system will not work. At the same time, unlike the old-style heater, the radiator of the new VAZ 2110 stove does not have a tap that shuts off the flow of antifreeze (antifreeze) through the radiator. As a result of this, it is always (whether in summer or winter) heated. This was done to eliminate leaks, which are often observed through this faucet, and also to heat the interior as quickly as possible, if necessary. In the summer, fresh air ventilation goes past the radiator, but some VAZ 2110 car owners add this valve to the system when repairing the stove.
- Three dampers, one of which closes/opens the heater duct, the second is responsible for air intake recirculation, and the third, most important for the interior, controls the heater.
- A resistor that regulates the blowing speed.
All elements are contained in a block with additional fittings, shields and valves. This entire unit is dressed in a housing and located in the engine compartment closer to the dashboard.
Description of the heating system on "Dvenashka"
In VAZ 2112 cars, supply and exhaust ventilation is used. In this case, the air flow enters through special holes located in the windshield trims. The air itself can be supplied either forcefully, under the influence of the heater fan, or arbitrarily. The air flow exits from the passenger compartment through the gaps that exist between the door panels, as well as at their ends. Special valves are built into these openings that allow air flow to the outside and also delay its entry inside, which improves thermal insulation in the cabin.
Assembly
Damper location
After this, reverse the assembly procedure according to the dismantling steps. Refill the system with coolant and check that the new damper is in place. It is important to ensure that there are no leaks and that the hose connections are not tight.
Turn on the stove and check how the heater behaves. If everything is normal, you have carried out competent and successful work, for which we congratulate you.
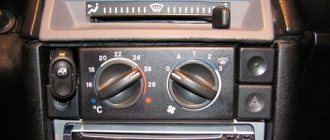
Heater operation (stove) in manual and automatic mode
The air temperature in the cabin is set by setting the controller knob (temperature sensor) to the appropriate scale division (from 16°C to 30°C, with an interval of 2°C). The unit reads information about the temperature in the cabin from a temperature sensor located on the ceiling and equipped with a microfan. Then, depending on the temperature difference, it turns on the micromotor that controls the heater dampers. The micromotor is equipped with a heater damper position sensor (ring resistor). The signal from the sensor is sent to the control unit, which turns off the micromotor as soon as the damper reaches the set position. Automatic mode, that is, position “A”, on the control unit adds to the adjustment of the gear motor also adjustment of the fan rotation speed.
Reasons why a gearmotor fails
If this element malfunctions, it is completely impossible to control the car's heater. You can check its functionality after setting the heater regulator to the middle position and applying voltage from the vehicle battery to the terminals of the gearbox electric motor. In good condition it should work. If the opposite is observed, it means that the gearmotor controller, which is responsible for regulating the temperature inside the cabin, has failed. Its serviceability is checked by analogy with a gearbox.
MR often breaks down for the following reasons:
- A defective place has arisen in the electrical network of the car, due to which the electric motor of the gearmotor of the VAZ-2112 stove no longer receives voltage, and it cannot function as before.
- The autonomous heater control unit received any damage during operation, as a result of which the MR can no longer correctly regulate the air supply in accordance with the temperature set by the driver.
- The gear motor shaft position sensor has failed.