Priora instrument panel: detailed description and analysis technique
The combination of these devices allows you to fully control the operation and condition of the vehicle while driving.
Deciphering faults in the fuel and air systems
How to change instrument lighting on a Priora
Replacing the backlight of the Lada Priora instrument panel
Where is the starter relay on the VAZ-2114: photo and video location
Task: replace the dashboard backlight in Lada Priora
We remove the dashboard of the Lada Priora. Let's disassemble it, everything is simple (4 screws and everything else is secured with latches). Another important thing is to carefully remove the hands and not damage them. Peel off the lining (overlay with numbers) and on the back side of this lining we begin to erase the green coating. I washed with ear sticks and rubbing alcohol (solvent is not recommended).
Next, carefully remove the LCD screen. We take out the green filter, erase the green coating of the filter and put everything back
Next, we change 5 light bulbs to white LEDs (you can also install red or blue LEDs, whichever backlight you prefer). I bought white LEDs together with a base at a radio store.
Let's put everything back together in reverse order.
The photo shows that it shines brightly, but in real life it is much worse. After driving around, some diodes began to blink, apparently there was a bad contact, and I decided to change the backlight a little.
I bought 1 meter of LED strip and a soldering iron with a thin tip.
1 Replacing Priora lamps in 5 minutes
2 Illumination of the instrument cluster Lada Priora 2.1 Soundproofing Priora
Replacing backlight
dashboard _
Lada Priora
VAZ 2170.
Illumination of the instrument cluster Lada Priora
Backlight tuning
instrument clusters
Priora frets
from Pavel Medved.
Let's begin. We take the tape and cut strips, 3 diodes in each, and solder the wiring to them. I took solid copper wire.
Next, glue these strips in the same way as shown in the photo. In some places it is necessary to drill holes for the wires.
Let's check this whole thing. To test the LEDs, I bought a 9 volt Krona battery. All diodes light up
We take the board and connect it to the car, turn on the dimensions and use the control light to find the plus and minus of the backlight. And solder the wiring to them.
Then we assemble everything and twist and insulate all the wires.
I wanted blue arrows. I bought blue fluorescent paint at an art salon. I wiped off the red coating on the hands and painted it.
It shines very brightly. You set the backlight control to minimum and everything is fine, it doesn’t dazzle. But still I decided to tint it with 20Koy.
Here is the final version of the work done. I spent 2 evenings on this matter and was pleased with the result. Now it shines evenly and brightly.
Result: work on replacing the dashboard backlight of the Lada Priora has been completed
Noise insulation priors
To soundproof the Lada Priora with your own hands - for starters, I bought five or two rolls of Splen, STP sheets, corrugations for
Communities › Lada Priora Club › Blog › Repair of BC instrument cluster Kalina/Priora
Ever since I bought the car, there have been problems with switching the readings of the standard BC, combined with the instrument cluster.
Periodically, the readings were not switched by the steering column switch. Then the BC completely stopped responding to the steering column switch. At first I thought it was a problem with the steering column, but it turned out that it was a problem with the instrument cluster. It turns out that on early devices the resistor assembly responsible for switching the BC readings was soldered crookedly. I found the information on the drive. You need to resolder the resistor assembly. I wanted to warm it up with a soldering iron tip, but it “floated” and I lost the part. The original has a 39 kOhm resistor assembly. But I didn’t find an assembly with this rating on the “Chip and Dip” website and bought a 47 kOhm resistor assembly. I found a craftsman and he soldered it for me. Now everything works as it should. The photo shows a disassembled instrument cluster; the resistor assemblies responsible for the operation of the BC are circled in red. Circled in yellow is the resistor assembly, which was initially soldered crookedly at the factory and needs to be resoldered. This is an already soldered resistor assembly:
This is the size of the resistor assemblies; there are nine of them left in the photo:
Video of bookmaker's work:
This is not the first time I’ve taken apart the dashboard, but I made a mistake with the temperature gauge by three degrees (overestimated it). Well, never mind, next time I’ll definitely put it right. Moreover, the next time will be soon. The tidy will have to be re-lit. There will be printed circuit boards.
Source
Changing the lamps in the dashboard
There are a total of 5 backlight lamps in the instrument panel on the Priora - 4 of which are in the middle and one illuminates the lower display.
We replace the lamps with regular or LED ones and reassemble them in the reverse order.
If you install LED lamps, be careful, they have polarity. Therefore, before installing the shield in place, connect the block, turn on the dashboard lights and check that all the lamps are on.
Failures in the idle speed system (IAC) and ESC
- P0500 - speed sensor is broken.
- P0506 - very low engine speed at idle.
- P0507 - too high speed at idle.
- P0511 - the XX regulator network is faulty.
- P0560 - BS voltage is below the minimum threshold.
- P0562 - very low voltage in the BS.
- P0563 - very high voltage in the BS.
- P0601 - ROM checksum error.
- P0615 - the wires of the additional starter relay are broken.
- P0616 - the same wires are shorted to ground.
- P0617 - they shorted at the BS.
- P0627 - the fuel pump relay wires are broken.
- P0628 - the same wires are shorted to ground.
- P0629 - they shorted it to the BS.
- P0645 - break in the wiring of the air conditioning compressor clutch relay.
- P0646 - the same wiring has shorted to ground.
- P0647 - she shorted to BS.
- P0650 - Malfunction indicator light circuit does not operate.
- P0654 - Tachometer control circuit is faulty.
- P0685 - the main relay electrical wire is broken.
- P0686 - the same electrical wire has shorted to ground.
- P0687 - he shorted it to the BS.
- P0691 - the electrical wiring of the fan control relay is shorted to ground.
- P0692 - the same wiring has shorted to the BS.
Note: in cases where the computer displays error codes that indicate a break in the electrical wiring of a device, before troubleshooting the problem and purchasing spare parts, you must first see if the electrical wiring plug has come out of the connector of the corresponding device. Such incidents happened. Testers and computers are, of course, good, but nothing can replace the eyes of a car enthusiast. Good luck with the repair.
Hi all! I discovered a huge number of topics dedicated to instrument panel errors and many questions related to them, therefore, I decided to write everything in one topic. Materials were used from the Internet, and in particular: www.drive2.ru, www.priorovod.ru/
How to remove the center console (panel trim) of Lada Priora
The interior of Priora 2 (after the latest restyling) is significantly different from the previous version of the car. The interior now has a more stylish dashboard (dashboard) with the ability to install a modern multimedia system. If you are engaged in independent modifications or repairs of your car, then you will need instructions for removing the central lining (together with the tunnel, it is also called the “beard”).
The plastic center console is attached to the panel (dashboard) with 6 screws. To gain access to the lower two mounting screws, you will have to remove the tunnel cover:
- Remove 2 screws under the heater and air conditioning control unit;
- Remove the gearshift knob cover by prying it off with a flat screwdriver and remove the 3 screws under the cover;
- Unscrew the 2 lower screws securing the center console .
screws for fastening the tunnel lining of the Lada Priora; screws for fastening the tunnel lining of the Lada Priora; lower screws for fastening the center console of the Lada Priora.
To remove the remaining four screws for fastening the center console:
- Remove the upper block of buttons and the plug by prying them off with a flat screwdriver or a plastic spatula;
- Remove the 2 upper console mounting screws;
- Remove the 2 middle console mounting screws .
Instructions for dismantling and repair
Dismantling the tidy may be required to perform tuning, replacing backlight bulbs or repair work.
You can find out how to remove the instrument panel on a Lada Kalina from the car's operating instructions. LED instrument lighting
Before disassembling the Kalina 2 instrument panel, you need to prepare the following materials and tools:
- a set of keys;
- Phillips and flat screwdriver;
- replacement parts and bulbs.
Removing the Kalina torpedo
Algorithm of actions
The disassembly procedure consists of the following steps:
- Using a Phillips screwdriver, you need to unscrew two self-tapping screws.
- Next, you need to remove the trim from the instrument panel.
- At the next stage, the spring clips are removed from the clutch.
- After unscrewing two screws, you need to slide the panel towards you.
- The latch holding the block must be pryed up using a flat-head screwdriver and turned.
- Next, you need to disconnect the connectors with the wires and you can safely remove the tidy.
- To remove the glass from the instrument panel, unclip the plastic clips.
Thus, knowing how to disassemble the panel on Kalina, you can repair it yourself if the backlight or signal lights do not light up.
Electric booster repair on a Priora: faults and their symptoms
Undoubtedly, the electric booster is a more reliable unit than a device running on hydraulics, but malfunctions also appear in the power steering. If they are detected, repairs must be carried out immediately, since the safety of the driver, his companions and other road users depends on the operation of the amplifier.
Complete failure of the EUR
As practice shows, this unit does not have many faults; breakdowns occur in the same parts. The first thing worth considering is the complete failure of the ESD. When you turn off the amplifier, you need to check the on-board computer screen; most likely, you will see a code there indicating a malfunction in the unit. But sometimes it is possible to determine when an amplifier is turned off only in practice.
We perform the following actions:
- Turn off the engine and turn the steering wheel in different directions several times;
- We repeat these steps, but with the engine running;
- Has the steering effort changed? This means the node has completely shut down.
Even with the ESD not working, you can continue driving, but this is not recommended. The driver needs time to get used to driving with the help of an amplifier. It is better to immediately begin diagnostics and determine which component requires repair or replacement.
Sometimes the amplifier and speedometer stop working at the same time. The cause of this defect is a speed sensor that has failed. Taking a look at the electrical diagram, you will understand that these three elements are connected. The torque sensor supplies data to the control unit, it compares it with speed and determines the force. If the cause is the speed sensor, then the repair consists of checking the wiring that leads to this element. It is also worth checking the wires connecting the sensor to the speedometer and power steering. If there are no breaks in the switching, then the sensor should be changed.
Low voltage in the car network can also lead to the ESD turning off. Faults should be looked for in the wiring insulation. If it is damaged, short circuits will appear in the network. Also, violations in insulation lead to malfunction of the generator. To troubleshoot the problem, check the wiring and generator. The torque sensor contains many contacts, which, if heavily soiled, help turn off the power steering. In this case, repair means disassembling the unit and cleaning the contacts of the torque sensor.
Unpredictable steering behavior
The driver is driving on a flat road, the position of the steering wheel does not change, and suddenly the car turns to the side. Such unpredictable behavior of the power steering requires urgent diagnosis, since at the most inopportune moment the electric power steering of the Lada Priora can send the car to the side of the road or into the oncoming lane. In such a situation, you should stop driving and turn off the amplifier. To do this, we need to remove the fuse, which is responsible for supplying voltage to the amplifier.
To remove this fuse, you need to do the following:
- The mounting block cover is located at the driver’s left foot;
- We turn the clamps and unclip the fasteners;
- You will find the block where the required fuse is located near the expansion tank;
- Feel free to take out fuse F5 (50 A) - it is responsible for providing the power supply circuit to the power steering unit.
The reason for this behavior is a malfunction in the electric amplifier device. This could be a torque sensor, control unit, clogged contacts or mechanical damage. It is recommended that diagnostics be carried out by professionals, since in a garage you will not be able to check the control unit; replacement can be done with your own hands.
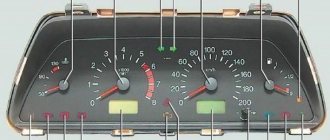
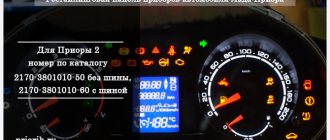
Icons on the factory dashboard
All indicators should light up like a Christmas tree for three seconds when the engine starts. If some icon remains, it means the system is signaling a breakdown. To make it easier to understand all the indicators, here is a schematic picture:
1,5,9,10 are already known scales that display the main parameters that can change. 19 – on-board computer display. Further:
- 2 – Icon indicating the operation of the braking system.
- 3 – Battery condition. If the light remains on, the battery is discharged or the charge level is too low.
- 4.7 – Doublers for direction indicators (“turn signals”).
- 6 – Oil level (indicates low level).
- 8 – Handbrake. Lights yellow when the lever is tightened.
- 11 – “Gasoline light bulb.” Lights up when there are only 10 liters left.
- 12 – Button for switching on-board computer modes.
- 13 – “Emergency”.
- 14 – Electric power steering (indicates a breakdown).
- 15 – High beam on.
- 16 – Side lights/low beam.
- 17 – Airbag condition (malfunction).
- 18 – Immobilizer (if you hear a beep and the icon itself blinks, the immobilizer is faulty).
- 20 – Seat belts not fastened.
- 21 – Unsatisfactory condition of the service brake system.
- 22 – Disabling the airbag.
- 23 – ABS malfunction.
- 24 – “Check”, “Check Engine” - engine failure.
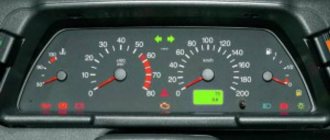
What does the dashboard consist of?
The Priora instrument panel contains all the necessary parts that no modern car can do without:
- regulator of external lighting and internal panel lighting;
- switch for turning, side and headlights;
- signal regulator;
- car instrument cluster;
- windshield wiper and washer regulator.
This is how the dashboard works
In addition, the panel contains an ignition switch connected to the anti-theft system. It contains 3 positions. Among the secondary mechanisms, we can note the presence of regulators for the rear window heating system, alarm and interior cooling. It is also worth mentioning the glove compartment, built-in clock and radio input jack.
Sometimes a certain panel element becomes unusable and you have to look for ways to replace it. In this case, you will need to disassemble the interior. Below is how to disassemble the instrument panel.
see also
Comments 11
That is, in order to change the hazard warning button you don’t have to remove the console?
It is possible, but it will require great care.
Is it possible to get the watch out without removing the panel?
no, there's a latch on the back
Is it possible to fit through the slot for the radio? By the way, are there diodes?
You can't unless you're an octopus. yes there are 2 diodes
Is it possible to get the watch out without removing the panel?
You can get it without taking it off! Today I pulled it out because the watch has stopped! And the backlight works! Just pull out the radio! Bend over and you will see the latch! And use a small L-shaped piece of iron to bend the latch! No difficulties! Easy. Can anyone repair the watch? Inside there is a round magnet and a thin winding wire... is the winding resistance of 400 ohms normal? Perhaps the magnet has become demagnetized over time... and because of this the clock does not go...
Step-by-step instruction
1. Set the steering wheel to the lower position.
2. Next we need to remove the instrument panel trim. It is secured with four Phillips screws.
Unscrew the 2 screws on top.
In order to get to the lower mounting screws, you need to remove the plastic from the bottom of the steering wheel.
To remove, turn the three latches counterclockwise half a turn.
After turning the clamps from above, pry up the plastic with your hand and remove it.
3. Unscrew the 2 lower screws securing the instrument panel trim.
4. Using both hands, remove the cover. Let's start from the top.
Be careful not to break the latches.
5. Unscrew the 2 screws securing the dashboard using a Phillips screwdriver.
6. After unscrewing the screws, pull the dashboard slightly towards you.
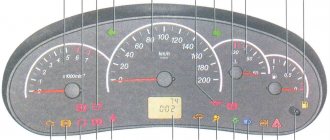
Diagnostics using the built-in BC
To view the error codes, you need to find the daily mileage reset button on the dashboard, press it and, holding it, turn the ignition key. The self-diagnosis mode will turn on. All arrows on the instruments should move from minimum to maximum values and back, and all positions on the LCD display should light up. You need to look: if any position does not light up or the arrow on any device does not move, then you should check the corresponding sensors, their networks or display for malfunctions.
Priora on-board computer
In the same mode, press any button for switching modes of the built-in BC 2 times, after which digital codes may appear on the liquid crystal display:
- 2 - very strong voltage in the BS;
- 3 - errors in the fuel level sensor system in the gas tank;
- 4 - error in the coolant temperature sensor system;
- 5 - error in the air temperature sensor system outside the car;
- 6 — motor overheating;
- 7 — emergency low oil pressure;
- 8 - malfunctions in the brake system;
- 9 - battery is low;
- E - error in the data packet stored in the EEPROM.
Many drivers ask how to reset error codes on a Lada Priora. Perhaps their built-in BC is faulty, since a working on-board computer automatically exits the diagnostic mode after 30 seconds if you do not press any control buttons.
What does the dashboard consist of?
On the panel? Priora devices have all the necessary parts, without which no modern car can do:
- regulator of external lighting and internal lighting panel;
- switch for rotary, dimensional and lighting regulators;
- headlight signal;
- car instrument cluster;
- wiper regulator and windshield washer.
In addition to the panel, there is an ignition switch connected to the anti-theft system. It contains 3 positions. Among the secondary mechanisms, we can note the presence of regulators for the rear window heating system, alarm and interior cooling. It is also worth mentioning the glove compartment, built-in clock and radio input jack.
Sometimes a certain element of the panel becomes unusable and you have to look for ways to replace it. In this case, you will need to disassemble the interior. Below we discuss how to disassemble the instrument panel.
Stages of removing the casing
Before removing the trim from the clips, you must remove all bolts, clamps and fasteners that are located in different parts of the door. It is most convenient to do this in a certain order.
Before you begin removing the door trim, disconnect the negative cable from the battery.
From the front door
To remove the door trim on a Lada Priora, you need to get rid of all the fasteners. To do this, follow the following procedure.
- Unscrew the button responsible for locking the door and remove it.
- Unscrew the screw on the inside door handle.
- Remove the handle by carefully moving it away with a flat-head screwdriver.
- Find the two screws in the special pocket that secure the power window control module. They can be hidden under a rubber mat.
- Unscrew both screws and remove the ESP module. Now you need to disconnect the connector with wires from it.
- Locate the three screws at the bottom of the door that secure the trim to the door. Turn them inside out.
- This way you got rid of all the screws and fasteners. Now you need to take a flat-head screwdriver and carefully pry off the casing at the bottom.
- Unsnap all eight clips, which are indicated in the diagram, starting from the bottom of the door. Be careful at this stage: broken fasteners are quite difficult to repair.
- Carefully remove the trim. If done correctly, you should encounter almost no resistance.
Location of the main screws that prevent the removal of the casing
after you remove the trim, your door will look like this
Due to their small size, screws and clips are often lost. To make the reassembly process easier for yourself, before starting work, prepare a container where you will put all the small parts.
To install the trim in place, place it against the door. Make sure the fasteners are in place. Insert and tighten the lock button. Thanks to this, you can pre-fasten the door components. Make sure the handle fits into its hole. Now you can snap all the clips into place and screw the screws back in.