The instrument panel of the VAZ 2110, as in any car, both imported and Russian, must determine the general condition of the car, and must show all information about: the amount of fuel, engine temperature and the presence (quantity) of engine lubricants.
In addition to the above data, the VAZ instrument panel displays all the errors (current malfunctions) of the car.
Further in the article, I will give you a complete description of the VAZ 2110 dashboard and tell you about the description of buttons, lamps, light indicators, and tell you about common errors that may appear on your display while on the road.
Indication symbols
As you know, all the lights on the control panel come on when the ignition is turned on, and then, when the engine is already running, most of them go out. But when one remains on or blinks, this cannot but be alarming, because not everyone can immediately figure out what malfunctions this indicates, which of the systems needs urgent repairs.
Let's look at the designations of the instrument panel of the VAZ 2110. You should know that regardless of whether the panel is new or old on your car, the designations are almost the same, but the indicators may be located slightly differently.
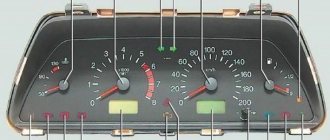
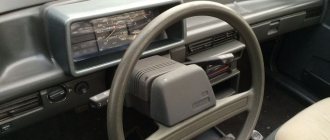
Instrument panel VAZ 2110
This is interesting: Soldering a car radiator - fixing the leak yourself!
Composition of devices
The entire pinout of the “tens” panel consists of connections of devices united by a single circuit, the nodes work, each device has its own indicator. If one of the lamps does not light, then urgent repair or replacement of the instrument lighting is required.
Pinout of the new VAZ 2110 panel
When removing the shield, all lighting must be disconnected. All characteristics of certain devices are controlled by special lamps; this board has twelve:
- Fuel reserve control lamp;
- Lighting combinations of lamps for illuminating the panel;
- Right turn light control lamp;
- Left turn light control lamp;
- Control reserve lamp;
- Coolant temperature level indicator;
- Exterior lighting status lamp;
- Light sensor for carburetor air damper status;
- Oil pressure control lamp;
- Indicator light for full stop brake status;
- Result of the state of the battery charger;
- Lamp for monitoring the status of high beam headlights.
Possible malfunctions: signs and causes
What problems can a car owner encounter:
- Some of the light bulbs on the dashboard do not work. If one or more light sources fail, then most likely this is due to burnt-out lamps. The problem is solved by replacing devices.
- The backlight has stopped functioning altogether, while all instruments and indicators light up. Apparently, the reason must be sought in the inoperability of the brightness control itself; it could have broken down. With constant use of this regulator, its connection contact with the on-board network may have come loose, so you need to check the wiring. The reason may also be a blown fuse located in the mounting block.
- The backlight does not turn on, and none of the indicators or sensors work. Perhaps the panel itself was “covered” or the block with the wires connected to the panel was damaged. You need to remove the device and carefully check all circuits.
- The speedometer does not work - the needle does not rise or rises, but very slowly and jerkily. With such a problem, the cause should be sought in the speed sensor, which can be electronic or mechanical. If it is mechanical, then check the condition of the tips that go into the speedometer itself and the gearbox. The end of the cable connected to the speedometer often wears out; you can try to solve the problem by wrapping a piece of food foil around this end. If the sensor is electronic, then you need to check the quality of the contacts.
- Indicators, for example, turn signals or optics, do not turn on. It is necessary to check the functionality of the steering column switches for low and high beam headlights, as well as turns.
- The fuel volume sensor does not function, the needle does not move or has risen all the way and does not fall. In the first case, the reason may lie in the failure of the controller itself, located in the fuel tank. You need to find the sensor and check its functionality. In the second case, the possible cause is a short circuit in the electrical circuit; you will need to test the wiring with a tester.
- The tachometer does not work. Again, the reason must be sought in the crankshaft position sensor - it could have failed, or the contact could have come loose from it. Most often, the reason for the malfunction of the sensors on the device is associated with oxidation of the contacts; they should be checked first.
Instructions for replacing the tidy yourself
Instructions for replacing the shield yourself:
- First, you need to turn off the ignition and turn off the power to the Tens electrical network; to do this, open the hood and disconnect the terminal from the battery.
- The switches located on the sides of the tidy are removed.
- Then use a Phillips head screwdriver to unscrew the bolts that secure the device.
- Next, you need to dismantle the mountings of the tidy to the trim. After this, the shield can be easily removed from its seat, and the glass can also be removed.
- The next step is to disconnect all the connectors and connectors connected to the dashboard.
- When the connectors are disconnected, the panel is dismantled. It is repaired or replaced with a new one, the assembly steps are performed in the reverse order (the video was filmed by the channel In the Garage).
Tidy error codes
Standard errors in car self-diagnosis do not accurately indicate a breakdown. Due to the simplicity of the on-board computer, the device can only indicate the direction where to look for the problem. The decoding of standard errors looks like this:
- 0 – no errors detected – the system is in perfect order;
- 1-2 the voltage in the on-board network is exceeded or too low;
- 3 – malfunction of the float sensor in the gas tank;
- 4/5 malfunction in the antifreeze and ambient temperature sensor circuits, respectively;
- 6 – critical overheating of the power plant, it is necessary to wait for the antifreeze to cool down;
- 7 – not enough oil in the engine crankcase;
- 8 – the problem lies in the brake system;
- 9 – the battery is dead or the part is damaged;
- E – error in the firmware, EEPROM data packet is broken.
It should be taken into account that in some cases, the error code may be two-digit. For example, if 15 is displayed on the display, this may indicate the presence of breakdowns in circuits No. 7 and 8. Having found out what each error means, you can independently determine the source of the problem and correct the breakdown.
Author of the material: Borisov Maxim
Fuel level indicator
The device indicating the fuel filling level of the tank operates in combination with a control sensor; it is installed in the fuel tank. If the lamp shows a resistance of 284-334 ohms on the board, then the indicator needle will be located near the beginning of the scale.
If the sensor reports a resistance identical to the level of 102-136 ohms, then the needle will move to the middle of the scale. If the sensor value is 8-26 ohms, the needle will move to the very end of the scale. If the resistance and the needle level on the scale do not match, then repair of the machine is inevitable.
- Author: ratico19
Rate this article:
- 5
- 4
- 3
- 2
- 1
(2 votes, average: 5 out of 5)
Share with your friends!
Ideas for tuning and modifying the shield
How can you improve the tidy in the “Ten”:
- By installing a new trim on the console. This type of tuning is the simplest, since you just need to install a trim on top. However, it will not improve the dashboard itself in any way, only its upper part.
- In the VAZ 2110 you can install a dashboard from Priora; in general, the selection of tuned, ready-to-use dashboards is quite large. When installing a device in 2110 from another car, you will have to partially redo some connectors and connect new devices. But in general there is nothing difficult about this.
- Installation of new scales on sensors. Scales can be downloaded from the Internet, found in a store, or developed independently. The alteration procedure in this case will be more complicated - you will have to remove the shield and disconnect the arrows from the instruments, this will take time. After installing the new scales, the arrows must be correctly installed, otherwise the speedometer and other sensors may malfunction.
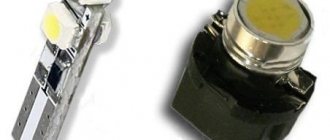
- Installation of LED lighting in the tidy. You can simply replace standard light bulbs with LED ones, or purchase a diode strip and solder it into the shield. But keep in mind that if the light bulb fails, it can be replaced without any problems, which cannot be said about the LED strip. If it burns out, you will have to unsolder the tape and install a new one in its place. Although the service life of the LED strip is quite long.
- If you install diode lamps, then you can additionally paint the numbers on the scales, as well as the arrows of the sensors, with fluorescent paint. The fact is that combining these two types of tuning will allow you to achieve a truly high-quality and beautiful result. Under LED lighting, arrows painted with luminescent paint will glow much brighter.
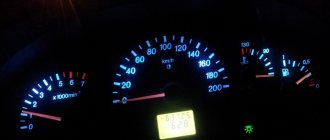
Photo gallery “Tuned devices of VAZ 2110”
This is interesting: Speedometer drive - who is counting kilometers for us?
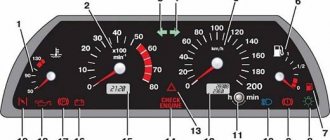
Top part
So let's start from left to right. First, the top part of the control panel:
- Side scale from 50 to 130 and arrow. Shows the temperature of antifreeze (antifreeze) in the engine cooling system;
- Almost round scale (0 – 80) and arrow. Tachometer showing engine speed;
- Two arrows at the top, almost in the middle of the control panel - turn signals (right, left);
- Speedometer. Well, this device, probably everyone knows, shows the speed at which the car is moving;
- A side scale with an arrow and, most often, two images of a filling column (white and red). Instead of a red column there may be a yellow light. This is an indicator of the fuel level in the tank. If the red column (yellow light) lights up, it means that there is very little fuel left in the tank - no more than 7 liters, urgent refueling is required.
Functional
The pinout of this VAZ model is as follows:
- Electronic speedometer;
- Electronic type tachometer;
- Coolant temperature indicator;
- Fuel level indicator in the tank;
- Indicator lamps in the amount of 12 pieces.
This combination is fixed on a special board, in a separate socket using two screws. The panel is removed after unscrewing them. The accuracy of the board is ensured by the printing method of production and installation of this pinout; foil getinax is used for printing.
Bottom part
Let's look at the indicators at the bottom of the control panel. If they don’t light up, it means the machine is working normally, and when any of them lights up, this indicates a malfunction in certain components. Most often, this is a signal that repairs are needed, and the sooner the better. From left to right:
- The indicator on the far left at the bottom is the air damper light (if you have a carburetor engine);
- Icon in the form of an oil can. If this light comes on, it means there is insufficient oil pressure in the engine. An alarming signal. You need to stop, find the reason;
- A round icon with the letter P inside on the control panel indicates that you have the parking brake on, which, as you know, should be turned off when moving away;
- Indicator of a fault related to the generator or battery (a symbolic image of the battery is shown on the indicator). Perhaps the battery is not charging from the generator, there is an open circuit, or the generator belt is loose or broken. In any case, your intervention and repairs are needed, otherwise troubles cannot be avoided;
- If the engine is running and the Check Engine indicator is on on the control panel, this is the most unpleasant thing for the driver, since it indicates serious malfunctions in the engine. In general, when this indicator lights up, it is recommended to stop driving and turn off the engine. Most likely it needs repairs;
- Typically there is a red triangle above the Check Engine. It lights up when the “hazard light” is on - an emergency signal sign;
- The headlight light indicates that the high beam is on. Designed to control headlights: when an oncoming car appears, do not forget to switch to low beam;
- A very important indication icon on the front panel (in a red circle) is a signal that there is not enough brake fluid. Perhaps it is leaking somewhere, which it is advisable to find out as soon as possible and, if necessary, carry out urgent repairs and replenish the level;
- The icon of a burning light is a control for turning on the dimensions;
- In addition to the indicated lights, the front control panel has time indicators (and a button for setting hours and minutes) as well as a display that shows the total and daily mileage. On the new panel, this display may be narrow.
Speedometer
The leading role in driving control is assigned to the speedometer, which controls speed. Removing the speedometer will reset all data on the board.
The VAZ 2110 car has a speedometer that has two types of counters (odometers):
- The first shows the total distance traveled;
- The second shows the distance traveled during the day.
To analyze fuel consumption, the distance traveled per day, and calculate the average, as well as determine whether the car needs repairs, you can completely reset the results of the second counter. The driver can reset the speedometer daily and compare the results of how the components work.
To reset the values on the board, use the corresponding button. You can reset the counter only after a complete stop, when the machine components are working. This cannot be done. If the button does not reset the numbers, it needs to be replaced.
This article will help you understand the reasons why the speedometer in a VAZ 2110 does not work: https://vazweb.ru/desyatka/salon/ne-rabotaet-spidometr.html
Description of the VAZ 2110 dashboard buttons
Well, let’s immediately move on to the description of the buttons on the dashboard of the VAZ 2110.
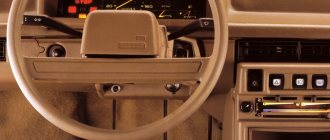
Instrument panel of a VAZ 2110 car - the buttons located on it are marked on the arrows
As you can see from the screenshot, there are only 4 buttons on the instrument panel of the VAZ 2110 - let's move on to their description.
- Button to turn on/off the front fog lights.
- Turn on/off outdoor lighting.
- Heated rear window
- Button for turning on/off the rear fog lights.
In addition to the buttons located on the dashboard, there are others that are located under the stove, next to the radio in the cabin. Let's find out their functions:
Instrument panel VAZ 2110 - description of the buttons next to the stove
Many VAZ 2110 owners wonder why these 4 buttons, which are located on the dashboard under the stove, are needed. The answer will seem rather banal to you:
These buttons actually do not play any function; I think the engineers working on the ten wanted to add electric windows to the car, but for some reason they forgot to do this.
Okay, it was a joke! In fact, these buttons are responsible for the following:
- Turning recirculation on/off
- Button for installing additional equipment (for example, power windows)
- Turning the hazard warning lights on/off
- Button for installing additional equipment (for example, power windows)
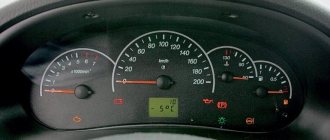
Europanel
Note Some versions of cars of later releases (in particular, models produced) are equipped with a modified instrument panel - the so-called “European panel”.
- Left side deflector.
- Outdoor lighting buttons.
- Instrument cluster.
- Egnition lock.
- Right steering column switch (windshield wipers and washers).
- Hazard warning light button.
- Instrument lighting control knob.
- Immobilizer sensor with indicator.
- Rear window heating switch.
- Plugs (reserve places for installing switches for additional equipment).
- Central deflectors.
- Heater control panel.
- Covers for niches for installing car radios.
- Right side deflector.
- Left steering column switch (direction indicators and headlights).
- Hood release lever.
- Steering wheel.
- Clutch pedal.
- Brake pedal.
- Accelerator pedal.
- Socket for connecting a portable lamp.
- Gear shift lever.
- Ashtray cover.
- Cigarette lighter.
- Glove box.
- Parking brake lever.
- Side light switch.
- Indicator for turning on side lights.
- Indicator for turning on headlights.
- Headlight switch.
- Indicator for turning on the rear fog lights.
- Rear fog lamp switch.
- Plugs (reserve places for installing switches for additional equipment).
- Headlight level control.
- Tachometer.
- Left turn signal indicator.
- Speedometer.
- Right turn signal indicator.
- Coolant temperature gauge.
- Fuel level indicator.
- Left indicator panel.
- Information display.
- Right indicator panel.
- Button for resetting the daily mileage counter and setting the clock.
The instrument panel of the VAZ 2110, as in any car, both imported and Russian, must determine the general condition of the car, and must show all information about: the amount of fuel, engine temperature and the presence (quantity) of engine lubricants.
Further in the article, I will give you a complete description of the VAZ 2110 dashboard and tell you about the description of buttons, lamps, light indicators, and tell you about common errors that may appear on your display while on the road.