1
The above action should be performed in order to detect malfunctions when diagnosing or repairing the fuel system and specifically in the fuel supply system. Next we will talk about how to properly check the pressure in the ramp.
at home.
How to remove the fuel rail on a VAZ 2115 - step-by-step instructions
Hi all. Today we’ll talk about the fuel rail, for your attention step-by-step instructions on how to remove the VAZ 2115 fuel rail with your own hands . A few words about rail is .
This device is a bar with a pressure regulator into which fuel injectors are installed. The fuel rail is mounted on the intake manifold with two bolts. Through this ramp, fuel is supplied to the injectors, and then through them into the intake pipe. The pressure in the fuel rail is adjusted using a fitting located on the fuel rail housing.
The need to remove the fuel rail usually arises when it is necessary to clean the injectors or replace the pressure regulator. In order to avoid any problems with removal during work, we will tell you how to remove the VAZ 2115 fuel rail quickly and easily.
Diagnostics of removed injectors
- Activate the battery by connecting the negative terminal.
- Connect the fuel supply pipe and power supply block to the removed ramp.
- Install the ramp in such a way that equal containers can be placed under each nozzle.
- An assistant is needed to turn the starter. The containers will be filled with fuel and poorly functioning injectors or those that are completely out of order will be revealed as the containers are filled.
- It is better to immediately replace a nozzle that is not working with a new one; washing the old one will not eliminate the problem for a long time. The same goes for sealing gaskets and power supply terminals.
- If the block is faulty, the injector will not function.
When diagnosing yourself, do not forget about fire safety!
How to remove and clean
- Turn off the fuel supply from the fuel rail.
- Disconnect the electrical connector for the fuel injectors.
- We unscrew the two bolts securing the ramp and pull it out.
- We remove the injectors from the ramp and install them in a special stand
- After cleaning, put everything back together in reverse order.
Further in our photo report there are more detailed instructions.
We begin to remove the fuel injectors for further cleaning. The injectors are located behind the intake manifold.
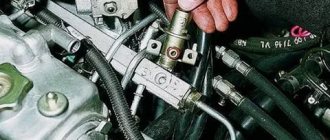
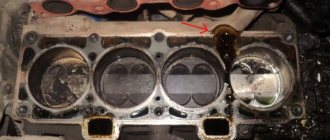
The first thing we need to do is relieve the fuel pressure from the fuel rail. To do this, unscrew the plastic cap indicated by the arrow in the photo.
And use something sharp to press on the spool valve, first placing a container so as not to pour gasoline all over it.
Be careful!
Before checking the pressure of the fuel system, you need to make sure that it is intact and there is no depressurization, otherwise the measurements will be inaccurate. First of all, you need to open the hood, then turn off the ignition.
- Find the injector fuel rail.
- Remove the fuel pressure fitting plug and unscrew the nipple using a spool valve.
- Using rags and containers, remove any remaining fuel. Be careful to avoid contact with eyes.
- Connect the device hose to the fitting and secure it using the same clamp.
How to remove the fuel rail of VAZ 2114, 2115 injectors - step-by-step instructions
1. First, you need to relieve the pressure in the fuel system; to do this, you need to turn off the fuel pump. To quickly turn off the fuel pump, simply remove the fuse that is responsible for this device from the socket in the fuse block. Next, you need to start the engine and let it run until it stalls. If you don’t want to go to the fuses, then you can try to turn off the power to the fuel pump in another way, for example, by disconnecting the fuel pump power supply.
Troubleshooting
After you remove the injectors, proceed to carefully inspect them. When the removal of the VAZ 2110 injectors is completed, you can see that one of them remains in the inner pipe of the engine. It will be necessary to replace its retainer and the rings responsible for the seal. In addition, injectors are also replaced when the rings lose the elasticity of their coating or when there are cracks.
Check how the injectors spray. Connect the harnesses and attach everything to the battery. Then place the nozzle in a glass container and turn on the starter to see if the gasoline is spraying correctly. Each nozzle must have at least 4 jets, in addition, the gasoline that is carried through them in containers must be at the same level. If the sprayer begins to leak, the nozzle needs to be replaced.
If it does not spray at all, you need to check whether the nozzle is receiving power. If it does not pass gasoline, disconnect the wires leading from the block and connect the battery directly with the ignition on. If it starts spraying gasoline, it means there is a problem in the electrical circuit. After the injectors have been replaced or cleaned, they will need to be reassembled, but before that, lubricate each ring with gasoline.
If the car has low-quality fasteners, they will also have to be replaced. To do this you will need to move them to the edge of the ramp. If you need to replace the fuel rail, unfasten all the wires and harnesses and install a new one, connecting all the parts in the reverse order. Good luck!
1200 rub. for the photo report
We pay for photo reports on car repairs. Earnings from 10,000 rubles/month.
Pressure in the fuel line VAZ 2114
The pressure in the fuel line of an injection engine is an important parameter - if it is low, normal injection by injectors into the cylinders of an internal combustion engine (ICE) will not be ensured. And its high degree is also dangerous - fuel can flood the entire engine compartment, and then a fire will occur.
Car owners may have a question about how to check the pressure in the fuel rail, within what limits should the readings be, what is used to check it, and how to determine what may be faulty in the fuel line? So, in order.
First you should know how the fuel system (TS) works and what elements it consists of. The vehicle includes (elements in order, starting from gasoline intake to its direct injection):
- Gas tank (in the VAZ model 2114 it is located under the bottom of the trunk);
- Electric fuel pump (located in the gas tank);
- Coarse filter (represents a mesh that is located on the intake part of the pump);
- Fine filter (located immediately after the gas tank, located below the trunk, between the rear of the muffler and the fuel tank);
- Fuel rail or rail (TR), it distributes gasoline among the cylinders, it can be steel, aluminum or plastic;
- Injectors (there are four on model 2114);
- Fuel pressure regulator (it maintains the required gasoline pressure in the system for normal injection through the injectors into the cylinder).
Sequence of replacement work
To replace the injectors, follow these steps:
- Disconnect all wires from the battery.
- Next, separate all the mounting brackets holding the engine guard in place.
- Proceed to remove the air filter on which the hoses are attached. Disconnect the hose from the device responsible for reading the gasoline pressure, the block from the idle air regulator. Keep in mind that it is held in place by a clamp. Next, disconnect the block from the wires, folded in the form of bundles.
- Now you need to carefully unscrew the two bolts located in the ramp mount. There are flat washers under the bolt heads. Therefore, in order to avoid losses, the excavation must be done using tweezers. Now unscrew the mounting screw used to hold the tubes through which the fuel passes. Carefully remove the holder itself so that the spring washer does not get lost. Next, the fuel rail is carefully moved along the injectors until it completely exits the holes in the engine pipe. To avoid breaking them, carefully remove the ramp from under the receiver. The slightest carelessness when performing this work will lead to catastrophic consequences and costly repairs.
- Remove the injectors from the ramp using a slight rocking motion. To ensure that as little dirt as possible gets on the parts, the already removed injectors are covered with a cloth, and the place where they were in the car is hidden under any material. The main thing is that there are no large gaps.
Let's figure out why there is no pressure in the fuel rail of the VAZ 2114
Car owners are sometimes faced with the fact that there is no pressure in the fuel rail of a VAZ 2114. In order to understand the causes of this problem and how to eliminate it, it is important to understand the purpose and operating principle of this element.
The injection engine for the VAZ 2114 car is a power unit with distributed injection, which is carried out through injectors located on the fuel frame. What is a fuel rail? This is a hollow tube with both ends welded. The frame is attached to the engine intake manifold and has a special drain line for excess fuel.
Disassembly
1. Use a slotted screwdriver to move the injector retainer along the fuel rail.
2. Remove the injector from the fuel rail.
3. Similarly, remove the other three injectors.
Warning! The connections of the injectors to the fuel rail and to the intake manifold are sealed with rubber rings. Any damaged O-rings must be replaced.
4. Remove the spring clamps of the injectors from the fuel rail.
6. 24 mm
Unscrew the nut of the fuel supply pipe and remove the end of the pipe from the fuel rail.
Warning! The connection of the tube with the fuel rail is sealed with a rubber ring installed at the end of the ramp. Any damaged fuel line O-rings must be replaced.
Removing and replacing injectors
Before dismantling the injectors on the VAZ-2114, you will need to relieve the pressure in the fuel rail. The process is performed by disconnecting the connectors with wires from the fuel pump and then starting the engine. The machine should run in this position until it stalls. The procedure must be repeated until the car can start.
Disconnect the connector with wires from the fuel pump
Disconnect the electrical connector from the fuel rail
Unscrew the gasoline supply pipes
Use a screwdriver to unscrew the bracket on which the fuel pipes are attached.
Removing the fuel rail
Remove the injector from the fuel rail hole
Options for solving the problem
Removing the injectors
Today, every vehicle owner can choose one of three possible options for cleaning injectors:
- use automotive chemicals;
- resort to the services of a service station;
- Remove and clean the injectors on the VAZ 2110 yourself.
In our article we will dwell in detail on the third option for resolving the issue. Self-cleaning is safer and more effective compared to the effect that occurs after using automotive chemicals. The economic benefits of cleaning injectors yourself are also an obvious fact, given the prices prevailing at service stations. It is recommended to carry out this procedure yourself only if you have at least a general understanding of the internal structure of the machine. Otherwise, it is advisable to entrust cleaning of injectors to specialists.
Methods for checking fuel rail pressure
The procedure for measuring the pressure in the VAZ 2114 ramp is carried out to identify a malfunction in the supply of gasoline to the injectors.
There may be several signs of a fuel system malfunction:
- instability in the operation of the car engine (motor trouble);
- increased volume of carbon monoxide at the outlet;
- unreasonably increased consumption of gasoline (increase to 30-50%);
- failures in the operation of the power unit;
- drop in engine power with a normally operating electronic control unit.
The first thing the car owner needs to do after identifying these malfunctions is to measure the pressure in the ramp.
Before work, you need to prepare the following tools and materials:
- pliers;
- screwdriver;
- sanitary linen;
- fuel or oxygen hose (internal diameter must be at least 8 mm);
- mechanical pressure gauge with a measurement limit of up to 7 atmospheres;
- several clamps;
- container for draining fuel;
- cap for twisting nipples.
Before starting work, you must ensure that the fuel system is tight. If you take measurements in the presence of microcracks or leaks, the results will be unreliable.
- We wrap plumbing flax under the pressure gauge nozzle, screw it into the hose and secure it with a clamp.
- Use your hands or pliers to remove the cap from the fuel rail.
- Using the cap, unscrew the nipple and put on a hose with a pressure gauge. We secure the connection with a clamp.
- We start the engine and record the pressure gauge readings.
- To check the pressure regulator, disconnect the hose leading from the regulator to the intake manifold. In this case, the pressure gauge should show an increase in pressure to 3-3.2 atm. If the pressure readings do not change, there may be a problem with the fuel pump.
- Now you need to measure what maximum pressure the pump develops. Using pliers, the return fuel line is pinched. The new pump should show at least 6 atm. If the pressure gauge registers 5 atm, then the pump is already very worn out, but can still continue to work for some time. The pump is clearly faulty if the reading is less than 4 atm.
- We check the condition of the pipeline. To do this, we find the fuel pump assembly (under the rear seat) and determine the type of connection. A quick-release connection can be purchased in a store for literally pennies. If the connection is threaded, then the entire pipe is purchased and the tip is cut off. We put a hose with a pressure gauge on one end of it, and connect the other to the pump outlet. Now let's check the pressure. If the pressure gauge shows 6 atm, then we simply flush the entire system and replace the fine filter. When replacing the filter, direct the gasoline supply hose into a previously prepared container and turn on the ignition. We carefully inspect the fuel that has spilled into the container, install a new filter and repeat the procedure again. If after the new filter the gasoline is dirty, be sure to wash the injectors.
If after all the checks the problem remains, then a complete diagnosis of other systems (mass air flow sensor, idle speed sensor, cylinder compression and throttle position sensor) is necessary.
Fuel supply system
Fuel supply system
Repair and operation manual - Fuel injection system - Fuel supply system
Fuel supply system
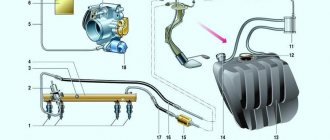
Rice. 11.5. Fuel supply system:
1 — fitting plug for monitoring fuel pressure; 2 — injector ramp; 3 — bracket for fastening fuel pipes; 4 — fuel pressure regulator; 5 — electric fuel pump; 6 — fuel filter; 7 — fuel drain line; 8 — fuel supply line; 9 - nozzles.
WARNING
When the engine is running, a pressure of 284-325 kPa (2.9-3.3 kg/cm2) is maintained in the fuel supply system, therefore, before carrying out work related to disconnecting any fuel pipes and hoses, it is necessary to reduce the pressure in the system.
Reducing rail pressure
To reduce system pressure:
1. Brake the car with the parking brake and put the gear in neutral.
2. Fold back the rear seat cushion and fold back the cut-out part of the sound insulation.
3. Unscrew the two fastening screws and remove the hatch cover above the gas tank.
4. Disconnect the connector with the fuel pump wires from the wiring harness by pressing the plastic latch.
5. Start the car's engine and let it run until it stalls due to the production of gasoline in the fuel line. Then turn on the starter for about 3 seconds. After this, you can disconnect the fuel lines. Upon completion of work, do not forget to connect the connector with the fuel pump wires to the wiring harness.
Electric fuel pump
Electric fuel pump 5 (Fig. 11.5) is a two-stage, rotary type, non-removable, installed in the gas tank, which reduces the possibility of vapor locks forming, since fuel is supplied under pressure of more than 284 kPa, and not under the influence of vacuum.
If engine power drops, increased noise is heard or periodic “howls” when the fuel pump operates, then most likely the fuel pump has failed. First, check the pressure in the fuel supply system by connecting a pressure gauge to the fitting on the rail in the engine compartment. If the pressure in the system is less than 250 kPa (2.5 kgf/cm2), replace the fuel filter.
If this does not help, try removing the fuel pump and cleaning the receiver screen. If in this case the pressure does not increase, the fuel pump must be replaced.
To replace the fuel pump, do the following:
1. Reduce the pressure in the supply system.
2. Disconnect the wire from the “-” terminal of the battery.
3. Place the car on a lift.
4. Remove the rear seat (Removing and installing the rear seat).
5. Remove the two screws securing the hatch cover.
6. Bend the clamps and disconnect the connector of the electric fuel pump and fuel level sensor wires.
7. Unscrew the nut securing the fuel supply pipe and move the pipe to the side.
8. Unscrew the fitting of the fuel drain pipe and disconnect the fuel line.
NOTE
Replace cracked or loose o-rings.
9. Disconnect the hoses from the gas tank, unscrew the bolts of the tank clamps, and remove it (Removing, installing and troubleshooting the fuel tank). On new cars (all VAZ 2113, 2114, 2115) there is no need to remove the fuel tank; everything can be done through the large hatch under the rear seat. On older cars, the standard hatch can be expanded using metal scissors. Having done this once, in the future, replacing the fuel pump mesh or the pump itself will be faster and much more convenient.
10. Unscrew the nut of the fuel drain pipe...
11. ...and disconnect the fuel line from the fuel pump.
12. Unscrew the fuel pump mounting nuts...
13. ...and remove the pressure ring.
14. Remove the fuel pump with fuel level sensor from the gas tank.
15. Remove the rubber o-ring of the fuel pump. A cracked ring that has lost its elasticity must be replaced.
16. If the storage cup remains in the gas tank when removing the fuel pump, remove it.
NOTE
Before reinstalling the fuel pump, secure the accumulator to the housing with plastic clips.
17. Install the fuel pump in the reverse order of removal. The arrow on the fuel pump should point towards the rear of the car.
18. Before installing the hatch cover, start the engine and check the tightness of the fuel line connections.
Fuel filter
Fuel filter 6 (see Fig. 11.5) is built into the supply line between the electric fuel pump and the fuel rail and is installed under the body floor behind the fuel tank. The fuel filter is non-separable, has a steel body with a paper filter element.
Replacing the fine fuel filter is regulated - every 30,000 km of vehicle mileage. However, the condition of the fuel filter depends on the quality of the gasoline: the dirtier the gasoline, the faster the fuel filter becomes clogged. Jerking when the car moves, first at high and then at low speeds, most likely indicates a clogged fuel filter.
1. Before replacing the filter, reduce the pressure in the supply system.
2. Disconnect the wire from the “-” terminal of the battery.
3. Loosen the nuts securing the hose ends to the fuel filter.
4. Loosen the fuel filter holder nut.
5. Completely unscrew the nuts and disconnect the hose ends from the fuel filter. Please note that a small amount of fuel will leak out of the fuel filter and hoses.
6. Remove the fuel filter from the holder.
7. Remove the O-rings from the hose ends. Check their condition. Replace rings that are torn or have lost elasticity.
8. Install a new fuel filter on the vehicle in the reverse order of removal. In this case, the arrow on the fuel filter housing should be directed in the direction of fuel flow.
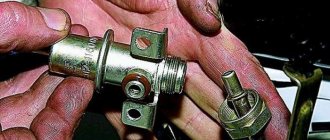
Fuel rail
Fuel rail 2 (see Fig. 11.5) of injectors is a hollow bar with injectors and a fuel pressure regulator installed on it. The injector ramp is secured with two bolts to the intake pipe. On the left side (in Fig. 11.5) on the injector ramp there is a fitting for monitoring the fuel pressure, closed with a screw plug 1.
The fuel rail has to be removed to replace the injectors.
1. Reduce the pressure in the supply system.
2. Disconnect the wire from the “-” terminal of the battery.
3. Remove the air filter 1 together with the intake pipe hose 2 (Air filter).
4. Disconnect the vacuum hose from the fuel pressure regulator.
5. Disconnect the connector with wires from the idle speed control by pressing the plastic latch.
6. Disconnect the injector harness connector from the wiring harness.
7. Remove the two fuel rail mounting bolts. Please note that flat washers are installed under the bolt heads (it is more convenient to remove the bolts, for example, with tweezers).
8. Disconnect the fuel supply and drain hoses from the fuel pipes.
9. Unscrew the screw securing the fuel pipe holder. Remove the holder. Please note that a spring washer is installed under the head of the screw securing it.
10. Carefully move the fuel rail along the axis of the injectors so that...
11. ... all the injectors have come out of the holes in the engine intake pipe.
WARNING
If any injector remains in the engine intake pipe when removing the fuel rail, replace the O-rings and injector retainer.
12. Carefully remove the fuel rail with injectors from under the receiver so as not to damage the injectors.
13. Install the fuel rail with injectors in the reverse order of removal.
Injectors
Injectors 9 (see Fig. 11.5) are attached to the fuel rail, from which fuel is supplied to them, and with their nozzles they enter the holes of the inlet pipe. In the openings of the fuel rail and inlet pipe, the injectors are sealed with rubber rings. The injector is a solenoid valve. When a voltage pulse is received from the controller to the injector, the solenoid valve opens and fuel is injected into the intake pipe through the atomizer in a finely sprayed jet under pressure into the intake pipe onto the intake valve. Here the fuel evaporates in contact with heated parts and enters the combustion chamber in a vapor state. After the electrical impulse stops, the spring-loaded injector valve shuts off the fuel supply.
Signs of injector failure may include:
— difficult engine starting; — unstable engine operation; — the engine stalls at idle; — increased crankshaft rotation speed at idle; — the engine does not develop full power, insufficient engine response; — jerks and dips in engine operation when the car is moving; — increased fuel consumption; — increased content of CO and CH in the exhaust gases; — glow ignition due to leaking injectors.
1. To check and replace injectors, remove the fuel rail.
2. Connect the injector harness block to the wiring harness, the wire to the “-” terminal of the battery and the fuel supply and drain hoses to the fuel pipes.
3. Lower the nozzles into transparent containers. It is more convenient to hang the containers on the fuel rail. Check the fuel atomization of the injectors. To do this, turn on the starter. The injectors must spray fuel in the correct cone. Each nozzle must have four jets, and...
4. ...the amount of fuel supplied through the injectors should be the same in all four containers (check using a measuring container). If any injector does not meet these conditions, the injector must be replaced.
5. Immediately after turning off the ignition, carefully inspect the injectors. If fuel leakage is noticeable from the nozzle of any injector, the injector is leaking and the injector must be replaced.
6. If the injector does not spray fuel, check that the injector is receiving power. To do this, disconnect the connector with wires from the injector, connect the battery directly to the injector contacts and turn on the ignition. If in this case the injector sprays fuel, then there is a malfunction in the injector electrical circuit.
7. It is recommended to check the resistance of the injector windings. To do this, disconnect the connector with wires from the injector (after first disconnecting the wire from the “-” terminal of the battery) and connect an ohmmeter to the injector contacts. It should show a resistance of 11-15 ohms. Otherwise, the nozzle must be replaced.
8. Pressing the spring clip, disconnect the connector with wires from the injector being replaced.
9. Move the injector lock to the side.
10. Remove the injector from the fuel rail. Remove the remaining faulty injectors in the same way.
11. It is recommended to check the O-rings on all injectors. Replace sealing rings that are cracked or have lost elasticity.
12. Install the injectors in the reverse order of removal. Before installation, lubricate the injector O-rings with gasoline.
13. To replace the clamps that do not hold the injectors well, slide them onto the recess for the fuel rail mounting bolt or onto the edge of the rail.
HELPFUL ADVICE
Contaminated injectors can be washed in a specialized workshop on a special stand.
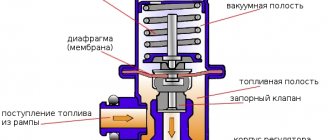
Fuel pressure control
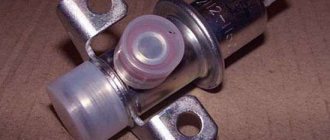
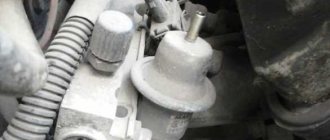
Fuel pressure regulator 4 (see Fig. 11.5) is installed on the fuel rail and is designed to maintain a constant pressure difference between the air pressure in the intake pipe and the fuel pressure in the rail.
Rice. 11.6. Fuel pressure regulator: 1 - housing; 2 - cover; 3—pipe for vacuum hose; 4 - diaphragm; 5 - valve; A - fuel cavity; B - vacuum cavity
The fuel pressure regulator consists of valve 5 (Fig. 11.6) with diaphragm 4, pressed by a spring to the seat in the regulator body. When the engine is running, the fuel pressure regulator maintains the pressure in the fuel rail of the injectors within the range of 284-325 kPa. The regulator diaphragm is affected by fuel pressure on one side, and pressure (vacuum) in the intake pipe on the other. When the pressure in the intake pipe decreases (the throttle valve closes), the regulator valve opens at lower fuel pressure, passing excess fuel through the return line back into the gas tank. The fuel pressure in the fuel rail decreases. As the pressure in the intake pipe increases (when the throttle valve opens), the regulator valve opens at a higher fuel pressure and the fuel pressure in the rail increases.
Signs of a malfunctioning fuel pressure regulator may include:
— unstable engine operation; — the engine stalls at idle; — increased or decreased crankshaft rotation speed at idle; — the engine does not develop full power, insufficient engine response; — jerks and dips in engine operation when the car is moving; — increased fuel consumption; — increased content of CO and CH in the exhaust gases.
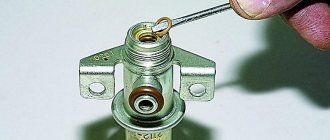
1. Before checking and removing the fuel pressure regulator, reduce the pressure in the power system.
2. Unscrew the fitting plug for monitoring the fuel pressure at the end of the ramp. Please note that there is an O-ring installed in the fitting plug to control the fuel pressure. If the ring is torn or has lost elasticity, replace it or the entire plug.
3. Using the metal protective cap of the tire valve, unscrew the spool (the same as in the tire) from the fitting.
4. Connect a hose with a pressure gauge to the fitting (you can use a tire pressure gauge). Secure the hose to the fitting with a clamp. Start the engine and check the pressure on the pressure gauge. The pressure should be 284-325 kPa (2.9-3.3 kgf/cm2).
5. Disconnect the vacuum hose from the fuel pressure regulator. In this case, the pressure on the pressure gauge should increase by 20-70 kPa (0.2-0.7 kgf/cm2). Otherwise, replace the fuel pressure regulator.
6. Reduce pressure in the supply system. Unscrew the nut securing the fuel pipe to the pressure regulator.
7. Remove the two bolts securing the fuel pressure regulator to the fuel rail.
8. Carefully remove the regulator fitting from the hole in the fuel rail and...
9. ...remove the fuel pressure regulator by disconnecting the regulator from the fuel pipe.
10. Install the fuel pressure regulator on the car in the reverse order, after lubricating the O-rings with gasoline. Replace torn or loose o-rings.
Quote
What pressure indicators should be in the fuel system?
Normally, the fuel system should have the following measurement indicators:
- at idle: approximately 2.5 atm. If the pressure gauge shows less, the coarse filter probably needs to be cleaned or replaced;
- with the ignition on: at least 2.9-3.0 atm;
- with the vacuum hose removed: 3.3 atm. A reading of 3 atm is also considered acceptable;
- with a pinched drain tube: from 6.9 to 7.0 atm;
- when gasping, the pressure should immediately jump to 3 atm, and then drop to 2.5 atm.
How to check gasoline injectors
Why do injectors fail, what are the symptoms of this problem? What methods exist for diagnosing injectors and how to do it yourself. We'll tell you in this article.
- Why do injectors fail?
- How deposits appear
- Filter contamination
- Signs of injector failure
- Power check
- Electrical resistance measurement
- Hearing test
- Injector diagnostic stand
Symptoms for replacement
In fact, there are quite a lot of reasons why injectors may not work well. And below are the most common symptoms:
- Difficulty starting the engine in any weather;
- The engine is running erratically;
- The engine stalls at idle;
- High crankshaft rotation speed at idle speed;
- Loss of power, poor response to the accelerator pedal;
- When you press the gas, shocks or dips may appear;
- High gas consumption;
If the nozzle is dirty or damaged, it should be replaced or cleaned. There is no point in repairing it. It should also be noted that today injectors cannot last even 100 thousand km .
Source
Removing the injector VAZ 2110 8 valves
If the car injectors become dirty, the engine will gradually lose power. As the car accelerates, engine problems will begin to become more noticeable and fuel consumption will increase. The injectors will need cleaning. Only a small number of problems arise due to contamination, which is why the VAZ 2110 injectors must be washed on time. This is done when you do not see any obvious deviations, but the car’s mileage has already exceeded 100 thousand km. The main signals that there are problems with the engine are the following factors:
- its launch is difficult;
- works unstably, it lacks the previous stability;
- it begins to stall after working for a certain time;
- the crankshaft begins to make more revolutions;
- the engine does not have enough power;
- when the car moves, it works jerkily;
- gasoline is consumed inappropriately over the distance, and the injector itself is significantly dirty;
- processed gas waste contains an increased amount of CO and CH compounds (this can be found out when inspecting the car at a car service center);
- the injectors become leaky, producing drip ignition.
Flushing valves and combustion chamber
At the end of the above procedures, it is recommended, to improve the cleaning result, to pour inside the fuel tank a liquid intended for cleaning valves, which will destroy carbon deposits on the intake valves and combustion chamber over the course of six engine operating hours, although you need to be careful, who knows what you have built up in the engine (and if you drove constantly under tension and only at low speeds, then carbon deposits, for example, on the bottom of the piston can reach several millimeters) and how it will begin to fly off when using a cleaner.
Now you can relax... until the next engine cleaning. We strongly advise you to read this article again after ten or twenty thousand kilometers. And then you will forget about engine problems!
vote
Article rating
Checking diesel injectors for overflow (drain to return)
As diesel injectors wear out over time, a problem arises due to the fact that the fuel from them gets back into the system, due to which the pump cannot generate the required operating pressure. The consequence of this may be problems with starting and operating the diesel engine.
Before the test, you will need to buy a 20 ml medical syringe and an IV system (to connect the syringe you will need a 45 cm long tube). To find an injector that throws more fuel into the return line than it should, you need to use the following algorithm:
- remove the plunger from the syringe;
- with the engine running, use the system to connect the syringe to the “return” of the injector (insert the tube into the neck of the syringe);
- hold the syringe for two minutes so that fuel is drawn into it (provided that it will be filled);
- repeat the procedure one by one for all nozzles or build a system for all of them at once.
Based on information about the amount of fuel in the syringe, the following conclusions can be drawn:
Checking the return flow
- if the syringe is empty, it means the nozzle is fully operational;
- the amount of fuel in a syringe with a volume of 2 to 4 ml is also within normal limits;
- if the volume of fuel in the syringe exceeds 10.15 ml, this means that the injector is partially or completely out of order and needs to be replaced/repaired (if it pours 20 ml, then it is useless to repair, since this indicates wear of the injector valve seat ), since it does not maintain fuel pressure.
However, such a simple check without a hydraulic stand and plan test does not give a complete picture. Indeed, in fact, when the engine is running, the amount of fuel discharged depends on many factors; it can be clogged and needs to be cleaned, or it freezes and needs to be repaired or replaced. Therefore, this method of checking diesel injectors at home allows you to only judge their throughput capabilities. Ideally, the amount of fuel volume they pass through should be the same and range up to 4 ml in 2 minutes.
You can find the exact amount of fuel that can be supplied to the return line in the manual of your car or engine.
To ensure that the injectors last as long as possible, refuel with high-quality diesel fuel. After all, it directly depends on the operation of the entire system. In addition, install original fuel filters and do not forget to change them on time.