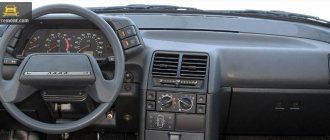
Many owners of domestic cars consider tuning a VAZ-2114 torpedo with their own hands to be a pressing topic for themselves. The improvement of the dashboard is carried out in order to improve its appearance and for functional modernization, which is considered one of the important points in tuning cars from domestic manufacturers.
Nowadays, there are a large number of different tuning options. Most often, car enthusiasts carry out minor restyling of the car’s exterior, while improving the VAZ-2114 dashboard is considered a significant improvement.
Sequence of work
Let us highlight the main stages of changing the appearance and features of tuning a VAZ-2114 torpedo with your own hands:
- First, disassemble the front panel of your car. Literally every owner of a domestic car should know how to remove this part. There is nothing complicated here. Everything is quite clear, because the dismantling process does not require special knowledge and skills.
- Next, modify the torpedo elements. At this stage, you may encounter many nuances. They directly depend on what you want to change and modify in the car. Everything should be thought through very carefully.
- At the end of the work, install the already remade and updated panel in place.
Where to begin
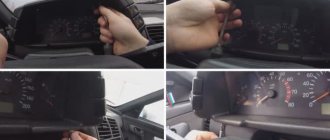
Before starting work, we recommend that you carefully study the dashboard structure. If you understand what and how, then it will be much easier for you to remove the torpedo. If you have already become familiar with the structure of the shield, you can begin work. You should start by dismantling the screens. This is done as follows.
- We take a positive screwdriver and carefully remove the three screws that secure the left screen. If you have a tool with a short tip, it is better to use it, it will be more convenient.
- We remove the lower part of the lining from the mounting on the body.
- We do the same with the screen on the right side. The only difference is that it is fixed with 5 screws. While working, carefully hold the pad with your hand.
Now that all the fasteners have been removed, you can remove the screen. But be careful that it doesn't get caught on the wires underneath it. Otherwise, you may simply break the cables.
Next, you should disconnect the ground from the battery. This is done by disconnecting the pads. If a radio is installed in the car, it must be disconnected from the wiring. If you do not have any audio devices installed, you can simply remove the wires (they are closed with a plug). Then the cigarette lighter and the socket that illuminates the ashtray are turned off.
So, the first stage of work has been completed. You can proceed to the next steps.
Panel painting
An excellent option for tuning a VAZ-2114 torpedo is painting the dashboard yourself. Before you start painting, you need to do the following:
- Thoroughly clean the entire surface from dirt and dust.
- Sand the dashboard with soft sandpaper to degrease it.
- Apply sealant.
- Carefully coat the torpedo with paint.
Before painting parts of your car, carefully read the instructions for using paint solutions. Despite the simplicity of restyling, certain skills will still be needed to perform this tuning and, most likely, this work is best left to professionals.
Important points regarding replacement
- When removing the right side of the console, be careful. Behind it are wires that can easily get caught on the side and be damaged. So before removing this cover, you should remove the negative terminal from the battery. You should also turn off the car radio by removing its connector from the common wiring harness located behind the upper instrument panel;
- Removing the plastic handles from the stove levers can cause serious difficulties. The fact is that there are protrusions on the stove levers (top and bottom), and holes on the handles. When you put the handle on, it snaps onto the lever. The only way to remove it is to pry it off with a flat screwdriver as shown in the picture. But when prying up the handle with a screwdriver, you should not bend it too much: the plastic breaks very easily;
So, a novice car enthusiast is quite capable of removing the dashboard from a VAZ 2115 and other cars in this line. All that is required is patience and attentiveness. If, after unscrewing all the fasteners, the dashboard stubbornly refuses to come off, you should inspect everything again: it is quite possible that some tiny screw was missed.
Panel cover
Covering a previously dismantled dashboard with natural, artificial leather or carbon fiber involves covering it with a ready-made pattern. It is best to prepare such templates in advance, that is, cut out the elements with a small allowance. Just like the previous version of tuning the VAZ-2114 torpedo, the upholstery is carried out after first cleaning the panel from all kinds of contaminants. The adhesive composition is chosen in such a way that it does not damage the material during the process of application and drying.
Tuning options
You can perform tuning in several ways:
- cover the panel with leather;
- paint;
- install overlays;
- combine materials.
Before tuning the dashboard yourself, you need to familiarize yourself with the rules and the car’s passport. You cannot use fur or ordinary fabric to cover the panels; the paint must be automotive grade. This is due to the operation of the stove, since as a result of high temperatures, ordinary paint and the described materials will begin to disintegrate and release harmful substances.
Before tuning the dashboard yourself, you need to familiarize yourself with the rules and the car’s passport.
You also need to take the choice of colors seriously. The color of the covers and interior trim are taken into account. If black and white are combined in any way, then when selecting other shades you need to use special tables of color combinations.
Panel painting
One of the simplest and most affordable options for tuning the VAZ 21114 dashboard is painting it. Here you can do everything yourself.
The procedure for painting the dashboard:
- The surface is thoroughly cleaned from dust and dirt. To do this, use a soft sponge and a regular soap solution.
- Sanded with fine sandpaper (P240, P280, P320, P360), this will help improve paint adhesion. The panel is also degreased using a special product for plastic; if this is not available, you can use compositions based on white spirit, dishwashing detergent or wet hand wipes.
- The sealant is applied. This is done at the points where the panel comes into contact with other body elements.
- Painting in progress.
In order to properly paint the VAZ 2114 panel, it must be dismantled
The paint can be applied with a brush, roller or spray. In any case, if the panel is not removed from the car, it is necessary to completely cover all areas that will not be painted. To do this, use masking tape. To properly paint the dashboard, it is recommended to remove it from the car. Although this is an easy way to remodel a dashboard, the work must be done carefully, and if you doubt your abilities, it is better to leave it to the professionals.
Panel cover
Another option for tuning the dashboard is covering it with artificial or natural leather or carbon fiber.
The procedure for covering the dashboard:
- The dashboard is being dismantled.
- The pattern is being prepared. To create a pattern for a specific panel element, remove it and cut out the required piece of material in accordance with the shape that will be pasted over, doing this with a small allowance.
The pattern is made in accordance with the shape of the element to be pasted - The dashboard is cleaned of dirt and degreased.
- The panel is pasted over. The adhesive composition is selected taking into account the material used for pasting, so as not to damage it during interaction. It should be taken into account that the panel gets very hot in the sun, so the glue must withstand high temperatures. A one-component polychloroprene adhesive is suitable for this; it must be heated to 60 °C to ensure a reliable connection (“Glue-88”, GTA Boterm, Mah). There is no need to heat polyurethane glue; it can be “Moment” (good for leatherette), Kaiflex K414, “Titan”, “Demoskol”.
Most often, the panel is covered with artificial or natural leather, carbon fiber
Video: covering the panel with rubber material
Installation of overlays
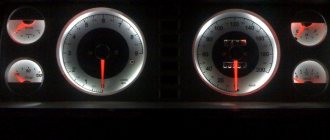
You can transform the dashboard of a VAZ 2114 using special overlays. They are sold in almost all auto stores. This tuning option allows you to change the color of the backlight. This occurs through the use of transparent elements and light filters of different colors. Such overlays must be installed correctly so that there is no distortion or displacement, otherwise the illumination of the devices will be uneven. It should also be taken into account that if light filters are too dark, the power of the factory light bulbs will not be enough, and they will not be able to properly illuminate the devices through such overlays.
The dashboard can be transformed using special overlays
In addition, you can install soft pads on the instrument panel. Unlike a rigid standard panel, they have better sound absorption, are more scratch resistant and have a shelf for small items. The cost of the instrument panel overlay is 1200–1500 rubles.
You can install a soft pad on the instrument panel
Europanel installation
Relatively recently, European-style dashboards began to be installed on the VAZ 2114. They have a more modern design and are made of high-quality materials, so they have become very popular among owners of the old-style VAZ 2114.
Europanel has a more modern design and is made of high quality materials
Installing the Europanel is not difficult, since it is designed specifically for the VAZ 2114 and is simply mounted in place of the old panel. The presence of several drawers for small items makes this solution more convenient. Among the disadvantages of the Europanel, owners note that the movement of the heater control levers is rather tight.
Video: installation of europanel
Improved backlight
To achieve a unique visual effect, one of the options for tuning the dashboard is to change the instrument lighting.
Work order:
- Removing the instrument panel.
- Removing protective glass.
- Removing the arrows.
- Removing the standard cover.
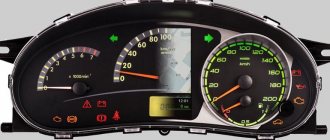
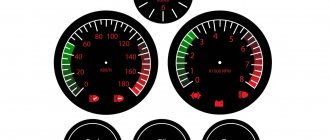
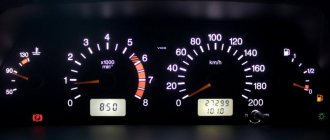
- Replacement of standard light bulbs. Green backlighting is installed at the factory. It can be changed so that the illuminated dashboard is in harmony with the rest of the dashboard and interior of the car. Typically, multi-colored LEDs in a plastic socket, a DSM LED or LED strips are used for this. It must be taken into account that the car's electrical voltage is 12 V, and the LEDs operate on a power supply of 2–3.5 V (this depends on the color) and have polarity. If you mix it up, the LEDs will immediately burn out. You can purchase ready-made clusters designed for 12 V, or make such a cluster yourself. To do this, several diodes are connected in series to achieve the required voltage. If you take 3 diodes of 3.5 V, then you also need to additionally set the resistance to 100–150 Ohms.
Changing the dashboard lighting improves its appearance - Reassembly of the structure.
Video: Changing the dashboard backlight
Tuning instrument needles
It is quite simple to implement this type of dashboard tuning, such as improving the instrument needles. In the standard design, the lighting of the heating equipment is yellow, the buttons are green, and the indicators are orange. Many people don’t like it because it resembles a parrot and makes it difficult to feel comfortable while driving at night.
To improve the instrument arrows, you need to disassemble the instrument panel and install a red, blue or other color LED under each arrow. To prevent light from scattering, a piece of heat-shrinkable tubing is placed over the diode. The wires from the diode are connected to the heater backlight. As a result of such changes, the instrument needles glow with a rich color.
You can make additional illumination of the arrows
Special pads
To modify the VAZ-2114 instrument panel, special overlays are used that have stylized images of the speedometer and tachometer. You can purchase such pads at literally any auto parts store. With this VAZ-2114 torpedo tuning, you can change the color of the backlight using built-in light filters and transparent elements. However, you need to attach such overlays correctly, because the result may be uneven illumination, for example, it is dim on the right and bright on the left, or the factory light bulbs will not have enough power to break through your additional built-in overlays.
Europanels for VAZ-2114
European-style shields appeared on the domestic automotive market relatively recently. Despite this, they were very quickly able to gain the trust of many car enthusiasts. The main reasons for this are the stylish appearance and the ability to mount this version of tuning the VAZ-2114 torpedo without the risk of damaging the windshield wiper blades.
The main reason for the high demand for panels among domestic buyers is the material from which they are made. Standard factory shields are made of soft plastic that is unpleasant to the touch, which begins to rattle in the near future. The European standard panel is made of softer material, which looks much more attractive. Positive emotions are also caused by the ventilation of the interior space of the cabin with such a product.
Instrument arrows
Another element of a car dashboard that is easy to improve yourself is the arrows of the measuring instruments. As many car enthusiasts have noticed, in the factory configuration the car panel is very similar to a parody of a parrot:
- heating device backlight – yellow;
- green buttons;
- all indicators are orange.
Quite often, such a diverse range of colors interferes with comfortable movement at night, because they all merge into one obscure color. At the same time, it is quite difficult to notice the instrument arrows. To improve the situation, tune the torpedo on the VAZ-2114 by installing red LEDs.
To do this, carefully disassemble the VAZ-2114 instrument panel. Place one LED under each of the arrows and put on special heat shrinks. Lead the wires of each of the devices outside the panel, and then connect them to the heater wiring. Upon completion of work, reassemble the shield in the reverse order.
What is included in the design?
To make it easier to remove the entire dashboard or its individual elements, you need to know what the structure consists of. In a VAZ 2114 car, the dashboard includes 11 main elements, which are shown below:
Dashboard base. It contains controls for interior systems.
- Overlays. This part is needed to securely fasten the base.
- Bracket.
- The sealing element is a plug.
- Ashtray.
- Crossbar, there are two of them. The number “6” shows the right one.
- Right dashboard screen.
- A shield that blocks access to the wiring.
- Central bracket.
- Left screen of the instrument panel.
- Left cross member.
In VAZ cars, you can improve the appearance of the dashboard. To do this, you need to unload the dashboard from the dials. More stylish and modern information devices are usually installed to replace them. The same applies to the backlight; if you wish, you can update it yourself and install modern original LEDs.
By dismantling these elements one by one, you can completely disassemble the dashboard. Below you will find detailed instructions with which the motorist can completely remove the dashboard elements from the car.
Replacing the steering wheel
The safest is the steering wheel that is installed on a domestic car by the manufacturer. Attaching a new steering wheel is considered an excellent option for tuning a VAZ-2114 torpedo with your own hands. However, it should be remembered that installation of a non-certified product entails changes in the rotation force. This directly affects the car's handling, especially in critical situations.
Therefore, in our opinion, the optimal action in this case would be to install a factory steering wheel with a new braid. The trim can be made of materials that provide better hand contact with the surface of the steering wheel. For example, genuine leather is perfect for this. This “steering wheel” looks stylish and fits better in the hands due to the increased thickness of the rim.
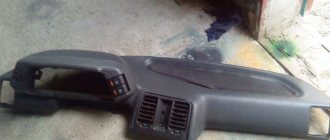
Preliminary panel removal, features
Buy a shaped screwdriver at the store and use it to gradually unscrew the screws that secure the instrument panel. These are directly three elements that secure the left screen of the center console. If you cannot figure out their location, focus on the place where the driver's pedals are located. We also remove the self-tapping screw, which is located under the plug or, if you previously installed the radio, then under it.
Those who have been driving recently need to know that the plug is located next to the button that turns on the heating of the rear window of the VAZ car. After this, you will need to pull out absolutely all the chips from the surface of the instrument panel. It is best if you completely replace them in the future. This will ensure better fastening and will prevent you from getting confused with the parts later.
When working, keep in mind that they are located on the cigarette lighter and the ashtray light. It is imperative to remove the steering column. After dismantling is completed, we also remove the steering wheel. After this, the column will smoothly move down. Next, all the remaining screws are turned out and the unit responsible for controlling the heating of the car is lightly pressed inward.
After removing all the specified elements of the dashboard, you will also need to unscrew the mounting bracket. This is an element that runs from the floor of the car directly to the instrument panel. Please note that the relay holder and fuses for the fuel injection system are also attached to it. Don't forget that you will also need to remove the cross mount.
You need to carefully pry and then remove the knobs responsible for leveling the headlights and regulating the lighting in the instrument panel, pull out the decorative trim and begin dismantling the LED insert. All work on the instrument panel must be carried out with the utmost care so as not to damage serviceable elements.
Subsequently, all the nuts are unscrewed, and the chips located in the immobilizer and glove box are disconnected. Once you have removed all associated elements, handle the old panel carefully and pull it towards you. Only now can you begin installing the new dashboard. There is nothing complicated or time-consuming about this task, but you will still have to spend a certain amount of your time on installation.
Additional on-board computer
The instrument panel of a domestic car has a special opening for attaching an additional trip computer. This nest is closed with a special plug. We decided to use this place for its intended purpose and perform tuning of the VAZ-2114 torpedo. In the photo you can clearly see what the dashboard improvement option looks like.
A route computer, or, as it is also called, an on-board computer, is an electronic device that allows the driver to receive information about fuel consumption, driving mode and other important parameters. In addition, many models of “brains” for cars allow diagnostics of the electronic engine control system. It is important to note that on-board computers are also mounted on cars with carburetor engines. However, in order for the equipment to perform its functions, it may be necessary to install special sensors on the dashboard.
Today there is a large selection of these devices on sale from different manufacturers. While they differ in the number of functions, they can also differ in the location of installation on the dashboard. Sequence of work:
- Connect the wiring harness block, which is intended to connect the VAZ-2114 trip computer, to the block on the back of the computer.
- Use a separate wire to connect the contact of the computer block to the contact of the diagnostic block.
- Insert the device into the slot.
Having done this work yourself, you will receive an updated instrument panel of the VAZ-2114, which has a completely different appearance.
Europanel: standard equipment
With a total weight of 17 kg, the panel has overall dimensions (in cm) – 170x90x100.
The package includes all the elements necessary for quick installation and further operation:
- Instrument panel (qty. - 1 pc.).
- Set of devices (qty. - 1 pc.).
- Under-panel wiring harness (qty. - 1 pc.).
- Central console (qty. - 1 pc.).
- Floor tunnel (qty. - 1 pc.).
- Control unit for the heater (qty. - 1 pc.).
- Top cover for the glove compartment (qty. - 1 pc.).
- External lighting switch (qty. - 1 pc.).
- Rear fog light switch (qty. - 1 pc.).
- Heating switch for rear window (qty. - 1 pc.).
- Set of plugs for switches (qty. - 4 pcs.).
- Heater air duct deflector (qty. - 5 pcs.).
- Cigarette lighter (qty. - 1 pc.).
- Metal frame (quantity - 1 piece).