03/04/2022 7,892 VAZ 2107
Author: Ivan Baranov
Previously, a cigarette lighter was used in cars to light a cigarette. Now this is a kind of 12 V outlet into which you can connect various devices. Therefore, if the cigarette lighter of a VAZ 2107 does not work, this is sometimes a big problem. What the device is, what the main malfunctions are, how to replace and repair the cigarette lighter, is discussed in this article.
[Hide]
Cigarette lighter VAZ 2106
For many car enthusiasts, a cigarette lighter is a necessary device, because a cigarette lighter in a car is needed not only as a lighter - in addition to using it for these purposes, it is through the cigarette lighter socket that a portable car refrigerator, compressor, TV, travel razor or coffee maker, and mobile phone charger are connected to the power supply. If the cigarette lighter breaks down, it must be disassembled and repaired. If the cigarette lighter completely fails, it needs to be replaced. Let's talk about how to change the cigarette lighter.
Does not work
screwdrivers; soldering iron; tweezers; cotton gloves.
Repair instructions:
Open the hood and then remove the negative terminal from the battery. This will de-energize the machine and significantly reduce the risk of a short circuit.
Then move the driver's seat as far as possible to gain access to the cigarette lighter, most often located on the center console.
Now take a bright flashlight and inspect the inside of your cigarette lighter. There should not be any foreign debris or objects there. If they are still present, you need to carefully remove them using tweezers with rubberized ends or 2 matches.
Check the fuse responsible for the operation of the cigarette lighter. In the event of a short circuit due to a device connected to the cigarette lighter, the fuse blows and no current is supplied. To restore its supply, you must install a new working fuse. An instruction book should help here, which will tell you which fuse needs to be replaced. In addition, a table of all fuses can be found on the back of the fuse box.
If the above methods are useless and the cigarette lighter does not work, remove it from the socket. To do this, gently pull the metal rim with pliers. Moreover, it is necessary to place a cloth under the teeth of the pliers so that marks do not remain on the rim.
Try to remove the cigarette lighter from its socket. If the body gives in tightly, try pulling on each side in turn. However, do not pull too hard to avoid breaking the wires.
Inspect the removed cigarette lighter. It is worth paying attention to the presence of dark carbon deposits. Also check the reliability of the soldering and the integrity of the wire insulation. A loose wire is often the reason for the lack of current in a car cigarette lighter. Then carefully solder this wire into place.
Install a new cigarette lighter head if there is current and the coil is cold. Due to frequent use, the heating element burns out quite quickly. Always buy a socket designed specifically for your cigarette lighter.
How to change the lock on the door using the link.
How to connect
It is best to make 5 V sources independent of the cigarette lighter for each additional device and power them from the ignition circuit (after the ignition switch). Then both the recorder and the navigator will be connected only when the engine is running (for the recorder this is doubly beneficial, it has an automatic on-off function when external power is available)
Connection diagram
There are slight differences depending on which model of center console is installed in the car.
If a replacement has been made and you have a “five console”, the connection diagram is as follows:
The color of the food is blue-red, paired, while the color of the minus “mass” is paired, black and white. The ground is fixed near the ignition relay. One branch powers the light in the glove compartment.
Native console (central) VAZ 2107, the connection principle is as follows:
“Ground” is black, the wires going to the lighting are white, there are two of them. The circuit provides that one wire illuminates the panel.
The power supply wire is blue and red, paired, one part fits and powers the on-board clock.
It is also important to know that in addition to wires, the circuit contains:
A 10 ampere fuse marked F 6, which is located in the mounting block.
Backlight
Replace the light bulb with the engine turned off and the battery disconnected.
Remove the plastic panel located under the dashboard. In addition to the cigarette lighter, the hazard warning button and light and fan switches are attached to it. To do this, pry the console from the side with a screwdriver and carefully press in the latch holding it.
Use a marker to mark the wires that go to the cigarette lighter, or draw a diagram of their connection.
The cigarette lighter body is held in place by a large nut - unscrew it.
Remove the cartridge with socket from the cigarette lighter housing.
The lamp housing is attached to the cigarette lighter body - disconnect it by pressing the latches that hold it.
Use a screwdriver to slightly open the lamp housing.
Remove the socket from it along with the lamp inserted into it.
Replace the lamp and reassemble the cigarette lighter in reverse order
If replacing the lamp and fuse did not help, then in order to restore normal operation of the cigarette lighter, it is necessary to change it completely.
Instructions for repairing and replacing the mechanism
Repair and replacement of the VAZ 2107 cigarette lighter are similar to the classic VAZ, so they can be considered as an example.
To perform these procedures, you need to prepare the following tools:
- Screwdriver Set;
- Pliers;
- Small forceps or tweezers;
- Soldering iron with solder;
- Portable lamp or flashlight;
- Electrical insulating tape;
- Cotton gloves.
Repair consists of a sequence of stages:
- Turn off the vehicle's power by removing the negative terminal from the battery.
- In the cabin, we find where the AP socket is and provide easy access to it. It's usually located on the center console, so we move the driver's seat as far back as possible.
- Now remove the cartridge from the slot. After selecting the inside of the nest, you must remove any foreign objects or debris using tweezers.
- Next, check the fuse in the mounting block. It is usually located under the hood, dashboard or driver's seat. Having opened the security unit, we find the required fuse. Its location can be determined by the diagram on the inside of the cover or in the operating instructions. Remove the required fuse and check its jumper. If it burns out, the part must be replaced.
- If replacing the fuse does not help, continue to the next step. Remove the cigarette lighter. Then carefully grab the pliers by the rim and, without applying any force, pull them towards you so as not to damage the wiring.
- On the elongated element, inspect the place where it is soldered to the AP. If a poor connection or gap is found, the wire should be soldered. During the inspection, pay attention to the wires and insulation. If there is chafing, the wire must be insulated.
- After checking the serviceability of the device, return the rim to its original place.
AP Replacement Photo Gallery
To replace the access point, you need to know how to connect the cigarette lighter. Information can be found in the operating instructions.
To replace the outlet, do the following:
- Disconnect the negative battery terminal.
- Remove the cartridge from the outlet.
- Using a thin screwdriver, bend the retaining clips.
- Carefully remove the inside of the socket and disconnect the connector.
- We change the socket and install everything in the reverse order.
After replacing the cigarette lighter bulb, remove the clip from the socket. Replace the lamp and reinsert the clip.
Where is the plus and where is the minus in a car cigarette lighter: pinout and polarity
- Design and principle of operation
- Where is the plus and where is the minus in the cigarette lighter?
- Plug
- Nest
- Why know polarity
- Signs of an incorrect connection
- How to check
- Cigarette lighter connection diagram
Leading automakers began introducing cigarette lighters in their cars back in the 20s. last century. Since then, they have gained great popularity and have become an indispensable accessory on the dashboard of vehicles. The operating principle of the devices has not changed, but the capabilities and functions have been expanded.
Design and principle of operation
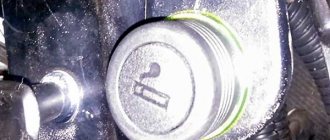
The car cigarette lighter has a simple design and is a small metal cartridge with a plastic handle and button. A nichrome spiral is installed under the body, which is heated by electric current.
There is a special socket on the instrument panel or in another part of the car. If you insert the cigarette lighter into it and press the handle, it will be connected to the on-board network.
The positive contact mates with the central terminal of the socket and the spiral of the device. The negative interacts with the socket base and the plug clamping mechanism. When using the cigarette lighter, current is supplied through the nichrome element, which contributes to its heating.
After reaching the maximum temperature indicators, the thermal relay is activated, and the cigarette lighter is disconnected from the on-board power supply.
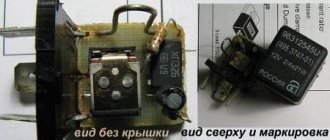
To protect the connector from blowing, manufacturers install a 10 A fuse. It is located in the fuse block and is indicated by the “cigar” marking or a cigarette icon.
Since its appearance in the first half of the 20th century. The internal structure of the cigarette lighter has remained virtually unchanged.
The key advantage of the device is the ability to power a variety of electrical appliances, which make long driving comfortable and safe.
However, due to the consumption of a large amount of energy, the structure may fail. In addition, there are other disadvantages of such an accessory. When gadgets are frequently connected, the internal elements of the device are subject to a large mechanical load, which contributes to their wear.
Design and purpose of the lighter
Originally, the automobile cigarette lighter (AR) was designed to allow the driver to light cigarette-like embers from a fire. The design of the device has not changed since its introduction, although it is present in car dealerships of even the first domestic cars.
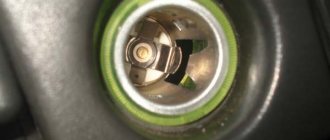
The VAZ 2106 lighter is a device consisting of two parts: a socket and a cartridge. The metal cartridge has a plastic handle in the form of a button. In the center of the socket there is a metal rod that acts as a positive pole.
The metal body of the cartridge plays a negative role. Between the body and the metal core there is an insulator, eliminating contact between plus and minus. The connection between the positive and negative contacts occurs through a nichrome spiral, which acts as a heating element.
When current flows to the heating element, it begins to heat up to a high temperature. When the coil reaches the required temperature, the current stops flowing thanks to the thermal relay. The device slot is located on the dashboard, in the driver’s comfort zone. It is made in the form of an elongated recess with a metal shell, which plays the role of a minus.
Inside there is a central contact that is powered by a battery. The housing is equipped with a backlight that automatically turns on along with the external lighting.
To turn on the heating mode, press the handle so that the cartridge is immersed in the slot and locked in the pressed state. Keep your bimetallic strips. At this moment, the positive contact of the cartridge is with the positive socket, and the negative contact of the connector is with the negative terminal of the cartridge. The current flowing through the spiral heats it. The heating element reaches the desired temperature within 15-20 seconds.
Where is the plus and where is the minus in the cigarette lighter?
To understand how the cigarette lighter works, where the plus and where the minus are, it is enough to examine its key components.
The plus point about the cigarette lighter is its handle. When you press the button, the electrical circuit is closed, and the nichrome spiral is heated. When wondering where the minus is on the cigarette lighter, you should pay attention to the side walls of the metal cylinder.
Using the polarity information as a guide, you can begin to repair the damaged part. To restore a failed element you need to:
- Unscrew the nut on the back side and remove the device.
- Find the semiconductor wafer and remove it (if it caused the breakdown).
- Make a small cut on the body and begin assembling the device.
- Strip the wires and crimp the terminals.
- Remove the center console in the car and turn off the backlight.
- Remove the block.
- Connect the wires using connecting clips, observing the diagram and polarity.
- Pull the wires down and connect them to the socket.
- Put the accessory in place.
- Turn on the backlight.
Plug
The plug is designed to transmit 12V/24V voltage through the cigarette lighter socket. Its body is made of plastic and has wires for screws. An 8A fuse is located inside the device, protecting the equipment from power surges.
The technical specifications of the plug are as follows:
- Input voltage indicators - 12V/24V.
- The maximum diameter of the wires used is 7 mm.
- Plug length - 83 mm.
- The current throughput is 8 A.
Nest
Experienced drivers know where the plus is on the cigarette lighter. It is supplied to the central contact of the socket and the clamping feet of the plug. The nominal voltage in the connector of modern machines is 12 V.
The diameter of Soviet nests differed from foreign ones. Therefore, when trying to insert a short plug into such a connector, it did not reach the central contact, and the external device refused to work.
causes of breakdown and repair methods
Initially, the cigarette lighter was aimed at the needs of smokers. However, as practice has shown, to light a cigarette it is much more convenient to use a match or a lighter.
Many automobile companies at one time even wanted to abandon this mechanism. But with technological progress, when the life of every motorist became almost impossible without devices, the cigarette lighter found a second life. The device socket, which allows you to connect any electrical equipment with an input voltage of 12 W, remains in demand. It is quite obvious that if the cigarette lighter does not work inside the car, not only the driver, but also the passengers nearby experience discomfort.
How the cigarette lighter works and how it works
This device consists of a metal spiral in a plastic case, which is inserted into a special socket in the car interior. The heating element is a material with high resistivity (most often nichrome). The entire structure is connected as follows: the ground is connected to the socket, and the positive contact to the heater.
The nichrome spiral is heated to extremely high temperatures, as evidenced by its red color. The system is equipped with a thermal relay that turns off the power supply if the temperature threshold is exceeded
Also, to illuminate the socket in case of insufficient lighting, install a special socket with a light bulb. The socket is equipped with a 10 A fuse, which is located in the fuse block. Despite the rather simple and understandable design, it happens that the cigarette lighter often stops functioning. There can be many reasons for this, each of which will be discussed in more detail below.
Why the cigarette lighter does not work: the main reasons
When this simple but important device for a comfortable stay in the car fails, it becomes unusually difficult. As mentioned above, the cigarette lighter may stop functioning for a variety of reasons. But the following situations are considered the most common:
- The fuse located in the block has failed
- Burnt out socket
- A foreign object has entered the socket, preventing connection
- The “antennae” of the nest are loose or frayed
The fuse is considered the most vulnerable element of the device. Often it burns out due to an overload formed when powerful electrical appliances are connected: a refrigerator for a car, a compressor for inflating wheels, mattresses, and the like.
The cigarette lighter is designed to work with low-power electrical appliances: laptop, tablet, mobile phone. Therefore, if there is a need to connect a “heavy” device, it is best to connect it directly to the battery
This method may seem inconvenient to many, although there is nothing complicated about it. It is enough to connect all the wires correctly, observing the polarity. In any case, you can install another battery-powered cigarette lighter. The throughput of such a mechanism is much higher, so many energy-intensive devices can be connected to it without fear.
How to repair a car cigarette lighter?
When the answer to the question of why the cigarette lighter does not work has been received, you can move on to the next stage - troubleshooting. That is, it is necessary to have a clear idea of which element has failed and what actions should be taken.
The simplest and most effective way to solve the problem is to go to a service station. Qualified personnel will quickly repair a failed device. True, you will have to pay a little for the work. In addition, you will have to spend money on fuel to get to your destination. Therefore, this method is not suitable for everyone.
If you decide to do all the work yourself, then follow these simple instructions:
- Make sure the fuse is in place. To do this, find it in the general box. It is indicated by signs in the form of a smoking cigarette, or by the inscription “cigar”
- If this element burns out, replace the old fuse with a new one
- If the mechanism is intact and continues to function correctly, check the socket itself
- Make sure that no foreign object has fallen into the socket
Third-party objects can be pulled out with tweezers, but this must be done carefully. In the worst case, the wiring has been unsoldered or burned out. Few people can fix such a breakdown with their own hands at home. You must have the appropriate electrical knowledge and tools. It is not recommended to install a higher power fuse. Increasing the power of the device will result in failure of the cigarette lighter socket itself.
Cigarette lighter repair instructions
If the cigarette lighter stops working and you decide to do the repairs yourself, first of all you should dismantle it. The complete procedure for repairing the device is as follows:
- Initially, you should have a new, working copy on hand.
- Remove the negative battery terminal
- Using pliers, carefully remove the cigarette lighter from its socket.
- Lift the device by the edges one by one, without sudden movements, so as not to break the contacts
- When the cigarette lighter is in your hands, pay attention to its contacts, there should be no burning on it
- If a soldered wire is found, solder it
- Install the mechanism into the socket, doing all the steps in reverse order.
Another common problem is that current flows, but the coil does not heat up. In this case, the head must be completely replaced. It is necessary to install new, original spare parts of the device in accordance with their specific brand of car. If the above steps do not bring the desired result, install a new cigarette lighter.
Other problems
In many cars common among domestic drivers, the cigarette lighter may have various malfunctions unique to this brand of car. Owners of many American SUVs note every time smoke appears in the cabin the moment they connect a powerful device to the connector. In its significance, the problem is comparable to engine smoke.
The whole difficulty lies in the fact that a seemingly insignificant breakdown can lead to the failure of the car’s electronics. After all, a wire burnt out from overvoltage may be in the same bundle with the rest of the wires.
On domestic VAZ cars, the fuse is considered the most vulnerable point. To check if it is working properly, just do the following:
- Turn on the heater fan, if the heater does not turn on, then there is a problem with fuse F18
- To replace it, you don't have to go under the hood. It is located to the left of the steering wheel in the common block
- If the stove fan is running, there may be a breakdown in the wiring. But you shouldn’t blame it right away, it’s best to check fuse F6 first
The latter also affects the operation of the cigarette lighter, like F18. Therefore, in the event of a malfunction, both should be checked for functionality.
Bottom line
It is best to use the cigarette lighter strictly for its intended purpose, then the likelihood of it breaking is significantly reduced. But over time, the “antennae” becomes loose, even if used in rare cases. There's nothing wrong with that - just bend them with the help of a tool at hand. In especially severe cases, for example, when the problem lies in the entire wiring, of course, you simply cannot do without the help of a specialist. In any case, there is no need to connect powerful electrical appliances to the cigarette lighter. Then the device will serve faithfully throughout the entire operation of the car.
Signs of an incorrect connection
If the cigarette lighter is connected incorrectly, it will malfunction or fail completely. In addition, deviation from the installation rules can cause a short circuit and lead to ignition of the element.
How to check
If the cigarette lighter refuses to conduct electricity, you should make sure that it is connected correctly.
To check the functionality of the device, you need to follow the following algorithm:
- Turn the ignition key and activate the electricity supply.
- Insert the cigarette lighter into the socket.
- Wait a few seconds and check the condition of the element with your hand. If it does not heat up, it means a breakdown has occurred.
Having completed the diagnostics, you should remove the device from the socket.
To restore the main function of the cigarette lighter, it is enough to change its head. If the nichrome spiral fails and is subject to wear due to intensive use, you can replace it with your own hands. The main thing is to choose the right model on the market.
If replacement does not fix the problem, you will need to check the power circuit and inspect all connections. At the inspection stage you should make sure:
- Are the contacts on the cigarette lighter body and connection points burnt out?
- Has the fuse, which is located in the corresponding compartment and is indicated by a cigarette icon or inscription, failed?
- Are there any traces of combustion or foreign particles in the nest?
- Is the socket plug OK?
Often, device malfunctions occur due to a damaged fuse. You can replace the part yourself without involving specialists.
If the device stops working, you can replace it yourself. The main thing is to figure out where the plus and minus are in the cigarette lighter.
Conclusion
Ideal use of the cigarette lighter. Its direct purpose. For lighting cigarettes. When using devices, you must add power to them and ensure that the total load does not exceed the permissible load. When working with the AP, keep in mind that even when the ignition is turned off, devices connected to its socket will consume electricity. This may result in the battery being completely discharged. Do not insert sockets or poor installation into the socket as this may cause a short circuit.
Cigarette lighter connection diagram
The exact connection diagram for a car cigarette lighter depends on its design and the characteristics of the vehicle. However, there are generally accepted rules and conditions that must be observed when installing the part.
The standard arrangement of parts is as follows:
- Battery
- Safety unit.
- Switch.
- Relay.
- Cigarette lighter.
Do not connect the accessory directly to the ignition switch, as the system will not be able to withstand the increased load. After laying the cable under the hood, you need to connect it to the positive contact, and then connect the fuse and attach it to the terminal. If you cannot do this, connect the wire to the starter and attach it to the positive terminal of the relay.
The end of the wire needs to be stripped 1 cm, and then installed on the terminal and clamped with pliers. Next, you should secure the wire to prevent it from loosening. For this purpose, you can use a soldering iron or a suitable terminal. A switch and fuse are installed near the cigarette lighter. Such details will increase the safety of operation of the device.
The switch must withstand operation with a current of 1.5 times the maximum load. If it is missing, you need to install a relay nearby with the appropriate current value. Some drivers place the switch and relay near the ignition switch. The switch is connected to the control contact of the relay, and the cigarette lighter is connected to the power contact.
Before turning on the device, you should make sure the connection is correct. The splitter and relay must be tightly fixed to the housing. Next, you need to make sure that the ignition circuit is turned off and begin testing the device. Using a tester, you can estimate the voltage on an unconnected battery. Next, you should put the minus terminal on the battery terminal and measure the voltage again. If there are no changes, then the connection diagram has been followed.
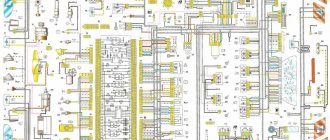
How the cigarette lighter works and its connection diagram
The main element of the cigarette lighter is its socket, into which both heating elements and plugs of various devices powered by a 12V network are inserted. Ground from the battery is supplied to the socket, and the plug has a positive contact. When you insert a connector into a socket, the circuit is completed and power is supplied to the devices.
How does a car cigarette lighter work?
Cigarette lighter power circuit
If there is a backlight, it is powered by a separate wire suitable for the socket. Power is supplied through wires, which, on the one hand, are connected through a chip to the mounting block with fuses, and on the other hand, through another chip, to the terminals of the cigarette lighter housing.
To avoid short circuits, the cigarette lighter socket always has a fuse in the fuse box. It also has another additional fuse on the body. By the way, the backlight has a separate fuse.
An important point - why does the cigarette lighter constantly work when the ignition is off? This is not a malfunction, it is a feature of its connection according to the diagram. For example, this is how the cigarette lighter works in VAZ Classic, VAZ-2114, Lada Kalina, BMW E34-E36, Skoda Octavia Mk2, SEAT Leon I and some others. But this doesn't always happen.
The cigarette lighter does not work when the ignition is turned off in VAZ-2115, BMW E39 and newer, Volkswagen Touareg, Opel Corsa and others. By the way, judging by the forums, in the same LADA models, the device may or may not work when the ignition is turned off.
It is interesting that car owners are looking for both how to turn on the cigarette lighter constantly and how, on the contrary, to turn it off when the ignition is off. The first want to be able to charge devices or use electrical appliances without turning on the ignition, while the second don’t want to turn off the DVR every time. But, in order to prevent current leakage, after turning off the ignition, it is advisable to stop supplying power to the cigarette lighter.
Advantages and disadvantages of car cigarette lighters
Once a cigarette lighter appears in a car, it remains an integral part of the equipment.
With the development of technology, many devices have appeared that require sufficient power from the vehicle’s on-board network. AP began to be used as a car socket. The operating principle of the device has not changed over the years. But various tees and adapters appeared, which expanded the possibilities of using AP (the author of the video is Do It Yourself).
Electrical circuit of the device
To successfully repair an AP, you must have at least basic knowledge of electrical engineering and know how the electrical circuit of the device works: where is the plus and where is the minus.
You can use a multimeter to find plus and minus.
Photo gallery “Cigarette lighter and its circuits”
In a car cigarette lighter, the plus is a handle-button that the user presses. When you press the button, the electrical circuit closes and the coil begins to heat up. The downside is the sides of the metal casing of the AP.
Knowing the polarity of the device, it will not be difficult to repair the car cigarette lighter.
To do this you need to do the following:
- Unscrew the nut on the back side of the AP.
- Next, we disassemble the device.
- At the bottom of the device is a semiconductor wafer. This may be the cause of the malfunction. In this case, it must be removed.
- On the body you need to cut off the protrusion using a file.
- Now the device needs to be assembled.
- Next, you should strip the wires not 7 mm in order to then connect them. In addition, you need to press the terminals on them.
- In the cabin, it is necessary to dismantle the center console and turn off the backlight.
- We take out the block and connect the wires using special clips. We connect the white-brown wire to the wire from the backlight. All that remains is to connect the yellow and black wires to the AP wires.
- Then the wires are laid down and connected to the plug from the car cigarette lighter.
- Next, the cigarette lighter is returned to its place, and the backlight is connected.
Video “Replacing the cigarette lighter”
This video demonstrates how to replace the AP without dismantling the tunnel (the author of the video is To the Village!).
This car device is used even by non-smoking car owners. After all, the device has excellent functionality that goes far beyond its name.
The following devices can be connected to the cigarette lighter socket:
- charger for a phone, tablet or other electronic device;
- compressor for inflating wheels;
- navigation complex;
- DVR;
- 12 volt socket.
However, over time, the cigarette lighter may fail or require repair. When connecting a new spare part, you must observe the polarity of the wires, know where the plus is and where the minus is. The article provides information and instructions on how to replace or repair the element.
Pros or cons of multiple cigarette lighters
Old cars, for example, the classic VAZ, have a different device design. There is a long cigarette lighter with its pros and cons. This device has been developed for a long time, so it has a number of technological shortcomings. The disadvantages include:
- Inability to connect multiple devices to the cigarette lighter.
- Weak contacts. Over time, due to age or frequent driving on rough roads, the antennae of the cigarette lighter itself may become loose. This disrupts the operation of the device and can lead to its failure.
- The disadvantages include the appearance of the old cigarette lighter, which is much worse. The light bulb does not shine as brightly or often burns out.
New car models are equipped with a modern European cigarette lighter with a large seat. To install it on a classic, you will need to drill out the socket, purchase a special three-pin connection plug and solder the wires.
But this modification of the cigarette lighter has a number of advantages.
- Reliable contacts. The European cigarette lighter holds well in the socket, and the fixing nut does not unscrew.
- Plus - the appearance, the backlight is prettier.
- A modern car cigarette lighter allows you to connect several devices at the same time.
Therefore, when purchasing a device for a car, it is better to choose the second option.
Help with choosing a part
VAZ 2107 owners sometimes change the standard cigarette lighter. Reasons for replacement are:
- constantly unscrewing fastening nut;
- desire to install a more attractive device;
- inability to connect several devices at the same time.
Most often they install a cigarette lighter from a VAZ 2114/15 - the so-called Euro-cigarette lighter, which is slightly shorter than the standard one. Installing it on a VAZ 2107 is quite simple. After dismantling the standard cigarette lighter, you will only need to slightly enlarge the hole in which it was fixed.
You can use sandpaper or a round file to widen the hole.
The device is installed in the following order:
- LED is installed.
- The cigarette lighter socket is fixed.
- Electrical wiring is connected.
Thus, any malfunction of the VAZ 2107 cigarette lighter can be eliminated independently. To do this, you only need a minimum set of plumbing tools and following the instructions of specialists. Installing a new cigarette lighter will also not cause much trouble for the owner of a VAZ 2107.
Car cigarette lighter polarity
Sometimes an element fails. Frequent malfunctions are as follows.
- Blown fuse. A special protective element is installed on the electrical circuit, designed for a current of 10 Amps. When a malfunction or short circuit occurs, it burns out to keep the cigarette lighter, wires and instruments working. This element is responsible for several more devices. If the cigarette lighter and the clock do not work, then you should get to the mounting block and replace the fuse.
- Oxidized contacts. Over time or from connecting powerful devices to the cigarette lighter (such as a compressor or car charger), the metal connectors can oxidize. Before replacing, it is advisable to remove the cartridge and inspect the antennae for the appearance of oxides. If there are such moments, they should be cleaned and bent for a better connection. Before carrying out the procedure, it is recommended to remove the negative terminal from the car battery. This will prevent a short circuit. You need to know where the plus and minus are.
- Waste car cigarette lighter incandescent element. The nichrome spiral located inside the cartridge can also burn out. This will entail installing a new cigarette lighter.
- Short circuit or broken wiring. Cables may fray or melt as a result of shortening. You can determine such a malfunction of the car cigarette lighter using a multitester. It is necessary to check the integrity of the wires.
Reasons why the cigarette lighter does not work
Due to the fact that the device consists of two detachable parts, you need to understand that when the VAZ-2107 cigarette lighter does not work, only one of the component parts of the device can be broken - the socket or cartridge.
In turn, a working socket may not work due to a lack of power at one of its contacts. In the VAZ-2107, the cigarette lighter is connected in parallel to the clock and the radio; if the socket stops functioning at the same time as these devices, this is a consequence of one reason - the fuse has failed. To restore the functioning of the device, the fuse must be replaced.
Unreliable contact
The cigarette lighter connectors are susceptible to oxidation. If the reason for the lack of power is oxidized terminals, they must be cleaned by first disconnecting the negative bus from the battery.
Nichrome wire serves as an incandescent element and over time can burn out and fail. It is not advisable to disassemble the cigarette lighter cartridge in order to repair it; you need to purchase a new element.
Lack of power may be due to a break in the electrical circuit.
The device, wiring diagram for electrical equipment of the VAZ-2105 and wiring are similar to other models; you need to find the break point, clean it and connect it. It would not be superfluous to solder the twisting point and securely insulate it.
The cigarette lighter is not directly responsible for the operation of any component of the car, but its operation negatively affects the comfort of the driver and passengers of the car. If the device is damaged, it must be repaired or replaced.
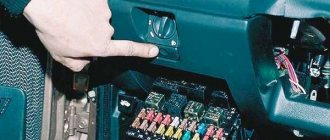
The VAZ-2107 cigarette lighter fuse is located in the fuse and relay mounting block. In VAZ cars this block is located in the engine compartment on the passenger side. To gain access to the fuse, you must remove the transparent plastic cover of the mounting block. The cigarette lighter fuse is marked F 6 and is rated for a current of 10 amperes.
The socket and removable cartridge are inexpensive parts that can easily be found at any auto store. If they stop working, it is impractical to repair them; a complete replacement is performed. To do this, disconnect the ground bus from the battery and disassemble the socket fixed on the front panel of the VAZ-2106, performing the following procedure:
- remove the heater cartridge from the socket;
- we pick up the panel on which the clock and cigarette lighter are located and drag it with a flat-head screwdriver until the latches click;
- carefully remove the dashboard; there may be short wires behind it;
- remove the dashboard connection terminals;
- unscrew the locking nut;
- remove the outer casing along with the backlight;
- remove the internal cigarette lighter socket.
The VAZ-2107 cigarette lighter must be connected in accordance with the diagram of an identical model - 2104:
- black wire - ground;
- red - goes through the fuse to the battery positive;
- yellow - included in the instrument panel lighting circuit.
Replacement
If the standard device for some reason does not satisfy the car owner, the cigarette lighter is replaced with a device of a more attractive appearance - a European standard cigarette lighter. This procedure is much easier to carry out than installing an injector on a VAZ-2108. Installation of a European cigarette lighter requires the need to widen the standard hole with a file or sandpaper: the modern device has a slightly larger diameter.
Which to choose
The socket for connecting external devices is a simple and unpretentious device. Its breakdowns are extremely rare and repair work is easy to carry out on your own. When making a purchase, you need to pay attention to the integrity of the wires and the quality of the threaded connections.
If for some reason the cigarette lighter stops working, the car owner believes that the color of its backlight does not match the design of the instrument panel, or there are simply not enough sockets for the simultaneous operation of all necessary devices, the device can be replaced with a splitter with several standard sockets.
The car device has rich functionality. In addition to its usual task, you can connect the following to the VAZ 2107 cigarette lighter socket:
- charger for a phone, tablet or other electronic device;
- compressor for inflating wheels;
- navigation complex;
- DVR.
It turns out that even non-smoking car owners use the cigarette lighter. If it stops working, it can cause significant inconvenience. Read the article about the reasons for the failure and how to properly change the device on a VAZ 2022 with your own hands.
There are certain factors that affect the performance of a part. You need to understand the structure of the cigarette lighter and understand why it does not work on the VAZ 2107.
Among the most common problems it is worth noting.
- Fuse failure. If one or more powerful devices are launched into the cigarette lighter socket, the circuit current may exceed a critical value. At 10 Amps the fuse element will burn out. Additionally, the clock and radio will stop working. The repair is carried out simply according to the scheme - just get to the mounting block and replace the blown cigarette lighter fuse.
- Bad connection. Over time, the contacts oxidize, causing the cigarette lighter to stop working. The reason for the appearance may also be the connection of a fuse with a high resistance, for example, a 15-amp one. If the VAZ 2105 cigarette lighter stops working, you must first remove the metal cartridge and check its contacts for the presence of oxides. During repairs, it is recommended to clean the contact areas. Before replacing the cigarette lighter or fuse, you need to remove the negative terminal from the car battery. This circuit will eliminate the possibility of a short circuit.
- Burnt out filament element. On the classic, inside the cartridge there is a nichrome spiral, which can burn out due to age. Repairing the fault consists of replacing the cigarette lighter and installing a new element according to the diagram.
- Due to old age or due to the fact that the wires can short out, there is a possibility of electrical wiring breaking or circuit burnout. The fuse trips. Such a malfunction of the VAZ 2107 cigarette lighter is diagnosed using a multitester. It is necessary to ring the circuit, diagnosing the integrity of the wires. In this case, it is the wiring that needs to be repaired or replaced, not the incandescent element.
Before you remove the device and begin repairing it, you should understand its structure. The connection diagram for the cigarette lighter is described in the photo. It is the same for all classic VAZ models, including modifications 2104, 2105, 2106 or 2107.
The pinout is done as follows:
- the red wire controls the voltage for the clock and is connected to the battery;
- the yellow element also goes to the plus of the battery, it supplies power to the socket illumination light;
- the black wire is ground.
The cigarette lighter connection diagram is carried out through a mounting block with fuses. To get to it (when replacing the safety element), it is necessary to remove the panel located in the front part of the cabin. Fuse No. 6, rated for a current of 10 Amperes, is responsible for keeping the circuit circuit closed.
Read more: Do-it-yourself repair of a VAZ 2101 generator
Before making repairs, you need to prepare the appropriate tools. To independently connect the cigarette lighter to a VAZ 2107 when replacing it according to the diagram, you will need:
- several screwdrivers, including Phillips and minus;
- pliers;
- small tweezers or special forceps;
- a blowtorch along with solder to connect new cigarette lighter wires;
- flashlight for ease of work;
- protective gloves;
- insulating tape;
- new replacement part.
Now you can start repairing. Before removing the cigarette lighter in the VAZ 2107, you should open the hood and disconnect the negative terminal from the battery. This will de-energize the electrical wiring and avoid a short circuit.
For repairs, follow the following instructions.
- We move the pilot's seat to its extreme position to provide more space in the workplace. Then remove the metal cigarette lighter socket from the connector.
- Using a screwdriver, pry up the plastic panel on the center console. In addition to the VAZ 2107 cigarette lighter, there is a clock here. The panel itself is held in place by plastic clips.
- Disconnect the two wires going to the element: yellow and red.
- Remove the nut securing the cigarette lighter.
- We take out the housing itself along with the seat lighting bulb.
- We take the metal case out - after dismantling the fixing nut, it can be removed without problems.
A detailed repair procedure, relevant for many VAZ models, can be seen in the video.
After replacing and installing the element, you must connect the device. The cigarette lighter connection is carried out according to the following diagram.
- We install a new spare part on the seats.
- We mount the housing together with the backlight bulb.
- Screw on the fixing nut.
- We connect the power wires.
- We snap the plastic latches of the central panel with the clock into place.
- Reinstall the cigarette lighter socket.
- We screw the negative terminal to the battery.
- We turn the key in the ignition and check the serviceability of the device.
Today, there are many options for the VAZ 2107 cigarette lighter available on the market. The average price of a part is 200 - 400 rubles for a standard element and 500 - 600 for a European cigarette lighter. It is advisable to choose the latter option. It has several advantages relative to the classic part.
- Reliable fixation. The European cigarette lighter is securely held in the socket, and the fixing nut does not unscrew.
- The appearance and backlight are prettier.
- A modern car lighter allows you to connect several devices at the same time.
One of the problems with the classic device is weak contacts. When driving on broken roads, the seats become loose, as a result of which the retaining ring can fly off, which can lead to a short circuit. Therefore, many owners decide to buy a short Euro cigarette lighter, also suitable for the VAZ 2107.
Its installation is carried out according to the diagram.
- The disassembly procedure is similar to the previous procedures.
- The diameter of the Euro cigarette lighter socket is slightly larger. Therefore, you should bore the old hole with a file to a suitable size.
- Install the green part of the backlight.
- We mount the landing socket.
- You need to buy a standard three-pin connector at the store. The yellow wire is soldered to the yellow, the center green to the red, and the blue to the negative black.
- Next, all that remains is to assemble the device according to the reverse diagram of disassembly and check its serviceability.
Does not work
- It often happens that the VAZ 2107 cigarette lighter socket is a socket, as described above. The calculation scheme is simple: by multiplying the maximum current for which the fuse is designed (10 A) by the voltage of the on-board circuit (voltage 12 V), we get 120 W. If this is not just a socket, but a splitter, you need to remember this. The fuse will burn like a match (at best), and repairs will become commonplace. A load of no more than 100 W works well.
- Sometimes the contacts of the cigarette lighter itself or its connector become oxidized. Then they are cleaned, having first reset the ground to avoid a short circuit. Replacement is not necessary at all; anyone can do the repair themselves.
- The next possible failure is that many additional devices do not fit tightly into the cigarette lighter socket, contact with the walls is poor, a “chatter” begins, and a short circuit occurs. After this, the contacts melt and the cigarette lighter does not work. If the contacts are melted, repairs can be made by cleaning and re-soldering them, or replacement is required. In this case, large peak loads occur on the fuse.
- Finally, sometimes the coil on the cigarette lighter itself may simply burn out. In this case, you just need to replace the head with a new one. If you can’t find a spare part, you can carry out a simple repair - clean the cigarette lighter coil from soot and carbon deposits.
Correct connection of the cigarette lighter
You can repair a car device, dismantle it or install it yourself. To replace the cigarette lighter you will need the following list of tools:
- Phillips/minus screwdriver;
- blowtorch with solder;
- connecting terminals for plus and minus.
Repair is carried out as follows.
- We dismantle the car cigarette lighter. It is removed differently in each car. Sometimes you just need to pry the cartridge, and sometimes you have to remove the lining of the central tunnel.
- We disassemble the car cigarette lighter. We find the semiconductor wafer at the bottom. This is what often causes breakdowns. Let's delete it.
- We cut off the protrusion on the outer casing.
- We assemble the cigarette lighter in the reverse order of disassembly.
- We strip the connection wires at least 5 mm.
- We connect the car cigarette lighter wires, observing the polarity, where is positive and where is minus. You can use a blowtorch or a special terminal block and clamps.
- We dismantle the center console for reverse connection.
- Disconnect the backlight unit.
- We stretch the wires and then connect them to the car cigarette lighter connector.
- We carry out the assembly process in reverse order.
Where is the cigarette lighter fuse located?
A burnt-out protective element may be the result of connecting one powerful device or several devices to the socket. Because of this, the current strength in the wires exceeds a critical value, as a result of which the fuse melts. This may happen because the owner has confused where the plus and where the minus is in the cigarette lighter. This malfunction is treated by removing the burnt out element and installing a new one.
Replacing the cigarette lighter fuse
To carry out the procedure, you should have instructions for a specific car. Each machine has its own mounting block location and fuse assignment. You need to know where the plus and minus are.
On most cars, the box is located directly behind the front panel. However, on classics, fuse No. 6 is responsible for the operation of the cigarette lighter, and on some other models - the turn relay. Therefore, when making repairs, you should know which element we plan to change and where it is located. It is necessary to buy a fuse with the resistance recommended by the manufacturer.
An easy way to fix a broken car cigarette lighter
It is very annoying when your phone battery is low and the cigarette lighter socket is not working properly. The problem is not that serious, but it is certainly inconvenient if left to be repaired. But the question arises: why is your car cigarette lighter not working
? Possible reasons could be anything, for example, the lighter socket fuse has blown; it has lost power or due to the presence of foreign objects, a problem has occurred inside the socket. Whatever the reason, lighter sockets also offer several useful services such as charging a GPS device, camera, phone, etc.
Why do you need to repair your charger?
A broken car cigarette lighter socket can cause a lot of problems
Before you put together a few ways to fix the socket, you first need to know why you want to fix it. Everyone may have their own personal reasons, but below are some of the most common:
- To avoid costly repairs from mechanics,
- For convenience (the socket can be charged anywhere),
- Use DIY methods to fix minor problems such as blown fuses, sockets, etc.
- To replace unrepaired components to the correct specifications and reduce safety hazards.
Methods for troubleshooting a car cigarette lighter
Now you know several reasons to fix it if your car cigarette lighter is not working properly.
. Below are several ways to fix the defects.
Let's get a look!
Check the lighter fuse
.
Installing a second cigarette lighter
Many drivers lack an additional socket. There are several ways out of this situation. The simplest one is to install a special splitter that plugs into a standard connector. However, this can put a lot of stress on the circuit and cause the wires and fuse to blow. Therefore, some car owners install an additional car cigarette lighter.
The second method is more difficult, but more reliable. The procedure is carried out as follows.
- We choose a suitable location for the additional device.
- We are purchasing a new spare part. The black wire is the ground that we mount under the bolt on the body. Red is a plus, it goes to the battery, and yellow is responsible for the backlight of the device.
- Cut a hole of suitable diameter.
- We install a new spare part.
- We connect all the wires, remembering where the plus and minus are in the cigarette lighter.
- We remove debris and perform final assembly. Now the owner has two nests at his disposal.
Publication date: June 26, 2016. Category: Automotive equipment.
The first cigarette lighters were born back in 1920 and since then have become one of the most indispensable elements in a car. Over the years of the formation and development of mechanical engineering, the operating principle of this miniature structure has not changed, but its purpose has expanded significantly. Today, with the help of this device, car enthusiasts recharge phones, tablets and laptops, connect car pumps, vacuum cleaners, fans, compressors and much more. And of course, the cigarette lighter is simply indispensable for smokers, both for those who still smoke cigarettes and for fans of electronic cigars that charge via USB.
Unfortunately, despite the appearance of all kinds of tees for the cigarette lighter, there is only one central element, and it has a number of advantages and disadvantages that should be taken into account when using this useful device.
Advantages and disadvantages of car cigarette lighters
The most important advantage of a cigarette lighter is the ability to connect a huge number of electrical appliances to it, making life easier on the road. However, due to switching such large amounts of current, the design of this device is unreliable. In addition, we must not overlook the fact that every time we connect gadgets to the cigarette lighter, we create a mechanical load on its elements. Ideally, car manufacturers would consider increasing the strength by adding more presser feet. Then the plug would stay in the cigarette lighter more “confidently”.
Alas, so far most forks are equipped with only a spring-loaded contact and a pair of presser feet. During a trip and the natural vibration of the car, the contact between the socket and the plug is broken, as a result of which the cigarette lighter begins to spark, and sometimes even causes a short circuit and fire.
If this element fails, you can repair it yourself, the main thing is to maintain the polarity of the car's cigarette lighter.
Possible malfunctions: signs and causes
AP is not a reliable communication device that lasts for a long time. This is not by design. Good hold can be achieved by increasing the number of presser feet, but a universal device has not yet been invented. In fact, the AP only has a central spring contact and two clamping legs. The central contact can be deep or close.
The foot grooves on the fork may not match the position of your foot. During operation, the contact between the plug socket and the socket of the device deteriorates, sparking occurs at the junction, which leads to a short circuit.
The following AP malfunctions are possible:
- The plug is not securely seated in the socket. In this situation, the driver must keep his head in the socket until it warms up, which is inconvenient and dangerous when driving. The cause of the malfunction is the antennas located in the outlet. Over time, they wear out and no longer hold the cartridge. To repair this damage, you simply need to bend the antennae (author of the video. And not just about fishing).
- Blowing spiral in a cartridge. In this case, the problem can be solved by replacing the cigarette lighter. You can restore an old coil by cleaning it of any soot or grime. According to the rules, the coil heats up hot within 20 seconds after switching on. Then the head should pop out. When this happens early or late, you can adjust the heating time by bending or unwinding the device's contacts. If the measures taken do not help, the head must be replaced.
- The fuse has blown. The driver is usually to blame for a blown fuse when multiple additional devices are connected through a splitter. Thus, the load on the cigarette lighter, designed for a certain power, increases. In addition, there is short-term use of the socket. Therefore, when the load is exceeded and used continuously, the fuse will blow. The problem is solved by replacing a part in the safety unit. The fuse is rated at 10 A. It is not necessary to install a part with a higher value, as this may lead to a burnt-out socket.
- Break in the wiring. The operation of the device may be interrupted due to a broken wiring. During operation, wires may become pinched or compressed, causing loss of contact. You can detect the open with a multimeter by ringing the circuit. Once you find the tear, you need to replace the torn piece with a whole one. Wires must be well insulated to avoid fire.
Cigarette lighter circuit
If your car does not have a cigarette lighter or it is broken, then it is not necessary to contact a car mechanic. It is enough to understand how an electrical circuit works.
So, the plus in the cigarette lighter is the button itself. When you press it, the circuit closes and the coil begins to heat up. If we talk about where the minus is in the cigarette lighter, then there is nothing complicated here either - these are the side walls of the metal cylinder itself.
Knowing this parameter, you can easily install and repair a damaged cigarette lighter in a car. For this:
- Unscrew the nut on the back of the device.
- Disassemble the cigarette lighter.
- Find the semiconductor wafer in its lower part and remove it if it caused the breakdown.
- Cut off the protrusion on the device body.
- Assemble the cigarette lighter.
- Strip the wires for connecting the device (7 mm); you also need to crimp the terminals on them.
- Remove the center console in your car and disconnect the lights.
- Remove the block.
- Connect the wires using special connecting clips. The first wire (white-brown) must be routed to the wire from the backlight. Connect the remaining two wires (yellow and black) to the cigarette lighter wires.
- Pull the wires down and connect them to the cigarette lighter socket.
- Reinstall the cigarette lighter.
- Install the backlight.