This article will discuss the VAZ-2106 generator. Its connection diagram is below, but at the very beginning we will talk about the general design of this device. With its help, mechanical energy is converted into electricity. The main function of a car generator is to recharge the battery. It also helps provide power to all equipment located in the car, including the engine. On all machines, generators produce alternating current. Only after some transformations does it stabilize and become permanent.
Electrical systems of VAZ 2106
The electrical circuit of the VAZ sixth model includes a number of systems that ensure the operation of consumers in different parts of the car. This:
- ignition system;
- control and lighting system;
- cigarette lighter operation system;
- engine starting system;
- carburetor solenoid valve control system;
- windshield wiper and washer system;
- heating system;
- sound signal system;
- component of the engine cooling system;
- system of indicators and status sensors.
The ignition system includes an alternating current generator, a rectifier unit, a current distribution system, spark plugs, fuses and a number of supporting elements. The system removes low voltage current from the generator brushes, converts it into high voltage current in transformers and, in accordance with the firing order of the engine cylinders, supplies it to the spark plug. The converted current must have enough energy to create electricity inside the engine cylinder and ignite the working mixture.
Control and lighting devices include all lighting devices, such as front and fog lights, interior lighting lamps, trunk lighting lamps, as well as additional lighting elements installed. This also includes turn signals, brake lights, side lights and others.
In general, these devices are an important part of ensuring compliance with traffic rules, and therefore are constantly powered either through the battery or through the generator and are turned off last. The same applies to the sound signal system, which provides clearer information to other road users about changes in the situation on the road.
The engine starting system includes a battery and a number of elements that supply high current to start all consumers and rotate the engine shaft to starting speed. When the crankshaft reaches this frequency, the alternating current generator comes into operation - now it powers all consumers and charges the battery.
For satisfactory operation of the fuel supply system at high speeds, the VAZ 2106 carburetor is equipped with a solenoid valve. It regulates the operation of the internal combustion engine at idle and operating speed. To control it and synchronize its operation with the operation of the engine, the electrical circuit has its own separate system. It is recommended to download the VAZ 2106 electrical diagram and familiarize yourself with its operation.
The engine cooling system fan control system ensures consistently normal thermal operating conditions for the internal combustion engine and increases the service life of the most expensive part of the vehicle. Indicators of the vehicle's operating status are connected to sensors installed in critical places on the VAZ 2106. The indicators take readings by converting physical quantities into an analog or digital signal, which is processed and sent to the indicators. From the latter, in turn, the necessary information can be read.
The VAZ 2106 has several electrical equipment systems designed to make life easier for the driver and increase driving comfort. These include windshield wipers, heater, defroster, cigarette lighter and others. Some of them are useful, others were created on the principle of “so it was.” Which one to use is up to the owner to decide, but the very fact that there is a choice is pleasing.
The electrical circuit of the VAZ 2106 car is very ramified and it is not possible to describe it all in one article. If there is a desire or there is a need to deepen and expand knowledge about the most popular car of the Union, it is strongly recommended that you familiarize yourself with special specialized literature or, at least, with a photo of the electrical circuit diagram.
How to connect a VAZ 2106 generator. Connection diagram for a generator on a VAZ Classic
This generator connection diagram is useful for cars from 21214, 2110(12), 2108, 2107.
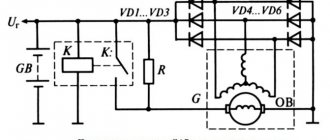
Fig. 1 Shows a diagram of connecting a generator to a VAZ 2101 (G-221) car
_4 – ignition switch, 1 – battery, 3 – voltage regulator, 2 – generator, 5 – fuse block, 7 – RS-702 indicator relay, 6 – battery charge indicator lamp._
Fig. 2 According to this scheme, the generator of a VAZ 21214 car is connected if the wiring base is from a VAZ 2101
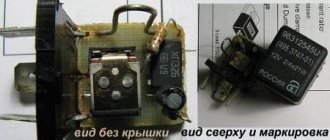
_1 – battery; 2 – generator; 3 – ignition switch; 4 – fuse block; 5 – battery charge lamp. 6 – diode (in5007) any diode will do. 7 - resistor 51 Ohm 5 W (5W51RJ)_The housing for the resistor and diode is made from an unnecessary RS-702 relay.
We don't need the orange wiring.
You need to bite off the (black and white) wire from the charge lamp, solder a new one instead, which connects to fuse 9 or 10.
Generator device
The design of a car generator implies the presence of its own rectifier and control circuit. The generating part of the generator, using a stationary winding (stator), generates three-phase alternating current, which is then rectified by a series of six large diodes and the direct current charges the battery. Alternating current is induced by the rotating magnetic field of the winding (around the field winding or rotor). Next, the current is supplied to the electronic circuit through the brushes and slip rings.
Generator structure: 1.Nut. 2. Washer. 3.Pulley 4.Front cover. 5. Distance ring. 6.Rotor. 7.Stator. 8.Back cover. 9.Casing. 10. Gasket. 11.Protective sleeve. 12. Rectifier unit with capacitor. 13. Brush holder with voltage regulator.
The generator is located at the front of the car engine and is started using the crankshaft. The connection diagram and operating principle of a car generator are the same for any car. There are, of course, some differences, but they are usually associated with the quality of the manufactured product, the power and the layout of the components in the motor. All modern cars are equipped with alternating current generator sets, which include not only the generator itself, but also a voltage regulator. The regulator equally distributes the current in the excitation winding, and it is due to this that the power of the generator set itself fluctuates at a time when the voltage at the power output terminals remains unchanged.
New cars are most often equipped with an electronic unit on the voltage regulator, so the on-board computer can control the amount of load on the generator set. In turn, on hybrid cars the generator performs the work of the starter-generator; a similar circuit is used in other designs of the stop-start system.
How to install and connect a new generator on a VAZ 21012106
The reason for replacing a generator is the combustion of its windings, inter-turn short circuit, aging of the housing, which leads to its breakdown, etc. sometimes the power of the generator is low, and for this reason it needs to be changed.
There are situations when, when upgrading their car, they install powerful amplifiers and additional gadgets that consume energy; in this case, the standard generator is not enough, and it must be replaced with a new and powerful one.
Now let’s take a closer look at what you can replace the standard G-221 generator with:
- To begin with, you can use a generator with a VAZ 2105, which produces a current of 55 Amps, but this is not the most powerful option, it is good in cases where there is not a very large amount of equipment. But the good thing about it is that when installing it, you don’t need to redo the mount on the case; you just need to slightly alter the electrical system to accommodate it.
- The next option is to use a generator from a VAZ-2106, which produces 55 Amperes, which is again sufficient when there is not a lot of additional electronics.
- The third option will be a standard generator, for the VAZ 21074 generator, it is marked 372.3701-03. It can produce approximately 73 Amperes, where there are many more accessories than in the previous two options; the installation does not differ much from the previous version of the generator.
- The fourth option is to install a generator from a car like a Niva, its power is about 80 Amps, and it can satisfy a very large number of electronics, additional amplifiers, and LEDs. Installation requires more changes than in other cases.
- The last option is that the standard generator can be replaced with other models of foreign cars, hybrids, but most often Chinese generators. These five methods are considered the most common.
- Now let's talk more specifically about installing a generator from a VAZ 21074 on a VAZ 2106 (2101). Quite often they choose model 2107-37011010; it is good because you can easily find spare parts for it. Quite a lot of bad things are written about the K1216Eh2 relay-regulator; it is bad because the relay does not change the charging voltage to a dependent ambient temperature.
The battery drains quickly.
If the battery is good and fully charged, then the car, left for several months, will start normally.
With the engine running, you need to check the voltage on the battery, it should be 13.8-14.2 Volts. Turn on the headlights and heater, the voltage should remain at 13.5 Volts. If it drops to 12 volts, the alternator is faulty and cannot keep the battery charged.
If the generator is working normally, then rapid discharge of the battery indicates that it has lost capacity, perhaps it is very old
The low battery light is blinking
The brushes and, possibly, the slip rings themselves on the rotor are worn out. In the first case, the brushes must be replaced (the generator will have to be removed). In the second case, it is better to replace the generator.
Noisy generator operation. This is almost always bearing wear. It is necessary to remove the generator and change the bearings. If the generator is very old, then the right thing to do is change the generator.
Source
Understanding the reasons for charging problems on the VAZ 2106
To check the electrical circuit of a car, you need a simple multimeter or voltmeter. The most common reasons for low charging voltage are:
- The generator belt tension is too weak or too worn;
- generator malfunction (worn brushes, faulty diode bridge, broken or burnt stator or armature coils);
- voltage regulator malfunction;
- shaving in charging area.
The most common cause of charging failure is a malfunction of the voltage relay. In order to verify its usefulness, it will be enough to remove the grudge from the grudge, put it together, and start the engine. Because of the fact that all other elements of the lance are attached, the voltage in the lance is close to 17 or more. If the voltage does not increase, then it is necessary to check the presence of 12 V at the terminal connected to pin 15 of the relay regulator. If necessary, check the lance, which confirms the lance and the very integrity of this lance.
If the device is connected to this terminal, it is necessary to check the connection in the generator wake-up circuit. Connect the test lamp between the 12 V rechargeable battery and the dart, which connects to connection 67 of the voltage regulator relay. In this way, you can check the voltage relay-generator circuit, as well as check the generator brushes and armature windings. If there is no voltage at the lamp pins, worry about a malfunction of the direct bridge.
Next, check the serviceability of the conductor from the generator to the relay regulator. For such verification it is necessary to disconnect the terminal from the generator and connect it to -12 Art. The indicator light is on to indicate faulty brushes or broken armature windings. If a malfunction of the generator is suspected, it should be removed from the vehicle and examined further. Next, check the integrity of the diode in the diode bridge of the generator, check the continuity of the stator coils and armatures for damage or burnout. Faulty elements must be repaired or replaced.
The VAZ 2106 battery charging circuit shows a constant voltage of 13.5 to 14.3, regardless of engine speed. However, there are breakdowns when the voltage on the middle turns of the engine noticeably “sags” when the additional voltage is turned on. If such a phenomenon occurs, it is necessary to check the tension of the generator belt and adjust it. Weak contact at the battery terminals can also lead to this effect.
Since the voltage at the battery terminals is higher than the specified values, you need to check all contacts, starting from the positive terminal of the battery to the voltage regulator relay. If all contacts are normal, then the relay regulator prompts replacement.
Keeping an eye on your car's electrical system, the contacts and terminals of the battery, regularly checking the belt tension and the level of the electrolyte in the battery will allow your car's engine to run smoothly and without problems, and you will avoid a bug atoch malfunctions in dozі.
Diagnosing charging relay faults
First of all, it is necessary to check the integrity of fuses No. 9 and 10, as well as their secure fastening in the fuse block.
If, after replacing the fuses, the VAZ 2106 still does not charge the battery, then you should continue troubleshooting.
Next, you need to check the integrity of the generator drive belt and its tension. If the belt is not torn and its tension is normal, then you need to check the condition of the drive pulleys. When the inner surface of the pulleys wears out, the alternator belt simply begins to slip, which will also contribute to the incomplete charging of the battery or there will be no charging at all. You can check this visually by looking at the inside of the pulley. If it shines, it means the belt is slipping and it was he who polished the inside of the pulley.
The next reason why the battery may not charge is poor contact at the battery terminals or their oxidation. The unreliable contact is tightened, and the oxidized terminals must be treated with a solution of soda and water. Soda neutralizes the oxide, after which the terminal must be rinsed with water and wiped well. To ensure that the remaining oxide is removed with fine sandpaper. Then the terminal must be lubricated, for example with Litol 24 grease. A similar operation must be done with the terminals themselves. There is no need to sand the terminals or scrape them with a knife. They are very malleable, since they are cast from lead, and three or four such procedures will noticeably reduce their diameter, which will make it impossible to properly tighten the terminals, and therefore there will be no reliable contact between them. Entrust this issue to soda and it will perfectly clean the terminals of oxide.
The battery is dead.
Perhaps you forgot to turn off your headlights while parking. If the battery is discharged in the morning, you need to start the car with another battery. Check the voltage on the battery, if it is normal 13.8 - 14 Volts, then charging is in progress and that means your battery needs to be changed. Just in case, it needs to be charged with a charger, if the battery is not old, perhaps it will still work. If, after starting with another battery, the test shows that the voltage remains 12 Volts, this means that the generator is not working, you need to check the belt tension and if it is normal, then you need to repair the generator.
VAZ 2106 car charging diagram
The VAZ 2106 charging circuit consists of a fairly small number of parts:
- three-phase synchronous generator with excitation winding;
- diode rectifier (combined in the same housing with the generator);
- accumulator battery;
- voltage regulator relay (mechanical or electronic);
- charging indicator lamp relay;
- battery charging indicator light.
The generator is driven from the crankshaft via a V-belt drive. A rectifier built into the generator converts its current into direct current. Next, the voltage regulator relay maintains its value in the range from 13.5 to 14.3 V. Old type relay regulators worked on the principle of mechanical closing and opening of contacts depending on the generator voltage. Such devices required additional adjustments during operation.
The modern VAZ 2106 charging relay circuit includes an electronic voltage regulator, built entirely on discrete elements, and does not require additional intervention in its operation throughout its entire service life. However, the use of such devices requires additional safety measures. Thus, when the engine is running, it is prohibited to remove the terminals from the battery in order to avoid damage to the new model relay regulators.
The warning lamp relay, which provides an indication when the battery charging voltage is lost, is a conventional electromagnetic relay with normally closed contacts. One terminal of the relay coil is connected through the ignition switch to the positive terminal of the battery. The other contact is connected to the +12 V terminal of the generator. The normally closed relay contacts are respectively connected to the +12 V battery (via the ignition switch contacts), and to the warning light.
When you turn the key, battery voltage appears at the relay contacts and the charging lamp lights up. When the engine is running, voltage appears at the output of the generator, which is supplied to the terminals of the electromagnetic relay. When a value of about 7.5 V is reached, the magnetic field of the solenoid increases so much that it attracts the armature, and the contacts through which voltage from the battery is supplied to the charging lamp open. The warning light goes out.
Voltage regulator
Using a voltage regulator, a certain value is maintained on the excitation winding. Today, most generators are equipped with an integrated relay-regulator. It is worth noting that there can be two designs of relay regulators: a hybrid one, in which radio-electronic components are used, such as zener diodes, resistors, capacitors, and an integral design, in which all the elements included in the relay regulator are made on one semiconductor wafer . This is the main element that makes up the VAZ-2106 generator. The semiconductor connection diagram is given in the article.
Eliminating the causes of charging failure on the VAZ 2106
To check the electrical circuit of a car, you need a simple multimeter or voltmeter. The most common reasons for loss of charging voltage are:
- the generator belt tension is too weak or it is worn out;
- generator malfunction (brush wear, diode bridge malfunction, break or burnout of stator or armature coils);
- voltage regulator malfunction;
- break in the charging circuit.
The most common cause of charging failure is a faulty voltage relay. In order to check its functionality, it will be enough to remove both wires from it, connect them together, and start the engine. Provided that all other elements in the circuit are good, the voltage in the circuit will reach about 17 V or more. If the voltage does not increase, then it is necessary to check the presence of +12 V at the terminal connected to pin 15 of the relay regulator. If it is missing, check the fuse responsible for the circuit and the integrity of this circuit itself.
If there is power at this terminal, then you need to check the connections in the generator excitation circuit. Connect a test lamp between +12 V of the battery and the wire that is connected to terminal 67 of the voltage regulator relay. In this way, you can check the voltage relay-generator circuit, as well as the serviceability of the generator brushes and its armature windings. If there is no voltage at the lamp terminals, an assumption is made that the rectifier bridge is faulty.
Next, check the serviceability of the conductor from the generator to the relay regulator. To do this check, you need to disconnect the terminal from the generator and connect it to -12 V. The glow of the control lamp indicates faulty brushes or broken armature windings. If a generator malfunction is suspected, it is removed from the vehicle and completely disassembled. Next, the serviceability of each diode in the diode bridge of the generator is checked, and the stator and armature coils are tested for breakage or burnout. Faulty elements are repaired or replaced.
The VAZ 2106 battery charging circuit provides for a constant voltage of 13.5 to 14.3 V, regardless of engine speed. However, there are cases when, at medium engine speeds, the voltage noticeably “drops” when an additional load is turned on. If such a phenomenon occurs, it is necessary to check the tension of the generator belt and adjust it. Poor contact at the battery terminals sometimes also leads to this effect.
If the voltage at the battery terminals is higher than the specified limits, you need to check all contacts, starting from the positive terminal of the battery to the voltage regulator relay. If all contacts are normal, then the relay regulator must be replaced.
Timely care of the car’s electrical equipment, the condition of the battery contacts and terminals, and regular checking of the belt tension and electrolyte level in the battery will allow your car’s engine to operate for a long time and without problems, and you will avoid many malfunctions on the road.
Removing and replacing the generator
First you need to prepare the car for repairs. Since you are working on electrical equipment, be sure to disconnect the battery. Moreover, it is advisable to disconnect both terminals, and not just the negative one. A thick red wire runs from the battery to the generator. It needs to be disabled. Using a 10mm wrench, unscrew the nut and pull out the wire.
Disconnect the wires that go to the brush mechanism. Unscrew the nut securing the generator to the upper bracket. After loosening the belt tension, it must be removed. Now you need to unscrew the nut from the bottom bolt.
It is advisable to treat it in advance with a penetrating lubricant. On one side, hold the bolt from turning using a key set to “17”. Use the second identical wrench to unscrew the nut.
After this, the VAZ 2106 generator can be removed. Installation of the new one must be done in reverse order. Do not forget that the normal operation of the unit is the correct tension of the belt. If it is over-tightened, this will lead to malfunctions of the front cover bearing.
If the tension is too weak, the battery will be constantly discharged. And if the generator does not charge, then there is a very big risk that the car will not start. This is especially dangerous in cold weather.
The principle of operation of electrical equipment of the VAZ 2106
The ignition switch has 4 positions, when each of them is activated, certain connectors and contacts are switched:
- In position “0”, the battery current is transmitted only to connectors 30 and 30/1, the others are de-energized.
- In position “I”, current is supplied to connectors 30-INT and 30/1-15, while the “dimensions”, windshield wiper, and fan heating system of the heating complex are energized.
- In position “II”, contact 30-50 is additionally connected to the previously used connectors. In this case, the ignition system, starter, panel sensors, “dimensions” and “turn signals” are included in the circuit.
- In position “III” only the “dimensions”, horn and windshield and stern wipers are activated. In this case, the current is available only to connectors 30-INT and 30/1.
A number of cars of this brand are equipped with such devices as a rear window heating complex, an electric windshield washer, a light relay, etc. The power supply to these gadgets is supplied via a separate line through the ignition switch at the key positions “I” and “II”.
Important: because The washer tank is made of PVC material and is a dielectric, then the electric motor is additionally equipped with a negative wire and when working with it it is necessary to use dielectric protection on the connectors
In the “six”, the following power circuits operate continuously under current: horn, brake lights, emergency lights, cigarette lighter socket, “carrying” plug, instrument lighting. The leading circuits of the electrical equipment of vehicles are subject to protection by fuses, which are located in two special blocks (main and spare), located on the driver’s side under the dashboard.
One of the elements of the VAZ 2106 wiring diagram is a safety block, the design of which does not meet modern requirements for the maintenance of electronic equipment. Flaws:
- an unstable connection between the fuse and the socket leads to the appearance of burnt spots;
- during operation, the safety element is subject to heating, which negatively affects the nearby fastening sockets;
- the low cost of replaceable fuses does not guarantee their reliability, so checks of this unit should be carried out regularly.
Using the so-called "bugs" can lead to a vehicle fire, because there is a high probability of committing a short circuit. There is a completely safe option for upgrading standard products, in which blade fuses must be installed, the seats of which are perfectly integrated into the safety block.
Advantages of blade fuses:
- stable contact of the product with the mounting location;
- the fusible type element is sealed in a transparent PVC casing;
- dynamic heat dissipation due to the increased contact area.
Important: the “six” generator unit, the wiring to it, as well as to the battery, starter, bobbin, optics relay and some other elements are not equipped with safety elements
Electrical equipment of the VAZ sixth model
If you look at the electrical diagram of the VAZ 2106 in its complete form, you will immediately notice the connection made according to the single-wire principle. That is, all equipment is connected to the current source in series from its “plus”, and the role of “minus” is taken by the car body or “ground”. This became possible due to its large mass and large capacity. The body has become a kind of conductor connected to the “minus” of the battery. This approach made it possible to increase the level of safety when operating electrical equipment, and also significantly saved on wiring, because it was now needed in half.
Now this will not surprise anyone, but this was not always the case. Yes, the VAZ 2106 was not the first car in the world with such an electrical circuit, but it was the first truly mass-produced one in the USSR. A battery and an alternating current generator are used as a current source for the operation of VAZ electrical equipment. The current from the battery is used when starting the engine to crank the crankshaft and to create a spark in the spark plugs. The current from the alternator is converted by a rectifier system into a current acceptable for the vehicle according to its characteristics and is supplied to the system to consumers during engine operation, as well as to the battery to compensate for losses when starting the engine.
Unfortunately, this design removes some of the payload from the crankshaft, reducing power output. However, you have to get electricity from somewhere, right? After all, the battery, due to a number of purely physical reasons (slow charging, unstable current strength, huge disproportion between capacity, weight and size, and so on), is not capable of providing all consumers with current.