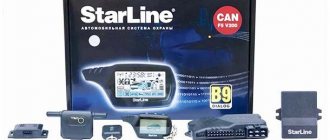
03/01/2022 1,775 Alarms
Author: Victor
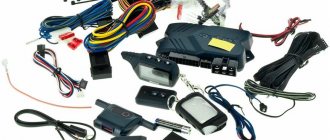
Self-repair of the Starline key fob can be carried out in case of any malfunction of the communicator, except for a software problem. Problems of this kind are eliminated by interfering with the operation of the electronic component, so it is not recommended to work with this part without experience. In addition, the recovery process for a device will differ depending on its type - primary or secondary.
[Hide]
General characteristics of Starline key fobs of different models
Main characteristics and features of new remote controls for controlling Starline alarms:
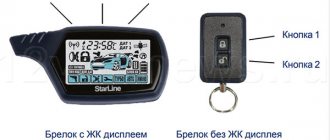
- The anti-theft installation for a car comes with two communicators. Earlier versions used two one-way remote controls; modern models use one pager with a display, the second without. Regardless of the number of keys, the device with a screen has feedback and the ability to monitor the condition of the car.
- The range of key fobs depends on the alarm model, as well as external factors. The latter include the architecture of the area (density of buildings and buildings), weather conditions, battery charge in the pager, and the presence of interference. The appearance of noise can be caused by transformer substations and industrial enterprises. On average, the operating radius of the main remote control is about 100-200 meters, the spare one - no more than 15 m.
- Three and four button devices are powered by batteries of different classes. These can be either ordinary AA batteries or batteries of CR2016, CR2025, CR2032, etc. standards.
- Different models of security systems use different signal encryption technologies. The encoding method can be dynamic or interactive. The second option is more reliable, since the signals sent from the control unit to the communicator and back always have a new code.
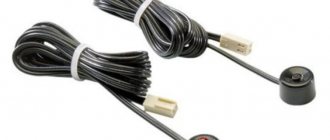
- Starline key fobs can be equipped with built-in or external antennas. This element can be hidden, installed inside the pager and connected via a cable to the main board.
Photo gallery: Starline keychains of different models
Additional keychain Starline B9
Additional keychain Starline A93
Additional keychain Starline D64
Additional keychain Starline A91
Starline B9
Starline A93
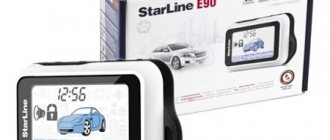
Starline E90
Starline B64
Programming Starline A91 key fob
Learning to use the alarm remote control is simple. Above we have given instructions for programming key fobs. However, the functionality of the system is broader. You can customize the alarm for yourself.
Button 1 on the key fob is responsible for the following system commands.
- Activation of security mode (one press).
- Silent security (two consecutive clicks).
- Door locking when the engine is running (one touch).
- Enable/disable shock sensor (double press).
- Exit alarm mode (1 press)
- Disabling silent security (2).
- Additional shock sensor (2 presses).
- Opening doors with the engine running (1).
- Alarm interruption (1).
- Anti-robbery mode (2).
- Indicator of temperature degrees in the cabin (1).
- Search mode (2).
A long press records additional system commands: auto start on an alarm clock, turbo timer, immobilizer and much more.
You can learn about the correct firmware of the key fob from the video.
Starline equipment compatibility
Equipment compatibility in Starline anti-theft systems:
- Starline alarm remotes, which have the number “6” in their name, are interchangeable with other similar devices. If the communicator for controlling the E60 system fails, it can be replaced with a key fob from models B64, D64 and vice versa.
- The key fob from the E90 can be replaced with a pager from the B94 and D94, as well as A91, A92, A93 and A94. Accordingly, you can buy an E90 communicator to work with these systems.
- Pagers for controlling Starline A2 and A4 versions are compatible with each other.
- In the Starline 24V, A4 and A2 alarm versions, spare communicators are completely interchangeable.
- Additional pagers are compatible with Starline B6 and B9 security system models.
- Line B alarms have one feature - all models are divided into older and newer classes. The latter are characterized by a blue color in design. Spare remote controls from older versions are completely interchangeable with key fobs from newer models.
- Starline A61 and B6 Dialog communicators are fully compatible. The same applies to the B9 Dialog and A91 models.
Operating manual for Starline A91 alarm system
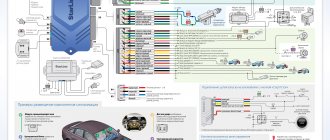
To fully understand how custom settings are made, you need to study the operating manual and the Starline A91 programming table. The link to the document is provided below.
Car owners additionally install a car alarm. The Starline A91 signaling model is popular among car enthusiasts. Among the advantages of the system are a shock-resistant remote control, many functions, wide compatibility and programming of your own commands. In addition, the security alarm system with feedback locks the doors and turns off the engine ignition, which makes it much more difficult to steal a car.
Below is an overview of the key fob and system settings. Find out how to independently register car alarm commands, synchronize with the car, activate or reflash the device from the article.
Common faults
The need to disassemble and restore the operation of the device occurs when the following problems occur:
- Failure of the battery or oxidation of the contacts inside the compartment. A low battery will cause the anti-theft system to stop responding to commands transmitted from the pager or to do so unstably. In this case, the display of symbols under the glass will be dimmer, and the blinking color of the LED light will also deteriorate. To restore the device yourself, you need to change the battery, and you will have to disassemble the pager if you need to clean the contacts.
- Damage to the display. This malfunction is usually caused by a serious physical impact on the pager body. In case of critical hits, a protective cover will not be able to save the situation. If the screen fails, the user may still be able to control the security mode and some other options. However, additional functionality will not be available to the consumer, since configuration requires the use of the display in any case.
- One or more buttons on the communicator have fallen off. Over long periods of use, the controls will wear out, which can cause them to stick. If the button fails, to restore the functionality of the key fob, the user will have to disassemble the remote control themselves and carefully check the board. Before replacing the key, you need to purchase a new part. In practice, the cause of the problem is usually a damaged contact on the control element, so re-soldering the button is usually enough to fix it.
- Damage to the pager body. Frequent falls can cause scratches on your device; over time, more serious defects may develop. Keyrings from Starline are generally characterized by low strength, so it is better to prevent them from being hit. The device must be repaired if there is serious damage, since liquid can get onto the board through a crack in the case.
- Hardware faults are usually caused by moisture in the pager circuitry. During prolonged operation in conditions of high humidity, capacitors, as well as other elements of the remote control, fail. Do-it-yourself repair in this case consists of disassembling the device body and drying it. You cannot dry your communicator on a household stove or with a hairdryer, since high temperatures can completely damage it. To dry, it is recommended to place the device in a warm place, for example, on a radiator, for several hours.
Video: troubleshooting the key fob
In a video, user Alexander Shkurevskikh showed the process of identifying problems in the operation of a car pager in the absence of feedback.
Alarm control methods
The multifunctional key fob system offers several options.
- Button 1 activates the standard security mode. The car will squeak after mechanical impact.
- The second button on the key fob removes the car from this mode.
- If you press the first and second buttons sequentially, silent security will be activated. The car will not respond to the influence, but the owner will receive messages displayed on the key fob screen.
- Double pressing the first button sets the car under security without sound, and double pressing the second button disarms it without a signal.
- When you press the first and third keys of the key fob, the car is armed with the engine running.
- The third button allows you to find out about the current state of the car and its settings: interior temperature. Double clicking will display additional information about the engine temperature on the key fob display. The auto search mode will be turned on.
Emergency unlock
The process of emergency shutdown of the security function of the Starline A1, A2, A4 and A8 alarm system looks like this:
- The car doors are opened with a key. If the security mode is turned on, this will activate the siren.
- The ignition is turned on.
- The service mode entry button is pressed three times within the next 20 seconds. For the Starline A8 model, four “clicks” will be required. The service mode button is usually located under the instrument panel, but its location may be different. To find the key, you need to check all the wires coming from the microprocessor module.
- The ignition is turned off. The vehicle security mode should turn off.
In Starline A6 alarm systems, emergency unlocking is possible only using a personal password (standard value is 11):
- The vehicle doors are opened using a key.
- The ignition is activated.
- Over the next 20 seconds, press the button to enter the Valet service mode. The number of “clicks” depends on the first digit of the password - they must match. For example, if the number is 5, then the button is pressed five times.
- The ignition in the car is turned off; to do this, the key in the lock must be moved to the “Off” position. Then it must be immediately switched to “ACC” mode.
- The next number of the password is entered in the same way.
- The ignition is turned off. The security mode should be disabled.
The emergency unlocking procedure for the Starline A91 alarm system is carried out as follows:
- The vehicle door is opened with a key. This will activate the siren as well as external lights. If the number of the latter is 4 pieces, this indicates that the security mode was turned on without the key fob.
- Over the next 20 seconds, the service button is pressed three times.
- The ignition is turned off. Security mode must be disabled. If a personal password is used to control the alarm, it is entered in the same way as in the case of the A6 model. The code combination can include from two to four characters.
The process of emergency shutdown of the Starline alarm depends on its version and is fully described in the service manual for the anti-theft system.
Video: emergency shutdown of the Starline A91 alarm
The Pandora Store channel in its video showed how emergency deactivation of the protection mode is carried out without using a communicator.
What to do if the alarm system no longer sees the key fob after replacing the battery
The Starline alarm control device, in the design of which the power element has been replaced, may stop functioning or begin to work incorrectly. To get rid of this problem, you should check whether the service mode has turned on: hold down the key marked “2” for a few seconds. A certain number of headlight blinks will indicate that the service mode has been disabled.
How to repair a key fob?
Starline key fob repair may include:
- replacing the remote control battery;
- replacing the case and display;
- restoring or installing new buttons;
- removing dirt and moisture.
For repairs you will need:
- Phillips screwdriver;
- an awl or screwdriver with a thin tip;
- soldering iron with a thick tip;
- copper wire;
- adhesive sealant;
- wet wipe;
- medical alcohol;
- small brush.
Replacing the key fob battery
To change the power source, follow these steps:
- The back cover of the communicator is removed. Depending on the model, this element is attached differently. Usually it is enough to pull the cover down or away from the antenna, but sometimes it is necessary to disconnect a special clamp. If we are talking about a spare communicator, then you may need to unscrew the screws with a Phillips screwdriver.
- The battery is removed from the rear compartment. After this, install a new battery, taking into account the polarity.
- The back cover is being installed in place.
Replacing the body and display of the key fob
Replacing the case and screen of the communicator is done as follows:
- The old battery is removed from the key fob.
- Using a screwdriver, unscrew the bolts that secure the parts of the communicator body. The cover and pager controls are removed.
- If the problem is with the display, then it changes immediately. In the case where a broken screen causes a malfunction of the main board, the circuit is removed. To dismantle the latter, you will need an awl or a screwdriver with a minimal tip, like the one used to repair watches. The board is removed together with the antenna module, and to remove the display you must also turn off the LED backlights.
- Carefully disconnect the graphite cable on the circuit.
- The contact pads on the pager board are being cleaned. A new screen is taken and applied to the remote control body, at this stage the user must ensure that the appropriate display is used.
- Then the wire needles are extended onto the contact legs and soldering is performed. The user must solder these elements as tightly as possible so that during operation they do not accidentally become detached.
- The screen is installed and fixed to the key fob body. The user needs to be careful to avoid any serious physical impact on the display. Glue is used to attach the screen, but if it gets on the display during the process, it must be wiped off immediately.
- The working board is installed in the key fob body.
- The bolts that secure the remote control structural elements are tightened. The operation of the communicator is diagnosed; if all components are working, then power supplies can be installed.
Video about replacing the screen on the Starline A9 remote control
The “Auto Start” channel clearly showed the procedure for replacing the display on the pager for controlling the A9.
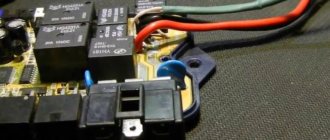
Repair or installation of new key fob buttons
Instructions for replacing the alarm key fob controls:
- The back cover of the key fob opens and the battery is removed from the device. There is a small bolt located under the battery; it can be unscrewed with a Phillips screwdriver. If there is a sticker in the battery compartment, it should be removed and checked for screws underneath. Additional bolts are also unscrewed.
- The rear part of the key fob is detached. The user must check the status of the alarm controls. If the buttons are already worn out, they will not be securely fastened.
- The damaged control element is dismantled and put aside. The main part of the communicator is placed on the work surface where it will be repaired, with the display down. When performing this task, you need to be careful with the spring under the housing. This element is used as an antenna, so it cannot be touched when installing a new key.
- The remote control control element is equipped with four contacts, which are installed at the ends. Also on the button you can see two plastic legs without contacts, which are used as guides and are installed from below. Using a toothpick and glue, you need to fix the button, but you must be careful not to fill the contact components.
- After the glue has dried, start soldering the button contacts. These elements are fixed at the corners of the diagram.
- The pager board for alarm control is inserted back into the housing. You need to make sure that all elements are installed correctly and the buttons are secured in place. It is recommended to coat the body components with glue for better fixation. All the bolts on the communicator are tightened, and a working power source is installed in the device.
- The key fob turns on, time parameters and other functions are configured.
Photo gallery: repairing buttons on the Starline key fob
The photo shows a disassembled Starline keychain
Designation of contacts for soldering buttons
Video: replacing the button on the Starline remote control
The Blue Box Ufa channel in its video showed in detail the procedure for replacing controls and soldering them on the Starline pager.
Removing dirt and moisture
Repairing the Starline key fob may involve removing dirt and traces of moisture:
- Using a damp cloth, wipe the body of the communicator. This must be done in order to prevent dirt from entering the device from the outside.
- The rear compartment of the pager is opened and the battery is removed. Use a dry cloth or a construction brush to clean the seat. If there are traces of oxidation on the contact elements for connecting the battery, they must be removed with medical alcohol. First, the liquid must be applied to a piece of cotton wool or napkin.
- The key fob body is being disassembled. To do this, you need to unscrew all the bolts that secure the components of the remote control to each other.
- The inner surface of the cover is cleaned from dirt. For this you will also need a brush or a dry cloth.
- The circuit status is checked. If there are traces of contamination, cleaning is carried out, but you need to act as carefully as possible - do not allow liquid to come into direct contact with the board.
- Then the key fob body is assembled, all steps are performed in the reverse order. After this, you need to turn on the communicator and check its operation.
The most common breakdown problems and their solutions
The most common reasons are:
- The control panel is dropped from a height, after which it does not work at all or partially. Depending on the height from which the keychain fell, the case may be destroyed or the quartz may be shaken off. If you can still turn off the alarm using a remote control with a broken case, then if the quartz of the transceiver device is damaged, the key fob becomes inoperable. The best solution would be to replace the remote control with a new one.
- The remote control has been dropped into water or exposed to rain. Water floods the printed circuit board and shorts the tracks, which leads to complete or partial inoperability of the device. If the remote control gets wet, you must immediately remove the battery, as there is a risk of filling the internal volume of the key fob with electrolyte. Then the device is disassembled and the contact tracks are wiped with alcohol. If the functionality of the buttons does not return, then it is necessary to ring the circuit with a tester. The faulty button is replaced with a new one. If tracks or elements on the printed circuit board are damaged, the key fob will have to be replaced.
- Sudden discharge of the battery due to an internal short circuit in the element itself or in the key fob, due to which the device stops working. In urban environments, you can purchase a new battery and replace it. If discharges occur repeatedly, you should check the operation of the remote control, eliminate the cause of the short circuit, or purchase a new device. If the problem occurs far from populated areas, you should remove the battery from the key fob and turn off the alarm.
- The key fob may stop working due to the destruction of the buttons or a section of the printed circuit board from physical impact. You can try changing the button in the service, but more often you have to change the entire remote control.
- The key fob may lose contact with the unit located in the car. This often occurs in the Tomahawk and Alligator systems due to channel desynchronization. Repairs will require re-programming the key fobs into the system.
- A temporary loss of functionality of the key fob is called freezing. Observed after attempts to start the engine from a dead battery or in the presence of radio frequency interference. In this case, it is recommended to turn off the system in emergency mode, drive a certain distance and check the operation of the key fob. It may be necessary to re-register the remote controls into the unit's memory.
Recommendations for preventing malfunctions
Tips to prevent your key fob from breaking:
- It is not recommended to store your device in places exposed to moisture or high temperatures. This will lead to oxidation of the contacts on the board, as well as damage to the circuit as a whole, which is why the key fob will have to be thrown away.
- Only working batteries should be used in the remote control, and if the power source fails, it must be replaced immediately. You should not store your communicator with a dead battery. The fact is that after the battery has reached the end of its service life, acid may be released from it. If the battery remains in the remote control, liquid will get onto the board and damage it.
- Do not store the device at low temperatures. If the key fob then gets into a warm place, the frost on the key fob elements will begin to melt and turn into condensation.
- It is recommended to use a protective case for the remote control. It will not protect against serious problems, but it can prevent the negative effects of dust and damage to the device from falls.
Why is the Starline A91 keychain not registered?
Sometimes owners have a problem that the remote control has become untied or the commands are not registered. You need to check the integrity of the battery. If the key fob indicator blinks, then the system commands may not reach the control unit. The battery needs to be replaced.
Or, if the number of key fobs in the system is already more than 4, then the previous alarm remotes begin to be deleted independently. Then you need to reprogram the device again, linking it to the car. If things don't work out, take it to a service center for reflashing.
Video: DIY repair of the Starline key fob
The AlanMorfreeman channel in its video showed in detail the process of resoldering the contact elements on the communicator to control the Starline alarm system.
Do you have any questions? Specialists and readers of the AUTODVIG website will help you ask a question
Was this article helpful?
Thank you for your opinion!
The article was useful. Please share the information with your friends.
Yes (100.00%)
No
X
Please write what is wrong and leave recommendations on the article
Cancel reply
Rate this article: ( 6 votes, average: 5.00 out of 5)
Discuss the article:
How to reset settings on Starline A91 alarm system
It happens that the remote control is faulty. Then it’s worth going to a service center to update the firmware of the Starline key fob. First you need to reset the alarm settings. If the individual shutdown code was not programmed, then you need to perform the listed actions.
- Open the doors with the key. The car's dimensions will flash 4 times.
- Turn on the ignition. Get to the Valet button, press it three times.
- Turn off the ignition. The siren should sound.
- Now you can start the car and get to the officials to flash the Starline alarm key fob.
Unpacking the keychain and official instructions
Good evening. I've been dreaming about this since I bought the car. When I received the keys, I was slightly upset that the screen on the key fob was leaking. Actually, I wasn’t in much of a hurry to change the key fob, since in the summer it doesn’t really matter to me if it’s there. But when winter came, I realized that without a display it would be difficult to set auto heating, so I decided to look for a new key fob. Studying the search results, I came to the conclusion (which, for some reason, I had never even thought about before) that you can change not the key fob, but the display! And the price will be 10 times cheaper...
Having stocked up with the necessary components and watched enough of the video, I began the replacement. I’ll say right away that I decided to take the display on a cable, and not “on legs,” because I don’t want to bother with soldering a bunch of wires and then not having to worry about laying them out.
The key fob is very easy to disassemble - remove the battery and unscrew the only screw. All that remains is to halve the keychain.
For convenience, I removed the antenna module (it can be easily pulled out). Then he tore the cable off the board. We don’t throw away the culprit too far, as we will need it later! Then you need to clean the contact pad (I wiped it with alcohol and cleaned the contacts with a utility knife).
Next, let's return to the old display. I noticed one useful point in the video: on the old cable you can “adjust” the temperature of the soldering iron. Since my soldering iron is connected through a transformer on which you can change the output voltage, I simply “twisted the knob” until I reached the point where the old cable stopped melting from the soldering iron, but at the same time the cable stuck to the surface (in my case, to piece of paper).
After setting up the soldering iron, you must first “glue” the cable to the display. At first I was afraid that I had come across a display with a “torn off” cable, but when I watched the video, I calmed down, since this is the case everywhere. You need to find translucent “legs” on the front of the display on the bottom side. You need to hit them with the black stripes of the train. Peel off the paper from the cable and stick it on the legs of the display. After making sure that we hit the legs clearly, we use a soldering iron so that everything sticks. The main thing is not to overdo it! After that, I glued a small strip of double-sided tape to the bottom of the display so that the display fits neatly into place. Then we bend the train onto the back side of the keychain and cut off the excess (the train is a little longer than necessary, just in case). We heat it up with a soldering iron in the same way and you’re done.
We put the antenna module in place and put on the battery for testing. Voila!
I was very happy that everything worked out! This was my first time doing this, it was a little scary! But everything turned out to be even easy. Next, it remains to change the glass in the case.
But the Chinese, as always, are in their repertoire! Having squeezed out the old glass, I realized that the new one did not fit in size. It is slightly larger than expected! After 20-30 minutes of adjustment on the “zero” level, I achieved the desired dimensions. Since I don’t have thin double-sided tape, I decided to glue the screen with glue. Unfortunately, this led to some error, which now confuses me... Somehow, along with the glue, the black paint of the outline spread and went beyond its boundaries. As they say, the first damn thing is lumpy. But in any case, this is much better than what was before!
Starline keychain prices
You can buy a standard remote control in any city in the country. The price of Starline A91 fluctuates between 1000-3000 rubles, depending on the distance of the seller or additional services.
- universal design - compatible with almost all cars with manual or automatic transmission;
- complex encryption system;
- increased range;
- versatility and long warranty periods.
Setting the volume mode
Attention! This method is suitable for the most common starline alarm models A63, A93, A64, A94, B64, B94, D64, D94, E60, E90, E61, E91.
To configure the operation of the sensors, you must have access to the VALET service button. Settings are made using the main key fob with feedback (with LCD screen).
With the ignition off, press the service button 5 times and then turn on the ignition. The car beep will sound (5 times) and the indication signal on the key fob will sound.
Then you need to press the button on the key fob. The icons on the key fob (on the screen) will display the inscription SO UN indicating that the volume of the sound signal has been adjusted.
To switch to the sound signal setting mode, you must press and hold the button for several seconds. then quickly click on the button again. A number indicating the signal volume will light up on the screen. To increase the volume, you need to press the button once. To decrease the volume, go through all the modes in a circle (there are 9 in total), and stop at the desired signal volume. To exit the setup mode, just turn off the ignition. If the modes are not saved, then you need to completely reset the alarm and again configure all modes to suit your needs.
Button
Single click = enable “control” mode. In this mode, all sensors and systems are checked in forced mode.
Holding the button for a long time turns on a certain mode that was programmed in advance, for example, starting the car on a timer at a certain moment or entering the “Starline alarm setting” mode.
Disabling the StarLine A94 car alarm
Manufacturers have made it easier to disable security options in StarLine. With the Starline alarm system, a number of simple steps are taken. Recommended order of execution:
- Open the door;
- When the StarLine alarm system is turned on by the remote control, alerts are emitted by a bellower;
- When you turn on the car alarm without a key fob, the dimensions will blink four times.
The machine’s protective options should be disabled within a twenty-second interval. The ignition is turned on, the code is entered in accordance with the car alarm operating manual and the rules stated above. Proof of disarming will be a two-time warning from the car siren. The dimensions will flash twice. The operation is completed.
Manufacturers recommend 2 methods for removing Starline from the active state using the remote control - with and without sound. In the first episode, button 1 of the remote control is pressed. Or the cursor moves to the symbol indicating the speaker is on. Button 2 is pressed.
The StarLine car alarm will warn you about deactivation with a two-time roar message and two light messages. The LED will turn off. The key fob will beep twice and the speaker symbol will be displayed on the screen.
With the silent method, it is recommended to turn off the StarLine alarm by pressing button 1 twice. In the second method, you should move the cursor across the screen to the symbol of the disabled speaker. Button 2 is pressed.
Proof that it was possible to disable the Starline alarm on the car is the dimensions blinking twice. The LED light does not blink. There will be 2 audio signals from the remote control. The speaker mute symbol will light up.
To turn off the Panther alarm in an emergency, you need to turn it on and off, then immediately turn on the ignition and hold the Valet emergency button for 10-15 seconds until the sound signal sounds. After these manipulations, the car engine will be unblocked and the car will be able to move around.
With Magnust alarm systems, the problem of “forgetting key fobs” is quite common. The alarm unit at one point stops “recognizing” the signal that the key fob sends to it. How to act in this situation? We open the car with the key, turn the ignition on and off three times and synchronize the key fob with the unit. To do this, you need to press the Valet button we already know and wait for the sound signal. After this, hold down the alarm arming button, which is located on the key fob . After the next beep, you can freely use the key fob. But this procedure is not suitable for all mongoose models. You can find out about the specifics of synchronization in the instructions for your alarm model in the section “Binding additional alarm key fobs.”
With the help of such simple manipulations, you can independently restore access to your car. However, if you do not feel confident in electronics, it is better to contact a car service after you have restored access in order to be completely sure that your car alarm is working as it should.
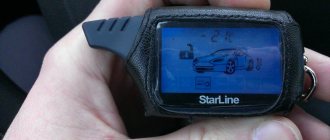
2.1. Designations on the icon keychain
Icons on the Starline A91 keychain
Starline A1, A2, A4
If the anti-theft system has worked and the starter is blocked, then you need to be able to manually disable the protection. For models A1, A2 and A4, the method of unlocking is the same. It involves performing the following actions:
- A key is used to open car doors.
- After this, turn on the ignition and leave it for 20 seconds.
- During this time, press the Valet key 3 times.
- Then turn off the ignition and wait for a confirmation sound signal.
Alarm operating modes
Most alarm models in the mid-price segment of this manufacturer have a variety of sensors and operating modes that form a large multifunctional vehicle security complex. This complex includes programmed modes:
- Advanced immobilizer mode.
- Regular self-diagnosis of the entire alarm system.
- Monitoring sensors, setting them up (using a key fob or computer).
- Silent security mode (this mode can operate both when the engine is running and when it is turned off).
- Monitoring vehicle location via GPS.
- Service modes for setting up alarm systems and flashing key fobs by the user.
Starline A91: additional (spare) key fob
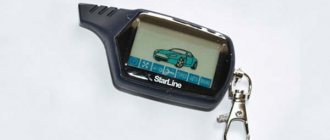
The alarm system has two remote controls - primary and secondary (see photo). The main key fob has a remote antenna, a color screen informing about the current state of the car, and three buttons on the side.
An additional or spare remote control differs from the main one and is necessary in case the first one is lost or the battery is dead. This key fob does not have a screen, and it cannot conduct a dialogue with its owner - a device without feedback. The remote control buttons are on the flat side, they retain all functions. A spare key fob can be used to open doors. The second remote control will help you unlock the interior or turn on the autostart of the engine.
Ways to unlock Starline A91 key fob
If the remote control malfunctions, turn it off. You can use a custom code that you programmed earlier.
- open the door with the key. The car will blink its turn signals 4 times;
- turn the ignition key by pressing the Valet button the previously set number of times;
- write the system startup code. The Starline remote control should vibrate slightly;
- turn off the ignition. We receive confirmation from two flashes of turn signals;
- The system is deactivated, you can go.
Replacing a key fob button using the example of a StarLine car alarm
If the button on key fob , you can replace it yourself.
To do this, it is enough to have minimal experience working with a soldering iron and have the following tools and materials on hand:
- new tact button;
- small Phillips screwdriver;
- soldering iron with a thin needle tip;
- tweezers;
- alcohol or nail polish remover;
- solder;
- soldering flux;
- hot glue gun or glue stick with a lighter.
Let's consider the process of replacing a key fob button using the example of a StarLine car alarm.
Since key fobs for different alarm systems have a similar structure, these instructions for replacing the button can be considered universal:
- We disassemble the keychain (the process is described above);
- We disconnect the two boards;
- Warm up the soldering iron. If it operates from a 220 volt network, then after warming up the device should be unplugged from the outlet;
- Solder the old button. It is soldered in four places: two points are the contacts themselves; the other two are installation;
- We remove excess solder, clean the contacts;
- Solder the new button, holding it with tweezers;
- We clean the soldering area and degrease the button connection area with alcohol;
- Additionally, we strengthen the button with a drop of hot-melt glue and let it cool;
- We assemble the keychain in reverse order.