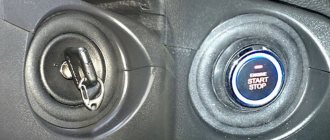
Hi all! The topic of our conversation will be installing the Start Stop button. Lately they have been talking about this more and more often, so I decided to provide some clarity regarding the possibility and feasibility of such a step.
In reality, everyone strives to improve their own comfort and make life easier. There are many examples. Cars are equipped with cruise control so you don't have to constantly hold the gas pedal. We also connect rear view cameras so that you don’t have to lean over the seat and twist your neck back and forth. And navigators have completely replaced old paper maps.
As for installing a simple button instead of the ignition switch, it is quite convenient, and even fashionable. Similar autostart is provided for many modern cars. But owners of old cars can only install the button with their own hands.
The circuit is not the most complicated, which has caused a real wave of popularity for altering the ignition system. Whether to do this or not, everyone decides for themselves.
Overview of the Start-Stop system
On what principle does the engine autostart device work, how is the system installed, what do you need to know about starter recuperation? You will find diagrams for connecting and starting a car engine below, but now we suggest you familiarize yourself with the design features and operating principle of the system.
Device
So, what elements are included in the ignition start system:
- Instead of a traditional ignition switch, a special, more powerful starter equipped with a button is installed.
- Bendix, as one of the components of the starter mechanism. For example, starting equipment for Bosch cars is equipped with special silent bendixes.
- A controller installed in the connection diagram. Its purpose is to display information about the charge of the car battery.
- Perhaps the most important component of the system is the control module, which monitors and controls the operation of the equipment. That is, this is, in fact, the “brain” of the system. Using the control module, the basic parameters are read, as well as the values transmitted by the speed sensor. In addition, thanks to the module, the engine crankshaft speed and the position of the gas pedal while driving are determined. The control module, receiving data, subsequently transmits it to the ECU.
Principle of operation
How should the system work? It should be noted that most of the modern devices that can be found on sale today have undergone various changes. New functions can be introduced into them, for example, a car alarm, but, nevertheless, the principle of operation is the same. The car's power unit automatically turns off if the car is standing still and not moving and subsequently starts if the driver plans to start moving.
It doesn’t matter whether the vehicle is equipped with an alarm or not, to activate the equipment with an automatic transmission, you must completely stop the car. The driver should then press the brake pedal
After the pedal is released, the equipment is automatically activated and the motor starts working again.
If we talk about cars with a manual transmission, then in this case the principle of operation is somewhat different. For the equipment to start working, you will need to engage neutral gear and disengage the clutch. After this, the car engine will turn off on its own until the driver of the vehicle presses the clutch again (the author of the video is the CARDOT channel).
Possible faults
If the power unit is equipped with such equipment, then one way or another, it is subject to more frequent starts. This means that the use of conventional starter mechanisms in such cars is irrelevant. In addition, the vehicle must be equipped with an additional battery, which will allow it to easily cope with an increased number of discharge and charge cycles.
It must be taken into account that if problems occur in the operation of the power unit, the system will still work in the following cases:
- If the fault affects the generator device. Even if the generator malfunctions, the motor will continue to function.
- In the event that the battery is discharged and the charge available in it is not enough to restart the engine after stopping.
- If for some reason the coolant in the system does not warm up and its temperature is less than 25 degrees. In this case, the engine will continue to function even if the driver does everything to stop it, since the unit will try to warm up the antifreeze to operating temperatures.
- Also, the system will not work if the car’s steering wheel is turned to the maximum left or right position (the author of the video is Dmitry Gerasimov).
As for the Start-Stop faults themselves:
- The control module has failed. This problem happens infrequently, but, nevertheless, it cannot be ruled out. If the unit breaks, it will be impossible to start the engine, so you will have to remove the module and repair it or replace it. Malfunctions of the control device may be caused by wear or burnout of the board.
- Failure of the starter mechanism, in particular the bendix. Like any other equipment, the starter tends to wear out over time, so no one is immune from its breakdown.
- Damage to the electrical connection circuit. Such malfunctions are solved by replacing the damaged area.
If a fault is detected by the control unit, the Check Engine button should appear on the dashboard.
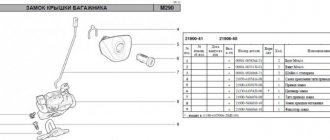
Broken ignition switch
An infrequent, but still occurring, breakdown in a car is the failure of the ignition switch. When a malfunction is detected, the question quite naturally arises about whether to replace the ignition switch with your own hands.
Since several groups of contacts are installed inside the lock, failure of one of them results in loss of power supply to the entire car.
Experienced car owners, if they have the appropriate spare parts, can repair the ignition switch with their own hands, especially if it only concerns a faulty relay.
First, using an ohmmeter (you can use a tester in resistance measurement mode), the contact groups of the lock are checked.
The presence of weak contact may indicate a breakdown of the lock core. It is not difficult to replace. If a more serious fault cannot be solved by repair, a complete replacement will be required.
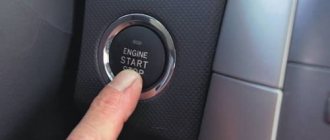
How the Start/Stop button works
Before starting all the work, it is important to understand the fundamental features of the device and understand the intricacies of its operation.
Without going into details, the procedure for activating this system itself consists of sequentially performing the following steps:
- disabling the alarm;
- pressing the brake pedal;
- pressing the treasured button.
The last action involves briefly starting the car starter. In order to turn off the car, you should press the same brake pedal all the way and press the magic button.
Execution of the presented algorithm will lead to the desired result only if a number of certain conditions related to the installation of working units and elements are met.
Such a superficial analysis of the system’s operation, however, does not give the car enthusiast a clear idea of its functional features. For a more thorough acquaintance with the operating features of the device, it would be advisable to study the circuit diagram of its connection, which is attached below.
Pros and cons of the device in the car
According to established tradition, let’s try to find out what positive and negative aspects are hidden in installing a “start-stop” button.
Let's start, perhaps, with the positives. If you believe numerous reviews, there are much more of them than there are minuses.
So, the presence of the presented system allows:
- simplify the engine starting procedure;
- increase comfort;
- improve the car's anti-theft system;
- save time.
If we talk about the negative phenomena associated with the installation of such a device, it is worth noting that they are all rather indirect in nature.
For example, in this case the driver has to get used to an unusual algorithm of actions for a long time. Some difficulties may also arise if the car has an autostart system.
In this case, in order to eliminate the possibility of malfunctions in the operation of the presented device, it becomes necessary to carry out work to reinstall the working module of the key fob. This will require the intervention of specialists and, as a result, unnecessary expenses.
Advantages and disadvantages of the device
First, we list the advantages of the “start/stop” mechanism:
- The driver no longer needs to use the ignition key every time he needs to start the engine. All it takes is a simple click;
- you can mount the “start/stop” anywhere. This means the car will become a little more comfortable;
- there are special schemes in which the start/stop button is connected to the immobilizer or alarm system, which is an additional security measure that prevents car theft;
The start/stop button can be linked to your car's alarm or immobilizer
- If the driver leaves the car for a short time, he can lock the car by simply pressing a button on the door. In such situations, there is no particular need to set the car alarm, therefore, there is a slight saving of time.
But there were some downsides too:
- To start the engine, the driver must sit in the car and press the brakes. Getting used to this feature of starting the engine can be difficult, especially for novice car enthusiasts;
- if the driver decides to install an alarm with an auto-start function on a car with a button (to warm up the car in winter, for example), then problems may arise with this, which, fortunately, can be solved. The driver will just need to have a couple of key fobs with him. One of them will have to be given to alarm installers so that they can disassemble it, take out the microcircuit and put it in the car. After this, the current will be supplied only at the moment the engine starts. But for all this, the car owner will have to seriously pay extra to the craftsmen;
- If a button is already installed on the car, but there is no alarm yet, then installing it will cost the driver more, sometimes twice as much.
Combined rework option (step by step)
The necessary materials for tuning are prepared:
- Three types of relays: ZPTF, 4- and 5-pin;
- Several meters of high-quality wiring with a cross-section of more than one millimeter;
- “Start stop” button;
- Diode and terminals.
You should be armed with all the tools necessary for a tuner, including pliers, wire cutters, etc.
The modification scheme looks like this.
How to install the ignition button
Everything is carried out according to the diagram, but the diode can be installed in any convenient place.
Ready-made universal kits
The modern market is replete with ready-made universal kits for starting internal combustion engines from a button. They are sold together with protective systems and are suitable for installation in almost all known car models.
Ready-made kits can provide reliable engine starting. Modernization, if carried out correctly, will easily turn the starting system of a domestic car into a universal and functional element, no different from the standard version of the best foreign cars in the world. However, the kits are not cheap, and if you call a specialist, then along with the installation, the new starting system will require quite a large financial investment. If you know how to install the ignition button, you can save money.
Ready kit
Thus, there are several ways to install a button. Each has its own characteristics, advantages and disadvantages.
- With a key. This ignition option requires a key. An old and proven scheme. Plus - ease of installation, minus - again you need to take the key with you. To start the engine, the driver must press a button.
- The same option, only without a key. The advantages are obvious, but the disadvantage is the complex installation scheme.
- Short press button. It is enough to just hold the button pressed for a second - this will be enough to crank the starter. The advantage of the scheme: the button only gives the starter a command to activate, it rotates until the internal combustion engine starts.
- Long press button. The same thing, only the button is held for a longer period of time. The advantage of the scheme is expressed in the fact that the driver himself controls the rotation of the starter. If he releases the button, the starter will stop rotating.
As was written above, in addition to the classic options for using schemes, there are also combined ones. They are often invented out of the blue by amateurs and craftsmen. Some schemes are so successful that they deserve higher approval.
About the options for installing the start/stop button
Now there are a lot of different connection schemes for the start/stop mechanism, each with its own characteristics. We list the most popular options:
- diagram involving the use of an ignition key. When using this option, it is impossible to start the car without a key: the driver first turns the key and only then presses the button;
- modification without an ignition key. The engine starts by simply pressing a key. This is very convenient, but if the device is installed incorrectly, the machine can become easy prey for intruders;
- circuit with a short press of a button. The driver presses the button for only 1–2 seconds, the starter makes several revolutions and turns off immediately after starting the engine;
- options with a long button press. In this case, the owner can hold the button as long as he wants, and the starter will rotate until the engine starts;
- a circuit that turns on the ignition only after pressing a key;
- a modification in which the ignition is turned on 1 second before the starter.
In addition, combinations of several of the above options are possible: it all depends on what exactly the car owner wants to achieve. However, installation of such combined circuits requires certain knowledge of automotive electrical equipment.
Electronic ignition switch
Manufacturer: Novels - Russia
Installation: depends on the configuration and vehicle. The electronic ignition switch (EIS) is a complete replacement for the standard mechanical ignition switch of a 12-volt car.
The electronic ignition switch is available in the following configurations:
- EZZLite – comes without an “Engine Start Stop” button. If there is already a button, or you plan to start the engine with a standard or hidden button, this is the most suitable configuration option. It is possible to block the engine from unauthorized starting by connecting the lock module to an existing car alarm, or using a secret toggle switch.
- EZZBase – the engine starts by pressing the included button. It is possible to block the engine from unauthorized starting by connecting the lock module to an existing car alarm, or by installing a secret toggle switch. Can subsequently be equipped with an electronic key reader.
- EZZDallas – owner authorization is carried out using an electronic tablet key, using the contact method. To authorize, you must attach the tablet to the reader. Arming occurs automatically after 3 seconds. after turning off the ACC mode.
Cost of equipment:
- start-stop buttons (China) - (block + button) = 2500 rub. China
- EZZLite (Russia)—Basic light (no button included) =2750 RUR
- EZZBase (Russia)—Basic—(block+button) =3650 rub.
- EZZDallas (Russia) - Basic + Dallas = 4050 rub.
- EZZPremium (Russia)—Basic+E-marin =5300 rub.
Installation methods
Nobody significantly limits car owners from installing a button on their car to start the engine with a simple press.
Therefore, more and more often you can meet those who want to install a solution:
- for 140 Mercedes;
- Niva;
- Lada Granta;
- Hyundai Solaris;
- to Priora;
- Honda cars;
- Mitsubishi ACX;
- Mitsubishi Lancer;
- Audi 100 C4;
- Toyota Yaris;
- Kia Rio;
- and even VAZ 2114.
The main thing here is to decide whether you really need this button. If yes, then move on to choosing the system itself.
Modern manufacturers of universal buttons allow you to select a mechanism for any machine. Please note that there are various connection schemes. Each of them has its own characteristics.
But a few of the most popular solutions dominate. These are the options that car owners prefer. Let me introduce you to them:
- Button with ignition key. This system will not allow you to start the car without using the ignition key. Therefore, you need to turn the key itself in the lock, and then press the button;
- Keyless. To start the motor, you just need to press the button. An extremely convenient scheme. But here it is important to install it correctly, otherwise the car will be extremely easy to steal;
- Short press. To start, hold the button for up to 2 seconds. The starter rotates and turns off when the engine is running;
- Long press. Allows you to hold a key as long as required. The starter will not stop rotating until the engine starts;
- A circuit where the ignition is activated after a key has been pressed;
- A scheme in which the ignition is activated 1 second earlier than the car starter.
Also, some combine different schemes to achieve the desired result.
If you do not have experience in such work, and also have poor understanding of automotive electrical equipment, you should not take on such work with your own hands.
Contact good workshops. Moscow alone is ready to offer dozens of addresses of car services that offer similar services. The price will be higher, but the result is guaranteed.
How to close the starter directly and is it possible to start the car without a starter
Hello, dear car enthusiasts! Many of us, motorists, have at least once in our lives found ourselves in a situation where the car starter stubbornly refused to fulfill its intended purpose.
According to the well-known Murphy’s law (in common parlance “the law of the falling sandwich”), such troubles happen at the most inopportune moment - you have to go, and time is running out. In such cases, there is nothing left to do but start the car without a starter or close it directly and hit the road.
Before closing the starter directly, diagnostics are recommended
Before taking decisive action, it would be a good idea to try to identify the causes of starter failure, because some of them can be eliminated on the spot.
The most difficult starter failures include:
If you have diagnosed one of these complex breakdowns, you can immediately begin to look for a way to start the engine with a non-working starter. These methods are few, but they work flawlessly.
The essence of the first simple and reliable way to start a car without a starter is that several strong, sympathetic neighbors in the garage rest their hands on the trunk of the car and, on command, begin to accelerate.
While you are driving, you turn on the ignition key and first gear. The more active the pushers are (in terms of acceleration speed), the faster the engine will start. This method of starting a car is called “push-start” and is the most popular among car enthusiasts.
The second most popular and effective auto-folk method to “revive” a car engine is towing. It consists in the fact that your car is towed by another car for some distance using a cable.
You need to exercise maximum caution in this case: first, keep in mind that when your car starts, it will definitely begin to accelerate. Secondly, when the car in front of you stops, do not forget to stop your car
Finally, do not turn off the engine when you get out of the car to unhook the cable, otherwise you will have to repeat the entire procedure.
How to start a car without a pushrod and a cable? Just close the starter.
You can try to bring the car back to life without using brute physical force. To quickly complete the task, you need to have an idea of how to close the starter directly.
Let's figure out how to start the starter directly or, in auto-folk language: how to close the starter with a screwdriver, wrench, pry bar or other suitable means at hand.
It is worth mentioning right away that a screwdriver and a wrench will only help if the cause of unsatisfactory operation of the starter is a malfunction of the solenoid relay.
You can recognize it by the characteristic clicks coming from under the hood when you turn the key. This sound indicates that the retractor relay has been turned on, but the Bendix drive gear cannot crank the engine crankshaft. There is no other way out of this situation except to bypass the starter and apply voltage to the windings.
So, to close the starter you will need a large screwdriver or a wrench with a “jaw” corresponding to the distance between the power terminals of the solenoid relay, with which you will simply need to close them.
But first you need to set the gearshift lever to neutral and tighten the brake to full. The key in the lock must be in the appropriate position. Under these conditions, the screwdriver (key) will act as a retractor relay.
In these simple ways you can start the car without briefly racking your brains over the question: how to close the starter.
The only point in this technology is that when starting the starter directly on the contact ignition system, make sure that the coil does not fail.
After all, if on a contactless ignition system the switch monitors the supply of voltage to the coil, then on classic contact systems there is no such protection.
On contact systems, it is more convenient to perform such actions with an assistant - one puts the key in the ignition position, the second closes the contact. Good luck jumping the starter directly.
Installation recommendations
Before starting work, you should take preparatory measures. A lot depends on what kind of machine you are dealing with. Some people remove the car ignition switch itself by installing a simple key in its place. In other situations, a hole is made to size, allowing access to the wiring and allowing connection to the electrical circuit.
To work you will need a set of tools and some materials, consisting of:
See also: What to do if brake lights do not work, punishment for rear-end collisions
- screwdriver;
- wire cutter;
- electrical tape;
- ready button;
- three four-pin relays;
- one five-pin relay;
- one relay from PTF;
- a set of insulated wiring with terminals;
- free time;
- installation instructions.
If you buy a ready-made kit, then you are doing absolutely right. The package includes everything you need, plus a detailed installation manual and the installation diagram itself. It is from this instruction that you need to build on, and not look for some universal guides.
For those who understand the electrical equipment of cars, the diagram below will be a clear example. This is the simplest algorithm that allows you to set keys to start the power plant by simply pressing a button.
If this picture doesn’t tell you anything at all, then taking on such a task is strictly prohibited.
The bottom line is to make three connection points in your car. The first will be located on the ignition block of your car, the second will be placed on the brake pedal limit switch, and the third will be placed on the control wire.
Whether to install such a solution or not, everyone decides for himself. Carefully consider the advisability of changing the engine switching principle on your car. Experience shows that the button is not suitable for everyone. That’s why many people change back Start-Stop to the usual key turned in the ignition.Advertising
How to install a button yourself
Regardless of which method was chosen, installation begins with choosing a location for the button. Various options are possible, but basically the part is installed in the ignition switch or a hole is prepared in the dashboard. This can be done with a knife, a drill or a soldering iron. To provide access to the wires, you will need to disassemble the console. If the button is planned to be installed in a different location, i.e. not into the ignition switch, then it will need to be hidden with a plug.
As an example, let's consider installing a button on a VAZ 21214. The operation of the system in question will be carried out as follows: if the brake pedal and the button are pressed at the same time, the engine starts, and when pressed again, it turns off. If the button is pressed without a pedal, the engine will start and stop. When pressed with the motor running, it stops.
Tools and materials
To install the system you will need the following list of elements:
- non-latching button;
- 3 standard four-pin relays;
- one five-pin relay with closed contacts;
- rear fog light relay 5 contacts;
- wires;
- terminals;
- terminal crimping pliers.
Instead of pliers, you can use small pliers, but the quality of crimping the wire will be lower.
To install the start-stop button, you will need relays, terminals and wires, the length of which is determined locally
Connection diagram
Let's consider the diagram according to which the system will be connected:
- We connect the working contact of the relay to +12V battery (brown wire);
- the enabling signal “+” is connected to the same point;
- the common one is connected to the body ground (the contact must be reliable);
- the relay contact, designed for the load, is connected to +12V when the ignition is turned on (blue wire);
- the control signal “-” is connected to the start button;
- the enabling signal “+” remains unused.
As a result, we get three connection points:
- to the ignition switch contacts;
- to the limit switch (toad) of the brake pedal;
- to the control wire.
This option prevents the starter from working after the engine starts. If we consider installing the system on other cars, the principle is approximately the same. Since the wires can be painted in different colors, you should be guided by the color shades. One of the points that may raise questions is the orange wire, since there are several of them. A thin wire located in the harness goes to the brake pedal, and the pairs are connected to “+”, they are responsible for the ignition. The harness has a purple wire that goes to the fuel pump and is responsible for starting the engine. Red is connected to “-”, black to “+” battery. The blue wire is used to connect the alarm and is connected to “+”. The purpose of the yellow wire is to connect the button to the starter.
The start-stop button circuit will not cause any particular difficulties during installation, since it requires minimal knowledge and simple tools
Sequential installation of a universal kit
Since we are talking about installing the system with your own hands, you need to clearly understand what works, how it works, and in what sequence to make the connections. So, if we look at old cars, then in them the wires from the starter were connected directly to the ignition switch. Naturally, a large load was placed on the contacts when starting the engine, since a large current flowed through them. As a result, the contacts quickly failed. Later, the starter was equipped with a separate relay, which eliminated the described problem. It was the relay that took all the current. This part, in addition to coping with a large load, is relatively easy to replace when it fails. Such changes ensure long-term operation of the contact group.
Keyless entry systems are offered both universally and for specific car brands
To connect the button correctly, you need to find out which contacts on the lock are responsible for supplying power to the starter, which will ensure that the engine starts and stops (when the contacts are closed and opened). Depending on the connection diagram, the contacts are connected to the button, and there is no need to use a key in the lock. We install the system in the following sequence:
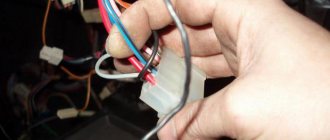
- First of all, decorative and protective elements are removed from the steering column, which will provide free access to the wiring. We are interested in the connector, which is located on the back of the ignition switch. It will need to be snapped off; it is held in place using special clamps. If the car does not have a starter relay, then you will need to find the power wires in the contact group of the lock. They usually have the largest cross-section. When the ignition is turned on, when the contacts (to which the thick wires go) are closed, the starter should start. This will indicate the correct choice of contacts.
- Now you need to connect the button itself. After the installation location has been selected, it is necessary to connect the power wires from the ignition switch to the button. On vehicles that use a starter relay, wires are connected to the button to supply power to the relay. To avoid confusion and accurately determine, you can test the wires with a multimeter in ohmmeter mode. The device checks the wires from the starter for ground and is determined to be “-”.
- Then move the tester to the voltage measurement position and take readings on the remaining wires. The goal being pursued is to detect the wire on which +12V appears when the key is turned in the lock, i.e. ignition voltage. In addition, a contact with a constant voltage of +12 V is determined. You also need to make sure that the voltage remains when you turn the key.
- To complete the diagnosis, use a piece of wire that is connected to the contact where voltage appears when the key is turned to the ignition position. Then this contact is connected using another wire to the one on which voltage is constantly present. If these wires are short-circuited and the starter turns, then the necessary terminals have been found correctly. All that remains is to lay the wires to the place where the button is mounted and connect it.
Connecting the starting system
It is worth paying attention to the fact that many modern cars use a chip key, which does not allow attackers to steal it. Therefore, you will have to either dismantle such protection or bypass it. The algorithm for installing the simplest push-button start system is as follows:
- The positive (working) contact from the relay must be connected to the “+12V” terminal of the battery.
- The enabling contact must also be connected to the same contact.
- The negative must be connected to the car body.
- From the load relay, the working contact must be connected to a “+12V” source. It is necessary that voltage appears only when the ignition is turned on.
- The control negative signal must be connected to the button.
- The enabling positive wire is not used.
With this option, three connection points are provided:
- Contact group on the ignition switch.
- "Frog" on the brake pedal.
- Control wire.
This connection scheme can be used on both domestic and imported cars. But do not forget about the chip key; it must be disabled in the ECU settings if you do not plan to use it in the starting system.
How does “start-stop” affect the protection of a car from theft?
Most drivers are of the opinion that starting the engine with a button makes the car more vulnerable to theft. But if you look at it, the presence of a key in the key fob is mandatory. If the door was opened without a key, the button simply will not work, which in no way affects theft protection. The system considered is an interesting and unusual option for replacing a key. Regarding installation, there is no definite answer - each car owner decides for himself what he wants to implement in his car. If you want to try something new, then why not. As a last resort, if you don’t like something, everything can be returned to its place.
Anyone can equip their car with a start-stop system if they wish. For this, minimal knowledge in the field of electrical engineering and operation will be sufficient. If you follow the installation recommendations, installing the device will not take much effort and time.
Advantages and disadvantages of the Start-Stop system
Start-Stop Engine is far from a new development by specialists. Although the system is constantly being improved, experts have not yet been able to resolve the nuances associated with certain “cons” of this function. Of course, each driver must weigh everything himself and analyze whether he needs an engine start button.
Advantages:
- the engine starts with a light click;
- installing a “Start-Stop” button instead of the ignition switch is possible in any suitable place;
- no need to carry the ignition key;
- additional protection from intruders (analogue of an immobilizer).
Flaws:
- to start the engine you need to press the brake pedal, you need to get used to this, novice drivers may have certain difficulties;
- the need for improvement when using an alarm system with auto start;
- the need to dismantle the standard steering wheel lock or keep the key in the ignition switch;
- Installing a security alarm on a car with an engine start button requires additional manipulations and is more expensive.
Cars
Instructions for installing the Start-Stop button (Start engine) on a BMW E36.
After the ignition switch started sticking on the E36, the idea of installing a Start engine button came up. The button was ordered here, at that time for 1378 rubles, the parcel arrived on the eighth day.
Inside the box there was everything necessary for connection and installation: a button with wires, a control unit, wiring, two immobilizer key fobs, an RFID ring-reader, a connection diagram.
First I put everything in its place. I placed the ring under the center console near the ashtray.
So that you can simply put your keys with the key fob in this pocket.
The control unit was attached with plastic clamps to a pipe under the dashboard on the driver's side.
At first I wanted to install the button instead of the cigarette lighter, but it turned out to be larger than I thought. The only suitable place for her is here.
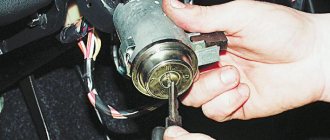
To install the button you need to bend the metal ears
and insert the button into the drilled hole, press it firmly and then bend the tabs on the back of the panel.
Button installation and connection methods
The following connection diagrams for the Start-Stop button are usually used:
- With or without ignition key. When this option is selected, the key is used to turn on the ignition. But the engine is started using a button. The second method involves completely dismantling the ignition switch. The ignition is turned on and the power unit is started without using a key.
- Turn on the ignition. There is an option in which pressing the button turns on the ignition, or an option in which the ignition is turned on simultaneously with the starter being activated.
- Single or long press. When using the first method, pressing once will cause the starter to rotate until the engine starts. And the second method involves rotating the starter until you release the button.
It is noteworthy that all these options can be combined with each other, since everyone has their own preferences. In most cases, installing the device does not require any special skills. Everything is intuitive; you just need to understand the connection diagram provided by the manufacturer and follow the instructions.
Connection diagram for a starter with a 220 V coil
Ignition switch VAZ 2107: connection diagram, replacement, how to remove, instructions with photos and videos
In any magnetic starter connection diagram there are two circuits. One power line through which power is supplied. The second is a signal one. This circuit controls the operation of the device. They need to be considered separately - it’s easier to understand the logic.
At the top of the magnetic starter housing there are contacts to which the power for this device is connected. The usual designation is A1 and A2. If the coil is 220 V, 220 V is supplied here. It makes no difference where to connect “zero” and “phase”. But more often the “phase” is supplied to A2, since here this output is usually duplicated in the lower part of the case and quite often it is more convenient to connect here.
Connecting power to the magnetic starter
Below on the case there are several contacts labeled L1, L2, L3. The power supply for the load is connected here
Its type is not important (constant or alternating), it is important that the rating is not higher than 220 V. Thus, through a starter with a 220 V coil, you can supply voltage from a battery, wind generator, etc.
It is removed from contacts T1, T2, T3.
Purpose of magnetic starter sockets
The simplest scheme
If you connect a power cord (control circuit) to pins A1 - A2, apply 12 V voltage from the battery to L1 and L3, and lighting devices (power circuit) to pins T1 and T3, we get a lighting circuit operating on 12 V. This is only one of the options for using a magnetic starter.
But more often, these devices are used to supply power to electric motors. In this case, 220 V is also connected to L1 and L3 (and the same 220 V is removed from T1 and T3).
The simplest diagram for connecting a magnetic starter - without buttons
The disadvantage of this scheme is obvious: to turn the power off and on, you will have to manipulate the plug - remove/insert it into the socket. The situation can be improved if you install an automatic machine in front of the starter and turn on/off the power supply to the control circuit with its help. The second option is to add buttons to the control circuit - Start and Stop.
Diagram with “Start” and “Stop” buttons
When connected via buttons, only the control circuit changes. The strength remains unchanged. The entire connection diagram of the magnetic starter changes slightly.
The buttons can be in a separate case, or in one. In the second version, the device is called a “push-button post”. Each button has two inputs and two outputs. The “start” button has normally open contacts (power is supplied when it is pressed), the “stop” button has normally closed contacts (the circuit breaks when pressed).
Connection diagram of a magnetic starter with “start” and “stop” buttons
Buttons are built in front of the magnetic starter in series. First - “start”, then - “stop”. Obviously, with such a connection scheme for a magnetic starter, the load will only work while the “start” button is held down. As soon as she is released, the food will disappear. Actually, in this version the “stop” button is superfluous. This is not the mode that is required in most cases. It is necessary that after releasing the start button, power continues to flow until the circuit is broken by pressing the stop button.
Connection diagram of a magnetic starter with a self-recharging circuit - after closing the contact shunting the “Start” button, the coil becomes self-feeding
This operating algorithm is implemented using auxiliary contacts of the starter NO13 and NO14. They are connected in parallel with the start button. In this case, everything works as it should: after releasing the “start” button, power flows through the auxiliary contacts. Stop the load operation by pressing “stop”, the circuit returns to the operating state.