Gasoline engine on the "eight"
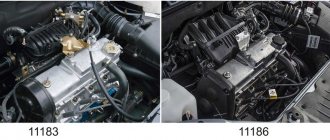
The appearance of the VAZ 21083 gasoline engine is directly related to the low quality of domestic rubber products. The fact is that at the very beginning of production, the Lada Samara family of cars was equipped with a VAZ 2108 engine, the first domestic power unit designed specifically for transverse placement under the hood of a front-wheel drive car.
However, the VAZ 2108 engine had an unpleasant feature, also characteristic of foreign engines with a timing belt drive. When the timing belt breaks, the engine pistons meet the cylinder head valves, and the latter inevitably bend, which leads to expensive repairs of the VAZ 2108 engine. On foreign cars, such a breakdown occurred extremely rarely due to the high reliability of timing belts. However, in the first Samaras, the breakage of a low-quality belt was such a frequent occurrence that it was necessary to urgently modify the engine with the help of specialists from German automakers. As a result, a new engine appeared, which became the progenitor of a whole family of power units. Assembling a VAZ 21083 engine is not a difficult task; it can be completed without the help of specialists.
Installing a crankshaft on a VAZ
Overhaul of a VAZ 21083 engine usually consists of disassembling the unit, troubleshooting parts, boring the crankshaft and cylinders, and assembling the engine. Disassembling the engine is a simple matter, troubleshooting and boring are also simple procedures. But you need to assemble the motor extremely carefully, carefully following the instructions.
Let's start by installing the crankshaft into the cylinder block. Remember: cylinder and main bearing numbers are counted from right to left as the vehicle moves. That is, 1 cylinder is located near the pump and timing drive, and 4 is located near the clutch and gearbox.
- Turn the block upside down.
- We place the main bearing shells with the locking protrusions into the grooves of the beds. In the 3rd bed (middle) we put the liner without a groove, and in the remaining 4 - with grooves.
- Lubricate the liners with engine oil.
- Lubricate the crankshaft journals with oil and place it in bed, with the flywheel flange facing the 4th cylinder.
- We insert thrust half rings into the grooves of the middle main bearing. Each half-ring has 2 notches on one side. Using these sides we install the half rings to the crankshaft cheeks. We place the white half-ring in front (on the pulley side), and the yellow half-ring in the back (on the flywheel side).
- We rotate the half rings so that their tips are flush with the ends of the bed.
- We place liners without grooves in the main bearing caps, with locking protrusions in the grooves, and lubricate them.
- We place the main bearing caps on their corresponding beds with notches in the direction of mounting the generator. 1 cover is marked with one notch, 2 - two notches and 2 holes, 3 - three, 4 - four, 5 - two.
- We secure the covers with bolts.
- Tighten the cover bolts in the following sequence - first cover bolts 3, then 2 and 4, and finally cover bolts 1 and 5.
- After this, we rotate the shaft; if it jams, we look for the cause and eliminate it. If it doesn’t jam, check the axial clearance of the crankshaft; if it is more than 0.26 mm, replace the half rings with thicker ones. If the gap is normal, we proceed to install the oil seals and oil pump.
Tightening torque of connecting rod bolts
It makes absolutely no difference which tightening method you chose, as well as whether an old or new bolt will be used, the first thing you need to do is fix the free length for each of the bolts used. Be sure to record where each bolt was installed (i.e. in cylinder 1, 2, etc.). After the measurements have been taken, comparison should be made with the length of the new bolts. If the bolt has a stretch of more than 0.012 mm, it should be replaced, since in this case it has already lost its elastic properties. Bolt measurements should be made using an accurate measuring device. When assembling the connecting rod, the bolt head and the base of the thread will need to be lubricated with machine oil or the lubricant specified by the manufacturer in the instructions (the recommended tightening torque may vary for different models).
Installation of oil seals and oil pump
The 21083 engine lubrication system consists of an oil pump, oil receiver, filter and channels. After disassembling the engine, all channels must be washed with solvent and blown with compressed air. The oil pump should be installed together with the crankshaft seals, and the oil receiver should be installed after installing the ShPG and flywheel.
Installation procedure for seals and pump.
- Using a thick copper or brass spacer and a hammer, drive the rear oil seal into the holder all the way.
- Using lithol or other grease, glue the gasket to the other side of the holder.
- Lubricate the inner edge of the rear oil seal and the crankshaft flange with engine oil.
- We put the oil seal assembly with the holder on the flange; to do this, carefully tuck the inner edge of the oil seal onto the flange using a sharp and soft wooden stick.
Replacing the oil pump seal
- After this, we slowly move the holder along the flange all the way to the cylinder block, secure it with bolts and align it so that its edge completely coincides with the edge of the block. Only after this do we tighten all the bolts completely.
- Just like the rear one, we hammer the front crankshaft oil seal into the oil pump hole.
- Lubricate the inner edge of the oil seal and pump gears with oil. To ensure uniform lubrication, turn the gears with your finger.
- Use lithol or any other consistency to glue the gasket to the oil pump.
- We rotate the drive gear so that the protrusions on it coincide with the cuts on the front of the crankshaft.
- We put the oil pump on the shaft, use a sharp soft wooden stick to tuck the lip of the oil seal onto the crankshaft journal.
- Just like the holder, we move the oil pump all the way to the block, secure it with bolts, align the edges and tighten the bolts completely.
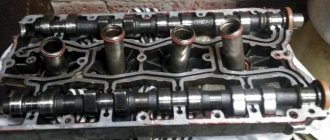
The procedure for tightening the camshaft VAZ 2109 8 valves
We install the camshaft in the reverse order of removal. Features of installing the camshaft on engines 2108, 21081, 21083:
- clean the mating surfaces of the camshaft bearing housing and the cylinder head from dirt and old sealant;
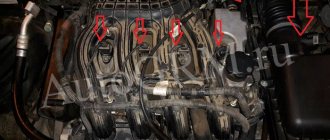
— before installing the bearing housing halves, apply a thin layer of sealant to the contact point of the front and rear housing halves and the mating surface of the block head, in the area of the distributor camshaft oil seal;
The places where the sealant is applied to the block head are indicated in red.
— before laying the camshaft in bed, lubricate its cams and support journals with engine oil;
— install the camshaft so that the cams on the first cylinder look up;
— we tighten the nuts securing the camshaft bearing housing in several passes in a certain sequence (from the middle to the edges), the tightening torque is 18.4-22.6 N.m (1.9-2.3 kgf.m);
— after tightening, remove the squeezed out sealant.
The camshaft on a VAZ 2114 16 cl or 8 cl, an integral part of the gas distribution system, is located in the cylinder head. This unit is reliable and malfunctions are extremely rare. Sometimes this is due to problems with the seals that need to be replaced.
Many car enthusiasts replace the camshaft not only in case of some malfunction, for example, something is knocking, but also for other purposes. For example, for sports tuning of this unit, which allows you to significantly increase power and increase speed. To achieve this, a sports camshaft is installed, which is characterized by increased lifts and wider phases. Also, the camshaft can be replaced with a special one, in order to make the VAZ 2114 8 cl system more economical. In a word, which one to set is a personal matter and depends on what exactly you want from your car.
Installing the connecting rod and piston group
The connecting rod and piston group (CPG) must be installed as an assembly. It is not recommended to press the piston pin into the connecting rod head without special tools. This procedure is best left to professionals.
To install the ShPG, you need a steel mandrel in the shape of a ring. The height of the ring is 2-3 cm, the diameter of the hole is slightly larger than the diameter of the cylinder. The pistons must be mounted in such a way that the arrow on their bottom (the part adjacent to the valves) is turned towards the oil pump. The number of the connecting rod and piston must correspond to the number of the cylinder. Before installation, you need to separate the locks of the oil scraper and compression rings at an angle of 120 degrees.
- Turn the block over.
- We wipe the cylinder walls and crankpins with a dry cloth.
- Thoroughly lubricate the cylinder walls, the side surfaces of the pistons and the inside of the mandrel with oil.
- We place the mandrel on the cylinder and insert the piston and connecting rod assembly through it. We push the piston into the cylinder using a round wooden stick (hammer handle).
- Place the liner in the connecting rod cover and lubricate it with oil.
- We lay the block on its side and install the connecting rod cap so that the cylinder number on it and on the connecting rod are on the same side. We secure the cover with nuts.
- In the same way we mount the remaining pistons and connecting rods. After this, turn the cylinder block upside down and tighten all 8 nuts securing the connecting rod caps.
If you don't have a mandrel, you can cut it yourself from a piece of thick-walled steel pipe.
Rear wheel bearing for VAZ 2108: price, part numbers, dimensions - which one is better
Today there are many offers on the market, sometimes significantly different in price. Which rear wheel bearing for VAZ 2108 is better to buy? The answer is simple - it corresponds to the basic characteristics. Attention should be paid not to the price, but to the dimensions and manufacturer of the bearing.
In addition, the product must have a certificate of conformity to GOST 520-2002 or ISO 15:1998, protective holograms and be well packaged.
- The VAZ 2108 rear wheel bearing number in the international system is VA2B633313С.
- Marking (number) according to GOST: 6-256706AC17.
Note:
Low-quality Chinese fakes should be avoided, giving preference to original parts from Saratov Bearing Production (VBF) or Samara Production (SPZ-4). The table below will help you choose the right spare part.
Table of recommended manufacturers
| No. | Manufacturer | Catalog number | Price 2022, rub. | Equipment | |||
| Retaining ring | Dirt cap | Lock-nut | Instructions | ||||
| 1 | VBF Russia | 2108-3104020 | 500 | — | — | — | — |
| 2 | SPZ Russia | 2108-3104020 | 520 | — | — | — | — |
| 3 | SKF Sweden | VKBA1307 | 1900 | 2 | — | + | + |
| 4 | FAG Germany | 545312A | 600 | — | — | — | — |
Table - Dimensions of hub ball bearing 6-256706AC17
| Parameter | Unit | Value according to GOST (TU) |
| Hole diameter | mm | 30 |
| Outside diameter | mm | 60 |
| Width | mm | 37 |
| Dynamic load capacity | kH | 30,1 |
| Static load capacity | kH | 25,9 |
| Speed | rpm | 6500 |
| Axial clearance | mm | 0,06-0,09 |
| Steel type | — | SHH-15 |
| Hardness of rings and balls | H.R.C. | 61-65 |
| Type of lubricant | — | Litol-24 (S17) |
| Torque | H*M | 220 |
| Ring roughness | Ra | 0.32 |
| Weight | G. | 435 |
Assembling the flywheel, oil receiver and pump
It is important to install the flywheel so that the notch on it is located against the connecting rod cap 4, and the ring gear is adjacent to the clutch.
- Apply a thin layer of auto sealant to the bolts securing the crankshaft.
- We put the flywheel and its washer on the shaft and tighten the bolts securing it until it stops.
That's it, the flywheel is installed. We mount the oil receiver and engine crankcase.
- We change the seal ring of the oil receiver.
- Lubricate the new ring with oil.
- We put the oil receiver in its proper place and screw it to the oil pump.
- We fasten the part with 2 bolts to the second main bearing.
- Tighten the bolts.
- We cut off the excess parts of the oil seal holder and oil pump gaskets.
- Apply consistency to the lower edges of the block and glue the crankcase gasket.
- Carefully put the crankcase in place so as not to move the gasket.
- We secure the crankcase with bolts around the perimeter.
- We tighten all the bolts one by one.
Now you can rest, since the assembly is almost complete. And after the break, you need to return the pump to its place.
- We place the gasket on the pump and lubricate it with lithol or other grease.
- We install the pump with the markings facing up and screw the part to the block with 2 bolts.
That's all, the cylinder block is assembled. After this, you need to install the head, clutch, pulleys, timing covers, generator and other attachments on it.
Above are videos about dismantling and assembling the engine, which should be studied before carrying out work.
Engine repair is considered the most difficult thing in a car, because no other part contains such a huge number of interconnected elements. On the one hand, this is very convenient, because if one of them breaks down, there is no need to change the entire assembly; it is enough to simply replace the failed part; on the other hand, the more component elements, the more complex the device and the more difficult it is for those who I'm not very experienced in car repairs. However, with a strong desire, anything is possible, especially if your zeal is supported by theoretical knowledge, for example, in determining the tightening torque of the main and connecting rod bearings. If for now this phrase is a set of incomprehensible words for you, be sure to read this article before getting into the engine.
When is it time to change the camshaft
Emergency intervention in the operation of the VAZ 2114 8 cl camshaft is necessary in the event of any obvious malfunctions. Signs may be different, for example, a knocking sound is heard when the engine is running or problems with the seals. You need to check what’s wrong in such a situation immediately, either yourself or at a service station.
If you determine that the problem is in the seals, then 10 minutes will be enough for you to make a replacement. The oil seals are located in easily accessible places and installing a new one does not require dismantling large systems and components. If you don’t know which one you need to replace, you can check this simply by looking at which one is already installed.
A more complex malfunction may occur if you hear a knocking sound in the engine. This malfunction may not progress, that is, the knocking does not increase, while the readings of all sensors are normal. Some drivers take this calmly; they are not bothered by this state of affairs and continue to use the vehicle without paying attention to it. But the solution is simple: if your engine knocks, it means that the axial play of the camshaft has increased. In this case, you can put a washer between the camshaft and the cover and there is a high probability that the knocking will stop. A fairly simple way out of this situation.
Some cars are equipped with camshaft position sensors, whose task is to signal in case of malfunction or malfunction of the system. But sometimes sensors fail and may need to be replaced. It is inexpensive and the price of such a sensor on the market does not exceed $10, and you can find out which one to buy from the car’s instructions. Installing such a sensor is simple, so there is no point in stopping there.
Sliding bearings, their types and role in the operation of internal combustion engines.
Main and connecting rod bearings are two types of plain bearings. They are produced using the same technology and differ from each other only in the inner diameter (for connecting rod liners this diameter is smaller).
The main task of the liners is to convert translational movements (up and down) into rotational ones and ensure uninterrupted operation of the crankshaft so that it does not wear out prematurely. It is for these purposes that the liners are installed under a strictly defined gap, in which a strictly specified oil pressure is maintained.
If this gap increases, the engine oil pressure in it becomes less, which means that the journals of the gas distribution mechanism, crankshaft, and other important components wear out much faster. Needless to say, too much pressure (reduced clearance) also does not bring anything positive, since it creates additional obstacles in the operation of the crankshaft; it may begin to jam. That is why it is so important to control this gap, which is impossible without using a torque wrench in repair work, knowledge of the necessary parameters that are prescribed by the manufacturer in the technical literature on engine repair, as well as observing the tightening torque of the main and connecting rod bearings. By the way, the tightening force (torque) of the connecting rod and main bearing cap bolts is different.
Bearing Specifications
The product catalog number is 256706, it has the following characteristics:
- The diameter of the inner race is 30 mm.
- The diameter of the outer ring is 60 mm.
- Weight – 400 gr.
- Bearing width – 37 mm.
- Inside there are 28 balls with a diameter of 9.525 mm.
- Dynamic load capacity of at least 30.1 kN.
- Static load capacity 25.9 kN.
- The bearing operates normally at 6500 rpm.
There are only four manufacturers of these products in Russia:
- JSC SPZ (Saratov). Produces the highest quality and durable bearings. The cost is quite low.
- GPZ-23 (Vologda). It produces very good elements, which are slightly inferior to those from Saratov (denoted by the abbreviation VBF).
- Samara SPZ-4. The quality of the products does not differ, but the cost is very low.
- GPZ-20 in Kursk. The plant was engaged in the production of high-quality products; currently only copies of previous years of production can be found on the shelves.
Video.
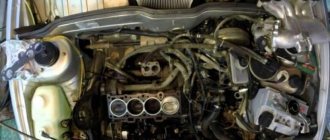
In previous articles I explained how you can remove the engine from a VAZ 2109 without removing the gearbox and disassemble it yourself at home. Now I will explain how to assemble it.
The engine was disassembled for repair, the reason for the repair was that the VAZ 21083 engine was burning oil. After disassembly, it turned out that the oil consumption was due to the high wear of the piston group; the block was bored to accommodate the pistons of the first repair, 82.4. The crankshaft turned out to be completely new; it was not ground; only the bearings were replaced with new ones. I also lapped the valve and replaced the valve seals; the head grinding is described in the article Grinding in the head valves of a VAZ-2108 up to 15
How to tighten main bearings and connecting rod bearings
So, taking into account the above, it becomes clear that the tightening torque of the main and connecting rod bearings is extremely important. Now let's move on to the assembly process itself.
- First of all, molar liners are installed in the bed of the molar necks. Please note that the middle liner is different from the others. Before installing the bearings, the preservative lubricant is removed, after which a little motor oil is applied to the surface. After this, the bed covers are placed, after which the tightening is carried out. The tightening torque should be that recommended for the specific model of the power unit. For example, for engines on the VAZ 2108 model, this figure can be from 68 to 84 Nm.
- Next, the connecting rod bearings are installed. During assembly, it is necessary to accurately install the covers in place. The specified covers are marked, that is, their arbitrary installation is not allowed. The tightening torque of the connecting rod bearings is slightly less compared to the main bearings (the indicator ranges from 43 to 53 Nm). For Lada Priora, the main bearings are tightened with a torque of 68.31-84.38, and the connecting rod bearings have a tightening torque of 43.3-53.5.
It should be separately added that the specified tightening torque assumes the use of new parts. If we are talking about an assembly that uses used spare parts, then the presence of wear or other possible defects may lead to a deviation from the recommended standard. In this case, when tightening the bolts, you can start from the upper bar of the recommended torque, which is indicated in the technical manual.
Engine assembly
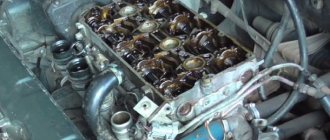
The engine begins to be assembled by installing the main bearings and crankshaft. Nowadays you can come across liners in different configurations, in the photo the liners are not very well equipped as there are no holes on the liner for the central crankshaft journal, and since this journal does not have a through hole, the lower liner will be starved of oil and this leads to faster wear of the crankshaft journal . So don’t be lazy and drill a couple of holes as shown in the photo below.
Photo. Correct installation of liners in the VAZ 21083 engine block.
Before installing the liners in the bed, carefully wipe the bed with a rag so that nothing gets under the liner; debris under the liner can lead to pinching of the crankshaft and poor heat transfer of the liner to the engine block. Install the half rings immediately as shown in the figure, lubricate the inserts with oil, and also lubricate the half rings inside with oil, then they will not fall out of their places.
Photo. The arrow shows the thrust half-rings of the VAZ 21083 engine
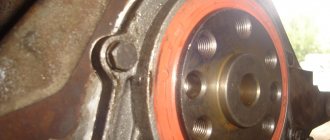
After installing the crankshaft into the block, be sure to check the longitudinal movement of the crankshaft, this can be done with a screwdriver as shown in the photo below, insert it from different sides, if there is movement of the crankshaft, then repair half rings are needed. Here you can already select one repair and the other standard, or lightly grind the half ring on a stone or sandpaper spread on a flat surface. Try to ensure that there is no longitudinal movement of the crankshaft; if there is longitudinal movement, the half rings may fall out during engine operation.
Photo. Checking the longitudinal movement of the crankshaft.
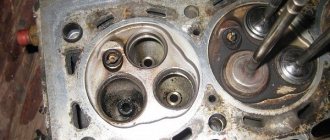
Now you need to put the crankshaft cushions in their places, each cushion must return to its place, you cannot install a cushion from another engine as it will be slightly different in the gap and can either clamp or give way. The photo below shows how to install the pillow correctly, note that the lock of the liner is placed next to the lock of another liner, the photo shows the installation of the third pillow with drilled holes. It doesn’t matter whether the holes are beautifully drilled or not, what is important is that oil will flow through them to the crankshaft journal.
Photo. Correct installation of the crankshaft cushion.
Immediately place all the cushions on the crankshaft but do not tighten, tighten the bolts. Now start tightening one cushion at a time, I always start with the third one, tighten it until the crankshaft is tight, turn it with a wrench as shown in the photo below. And so after each tightened pillow, try to rotate the crankshaft. You need to tighten the pillows well, but do not overdo it, as you can break the bolts. You can read more about the crankshaft in the article Repair of the crankshaft (crankshaft).
Diagnostics, signs of malfunction, causes of failure
With proper operation, the ball bearing itself can last a really long time - about 100,000 kilometers. However, there are a number of reasons why a part may become unusable much earlier. Among them:
- frequent driving at high speed on bad roads;
- improper installation without lubrication (resulting in overheating and increased wear);
- prolonged exposure to an aggressive environment (water, dirt, other abrasives or liquids that get inside);
It is easy to understand that the ball bearing has failed - a distinct noise or buzz appears in the area of the rear wheels. If you ignore the problem, vibrations will appear on the body, and in critical cases, a grinding noise in the rear, indicating that the assembly has simply fallen apart. It is simply unacceptable to wait any longer - the wheel may simply become blocked while driving, so it is necessary to immediately replace it.
Checking wheel bearings:
Fault definition:
Rear wheel bearing VAZ 2108 - unit design
The main details of the unit can be seen in the photo below:
- guide;
- rear hub;
- sealing element;
- retaining ring;
- wheel bearing;
- thrust ring;
- hub nut;
- moisture-proof element;
- external protective washer;
Before proceeding directly to removing the VAZ 2108 rear wheel bearing and installing a new part, you should stock up on the necessary tools. So, the list of necessary tools includes:
- a set of keys (a 30mm head is required);
- pliers or round nose pliers;
- wooden beam;
- jack;
- hammer;
- chisel;
- mount;
- To facilitate the process, you will also need a special puller and a vice.
Note:
In principle, you can do without the last point, but with such a set the replacement process will be as fast, convenient and effective as possible. In addition, the presence of a special puller will help to change not only the rear, but also the front wheel bearing, including not only on VAZ cars.
Installation of VAZ 21083 engine
Photo. Box boot VAZ 21083
You can immediately lubricate the release bearing with oil, preferably transmission oil or mixed with lithol; it can be pressed with a syringe through the slot shown in the photo below.
Photo. Release bearing of VAZ 21083 engine.
We install the engine as we removed it through the bottom without the head; this can be easily done at home with two people. To do this, pass a belt or rope under the engine, place a thick rag on the front of the car and using a pipe or crowbar you can effortlessly pull the engine onto the box, as shown in the photo below. Bolt the box, lift the engine, screw on the mount, the engine is installed, all that remains is to install the head.
Photo. Installing the VAZ 21083 engine through the bottom.