03/02/2022 17 506 Cylinder block
Author: Victor
The longevity of the cylinder head is determined by many factors - from proper use and timely maintenance to tightening the bolts of the device in accordance with a certain pattern. Therefore, it is important to know the tightening torque of the VAZ 2109 cylinder head and the sequence of task completion.
[Hide]
When is it necessary to puff?
On most injection and carburetor cars with engines of 8 and 16 valves, there is no need to tighten the cylinder head bolts during operation of the car. But in the case of the domestic “Nine”, it is necessary to correctly stretch the cylinder head and tighten the screws at least when carrying out maintenance of the machine. If it is discovered that moisture has begun to accumulate in the car at the point where the block itself comes into contact with the cylinders, then the bolts will need to be tightened. Since the appearance of moisture in this place indicates a possible leak of motor fluid.
For what reasons may a tightening be necessary:
- The device has been damaged due to engine overheating. Operating the motor in conditions of excessive temperature is fraught with serious malfunctions. The cylinder head of the power unit will need to be repaired, polished and then installed with tightening.
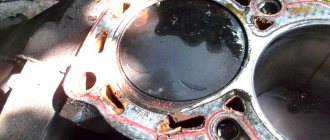
- The cylinder head gasket is damaged or has lost its tightness. If this problem is not resolved in a timely manner, engine fluid will enter the cooling system. A damaged gasket must be replaced. After changing the part, the head bolts must be tightened correctly.
- The engine has run for a certain time.
Tightening procedure for cylinder head bolts
The standard tightening pattern starts from the central screws to the edges. This rule must be strictly adhered to in order to avoid distortion or cracking of the aluminum “motor head”.
Typically the sequence of actions for a four-cylinder model looks like this:
The following motors can be classified as standard row engines:
- ZMZ 406/402;
- GAZ 53;
- D 260;
- K24Z3;
- YaMZ 236;
- D 240.
Since these units are similar in design, the general system is applicable to them. This category includes the Lada Priora with 8/16 valves Chery Tiggo, and the VAZ 2108. Only Japanese engines of Mazda cars, some Toyotas, Hondas and Mitsubishi raise doubts. Due to the high-tech, complex design, the sequence of actions may vary.
Working with a torque wrench
Extreme caution should be exercised when using DMC. The tool is sensitive to mechanical damage - it’s easy to lose the calibration and the tool will become unusable
Depending on the type of key, the principle and sequence of operation differs.
How is the tightening torque of VAZ 2109 bolts adjusted?
If it is necessary to tighten the cylinder head of a Nine engine, it is important to observe not only the strength and degree of tightening of the bolts, but also other conditions. Below we will look at how to correctly stretch the cylinder head on a VAZ 2109.
What will you need?
The procedure for tightening fasteners after removal and repair, as well as when installing the cylinder head, is carried out exclusively with a torque wrench.
A dynamometer is a tool designed to tighten the cylinder head screws of various engines.
In addition to the key, you will also need a caliper or a regular ruler.
User Marat Ibatullin made a video in which he clearly showed how the task of tightening the screws is performed.
Scheme of work
The order of tightening the bolts on cars with an injector or carburetor engine is determined by the manufacturer and is indicated in the service book for the car. According to the diagram, the pulling procedure begins with the central two cylinder head bolts.
The cylinder head bolts must be tightened as follows:
- First, you need to twist the screws with a force in Newtons of 2.0 kg/cm.
- Then the bolts are tightened to a torque of 7.5-8.5 kg/cm.
- After this, all screws must be tightened 90 degrees.
- At the end, each bolt is rotated 90 degrees again.
How to tighten the head screws of a VAZ 2109 block with your own hands:
- The torque wrench holder is placed in the zero position. This indicates that the instrument data corresponds to the moment of the initial position.
- Evaluate the indicators on the key before starting the tightening procedure.
- The tool holder can now be rotated. Monitor the readings as you complete the task.
- If it happens that the torque does not change during tightening, then the head mount may be stretched. This is quite normal, as it should be. First, use a wrench to tighten the screws to 2 kg/cm. Follow the tension sequence shown in the diagram.
- At the next stage, the covering is performed again in the same sequence. Only now the bolts need to be pulled to approximately 8 kg/cm.
- At the end of the procedure, the screws must be tightened once 90 degrees in a circle, and then again 90 degrees.
Channel RUS13 in its video showed how to install the cylinder head on a VAZ 2109 engine and tighten the bolts.
Tightening rules
What nuances should be taken into account when carrying out this procedure:
- Observe the appropriate tightening torque for the VAZ 2109 cylinder head.
- The use of wrenches and other tools is not allowed, since the degree of tension can only be determined using a dynamometer.
- To perform tensioning, only working screws are allowed. The bolts must meet the requirements of the power unit installed on the machine.
- Before completing the task, make sure that the holders are in good working order.
- If the cylinder head has been replaced or repaired, then the old bolts cannot be used for tension; new ones must be purchased. On sixteen-valve power units, it is allowed to re-use screws to fix the block head, but only if the length of the parts is no more than 9.5 cm. It is necessary to measure the length of the screw only with a washer. If the bolts are larger than 9.5 cm, they must be replaced.
- If the vehicle is equipped with an aluminum head, then the cylinder head is fixed with TTU type screws. They cannot be tightened because they are screwed into a thread with a certain degree.
- When purchasing a cylinder head gasket, you need to pay attention to the manufacturer's specifications. They often prescribe a certain tightening ratio required for specific gaskets. Please note that the indicated moment of force should not diverge much from the one applied during the work process.
- In power units equipped with aluminum cylinder heads, the tightening procedure is carried out on a cold engine. As for cast iron engines, in such internal combustion engines it is necessary to perform the tightening while it is hot.
Lada 2107 7up › Logbook › Two methods of tightening the cylinder head. Which one is correct? Let's figure it out.
I once had to climb into the engine and remove the head due to a burnt-out valve. Then the question arose: how to actually tighten the cylinder head according to science? In different manuals, this operation is described by two methods: 1. Tighten in several passes to a torque of 10.5-12 kg/m2. Pull up to 8 kg in several passes and then turn 90 degrees 2 times. Which method should you choose? The second method supposedly puts the bolts into elastic deformation mode, stretching them like a spring, while the moment goes beyond 13 kg/m. Being in a stretched state, the bolts compensate for the subsequent shrinkage of the gasket and tightening the bolts is no longer required. It goes without saying that re-tightening old bolts is fraught with entering the zone of plastic deformation and subsequent breakage. The fact that the bolts should be tensioned is in principle correct, but how can this be checked? Right! Moment! Having come to this conclusion, I decided to stall purely for the moment, and at the same time see how effective the second method would be. I took a click wrench marked up to 32 kg. I started with a smooth tightening from 2 kg in several passes and reached 11 kg and then the fun began. Each bolt began to live its own life. 70% of the bolts clicked when turned at the same angle, while the rest required turning more than 90 degrees to click. The cylinder head was previously milled and the plane of the block was carefully cleaned with a scraper. It turned out that the real compression of the gasket began only after 11 kg and took place in different areas with different intensities. If I had used the angle method, I would have gotten a scatter of moment across the entire plane and a bend in the cylinder head, which would have inevitably led to gasket burnout. Why is the gasket crimped at different speeds over its entire area? This may be due to the design features of the gasket itself; perhaps there is a curvature of the plane of the cylinder block. In any case, it is necessary to tighten solely using the torque on the torque wrench; this is the only way to guarantee tight and, most importantly, uniform pressing of the cylinder head plane to the block. At what torque should you turn? I settled on 13.5 kg, perhaps a bit too much, but good compression is guaranteed.
Mileage: 89100 km
Like 17 Subscribe
Video “Visual aid for tightening cylinder head screws on a VAZ 2109”
Engine Repair Channel! And interesting! published a video demonstrating the procedure for tightening the cylinder head bolts on a Nine with a description of all the nuances of this process.
Do you have any questions? Specialists and readers of the AUTODVIG website will help you ask a question
Was this article helpful?
Thank you for your opinion!
The article was useful. Please share the information with your friends.
Yes (83.33%)
No (16.67%)
X
Please write what is wrong and leave recommendations on the article
Cancel reply
Rate this article: ( 12 votes, average: 4.83 out of 5)
Discuss the article:
How to remove the cylinder head of a VAZ 2107
If you decide to change the cylinder head gasket or you have a burnt valve or other malfunctions, then you will have to partially disassemble the engine. And in this article I will tell you the entire sequence of actions so that you learn how to remove the cylinder head of a VAZ 2107 carburetor version and similar 2106, etc.
To begin with, we list the tools needed to remove the cylinder head: wrenches “13” “17” “21” spark plug wrench and a device for compressing the valve springs, as well as pliers and a screwdriver.
Before removing the part being repaired, you need to drain the coolant and loosen the clamps on the hoses leading to the cylinder head. Disconnect the high-voltage wires from the spark plugs. Next, disconnect the breather hose and remove the air filter. We unhook the choke cable from the carburetor, the gas cable, the wire going to the idle speed regulator, the hose of the vacuum regulator of the ignition distributor, the heating hose and unscrew the carburetor.
Unscrew the bolts of the intake and exhaust manifold. The next step is to remove the cylinder head cover and align the timing marks.
This procedure is done to speed up the assembly process. You can read how this is done in the article Replacing the timing chain on a classic. For engines with a belt, a similar procedure is performed. Unhook the wire from the coolant temperature sensor. Loosen the chain tensioner nut. Unbend the lock washer of the camshaft star bolt and unscrew it.
Remove the sprocket and secure the chain from falling.
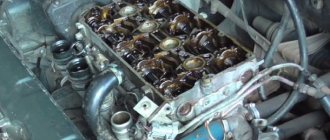
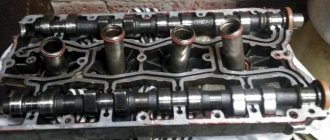
Remove the camshaft bearing housing, carefully, without dropping the washers, by unscrewing the 9 nuts. Now we see 10 bolts securing the cylinder head to the block inside and another one located outside. We unscrew them and the head is ready for dismantling.
Now you have learned how to remove the cylinder head of a VAZ 2107 and similar classic models. If you have any questions, please leave them in the comments.
Source
Replacement procedure
To replace the gasket, it is necessary, first of all, to completely dismantle the entire assembly, remove the seal that has become unusable and reassemble everything in the reverse order. At the final stage, it will be extremely important to tighten the bolts correctly.
The procedure is carried out in the same order for engines with both 16 and 8 valves. First of all, it will be necessary to disable the sensors that control the coolant temperature and oil pressure.
- before dismantling the thermostat, drain all the coolant;
- unscrew the housing protecting the air filter;
- the carburetor is left in place;
- disconnect the exhaust pipe at the muffler, on the side of the exhaust manifold.
After all this, you will need to remove the drive gear from the camshaft. Before this, the piston located in the first cylinder must be moved to top dead center (TDC).
Only after this is it possible to remove the casing and the drive belt itself, loosen the bolts securing the gear and remove it completely.
Now comes the turn of the electrical cables. In order to remove the block with the ignition wires, you will need to press the latch. The central high-voltage loop is switched off in the same way.
Next, you need to remove the fuel hose coming out of the pump - here you will need to disassemble the clamps holding it. Then the traction of both the air and throttle valve drives from the carburetor is disconnected.
You should also de-energize the solenoid valve - to do this, just disconnect all the wires leading to it. After this, remove the hose from the vacuum booster. The sleeves that supply heat to the interior are completely removed.
Only after all of the above can you remove the cylinder head. As a rule, to remove it completely, you will need to not only unscrew all the bolts, but also pull the entire assembly towards you several times.
After removing the gasket that has become unusable, it is necessary to clean all parts adjacent to it from fragments of rubber and other dirt. After this, everything needs to be wiped dry with a clean rag.
Before reassembling, you need to make sure that the bolts holding the cylinder head in place are the correct length. The thing is that they stretch out over time. The standard value is 13.55 centimeters. If they do not meet the requirements, they must be changed.
Start of work
The very first step is to remove the air filter. Of course, on a carburetor engine it is somewhat easier to remove it. If you have an injector, you will have to tinker with its rubber fasteners. But the essence remains the same - it is necessary to disassemble the fuel system completely to get to the cylinder head. But we will look at the example of not an injection, but a carburetor seven. Still, there are many more classic cars with such a power system.
We recommend: Fixing the problem with low beam lamps on the Lada Kalina
It is advisable to dismantle the carburetor, since if you remove the head along with it, you can accidentally damage it. On all classic series cars, the carburetor is removed in the same way. This procedure is quite simple, but it will take some time. Now you can unscrew the nut securing the distributor and remove the distributor along with the wires. Getting closer to the engine, all that’s left to do is drain the antifreeze from the system.
And then turn off all the pipes that you see. After this, it will be possible to dismantle the cylinder head cover. It is secured with nuts and shaped washers. Don't lose them during repairs. That's all, the preparation is complete, you can begin the most difficult part - dismantling and installing the cylinder head.
Video “About heavy cylinder head”
In this video, an experienced specialist explains in detail how to properly carry out work on the cylinder head and what tools are needed for this. On the VAZ 2109 they follow the same pattern.
The longevity of the cylinder head is determined by many factors - from proper use and timely maintenance to tightening the bolts of the device in accordance with a certain pattern. Therefore, it is important to know the tightening torque of the VAZ 2109 cylinder head and the sequence of task completion.
When is it necessary to puff?
How is the tightening torque of VAZ 2109 bolts adjusted?
Video “Visual aid for tightening cylinder head screws on a VAZ 2109”
Comments and Reviews
The order of tightening the cylinder head bolts of VAZ 2112 16 valves
Reference sequence of actions.
- Completely degrease the flat surfaces of the block and head and allow to dry.
- Remove all debris and dust from the bolt sockets. If there is debris left inside, you won’t be able to tighten the studs all the way, as this could result in the threads being licked.
- Calibrate the guides and install a new seal. Only a metal gasket is used; the use of sealants, adhesives, and oils is strictly prohibited.
- Prepare the cylinder head for docking, pre-install and lubricate all components.
- Place the head on the gasket and lower the studs into the seats, after wetting them with a thin layer of motor oil.
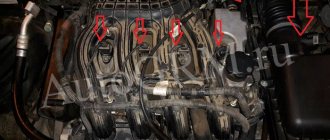
- Tighten the bolts in the sequence shown in the figure with a force of 20 N/m. (this is the first round)
- Next, rotate the elements 90 degrees and leave them alone for 3 minutes.
- By analogy, repeat point No. 7.
After this, you can continue assembling the motor as normal.
Step-by-step instructions for replacing the cylinder head gasket
The design features of the Niva Chevrolet make it possible to remove the cylinder head without good access from below. However, the presence of an inspection hole or lift greatly facilitates access to some nuts and the coolant drain valve. There is no need to remove the engine, but it is advisable to clear the space under the hood of interfering hoses and wires.
For repairs you will need the following tools:
- set of keys and socket heads;
- powerful wrench, ratchets, extensions;
- hammer;
- flat screwdriver;
- head or special wrench 38 for cranking the crankshaft;
- torque wrench;
- brake pipe wrench (suitable for oil line).
Conventionally, all work on replacing the cylinder head gasket on a Niva can be divided into 2 stages: removing all attachments and all electrical sensors from the cylinder head, removing the timing mechanism and attaching the head to the cylinder block.
Procedure for removing the cylinder head of a Chevy Niva
The work algorithm is as follows:
- Drain the antifreeze from the radiator and engine block. To do this, unscrew the plug on the block with a 13 key. In this case, there is no need to drain the oil from the crankcase. Remove the terminal from the battery. We move the gearbox to neutral position.
- While the coolant is draining, we begin to disassemble the engine from the hood side. We unscrew the throttle valve, remove the throttle cable, remove the wires from the spark plugs, disconnect the electrical connectors of the injectors, TPS, IAC, oil pressure and coolant temperature sensor.
- Now you can disconnect all the cooling system hoses going to the thermostat, heater core and throttle body heating. Remove the brake booster hose from the intake manifold.
- We take the engine wiring harness and all removed hoses to the side and secure them if necessary.
- We unscrew the protective screen of the exhaust manifold, loosen the 4 nuts securing the exhaust pipe to the exhaust manifold. For the convenience of further actions, the exhaust pipe can be removed from the lower mounts and completely lowered under the car.
- On a Chevy Niva with power steering, the pump mounting bracket will interfere with us. It is not necessary to remove it completely - just unscrew the fastening bolts and carefully hang it on the wire.
- Now you can start opening the engine. Remove the valve cover. Using a special wrench, unscrew the oil line to the hydraulic compensators and chain tensioner.
- Set the piston of the first cylinder to TDC until the marks align by turning the crankshaft. Loosen the chain tensioner and unscrew the top sprocket. We immediately fix it in this position with wire to prevent the circuit from jumping and phase failure.
- Unscrew the 10 nuts securing the camshaft housing with bearings. You need to unscrew evenly around the entire perimeter (according to the tightening order in the instructions). Remove the assembly from the engine.
- Access to 10 cylinder head mounting bolts is now open. You need to tear them off with a wrench, starting from the middle and moving to the outer bolts. The bolts are removed from their places and checked for thread condition and possible elongation (no more than 117 mm).
- Gently tapping and prying from below with a screwdriver, pull the cylinder head out of its place. After which you can remove it from the engine along with the collectors. The mass of this unit allows you to perform the operation yourself.
After removing the old gasket, possible damage and wear of the surfaces are assessed. If no repairs are required, the valves do not have carbon deposits, and all dimensions are within tolerance, then you can immediately begin replacing the cylinder head gasket and assembling the engine.