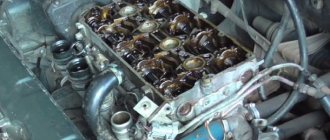
1. Drain the engine coolant
2. Remove the ends of the high-voltage wires from the spark plugs.
3. Remove the cylinder head cover
4. Remove the camshaft pulley
Cap bolts are available with the camshaft installed, but require a socket wrench with a special head. The cylinder head can be removed along with the receiver and exhaust manifold. But if the head is removed for repairs, it is better to disassemble it first
5. Remove the thermostat housing from the cylinder head studs
6. Unscrew the nut and bolt of the upper fastening of the rear timing belt cover
7. Using a Togx E14 wrench, unscrew the 10 cylinder head bolts evenly in several steps.
8. Carefully move the rear timing belt cover to the side and remove the cylinder head.
9. Remove the cylinder head gasket and remove the two guide bushings from the seats.
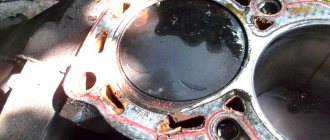
1. We wash the cylinder head from dirt and deposits with kerosene or diesel fuel.
2. Using a medical syringe or blower, remove the remaining oil and coolant from the threaded holes in the cylinder block (for the cylinder head bolts.
3. We clean the mating surfaces of the cylinder head and cylinder block from the remains of the old gasket, and degrease the surfaces with a solvent.
Always use a new gasket when installing the cylinder head. Oil should not come into contact with the gasket surface.
4. Install the head guide bushings into the slots in the cylinder block.
5. We put the gasket on the cylinder block, while the guide bushings should fit into the corresponding holes in the gasket.
6. Install the head onto the cylinder block. By slightly moving the head from side to side, we make sure that the guide bushings fit into the corresponding holes in the head.
Reuse of cylinder head bolts is only permitted if their length does not exceed 135.5 mm.
Bolt tightening sequence
8. Before screwing in, moisten the threaded part of the bolts in engine oil, then let the oil drain after about half an hour.
9. Install the bolts and washers into the head holes.
10. Using a torque wrench, tighten the head bolts (in the sequence shown in the photo) in four stages:
— tighten the bolts to a torque of 20 Nm (2 kg-m);
- tighten the screws to a torque of 69.4 - 85.7 Nm (7.1 - 8.7 kg);
— turn the bolts 90*;
— turn the bolts 90* again.
11. Further assembly is carried out in the reverse order of removal.
To perform the work, you will need a special template or a wide forging ruler, a set of flat feeler gauges - a device for lapping valves, and lapping paste.
1. Remove the cylinder head
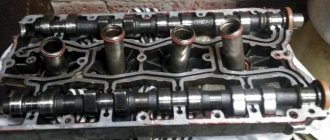
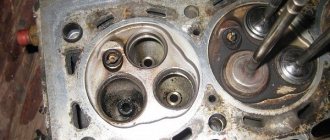
2. We clean the block head from dirt and carbon deposits, rinse it from oil deposits, and remove carbon deposits from the walls of the combustion chambers with a wire brush.
3. Carefully inspect the cylinder head. There should be no cracks on them. The working surfaces of the camshaft bearings and the walls of the thrust holes must be free of scratches and traces of metal coating. The valve guides and seats must fit snugly against the cylinder head body, with no signs of displacement during valve timing. Valves and their seats must not have cracks or burns.
4. Check the flatness of the head.
This requires a special pattern, but if it is not there, the lower plane of the head attachment can be checked with reasonable accuracy using a wide blacksmith's ruler.
The template (ruler) is applied with its edge to the mating plane diagonally to the head.
Make sure that there is no gap between the edge of the template (ruler) and the plane of the head. The gap can be observed both in the central part of the plane and along its edges. Distance measurement is carried out along both diagonals using a set of flat probes.
The maximum permissible distance is 0.1 mm.
If the gap is greater than permissible, the head must be replaced.
5. Check the tightness of the block head. To do this, close the window for supplying coolant to the thermostat with a plug on the end surface of the head.
6. Turn the head upside down and fill the internal cavities for coolant with kerosene.
7. Make sure that kerosene does not leak from the block head.
If the kerosene level in any of the chambers drops, it means that one or both valves are leaking.
If a leak is detected, the cylinder head must be repaired or replaced.
Lada Granta valve grinding
1. Remove the valve stem seal
2. Remove the valve from the guide sleeve.
3. Apply lapping paste to the valve edge.
4. Install the valve into the block head and attach the valve grinder to the valve stem.
5. While pressing the valve against the seat, rotate it from side to side. After 10-15 movements, turn the valve 90 * and continue grinding.
6. Lapping is carried out until a uniform ring mark is formed on the valve plate.
7. Remove any remaining lapping paste from the valve and valve seat.
8. Grind the remaining tubes in the same way.
9. After grinding in, recheck the tightness of the valves
10. If the kerosene does not disappear, install new valve stem seals and valve in the reverse order of removal.
Experts consider the VAZ 11186 engine as a modernization of the 21114 engine, a minor modification of the 21083, or an improvement in the characteristics of the 11183 internal combustion engine. The first option is considered more correct, since the design of the 11186 and 21114 are absolutely identical, with the exception of the pistons. Engine 11186 is equipped with AvtoVAZ products, and the previous version of the internal combustion engine was equipped with pistons produced by Federal Mogul (USA), which developed it under a contract with the Volzhsky Automobile Plant.
Performing the operation without a torque wrench
Since the force is precisely indicated on all of these vehicles, it is impossible to do without a torque wrench when seating the cylinder head. But on some cars it is quite possible to do without it and use ordinary wrenches and an extension socket to tighten it.
Let us immediately note that performing work without special equipment. The tool is allowed only on “old” engines (Moskvich, VAZ of the first models).
A feature of tightening the cylinder head without a torque wrench is the need to “feel” the force applied. Otherwise, the general method of work is the same as using special equipment. tool:
- We tighten all the bolts by hand;
- We do the 1st approach, applying medium force (we try to pull all the bolts with the same force, smoothly and without jerking). Be sure to follow the tightening order;
- We carry out the second approach, increasing the force (in order to more accurately “feel” the force, the key with an increased shoulder should be pulled “toward” rather than pushed “away”);
- We do the third approach with high force (turn until the bolt stops).
One of the options for tightening without a torque wrench is to double tighten the fasteners after completing the 2nd approach.
Since not everyone can “feel” the applied force without the skills, it is better not to use the method without a torque wrench, because the consequences of improperly tightening the cylinder head are quite serious and can lead to very serious damage.
Therefore, before engine repairs involving removing the cylinder head, you should stock up on a special tool, especially since it will not be superfluous and there will always be a use for it.
Tightening the cylinder head
What cars was it used in?
Engine 11186, created in 2011, is used as an engine for several models of the automaker AvtoVAZ:
- Lada Kalina II - station wagon, sedan;
- Lada Granta (Lux and Norm equipment) - liftback, sedan;
- Lada Priora - sedan, station wagon, hatchback;
- Lada Largus - minivan, station wagon, van;
- Lada Vesta - station wagon;
- Lada XRay is a compact crossover / high sedan.
The best characteristics of the engine allow it to be used in any front-wheel drive vehicle when changing, rather than tuning, the engine.
Instructions for tightening cylinder head bolts
As mentioned above, we use exclusively a torque wrench to tighten the cylinder head. It is impossible to tighten the cylinder head with the required force with open-end or ring wrenches, even if you use additional tools, a crowbar or a pipe.
How to properly tighten the cylinder head bolts?
The dynamometer located near the handle shows how much force was applied when tightening, and this requirement must be met accurately. A slight deviation from the requirements is allowed, about 0.5 kg/m.
After you take the torque wrench, remember the second requirement - the order in which the cylinder head bolts (nuts) are tightened. The order is a certain scheme that must be strictly followed.
The central nuts (bolts) are tightened first, and then we gradually move to the edge of the cylinder head.
There are several head tightening patterns, and all of them are correct. The main thing is to follow the “iron” rule: tighten the bolts (nuts) in pairs from the center to the edges. And don’t try to tighten it completely right away, as this can warp the head. Tighten in three stages: first tighten the bolts (nuts) slightly, then tighten them strongly, and then finally tighten them firmly. For the first tightening, set the key dynamometer to 3 kg/m, then more. The intermediate puff should be “sounded” by a characteristic crackling sound. This sound means that the nut (bolt) is tightened correctly. Experienced mechanics recommend tightening bolts (nuts diagonally).
After this, finally tighten the cylinder head, and the engine can be operated. The torque wrench is set to the maximum position required by the repair manual for the vehicle.
Important! After the clicks, during final tightening, you cannot pull the bolts (nuts) any further! This will lead to thread failure
Cylinder head and valve mechanism (eng.) (disassembly, repair, replacement of cylinder head gasket)
After tightening the cylinder head, let it settle. In order not to waste time, you can still screw on the manifold and other equipment removed during disassembly, tighten the chain, etc. After waiting 30-40 minutes, take a test puff.
The fact is that the gasket, which is placed between the cylinder head and the engine block itself, tends to “shrink,” that is, fill the irregularities and grooves that are on the surfaces of the cylinder head and the block, although they are not noticeable to the naked eye. If you ignore the control tightening, then in the near future the gasket will “squeeze through”, and the engine repair will have to be repeated.
And further! After a short run on the repaired engine (no more than 100 km), you should tighten the bolts (cylinder head nuts) again; this must be done, because “when it’s hot,” that is, when it warms up, the gasket may “shrink” again.
That's all the instructions that will help the car enthusiast independently tighten the car's cylinder head. The main thing is not to confuse the tightening sequence and avoid jerking when operating the torque wrench.
If you follow our advice, tightening your car's cylinder head will be quick, save you money (you won't have to go to a service station) and ensure long and reliable operation of your car's engine.
Something else useful for you:
What force and tightening torque should be for the Grant wheel nuts?
The values for the tightening torque of the wheel nuts for this car are indicated above. And the tightening torque of the wheel bolts on the Lada Grant is 105-120 Hm. For cars with a liftback body this value is 70-90 Nm.
Is there a difference in the tightening torque of the front and rear wheels?
The front and rear wheels of the vehicle should be tightened with the same force. This rule also applies to each of the wheel bolts. For them, the tightening torque of the Grant wheels should not be different.
How to tighten Granta wheels to the required torque
To tighten the Granta wheels to the required torque, you will need a torque wrench. It should only be used with a test tightening. At the beginning of the process, you will need a regular spray bottle.
Torque wrench
Before the procedure, the car is placed on a flat, hard surface. To prevent involuntary movement, it must be secured with a hand brake. After installing the wheels, the bolts must be inserted into the mounting holes.
They must be screwed clockwise. The work should be done crosswise. You need to start tightening the bolt by hand. Next, tighten with a wheel wrench with sufficient force.
Tightening is carried out gradually. In this case, it is necessary to control the reliability of twisting by rocking the wheel. When the wheel is already tightened sufficiently, you should finally tighten it with a torque wrench to the required torque.
When using the tool, you must follow the rules:
- A torque wrench is used for control tightening. It should not be used as a regular spray gun.
- The key must be selected so that its maximum force is slightly greater than necessary.
- Before broaching, make sure that the exact tightening torque is known. It needs to be set on the instrument.
- Use a wrench to check the tightness of all bolts in a circle.
Proper use of a torque wrench and precise setting of the torque eliminates under-tightening or over-tightening of wheel elements.
Junsun recorder for Android with GPS and Sim card
More details
Restorer-polish for plastic, rubber and leather
More details
German autobuffers Power Guard. Increase ground clearance, reduce wear.
More details
Radar detector + Recorder for 2 cameras + GPS
More details
Sun protection frame blinds with magnetic fastenings
More details
AvtoShark Store
wheel bolt tightening grant tightening torque rear wheel hub nut tightening torque
What does cylinder head tightening affect?
Similar work (tightening) is done when the reverse process of assembling a car engine is carried out. And how correctly, securely and firmly the cylinder head bolts are tightened can greatly affect the operation of the combustion chamber, gas distribution mechanism and the engine as a whole.
If the cylinder head is tightened incorrectly, or in the wrong sequence, or loosely, this may result in a puncture of the gasket, which is installed between the cylinder head and the cylinder block. Once the gasket is damaged, the consequences are difficult to predict correctly. Most often, after this, water from the cooling system gets into the engine oil. The result is an emulsion that lubricates engine parts much worse than motor oil, and therefore the engine can quickly “seize.”
In addition to water getting into the engine oil, engine power may sharply decrease, engine noise may sharply increase, etc. In any case, nothing good will happen after improperly tightening the cylinder head.
To tighten the cylinder head bolts with sufficient force, be sure to use a special tool, in this case a torque wrench. It has a special scale that will allow you to determine the force with which you need to tighten the cylinder head bolts. Each motor has its own tightening parameters; you will learn them from the repair manual for the motor of this machine.
Next, we will try to explain in detail and demonstrate in photos the key points on how to correctly and securely tighten the cylinder head bolts in order to ensure reliable and proper operation of the car engine for a long time.
Countersinking saddles
When repairing the cylinder head yourself, be prepared for the most monotonous and lengthy process - countersinking. A lot depends on its quality:
- tight fit of the valve to the seat;
- compression ratio in the combustion chamber.
The seat grinding work is carried out with a special tool - a roller cutter (less often - a countersink). With its help, a not quite finished seat can be given the desired shape so that the valve fits more tightly. Start work with a countersink at 60 degrees.
As soon as metal removal has begun in a circle, change the nozzle - take a countersink with a cone angle of 120 degrees. Work with it until a clear round edge appears. The final stage of countersinking is done with a 90-degree cone - it should go through the working chamfer of no more than 1.5 mm. Further grinding of the valve will increase it to the required value.
Purpose and structure of the cylinder head
Modern cars overwhelmingly use various types of fuel to perform work due to its combustion. Ignition of the air-fuel mixture occurs in an internal combustion engine.
When fuel detonates in the combustion chamber, the mixture “explodes” and gases are released, which push the piston to bottom dead center. In order for the engine to operate correctly, all exhaust gases are discharged into the atmosphere through the exhaust manifold. For this purpose, the engine design includes a gas distribution system.
The most important component of this mechanism is the cylinder head
The cylinder head of the timing mechanism is designed to provide a seal between the piston and the surface of the engine combustion chamber.
Depending on the design of the car engine, cylinder heads may be made of cast iron or lighter aluminum. The cylinder head is usually shaped by casting. Design features may vary, but basically the head contains parts such as:
- combustion chambers;
- valves (there are intake and exhaust valves, depending on their purpose - the intake valves allow access to the working mixture of fuel and air into the cylinder, the exhaust valves ventilate the cylinder by pushing the exhaust gases into the exhaust manifold with a piston);
- section of the gas distribution mechanism;
- cooling jacket;
- casting for injectors or spark plugs;
- oil channels.
A gasket is usually installed between the cylinder block and the head, which prevents the breakthrough of gases from under the combustion chamber, as well as oil and coolant from the channels connecting the cylinder head and the block itself.
About the forces acting on the cylinder head during engine operation
When a car engine is running, the head is exposed to high pressure (due to the compression stroke in the combustion chamber, the pressure can reach up to 15 atmospheres), high combustion temperature of the mixture (about 550-600 ºC), and vibration from the crank mechanism.
A gasket of a certain thickness is installed between the cylinder block and the head - when the head bolts are tightened, this thickness decreases (shrinks) and the cylinder head fits tightly to the engine body. But during tightening, the head tends to deform by thousandths of a millimeter, so the bolts are always tightened in a certain order.
Forces acting on the cylinder head during bolt tightening
In the process of tightening the bolts at their fastening points, the pressure on the surface increases significantly, which in turn leads to a V-shaped deformation of the “sole”. If the tightening order is not followed, as well as with an unregulated torque (force), installation of the head can lead to burnout of the gasket due to gas breakthrough, which will lead to more serious consequences.
Design Features
By default, the 11186 engine retains all the design features of the original 21114 from which it is derived:
- volume 1.6 liters;
- block height is 2.3 mm higher than 2110;
- a crankshaft with an increased crank radius by the same 2.3 mm (piston stroke 75.6 mm, respectively);
- ShPG, flywheel and crown from 2110.
In addition, a feature of the 11186 engine is the curvature of the valves on the pistons when the timing belt breaks:
- the piston skirt is reduced here to make it lighter;
- It is physically impossible to make a deep hole for the valve inside the piston.
It contains the manufacturer's instructions describing the components and parameters of the internal combustion engine, which are most often compared with the characteristics of the 11183 engine, which has the most similar markings. The main differences between these drives from the same manufacturer are:
- torque is 15 Nm more;
- power 87 hp together instead of 82 hp;
- engine 11186 has been produced since 2011, and its predecessor 11183 - since 2004;
- instead of serial pistons 2110 weighing 350 g, a lightweight version 21116 weighing 240 g is used;
- connecting rod length increased from 121 mm to 133.32 mm;
- the piston skirt has a graphite coating, in the area of the first ring the metal is anodized;
- combustion chamber 30 cm 3 instead of 26 cm 3;
- compression ratio increased from 9.6 to 10.5;
- the cylinder head gasket is completely metal, its thickness has been reduced from 1.2 mm to 0.43 mm;
- the cylinder head is 1.2 mm higher to compensate for the increase in the combustion chamber;
- the bolt diameter was reduced from M12 to M10 to reduce cylinder deformation when tightening;
- The diameter of the flow channels in the cylinder head was increased, nozzles were installed to cool the piston heads;
- the working chamfer under the valves is maintained longer due to the strengthening of the aluminum alloy using a special technology;
- Since the recesses on the pistons are not enough to ensure valve safety, a high-strength Gates timing belt is used;
- the camshaft V-belt received an automatic tensioner, which had not previously been used in VAZ engines;
- the piston system is protected externally from overheating by a cooling jacket built into the cylinder block;
- the length of the receiver channels has increased, the characteristics of the internal combustion engine are close to those of a 16-valve engine;
- the collector has a flattened block, which made it possible to dilute the air ducts and eliminate power losses and turbulence;
- the generator is mounted on a bracket, so its drive belt is not too tight, like 11183, it lasts longer;
- The cabin heat exchanger and the expansion tank are connected in parallel to the thermostat, the operation error has decreased to 2 degrees instead of 5 degrees.
According to the AvtoVAZ plant, the internal combustion engine 11186 has a potential of 120 hp. (without resource reduction) or 180 l together with. (the resource will be reduced due to intense wear of the piston). The manufacturer recommends tuning only by modifying components and mechanisms without the use of turbines.
Video “About heavy cylinder head”
In this video, an experienced specialist explains in detail how to properly carry out work on the cylinder head and what tools are needed for this. On the VAZ 2109 they follow the same pattern.
Tightening the cylinder head is an important and responsible procedure. This operation is performed during engine reassembly after removing the cylinder head.
Correct tightening of the cylinder head bolts affects the serviceability and performance of the power unit, since the head is part of the combustion chamber. In other words, after tightening, the cylinder head is a single unit with the cylinder block. A sealing gasket is additionally installed between the block and the block head. If the head is not tightened correctly, there is a high probability of damage to the cylinder head itself, the gasket, the head bolts and the bolt holes in the cylinder head.
In some cases, leaks appear at the gasket installation site. Also, if the cylinder head does not fit tightly during operation of the internal combustion engine, exhaust gases may leak into the channels of the engine lubrication and cooling system, and antifreeze may also enter the oil and vice versa. As a result, the properties of the lubricant and coolant change, which can quickly damage the engine. Next we will talk about what order of tightening the cylinder head bolts must be followed, how the cylinder head bolts are tightened with a torque wrench, and also what the head tightening force should be.
Read in this article
Payment via WebMoney
After selecting payment via WebMoney, the payment system will launch, where you need to select the payment method: bank card or WebMoney wallet.
If you already have a WebMoney wallet, then you need to log into it and make a payment.
If you do not have a WebMoney wallet and you want to pay in another way, you need to select any of the methods that WebMoney offers and make the payment
After specifying payment details and confirming payment, payment for the goods will occur.
Maintenance
In accordance with the manufacturer's regulations, engine 11186 must be serviced in the following order:
| Oil consumption | maximum 1 l/1000 km |
| Engine oil for 11186 | 5W-30 and 10W-30 |
| Engine oil volume | 3.5 l |
| Operating temperature | 95° |
| Motor life | stated 150,000 km |
| Adjustment of valves | washers between camshaft cams and tappets |
| Cooling system | forced, antifreeze/antifreeze |
| Coolant quantity | 7.8 l |
| water pump | polymer impeller |
| Candles for 11186 | BPR6ES, A17DVRM |
| Gap between spark plug electrodes | 1.1 mm |
| Timing belt | 163 teeth, pitch 8 mm, belt width 26.7 mm |
| Cylinder operating order | 1-3-4-2 |
| Air filter | Nitto, Knecht, Fram, WIX, Hengst |
| Oil filter | catalog number 90915-10001 |
| Flywheel | from 2110, steel crown placed on a cast iron body |
| Flywheel mounting bolts | MT box – M10x1.25 mm, length 26 mm, groove 11 mm |
| Valve stem seals | code 90913-02090 light inlet |
| Compression | 13 bar |
| XX speed | 650 – 750 min -1 |
| Tightening force of threaded connections | spark plug – 18 Nm |
| Maintenance object | Time (year) or mileage (1000 km), |
which comes first
This is exactly the frequency of maintenance that the ICE 11186 device is designed for.
What is a torque wrench used for?
A certain tightening torque on the mating parts is necessary for uniform contact of the planes. In addition, if a gasket is installed along the contour, the uneven force of the bolted connections can destroy it.
A torque wrench allows you to tighten bolts with an accuracy of hundredths of a millimeter. In addition, it is often necessary to perform torque tightening of the bearing seat with high precision.
The manufacturer calculates torque values based on the type of material and design features of the unit. When building a car at a factory, all fasteners are tightened according to specifications: as a rule, this work is performed by assembly robots.
Consequences of retightening the cylinder head bolts
If the threaded connections of the block head are tightened with a force exceeding the nominal force, then the tensile force that acts on the bolt or stud will begin to destroy the threads in the block or pull out the body of the fastener. The so-called yield point occurs, when with a further increase in the tightening force, the pressing force begins to decrease. Result: rapid burnout of the gasket at the point of worst compression.
If the threads in the holes of the block are severely damaged, then they will no longer be able to provide the necessary pressure on the head at the correct tightening torque. It will need to be restored, and this is an additional cost. Experienced motor repairmen in practice feel the maximum tightening force that a threaded connection can withstand. They will never allow defects from overtightening bolts or nuts.
What happens if you don’t tighten the cylinder head bolts enough?
If the head is fastened with minimal force, this will lead to weak pressing of it to the surface of the cylinder block. Microscopic gaps form between the gasket and the adjacent planes of the block and head, which will certainly lead to burning of the sealing material.
Rear suspension Lada Kalina / Lada Kalina (VAZ 1118, 117, 1119)
Tightening torques for threaded connections
Name of units and parts
Rear wheel bearing nut
Bolt nut for the lower shock absorber mounting to the rear suspension arm
Nut securing the rear suspension shock absorber rod to the body
Nuts of bolts securing the rear suspension arm to the bracket
Nuts securing the rear suspension arm bracket to the body
The rear suspension of the car is semi-independent, made on an “elastic” beam with trailing arms, coil springs and double-acting telescopic shock absorbers.
The rear suspension beam consists of two trailing arms connected by a U-shaped cross member. This cross-section provides the connector (cross member) with greater bending rigidity and less torsional rigidity. The connector allows the levers to move relative to each other within small limits. The levers are made of pipes of variable cross-section, which gives them the necessary rigidity. Brackets are welded to the rear end of each lever for attaching the shock absorber, rear brake assembly and wheel hub axle. At the front, the beam arms are bolted to removable brackets for the body side members. The mobility of the levers is ensured by rubber-metal hinges (silent blocks) pressed into the front ends of the levers.
The lower shock absorber eye is attached to the beam arm bracket. The shock absorber is attached to the body by a rod with a nut. The elasticity of the upper and lower connections of the shock absorber is provided by a rod cushion and a rubber-metal bushing pressed into the eye. The shock absorber rod is covered with a corrugated casing that protects it from dirt and moisture. In the event of suspension breakdowns, the shock absorber rod stroke is limited by a compression stroke buffer made of elastic plastic.
The suspension spring with its lower coil rests on the support cup (a stamped steel plate welded to the shock absorber body), and with its upper coil it rests against the body through a rubber gasket.
The rear wheel hub axle is installed on the flange of the beam arm bracket (it is secured with four bolts). The hub with a double-row roller bearing pressed into it is held on the axle by a special nut. The nut has an annular collar that securely locks the nut by jamming it into the groove of the axle. The hub bearing is a closed type and does not require adjustment or lubrication during vehicle operation.-
Rear suspension shock absorber spring: 1 - spring; 2 — rubber gasket; 3 — casing cover; 4, 10 — shock absorber rod cushion; 5 — spacer sleeve; 6 — shock absorber casing; 7 - nut; 8 — spring washer; 9 — support washer; 11 — shock absorber rod; 12 — shock absorber body; 13 — lower spring support plate; 14 — nut of the shock absorber lower mounting bolt; 15 - eye; 16 — bolt of the lower shock absorber mounting; 17 - compression progress buffer
Procedure for replacing the cylinder head gasket on a VAZ 2109-2108
The gasket may remain either on the surface of the head or stick to the block itself. You can try to remove it by hand without using any tools, and if that doesn’t work, you can carefully pry it off with a flat-head screwdriver without damaging the surface of the part.
Carefully inspect the surface of the cylinder head and if pronounced traces of corrosion are found on it, especially in close proximity to the coolant channels, then it is necessary to repair it: milling, grinding, etc. If everything is normal, then we remove traces of the old gasket using special means:
We wait a few minutes until the whole thing has cooled down and remove the residues that have not succumbed to the chemicals, if any remain, with a razor blade. Then we wipe everything dry and you can even degrease it so that no foreign traces remain on the surface:
The engine block also needs to be cleaned and then a new gasket installed on it.
It is important that the holes in the gasket coincide with the guides, which are located at the corners of the block:
Payment via Portmone
After selecting payment through Portmone, the payment system will launch, where you need to select the payment method: bank card or Portmone account.
The price in the Portmone payment system is converted into dollars at the exchange rate of the Central Bank of the country where you are located.
If you have a bank card in a currency other than the dollar, then the money will be debited from the card at the rate of the Central Bank of your country at the time of the purchase.
After specifying payment details and confirming payment, payment for the goods will occur.
Replacing the cylinder head gasket on VAZ 11183, VAZ 21116 and VAZ 11186 Lada Granta engines
Tools:
- 5 mm hex key
- Ratchet wrench
- Extension
- 8 mm head
- 10 mm head
- 13 mm head
- Torx head E14
- 15 mm straight box spanner
- 17 mm straight box spanner
- Curved box spanner 8 mm
- Torque wrench
- Driver for socket attachment
- 17mm wrench attachment
- Medium flat screwdriver
- Medium Phillips screwdriver
- Screw jack
- Wheel key
- Special wrench for turning the tension roller (or circlip remover)
- A key for fixing the camshaft pulley (or an extension for the end attachment on the wrench)
- Knife (or scraper)
- Funnel
- Universal puller (if necessary)
- Calipers
- Valve adjustment tool
- Tweezers
- Micrometer
Parts and consumables:
- Shoe - 2 pcs.
- Technical capacity
- Coolant
- Head gasket
- Head bolts (if necessary)
- Engine oil
- Shims (if necessary)
- Rags
If a leak of engine oil or coolant is detected at the junction of the cylinder head with the cylinder block, remove the head and replace its gasket. A leak can also occur due to warping of the block head due to overheating. The cylinder head gasket of the VAZ 11183 engine is made of metal asbestos sheet, and on the VAZ 21116 and VAZ 11186 engines it is metal. The procedure for replacing the cylinder head gasket on a Lada Granta car on all three engines is the same and is shown using the example of a VAZ 11183 engine. Replacing the cylinder head gasket of a VAZ 21126 engine is described separately.
The cylinder head gasket is a one-time use product, so the gasket must be replaced each time the cylinder head is removed.
1. Set the piston of the 1st cylinder to the TDC position of the compression stroke, then leave the front timing cover removed.
2. Reduce the pressure in the engine power supply system on the vehicle if work is performed immediately after a trip.
3. Disconnect the wire from the negative terminal of the battery.
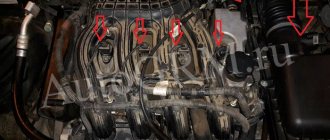
6. Disconnect the air supply hose and wire connector from the throttle assembly as described here.
7. Disconnect the high-voltage wire tips from the spark plugs.
8. Disconnect the wiring block from the oil pressure warning lamp sensor connector.
9. Disconnect the wiring harness from the valve timing sensor.
10. Then disconnect the wire block from the coolant temperature sensor (coolant temperature sensor) of the engine management system. The sensor is located on the thermostat.
11. Remove the cylinder head cover as described here.
12. Remove the timing belt and tensioner pulley as described here.
13. Loosen the bolt securing the camshaft pulley, holding the camshaft from turning (this can be done by inserting a key into the holes of the pulley hub to fix the camshaft or insert a 10 mm socket with an extension into the hole of the camshaft pulley and put it on the nut that secures the rear cover timing belt).
14. Completely unscrew the camshaft pulley mounting bolt and remove the camshaft pulley.
If the pulley is tight on the camshaft shank, compress it with a universal puller. To do this, rest the puller screw against the camshaft pulley mounting bolt that has been previously screwed into the shaft (so as not to damage the threads in the camshaft).
15. Using a 10 mm socket, unscrew the two bolts and the nut securing the rear cover of the timing gear drive.
16. Remove the rear timing cover.
17. Disconnect the wire from the coolant temperature indicator sensor (the sensor is screwed into the cylinder block under the thermostat).
18. Loosen the clamps and disconnect the five cooling system hoses from the thermostat pipes.
19. Unscrew the nut securing the tip of the “mass” wire and remove the wire.
20. Disconnect the injector wire connectors as described here.
21. Disconnect the fuel supply hose from the fuel rail tube.
How does the part change?
To dismantle the old boot and install a new one, you will need an inspection hole or a lift. Obviously, such devices are not always available at home, so most often you have to use a jack.
Before starting the procedure, of course, you need to purchase a new boot. There is nothing better than the original part, but many modern manufacturers offer quite passable analogues. They often come with matching clamps.
You also need to stock up on the following ingredients and tools:
Work order
Before tightening, you will have to get to the block head. This can be done no earlier than after disassembling a good half of the engine.
First, open the connectors, the connecting wires leading to the antifreeze temperature sensors and the oil level control sensors. Once done, drain the coolant
It is necessary to dwell on this important point separately. Be careful - the composition mentioned above is quite toxic, so it is better to work with gloves
To collect coolant, prepare a container with a volume of at least 9 liters.
To drain the fluid, open the distribution tank, and then unscrew the plug located directly on the cylinder block. When the leak stops, move the container to the radiator - there is a separate drain here. After removing all the antifreeze, screw on the caps.
- remove the thermostat, and behind it the air filter;
- disconnect the exhaust pipe from the manifold;
- Remove the protective housing and the belt from the VAZ camshaft;
- The throttle valve drive cables must be separated from the carburetor;
- remove all cables leading to the cylinder head, as well as tubes, hoses, etc. (be sure to loosen the clamps that secure them, otherwise you won’t be able to move them to the side).
You now have direct access to the head. Unscrew all the bolts holding it, and, using the help of a partner, remove the cylinder head. After this, tear off the old gasket.
Carefully clean the rear surface of the VAZ 8-valve engine block from dirt and adhered fragments of the sealing element material. Sand it with fine sandpaper - you should be left with a completely smooth, matte base.
At the same time, check all valves and seals.
Be sure to remove any oil or debris from the bolt holes. Lubrication helps reduce the friction force, which in this case is fraught with many troubles, and foreign fragments will not allow reliable fastening.
All that remains is to install a new gasket and reinstall the VAZ-2114 cylinder head. This is where the time comes to talk about what tightening torque is required.
General issues
Let's consider general philistine questions about Granta and butter.
How to check the oil level in Grant
We check the level classically;
- The car must be turned off for at least 5-10 minutes;
- We take out the oil dipstick, wipe it with a rag and put it back;
- We take it out and look at the light - the level should be between MIN and MAX.
The dipsticks on the Lada suffer from the fact that they are difficult to read. You may need to wipe and lower the dipstick again.
When to change the oil of a VAZ 2190
According to the regulations, replacement on the Grant is required every 15,000 kilometers. Practical experience suggests replacement every 10,000 km. mileage, or once/twice a year.
The Grants are stuffed with Rosneft from the factory. The brand has not proven itself to be reliable and of high quality.
The first replacement occurs after the new car has been broken in - after 2000 km. This is not a requirement from the factory, but common sense - change the flooded s to something normal.
Which oil to choose
Next is a table with factory recommendations for Grants.
Excerpt from the documentation for the VAZ 2190.
Which is better: 8 or 16 valve engine system?
The engine type should be selected taking into account the operating conditions of the vehicle.
Comparisons should be made based on the way the car is used, driving style, and the availability of funds for repairs. From the point of view of repairability, engines with 8 valves are considered the best. Their main advantage is the quick start of the engine and low fuel consumption. Such units are most often purchased for driving around the city. Moreover, the main reason why the choice falls on these engines is that if the timing belt breaks, the valve system does not fail. This is ensured by the presence of cavities in the engine structure, where the valves fly off in an emergency situation associated with a rupture of the timing belt. The 8-valve Granta cannot boast of low noise levels in the cabin from a running engine. Perhaps these are all the disadvantages.
As for the Lada Granta car with a 16-valve engine system, it is best suited for driving over long distances. With such engines you can develop a decent speed, which is a plus compared to the 8-valve option. Also, the noise from the engine will not interfere when driving at high speeds. As for the disadvantages, to increase driving speed, such engines use a lightweight piston system. This means that the piston of a 16-valve system is shorter than that of 8-valve cars. Simply put, it lacks the space needed to keep the piston from making contact with the valve if the timing belt breaks. The Granta with air conditioning is the same.
Thus, the following conclusions can be drawn:
- Choosing a car valve system is an individual decision for each car enthusiast.
- If you monitor the condition of the car's working components, you can avoid major repairs, the cost of which is comparable to buying a new engine, and at the same time safely drive a 16-valve engine.
- In all other cases, it is recommended to purchase a car with 8 valves. Reviews of the Lada with this configuration can be obtained from owners of domestic cars.
How to adjust valves on a VAZ-21099
The frequency of such a procedure depends solely on how much your car needs it. The fact is that there are a huge number of domestically produced cars that do not require valve adjustment even after 100 thousand kilometers. But as soon as you hear a knock coming from under the valve cover, which appears mainly on a well-warmed-up engine, or the car engine refuses to start at all, there is a high probability that the reason lies precisely in the incorrectly set gap between the valve tappets and washers .
And now we bring to your attention the entire list of tools necessary to adjust the valves on the Lada Granta on your own:
- socket head (diameter 10) with ratchet or wrench;
- tweezers (needed to remove old washers);
- probes from 0.05 to 1 mm;
- adjustment device (suitable the same as for the VAZ-2108);
- shims (these must be purchased after the current gap has been measured).
By the way, on a Lada Granta engine with 8 valves, experts strongly recommend adjusting them after it has run 25 thousand kilometers. First of all, this action is necessary to significantly increase the efficiency of the engine.
Payment via PayPal
After selecting payment via PayPal, the PayPal payment system will launch, where you need to select the payment method: bank card or PayPal account.
If you already have a PayPal account, then you need to log into it and make a payment.
If you do not have a PayPal account and you want to pay using a bank card via PayPal, you need to click on the “Create an Account” button - shown with an arrow in the picture.
PayPal will then prompt you to select your country and provide your credit card information.
After specifying the information required to make the payment, you must click on the “Pay Now” button.
Cylinder head gasket replacement technology
In essence, replacing the cylinder head gasket on all car models is basically the same. There may be such a feature as the order of tightening the cylinder head mounting bolts and the tightening torque parameters of these bolts. These figures should be provided by the manufacturer in the manual for your model. As a last resort, you can find parameters on the Internet on forums for fans of a particular car model.
Very important! Before you begin to unscrew the cylinder head mounting bolts, they must be cleaned so that the keys do not break, which can lead to a defect in the bolt slot and the inability to unscrew it. Unscrewing the fastening bolts should start from the middle and first turn all the bolts evenly by 0.5-1 turns
Unscrewing the fastening bolts should start from the middle and first turn all the bolts evenly by 0.5-1 turns.
First, before dismantling the cylinder head, we disconnect all attachments. It is advisable to mark the dismantling sequence and designate it schematically.
After unscrewing the bolts, remove the cylinder head and replace the cylinder head gasket. To center the gasket and the block head, as a rule, there are bushings in the block itself.
Then, in reverse order, install the cylinder head itself and all attachments that are associated with it. This is exactly why you drew the diagram.
Tightening the cylinder head head bolts must be done in strict sequence with the diagram for this unit and observing the tightening torque parameters specified by the manufacturer. To do this you will need a torque wrench.
Expert opinion Ruslan Konstantinov Expert on automotive topics. Graduated from Izhevsk State Technical University named after M.T. Kalashnikov, specializing in “Operation of transport and technological machines and complexes.” More than 10 years of professional car repair experience.
If the cylinder head gasket is damaged, it must be replaced as soon as possible. The fact is that operating a car with a broken or burnt gasket is fraught with serious consequences. The main problem is mixing engine oil and antifreeze. This phenomenon can be determined by the presence of thick white smoke from the exhaust pipe with a characteristic sweetish odor and by the appearance of an emulsion in the lubrication system. In addition to obvious oil leaks, you can sometimes observe a breakthrough through the exhaust gasket.
The emulsion is a white substance on the valve head cover, which indicates the presence of antifreeze in the lubrication system. This is dangerous because the antifreeze mixes with the oil and dilutes it; there is no need to talk about lubricating properties, they are significantly reduced, and accordingly, the rubbing parts of the engine begin to heat up very much and can be destroyed by exposure to high temperatures. If oil enters the cooling system due to a damaged cylinder head gasket, this can be understood by a decrease in the level of antifreeze in the expanded tank and the appearance of oil stains on the surface. If exhaust gases enter, boiling of the coolant may occur.
If damage to the cylinder head gasket is diagnosed, it is better to exclude the vehicle from operation, otherwise the engine may fail due to water hammer (at least half of the antifreeze is distilled water) and a major engine repair will be required, with the replacement of many components, and this procedure is much more complicated and more expensive than replacing the gasket
When choosing this consumable, it is important to pay special attention to quality; it is advisable to purchase an original part or, in extreme cases, an analogue, but from a trusted brand. It’s better to buy something more expensive, but not be afraid that after a few thousand kilometers you will have to deal with the labor-intensive replacement of the gasket again
Good luck with your DIY head gasket replacement.
replacing cylinder head gasket
Home →
Maintenance and Repair → Engine →
Problems when paying with bank cards
Sometimes difficulties may arise when paying with Visa/MasterCard bank cards. The most common of them:
- There is a restriction on the card for paying for online purchases
- A plastic card is not intended for making payments online.
- The plastic card is not activated for making payments online.
- There are not enough funds on the plastic card.
In order to solve these problems, you need to call or write to the technical support of the bank where you are served. Bank specialists will help you resolve them and make payments.
That's basically it. The entire process of paying for a book in PDF format on car repair on our website takes 1-2 minutes.
Malfunctions: causes, elimination
Like all internal combustion engines with mechanical adjustment of valve clearances, the 11186 engine requires periodic adjustment of this characteristic. In addition, during operation, characteristic “diseases” of this particular version of the power drive were identified:
| Timing belt | 3/50 |
| battery | 1/20 |
| Valve clearances | 2/20 |
| Crankcase ventilation | 2/20 |
| Belts that drive attachments | 2/20 |
| Fuel line and tank cap | 2/40 |
| Motor oil | 1/10 |
| Oil filter) | 1/10 |
| Air filter) | 1 – 2/40 |
| Fuel filter) | 4/40 |
| Heating/Cooling Fittings and Hoses | 2/40 |
| coolant | 2/40 |
| Oxygen sensor | 100 |
| Spark plug | 1 – 2/20 |
| Exhaust manifold | 1 |
| Bend valves | broken timing belt | periodic wear monitoring |
| Ignition system interruptions | failure of the corresponding block | replacing the ignition module |
| Increased oil consumption | development of main liners |
stuck piston rings
When repairing piston and crankshaft engines, it is recommended to use original components from the AvtoVAZ manufacturer. Because only he uses special technologies for strengthening structural materials. From third-party companies, the metal may be “raw”; the resource of such consumables cannot be analyzed.
Updating the factory firmware of the AMT Lada Granta robot box
Updating the factory firmware for the robot box or AMT (automated manual transmission) to the latest version UAA6CB060040. With the new software, shift times from 1st to 2nd gear and from 2nd to 3rd gear are reduced by 30%. Crawl mode activated. This feature allows the vehicle to start moving forward without pressing the gas pedal. This option is needed to increase the comfort of the robot when driving in a traffic jam. To support confident starting in slippery conditions, the “winter mode” function has been added, which allows you to start moving from 2nd gear. Reprogramming the AMT takes approximately 20 minutes.