What you need to properly tighten your wheel bolts
Many people often wonder how hard they can tighten wheel nuts at home. This process seems quite simple at first glance. Before starting a step-by-step action, a person must prepare certain tools. Very often, car owners independently perform these actions at home and, without counting their strength, break the thread. This is due to the beginner putting enough pressure on the bolts.
Bolt tightening process
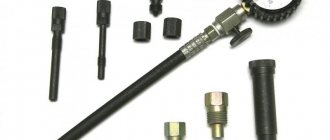
The tightening torque of the wheel bolts is carried out with the preparation of the necessary tools. To perform the process correctly, you need to purchase a special torque wrench. Without this tool it is difficult to imagine the process of tightening bolts.
If this development is not available, you can use a pneumatic impact wrench. Many stations provide professional maintenance with this product.
As a rule, a pneumatic impact wrench regulates the tightening torque of elements on a structure. If a bolt that is not tightened protrudes from the front, then discomfort will be felt while moving on the vehicle. That is, the car will “shake” a little. After all, the main load falls on the steering wheel.
If the wheel is loosely tightened on the rear of the axle, then the tires will wear out quickly. There is also the possibility of damage to the steering rod and destruction of the bearings.
What tightening force and torque should be
Wheel nut for a passenger car
Proper tightening of wheel nuts for passenger cars is carried out using a torque wrench. It allows you to set the required tightening torque for the nuts. If the force exceeds it, then the key will begin to slip. Having determined with what force you will have to tighten the nuts on the wheels, you can purchase this tool. The cost of such development starts from 1400 rubles* and above.
Important! There are two types of models on the market: mechanical and electronic. The second tool, accordingly, will cost more.
How the tool works
Semi-automatic torque wrenches resemble in shape and design a regular ratchet wrench, which is used for socket heads. The only significant difference from its “brothers” is the presence of a special ratcheting mechanism, which allows the built-in gear to rotate in two directions.
For example, to return the handle of a tool back after a full rotation, you need to apply relatively little force. But to tighten the nut you need to apply a little more force.
When the required value is reached, the ratchet gear simply begins to slip (a characteristic sound is heard), as a result of which the nut or bolt is no longer tightened. This eliminates the possibility that the thread will break.
Torque wrenches with a force measurement scale by default do not have the ability to limit torque when a specified value is reached. In this case, this moment must be controlled independently using a mechanical or electronic digital measuring scale.
A homemade almost torque wrench, depending on the design, can work according to the example of the first and second options described above.
Why do we count Newtons and meters?
Before you start making a simple homemade torque wrench for tightening bolts and nuts, you will need to do some calculations. For example, to achieve a tightening torque of 10 N*m, you need to apply a force equal to one kilogram of force to a lever or arm 1 meter long.
But in a home workshop or garage, a meter lever is not the most practical and convenient option. Ideally, it is better to use a lever within 20–50 cm. And in order to correctly calculate how much force needs to be applied to the lever to achieve the required tightening torque, you need to count Newtons and meters.
However, it is not at all necessary to go into the jungle of mathematical equations. The required values can be easily calculated in proportion. That is, if we take as a basis that to obtain a torque of 10 N*m, you need to apply a force of 1 kg on a meter-long lever, then it is similarly easy to calculate how much force will need to be applied to a lever of shorter length.
The shorter the lever used, the greater the force required to tighten the bolt or nut - this is, so to speak, an axiom. For example, if instead of a meter lever you use a lever 50 cm long, then to obtain a torque of 10 N*m you need to apply a force equal to 2 kg.
If you use a lever with a length of, for example, 22 cm, then the force will be already 4.5 kg. In other words, you need to divide the torque (10 N*m) by the length of the lever (in this case - 0.22 m) and multiply by 0.1. Using this simple formula, you can easily calculate how much specific force is required to tighten the nut.
Buy or make?
In the process of performing auto repair work, almost every vehicle owner is faced with the fact that it is necessary to tighten a bolt or nut by applying a certain force, but there is no torque wrench at hand. Don’t run to the store to buy an expensive instrument, use it for 20–30 minutes and forget it for a year.
Therefore, the best option is to make a homemade torque wrench for tightening nuts and bolts. Moreover, you can make a tool like a ratchet with a ratchet mechanism, as well as one made by analogy with a simpler design - using ordinary hand scales.
4.5. Acceptance and sealing of connections subject to their complete disassembly
4.5.1. Regardless of the tensioning method, the inspector must, first of all, carry out an external inspection of all supplied high-strength bolts and make sure that all bolts have the established markings, washers are installed under all heads and nuts; parts of the bolts protruding beyond the nut have at least one turn of thread above the nut and two below the nut; The assembled unit bears the mark of the team that performed this work (Fig. 3).
4.5.2. The number of bolts in the assembly that are subject to control is indicated in table. 3.
Table 3
| Number of bolts in the connection, pcs. | Number of bolts to be inspected |
| Up to 5 | 100 % |
| 6-20 | 5 pieces. |
| 21 or more | at least 25% |
4.5.3. If the control results do not comply with the requirements of clause 3.5.1. for at least one bolt, double the number of bolts is controlled. If in this case a defective bolt is detected, all bolts of this connection are checked.
Rice. 3
4.5.4. The results of control, regardless of the method of tension, must be entered in a special journal (Appendix No. I).
4.5.5. The manufacturer is responsible for the quality of installation of bolts.
4.5.6 The tightness of the package tie is checked with a thickness probe. 0.3 mm against the tightened bolt in the area limited by the washer. The probe should not pass between the assembled parts into the area limited by the washer (later formed by the washer).
4.5.7. On each connection, as a rule, the mark of the team that performed the connection and the person who carried out the control is applied with a core. The mark number is assigned by order to the unit performing the connections. If the bolts are prepared by waxing, the letter “P” is placed next to the mark.
4.5.8. After acceptance of the connection by the inspector, all joints along the contour must be primed. If there is no brand of primer in the project design, it is allowed to use primers FL-03K, GF-021 with the addition of dry pigment to a consistency that prevents the primer from flowing into the bag.
4.5.9. Tools for tensioning bolts and preparing surfaces are adopted in accordance with the “Guidelines for the use of a tool kit for installing high-strength bolts.” MMSS USSR Moscow 1985 (Appendix No. 10).
Practical application: how to use the tool correctly
The tightening value of the front and rear bearings is calculated based on a number of factors, such as:
- Minimum and maximum allowable size (parameter) of the bearing.
- The amount of axial clearance.
- Type of thread pitch (large or small).
The above list of data is of a template nature and in each specific situation may be supplemented by new factors. However, the above reasons remain the same, regardless of the situation.
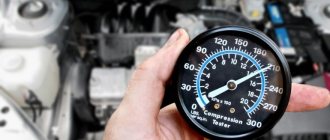
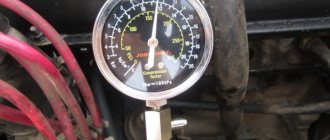
Indicator devices do not cause any difficulties. You just read the readings and see the torque. But the click mechanism requires getting used to and correct understanding of the scale markings. Rough readings are marked on the fixed shaft of the handle. Precise divisions on the turning part.
The illustration shows marks at 98 Nm and 2 Nm (on the rotary handle). The values are added up: the final value is 100 Nm. To tighten the car wheel bolts with such a torque wrench (for example, a value of 120 Nm), you need to set 112 Nm on the fixed handle and 8 Nm on the rotating part.
If you understand the general principle, using the tool will be convenient.
In this case, for all types of handles there is a general rule: the locking wheel is unscrewed at the end, the value is set, after which the mechanism is tightened again. Most torque wrenches of this type are even simpler.
The ratchet does not spin, you just hear a loud click. Fundamentally, this does not change anything: you just need to stop puffing after the characteristic sound.
The tightening torques for bolts and nuts are indicated in the vehicle repair and maintenance instructions. The table is not universal: fasteners with the same metric dimension may have different indicators on different units.
Even the tightening torque of wheel bolts on cars of the same manufacturer (assembled on the same platform) may differ. For example, the Volkswagen Passat is 120 Nm, and the single-platform Volkswagen Sharan is 170 Nm.
It is highly advisable to comply with the factory settings, otherwise components and parts may be damaged. But there are situations when information is not available. In such cases, a table for tightening bolts with a torque wrench will help.
Tightening torques for popular models
The variety of cars on the Russian market is amazing. But there are certain categories of the most popular models that are more often found on local roads than others.
Let us give examples of the required tightening torques for the most common and popular cars in Russia.
- The entire Audi lineup, not counting the Q5 and Q7 crossovers, uses the same torque. This is 120 Nm. The Q5 requires 140 Nm of force, and the Q7 requires 160 Nm.
- BMW passenger cars 1, 3 and 5 series require 120 Nm. And crossovers are 140 Nm.
- For Chevrolet Cruze and Captiva, the regulated torque is 140 and 125 Nm, respectively.
- For Ford Mondeo this figure is 85 Nm. The Fiesta had a torque of 90 Nm until 2008, and then increased to 110 Nm according to the regulations.
- The entire Hyundai model range provides the same torque value, and it is 110 Nm.
- The Honda line of cars differs slightly, and here the regulated range varies from 108 to 110 Nm.
- For Kia Rio, the set torque will be 103 Nm.
- For Lada cars the range will be from 70 to 78 units, while for Niva it is 88-91.
- With Lexus models it's simple. According to the regulations, all tightening is done at 103 Nm.
- Mercedes S and M class have as much as 150 Nm. For the rest, the tightening is performed in the range from 103 to 110 units.
- Mitsubishi Lancer and Outlander require the torque wrench limiter to be set to 98 units.
- If you have a Nissan Qashqai, prepare a force of 133 Nm. Same for Patrol and Terrano models.
- Renault Logan has a force of 105 units.
- The Skoda model range is designed for bolt tightening at a torque of 120.
- Passat, Golf and Polo cars have the same torque and amount to 120 Nm. The Touareg already requires 180 Nm.
- Avensis, Corolla and Camry along with Yaris need 103 Nm. But the Land Cruiser is designed for 209 units.
How hard should you tighten the wheel nuts?
The tightening force for the bolts is different for each car and is determined by the manufacturer, indicating it in the operating instructions for the model.
But how do you understand that when twisting, exactly the force that is needed is applied? And how not to overdo it and not break the thread? For this purpose, there is a special wrench with a built-in dynamometer (hence the name dynamometer). It will provide control of the tightening torque of wheel nuts, for which pinching is as undesirable as weak fastening.
It can lead not only to thread breakage or deformation of a bolt or stud, but also to the appearance of a crack on the disk. In addition, overtightened fasteners tend to stick to the hub, after which it is impossible to unscrew it - you just need to cut it off. You can tighten the threads not only with a wrench, but also with a bolt gun, the lever of which is of sufficient length.
Therefore, after screwing the fasteners with a conventional tool, it is recommended to final tighten the bolts with a torque wrench. With its help, the connection can be either tightened to the specified level or weakened if excessive force was initially applied.
Selecting the right fasteners
The main thing when installing wheels on a car is to tighten the fasteners so as to prevent them from loosening while driving. This can lead to spontaneous removal of the wheel, and it is clear what the consequences will be. Although, a fairly experienced driver will already understand from the characteristic knock that the wheel fastening has become loose and will take action.
Sometimes self-loosening of the connection occurs due to incorrect selection of fasteners for the disks. This does not mean, of course, the thread - if the pitch is wrong, then you simply cannot screw in the nut or bolt. We are talking about the shape of the bolt head or the lower edge of the nut, which can be either conical or spherical. And the nut can also be blind, through, short, tall, or have a pressure washer.
If the fastener is chosen correctly, it even tightens itself during the ride. In addition to the function of holding the wheel on the hub, bolts and nuts also center the rim relative to the axis of rotation. What helps in this is the shape of the head or edge of the fastener, for which the disk has seats of the appropriate type. The cone is centered with the cone, the sphere with the sphere - a violation of such a tandem leads to loosening of the bolts or nuts after just a few kilometers of movement.
Tightening the wheel bolts
A few important nuances
In order to protect the car that sleeps under the entrance doors, many car owners put locks on the wheels. This is a set of four nuts or bolts (one per wheel) that cannot be unscrewed with a regular wrench.
- For this purpose, the kit contains a special key, the configuration of which corresponds to the individual shape of the hole on the nut or in the bolt head. The lockers do not need to be tightened as tightly as the main fasteners, so the tightening torque of the wheel bolts or nuts does not apply to them.
- It is very important not to use fasteners with broken threads or crumpled edges to secure wheels. If you see such a defect, replace the nut or bolt with a new one, similar not only in thread, but also in strength characteristics. And only factory production provides them.
- Today, alloy wheels are often produced in a universal version, so that they can be installed on different cars. In this case, the size of the hub hole (DIA) is made as large as possible, and they switch to a smaller size due to the installation of hub adapters.
- Without these liners, even if the difference is only a millimeter, the load on the fastener increases. Its holes become deformed and the wheel begins to rotate along the trajectory of an oval rather than a circle. The steering wheel begins to beat, and this is especially felt at speeds closer to 100 km/h.
Not understanding what is happening, the car owner turns to a tire shop. New balancing does not solve the problem, but meanwhile the shock absorbers and chassis elements on the car are destroyed, and the wheel studs break. The reason for this is the lack of small plastic rings costing 50-75 rubles.
Other techniques
Hybrid kick is a great method for trying out new e-liquids. You suck a little steam into your mouth, pause for a moment, but instead of letting it pass into your lungs along with the air, you take another puff of steam, only this time on the DLI.
Snap Draw - This method is difficult to master, but looks very impressive, so if you want to seem like an advanced vaper, you should try to master it. Its essence is that you draw steam into your mouth, then exhale a little and immediately try to draw it back. As a result, the hit you get is double: direct from the first batch of steam, indirect from the one pulled back.
The French puff is also essentially more of a trick than an ordinary method of vaping. You inhale the steam through your mouth and exhale it slowly through your nose.
Useful tips
The driver is required to check the condition of the wheels before starting work and after finishing the shift.
• Check what can be seen with the naked eye: there are no distortions, runout, misalignment; Is the tire pressure sufficient? does the wheel rub against other parts of the car - frame, fender?
Look for signs of uneven wear on the tread or sidewalls, bubbles due to broken cords, and other defects. Are different tires installed in a pair, are all valve caps in place?
• Pay attention to any oil or fuel leaks - these fluids can damage your tires. • Check that the rims are not bent or otherwise damaged, and that there are no signs of the tire turning relative to the rim
• Check that the rims are not bent or otherwise damaged, and that there are no signs of the tire turning relative to the rim.
• All axles and wheels must be located (rotate) in the correct planes, and suspension movements must also be made in the correct planes. Deviations can cause tires to slip and slip, which, of course, shortens their service life, creates additional rolling resistance and increases fuel consumption.
• Remove any objects stuck in the tread and between the dual tires.
• Inspect tires that have cuts or other defects. Off-road tires often have damage, but they are not always dangerous and impair its performance. If the damage is really serious, the tire should be replaced or repaired. Contact qualified technicians who can determine whether the damaged tire can be repaired or should be replaced. You can fill as many nail holes as you like. There should be no more than two cuts. A hole in the tread pattern area of no more than 10 mm in length is allowed. Repair options in the most stressed areas of the sidewalls are also limited.
• Do not weld or otherwise heat the rims near a mounted tire. Be sure to remove tires before performing heat-related wheel repairs.
• Before removing the inner or outer wheel rim, both dual tires must be deflated.
• It is forbidden to lift tires with a crane, securing the hook from the inside to the sidewall. Use flat straps that wrap around the outside of the tire.
• Do not install damaged tires or wheels on steering axles.
• Tires should be replaced in advance. It is not profitable to operate tires until the groove depth reaches the maximum value. It is recommended to leave approximately 5 mm of the pattern to the maximum depth so that the tire can be repaired by welding.
• Store tires in a cool, dry place, out of direct sunlight, and in an upright position rather than stacked.