Of all the domestic motorcycles, it was the heavy Urals and Dniepers that motorcyclists fell in love with. They were mainly valued for their engine - a boxer, four-stroke, two-cylinder, with a large volume that gave the rider an indescribable sensation. Alas, the engines were very unique and demanding. In order to move carefree on your horse, you either had to be a good mechanic, to know all the nuances of the engine in order to set everything up properly, or you could approach the problem from the other side, getting rid of its source. In this article we decided to look at how to install one carburetor on a Ural motorcycle? You might also be interested in the article: Ural motorcycle tuning.
It's not a simple procedure, but it saves you hours of agony trying to synchronize two carburetors. To make it more clear how difficult this task is, the owners of Ural and Dnepr compare it with trying to synchronize two mopeds standing next to each other. In comparison, installing and servicing a single carburetor is a simple task, which has a number of other advantages, such as fuel economy, lighter throttle control and the ability to install a set of handles on one cable. But let's look at the whole procedure in order.
Conversion of the Dnepr motorcycle to one K65D carburetor
Hello dear comrades of thought! So, I thought about installing a carburetor instead of the old K301. Because it was very difficult to set up timing, the range was high and they were generally outdated. I thought for a long time which one to choose, there were many options: Solex, DAZ, K133, from a tractor launcher, etc. I read a post on this resource that you can install a K65D carburetor from Jupiter. This was my argument about the K65D; logically, it would have been better to remove the K65I from the planet, but it turned out the way it did. K65D (Pekar, Russia). Mixing chamber diameter, mm - 32; Diffuser diameter, mm - 30; Flow rate, mlmin — GTZ — 260 — Idle metering hoses — 50 — Fuel corrector jet — 255 Ambient temperature range at which the engine starts and stable operation is guaranteed in all operating modes — from -20C to + 50C.
A stainless steel pipe with a diameter of 28 mm was discovered, 4 pieces of pipeline corners with a diameter of 25-28 mm were purchased, the diameter of the corners was floating. The flanges were made of metal 5mm thick; there were two more metal options - 3-3.5mm, 10mm. 3 mm is, in my opinion, too thin; when tightened, it will most likely begin to bend, and 10 mm is too much, and it is more difficult to work with such material.
Here is the finished flange.
The most difficult thing was to make a design with a flange that was attached to the carburetor, or rather, to make a hole in the pipe, we endured for a long time. Since there was no drill of this diameter, it turned out that it was decided to use a trick, namely, take a pin with a diameter of 30 mm, cut longitudinal lines on it with a grinder, it turned out something like a stationery knife. The hole was not drilled, but squeezed out, the finger glowed.
it was difficult to secure the manifold to the flanges in place. Fortunately, four pipeline bends were purchased; without them, this would hardly have happened; the pipe would probably have had to be bent. And so we put him on one knee, and on the other there was something like the English letter “S”. So they made a less abrupt transition.
Of course there is a lot of welding, the welder offered to remove everything with a grinder, but I refused. However, the collector needs to be covered with something and insulated. There is an idea to cover it with road insulation for the wires. The whole remodel took a very long time to do, we started at 13:00 and by 21:30 everything was done. Since it was dark, the manifold was poorly welded and there were many small holes. I noticed this already at home, so I went to the welder again. The second time they boiled it well, checked it, dipped it in water and blew it into the collector, everything was clear.
The first launch went surprisingly well. Nothing, without changing the position of the needle in the center of the carburetor. I put it on, a sock came out instead of an air filter, pumped it up, took the first blow, but stopped and went off on the second. Singles fixed everything. A pleasant surprise was the efficient operation of both boilers. After unscrewing the throttle handle, a shot followed, the first and the last. This never happened again. The traction at the bottom is crazy, at the first one you can even climb the wall. The top most likely broke off, acceleration to 70 km/h was normal, I don’t know beyond that. The collector cooled down greatly, even in heat below 30 ° C, it was covered with dew. The consumption, it seems to me, is still high, the spark plugs indicate this, they are too black. I lowered the arrow to the last division, it is no longer as black as before. Maybe because I mostly drive at idle... This is the experience of switching to one carburetor, I’m happy, I definitely won’t go back to two. I apologize for the photos because I took them on my phone!
Thank you for your attention!
Change or leave, what do you prefer?
If you don’t do everything as expected, then selecting and installing a carburetor for a Ural motorcycle will only be a waste of time, effort and money. But even when all the conditions are met, it should be remembered that such a modification, although it will make it possible to easily adjust the supply of the fuel mixture, will create other problems:
- In the intake manifold, which is necessary to switch to a single carburetor, condensation will accumulate in cold weather. This will make starting the engine more difficult.
- A converted Ural with one carburetor will lose some power and will consume more fuel. After all, the filling of the cylinders will worsen.
- You will need to decide where to install a new air filter that matches the parameters, of which there will also only be one now.
After studying the issue, many leave the option with two carburetors
Based on the above, many prefer to leave two carburetors on the Ural motorcycle, as before, replacing them with more advanced ones. Models with constant, rather than variable, discharge in diffusers are better suited for this. They allow you to get rid of failure during acceleration - a disease of many two-cylinder four-stroke engines.
How to install one carburetor on a Ural motorcycle | Life in RGV style
One of the disadvantages of heavy, large motorcycles is the constant need to adjust the carburetor to keep them in sync.
In such a situation, you can install one, but very powerful, instead of 2 conventional carburetors. To do this, you need to create an exact replica of the bottom of the carburetor using a metal plate for it. Then you need to make a wire, put on the nuts and solder them to the plate itself.
At the end parts of the plate, you need to drill holes in the shape of an ellipse, insert metal strips into them and solder them. The thickness of this strip should not exceed 1 mm. After all the parts have been welded, the place where the carburetor is screwed must be aligned and it is necessary to determine whether the dimensions are suitable for future installation.
It is necessary to cut a groove in the metal box and it is better to leave the pipes as is. It is also necessary to make special washers with holes intended for the heads, into which a curved triangle should be inserted and the whole thing should be welded well. It is recommended to use a rubber tube and clamps to secure it so that the transition from the wide standard tube to the diameter of the head is smooth.
The gearbox is attached to the box with M6 screws, the covers of which are better fixed so that the plate does not come out. The carburetor can be upgraded by replacing the part to which the choke is connected with a wider one. Then upgrade the bolt that is used to protect the sector. To do this, you need to drill a hole exactly along its axis, insert a spring, bushing and washer.
In addition, it is necessary to weld the air filter housing, shorten the carburetor pins and screw the cuff using the nipples of the Ural motorcycle. To attach the filter, you need to weld 4 plates in the shape of the letter “L” and in order for this structure to fit in the right place, you can lightly file the bottom of the frame pipe. This is the last step before installing the carburetor.
Hotorel + A carburetor for Ural motorcycle
The agony of choice
There is more than enough advice on the Internet about which carburetor to install for a Ural motorcycle. But not all of them should be trusted unreservedly. Indeed, in the process of realizing your plans, you will encounter considerable difficulties. Here are some examples:
- An affordable option can be considered the domestic K28G carburetor, which was equipped with the Tula-200 scooter produced during Soviet times. But there are no new ones on sale, and finding a used one in decent condition is very difficult. Unidentified defects will negate all expected benefits.
- Mikuni or Keihin models, borrowed from Japanese motorcycle models with a similar number of aspirations, cost a lot of money and will still require additional modifications. You will have to grind out new jets and change the factory settings.
Simply installing one carburetor instead of two without modification will not work!
Whatever option you prefer, simply installing one carburetor instead of two will not work. It will require major remodeling.
One Carburetor K68 on K750
Making an adapter for 1 carburetor
In this article I won't discuss why one, I personally have ridden a monocarb before and it was the kind of ride that made me want to change my bike, I don't know how this will affect your opinion, but I'm happy with the result.
So, I installed a k-68 carburetor on the k750, due to its availability and the same reason it is usually suitable for it.
Manufacturing process
First I started making flanges, I have a small lathe, I made them from a 3mm thick plate, as practice has shown, they turned out to be unsuitable (too thin, deformed), after which they were turned again with a 10mm thick plate.
The hose was taken along the inner diameter of the intake manifold,
Fortunately, the old crankcase and a couple of cylinders remained, the box was also found, how could it be more convenient to work on the layout,
In order not to do everything on my knee, I took a hard rubber tube and inserted it into the sockets
I put a piece of plywood under it
The internal contour of the future collector is transferred to it
Using a circular saw, I cut out a rough piece of oak,
I stitched it with a utility knife with a knife that follows the outer diameter of the pipe
Cut out two plugs
I also made the outer shape of a straight beam by choosing a pipe
He filled the tube with sand and plugged it. As it turned out, heating with a blowtorch is not so effective; a conventional furnace heats the metal to a red color in 5-7 minutes, with normal heating.
Before folding, wooden forms are well filled with water,
it folded in 2 stages for each cylinder using a larger diameter lever tube.
I screwed the flanges to the cylinders and grabbed them in spots, disassembled them, welded them in tex, checked the tightness using old 3mm flanges and a bicycle chamber, eliminated the defects, screwed them onto the bike. I saw what the carburetor would be like, since I wanted to make a horizontal manifold, so I had to use elbow made of the same pipes.
Welded, tightness checked.
Cleaned it and washed it with gasoline.
I mounted it on the motorcycle, the bike started up immediately and without problems, the idle speed adjustment immediately satisfied me, the engine speed could be monstrously reduced, it was problematic on the old k302, I set it to the maximum reasonable speed.
After the test drive, the dynamics of the motorcycle changed for the better; while riding, it seemed that the motorcycle had a different engine, the engine was running faster, which pleased me, there were no breaths, bees or voids, and it felt like the cylinders were really working more harmoniously.
The myth is that the motorcycle is difficult to start in the cold, I came across this, the problem is not big because it is simply solved, with the ignition off and the gasoline off, activate the kick several times, then open the gasoline to pump the carburetor, and pump the butt, insert the ignition and start the engine, as soon as the engine makes a few strokes, turn the trigger slightly for 10 seconds to maintain a stable number of revolutions, repeat stable (without fanaticism) just above idle, then let the engine warm up at idle.
Published May 24, 2018
Installing one carburetor on top of another solves a serious problem - cylinder synchronization. As additional advantages: throttle cable, fuel line, with proper adjustment, fuel consumption is reduced. I’ve been driving with a carburetor from a ZAZ car for two years and decided that I don’t want to change it beyond two carburetors. The problem is that the new cylinder heads are designed for horizontal carburetor mounting flanges, but the manifold was originally made for vertical ones. Then we do the rework, assembly and welding.
First))) a lot of questions!
everything was obviously done beautifully and correctly, why don’t you want your Corby?
where did you get the tubes for such an adapter?
What did you do with the rockers? It also differs in that on the left head they are oriented incorrectly, there are no holes for lubrication at the top!
Have you ordered porous metal gaskets?
what carburetor? k133 or k127?
what about the different distances from the center to the heads? (i.e. the carburetor needs to be moved closer to the reservoir to the right cylinder)
and why wouldn’t Okashka’s carbohydrates for constipation be better, it is similar in scope of work and more modern in design, at least it seems so to me.
I really liked the implemented manifold) I like it) but I think I’ll install a Ural carabiner instead of two, and now I think that the diameter of the intake manifold pipes should be less than 32, because I think that with such a length there are no exhaust pipes enough to take in gasoline. What do you think about it?
The jets were changed or remained from ZAZ. I also think of installing it with their so-called Jacob (not the original) from Java. Gobble in all ranges.
Thank you for the video. It's good that they did this and posted the video. I also did this once, but with heating the savings were greater, if you're interested, I can tell you.
Wouldn't it be easier to buy an adapter?
carburetor adapters, I mean horizontal
the length of one manifold relative to the other should be the same; the cylinders to the carburetor are located at different distances. Meritsch wire, the wire is bent in half and the center of the carburetor holder is marked.. I just installed a carb, but before doing much work on the engine, my Dnepr no longer runs at 0°, freezes and is starving..
I drove this carburetor for 11 years, consumption was 5-6 liters with a Carb sidecar. It should be moved aside and cooked on the motorcycle. On traction, everything works like a steam locomotive, the engine does not heat up, you can forget to adjust the valves. But there is one thing. Triggers every time above +3 +5 degrees, most of the tax is after +30. You need to warm up the caliper, the left bend of the tube and sit next to it. In fact, I sold the Urals and don’t regret some of them.
So? Everything is clear, the main thing is the desire))
In 1991, I was one of the first to convert the DNEPR motorcycle to one K-63 carburetor. To save fuel, I had to experiment a lot. To reduce consumption and at the same time provide high power at the right time, when needed. Numerous design changes have been made to the carburetor. Threaded rods of different calibers were inserted into the central jet until the engine stopped revving. The savings amounted to 3.9 l / 100 km of fuel. It was decided to install a fuel corrector on the starting jet of a cold engine. Handle, cable of the IZH PLANET motorcycle - 4. Fuel consumption of the Dnepr motorcycle after retrofitting with a carburetor is 4.5 l / 100 km. When tested at a range of 1101 km / 25 liters on A-76 gasoline in 1993.
EVEN MINE HAS CARBOHYDRATES! SIMPLE IS BETTER AND CHEAPER!
In the 70-80s in the USSR, heavy motorcycles were a cult among a certain percentage of the population. And their owners were called to the military registration and enlistment office to register their motorcycles and this pride was betrayed. Gasoline was cheap and available (and we ate a lot, up to 10 liters), and we traveled a lot. They could not be killed, but they also could not be repaired or repaired. The man who could find the spark, adjust the ignition or adjust the carburetor was a master, and everyone wanted to be his friend. The biggest problem was the carburetors. And after two or three years he began to drink shelter and fire, but how to cure him is another topic. At that time, few people knew about this and offered it to me. But I'm off topic. By experimenting on myself and studying the experiences of others, I also managed to do something. But I didn't have time to hit him and remind myself. It wasn't the right time. It was the “dashing nineties”. For a month of work, there was only enough money for a steering wheel camera. And the flywheel in my engine was cut off (personally my fault), and then all the development in the form of spare parts went to my comrades, as well as to the bike. What I still regret is that I did not bring this idea to completion. After all, as the gunsmith said, answering the question. How an ingenious model turns out, I take an old and proven one, modify low-quality components or mechanisms and insert a secret. Even with motorcycles something like that. At that time, I liked the Jupiter 5 carburetor the most, due to its enrichment with a richer one on the steering wheel (everything is original, I did not change the jets). But it justified itself, the engine’s operation was easy and pleasant and also very reminiscent of Java. But all this idyll continued when it was +30 on the way up. On a hot day, even with a stroller, I managed to accelerate to 90 km. I couldn't do it anymore. The flat section of the road is finished. But there could have been more impressions. The engine ran easily and did not warm up responsively. At a speed of 50 km approximately 4 liters percent. There is no point in going faster on earth. But below +30 and it was approaching autumn, big problems began. The intake pipes became covered with ice, the thrust decreased, and fuel consumption increased. Black smoke came out of the exhaust pipe, and the operation of the engine began to resemble the operation of the two-cylinder diesel engine of the T-25 Vladimir tractor. My whole design was primitive considering it wakes up to be redesigned 20 times. Inlet pipes from a bicycle frame Minsk. But I didn’t have to redo it, I just brought it in a wooden casing (welded tightly with a gap of about 20 mm. Like a water jacket of a cylinder block. I took the heating from the left cylinder with exhaust gases, to the left carburetor along the entire length of the manifold with an outlet on the right carburetor, again primitive, taking into account whether it works. I'll do it well and beautifully. And strangely enough, it worked. The engine started easily and responsively. And so it drove for several months. I did everything correctly, I couldn't get around to it. I took it to work. And in December we brought home a tractor in the snow on in a tug with a torn flywheel and the end of the experiments in the summer, I think this makes sense, you just need to find an adjustment. The largest amount of ice forms right at the carburetor, I think you need to supply gas there, and the outlet should be made close to the carburetors. But this needs to be checked in practice. You will understand on engine operation.In the summer, I think, only part of the gases can be used for heating, but how much will be shown by the practice of high-performance engines with a radiator for the air that is pumped. Air temperature is about + 60C. So that there is no condensation of fuel vapor and not higher than + 60 ° C. To clog in more air and not exceed the engine temperature. Good luck if you're asking for anything.
Regarding the head gaskets, the gases exploded from solid metal for sale. I did this while wounded, cut out the rings from the VAZ 2108 gasket and inserted them into the gasket. It turned out great, I removed the heads and glued everything back several times.
The Ural is the most recognizable boxer motorcycle with a side trailer, known not only in the countries of the former USSR, but throughout the world. Today, these motorcycles are mainly produced for the foreign market with electronic injection. But they were equipped with carburetors. This article will tell you in detail about adjusting and tuning various carburetors on a Ural motorcycle.
Settings
The last stage is starting the Ural engine and setting it up. Some imported carburetor models do not have an enricher, which must be taken into account when purchasing. Otherwise, the idea is simple: when the engine starts, we do a test drive, with maximum spin in low gears and try to reach speeds of more than 100 km/h. If the engine does not pull, perhaps a more efficient jet will solve the problem; you also need to work some magic with the idle speed setting.
Note! This entire system has one significant drawback - problems with operation at low temperatures. In cold weather, condensation forms in a long manifold, which inevitably leads to deterioration in engine performance.
You can try to isolate the inlet with rubber pads or other insulating materials. Plus, you shouldn’t do test runs and adjustments in the cold season.
Conclusion
Now you know how to install one carburetor on a Dnepr or Ural motorcycle. Before you start work, weigh the pros and cons, correctly assess your abilities, because if you don’t have a lot of money to entrust this work to workshops, you will have to use the skills of a welder, designer, mechanic and others. On the other hand, by correctly completing all the described points, you will lighten the burden of owning Soviet equipment and will be able to ride a motorcycle without any problems, even in everyday use.
Ural motorcycle carburetor
The most popular models of the surviving Irbit motorcycle plant in our country are IMZ M-67 (M-67-36 with a power of 36 hp), IMZ 8.103-30 (8.103-10 - gearbox with reverse). Let's dwell on them, because the carburetor settings on other models are similar.
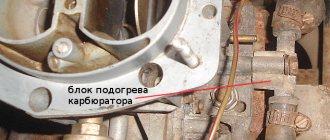
All Ural motorcycles were equipped with adjustable vacuum-float carburetors. Initially these were K-301G (B) with a float, installed on the M-67 and M-67-36 models. The letter index indicates the diameter of the diffuser (28 and 32 mm) and the power of the GTZ.
More advanced K-63U (T), K-65T and K-68U (T) began to be installed on later Ural models. These carburetors had a new float and mixing chamber design. The throttle remained flat (cylindrical on the K-68), but a manual starter throttle appeared. This made it easier to start the engine in cold weather. In addition, thanks to the new carburetors, the fuel consumption of the motorcycle has been significantly reduced.
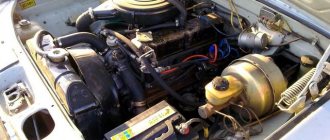
Motorcycle Ural IMZ M-67 with K-301 carburetors
Design and principle of operation
The design and operating principle of the above-mentioned carburetors are similar. The mixture from the fuel tank flows through the pipe into the float chamber. When the chamber is filled to the required level, the floats will float and the needle valve will close the fuel line. From the float chamber, fuel is sucked through the GTZ into the diffuser (mixing chamber), where it is mixed with air in the required proportion and the finished mixture enters the engine cylinder.
Please note that the carburetors on the motorcycle are different for the left and right. To determine this, just look at the markings on the case.
The throttle valve is responsible for narrowing or increasing the diameter of the diffuser, as a result of which the necessary vacuum is created in the mixing chamber. When the throttle valve is closed, the vacuum is at its maximum and fuel is drawn through the idle jet. And the air enters the mixing chamber through a special emulsion channel (usually located near the carburetor inlet pipe).
With a further increase in the throttle valve, the amount of air in the diffuser increases, and the mixture becomes leaner. This is where the main fuel explosion and spatter comes into play.
In order for fuel to be drawn into the diffuser in the required volume, a conical needle is provided in the mixing chamber. It rises along with the throttle valve, thereby changing the flow area between the nozzle and the needle (the fuel supply does not stop, despite the decrease in vacuum parameters when the accelerator is raised).
To adjust the optimal mixture parameter, the carburetor has screws for the quantity and quality of fuel. You can also change the position of the needle in the lock by raising or lowering it (changes the quality of the mixture). This is usually done when the season changes, when atmospheric air parameters change sharply.
To prevent engine detonation due to a strong enrichment of the mixture (for example, when refueling a carburetor), a drain hole is made in the float chamber housing. If the fuel level in the chamber becomes too high, excess fuel is removed through this channel.
Adjusting the carburetor on a Ural motorcycle
To adjust the carburetor you will need: a flat-head screwdriver, a ruler (caliper). To set up high-quality alternating operation of the engine cylinders, you will need a vacuum synchronizer, an electronic speedometer, and 2 syringes of 5 ml each. But you can do without all this.
First you need to configure each carburetor individually. The algorithm is as follows (using the K-65T as an example):
- Check the fuel level in the float chamber. Unscrew the two screws and remove the camera cover. With the carburetor upside down, measure the distance from the center of the float to the carburetor. It should be within 13 (+ 1.5 / -1.5) mm. If the distance does not meet this limit, bend the float tab in the desired direction. At the same time, at this stage you can check the cleanliness of the carburetor jets and channels (if there is contamination, blow them out with compressed air). We put everything in place and attach the carburetor to the engine cylinder flange. ATTENTION! Before further adjustments, it is recommended to check the motorcycle ignition system, gas valve and air filter. The latter must be clean and have the necessary throughput. By default, the needle groove lock is in the center position.
- Next, set the mixture to idle. Fully tighten the mixture screw (11) and back it out 1 turn. Start the bike and warm up the engine for 5-10 minutes. Since we are adjusting each carburetor separately, the spark plug cap on the second cylinder must be shorted to ground. We measure and adjust the amount of mixture with the screw (27), the distance between the throttle valve and the bottom of the mixing chamber is about 2 mm. Next, we start the bike on the cylinder. Using the adjusting screw, we set the lowest engine speed at which the bike does not stop. Next, use the mixture quality screw to look for the maximum engine speed. Sometimes these operations have to be repeated several times. It is necessary to find the position of the mixture quality auger, depending on the amount of auger, at which you will have the “maximum” engine idle speed. We make a similar adjustment with the second carburetor with a closed spark plug insulator on the other cylinder.
- Once the correct position of the screws has been found, you should also check the mixture in the carburetor with the engine running. It must be optimal. To do this, while the engine is idling, sharply turn the throttle lever. The number of revolutions should gradually increase without dips or jerks. For more precise control of the mixture, after adjusting and synchronizing the carburetors, drive a motorcycle for 20 kilometers, the color of the spark plug insulator will tell you a lot.
Once you have adjusted each carburetor individually, you need to synchronize them together. Otherwise, when the engine is running, one of the cylinders will overheat more and fail faster.
The secret to getting the timing right is to have the same amount of vacuum on each carburetor. But since there are no completely identical cylinders and each carburetor has its own unique quantity and quality screw position (for optimal mixture composition), it is necessary, first of all, to adjust the synchronous lift of each throttle valve. To do this, according to the factory instructions, the motorcycle is placed on the central stand, with the rear wheel suspended.
They start the bike on each cylinder one at a time and engage 4th gear. You need to get the same speedometer reading of 40-50 km/h with a load on each cylinder (turn on the high beams or slow down using the rear brake). When the speed is below the required speed, the throttle valve is raised by the numbered screw (27) on the carburetor of the corresponding cylinder. It should be remembered that the cables stretch over time, so synchronization in the Urals needs to be checked every thousand kilometers.
Carburetor K65
The above method has some disadvantages, in particular the inaccuracy of adjustment. The speedometer has an error and not everyone can determine by ear whether the cylinders are working correctly. For more accurate synchronization, you will need the special devices that we mentioned above.
The electronic tachometer is connected to the motorcycle's ignition system. Starting the motorcycle alternately on different cylinders, we measure the crankshaft speed on each of them (at idle it should be 1200-1300 rpm). If the values differ, adjust the number of revolutions using the adjusting screw. Once you get the same speedometer reading on each cylinder, turn off the engine and run on two cylinders.
We ride a motorcycle for 10-20 kilometers to assess the condition of the spark plug insulator. For optimal quality of the mixture, its color should be brick (light brown).
In addition, measuring the fuel consumption on each of them will help evaluate the synchronous operation of the cylinders. To do this, we connect syringes filled with fuel through hoses to the carburetor fitting. We start the motorcycle and visually observe which syringe releases fuel faster. Therefore, it is easy to determine which cylinder “eats” the most and, accordingly, heats up faster. The adjustment is made again using the adjustment screw at the top of the carburetor.
You can see more details about synchronizing carburetors on a Ural motorcycle by following the video link:
Carburetor repair
Among the common malfunctions of the Ural motorcycle carburetor are the following:
- Worn throttle body resulting in idle hesitation. The shock absorber begins to sound in the carburetor because it sits loosely in its place. It can be treated by replacing it from the repair kit or restoring its shape with MS-2000 solid lubricant. It is worth noting that on K-68 carburetors the shock absorber was made cylindrical and made of a harder material. Its duration has increased.
- The carburetor is filling. The fuel line in the mixing chamber is clogged. The needle does not close it completely. The rubber tip of the locking needle may be damaged or the floats may leak. The channel can be blown out with compressed air, and the tipping floats can be replaced with a repair kit.
- The main dispensing needle or spray hole is worn. This leads to incorrect dosage of the mixture in the mixing chamber, and the minimum settings are lost. The needle can be replaced with a repair kit, but the nozzle will need to be changed along with the carburetor body. But, as a rule, it is rarely used.
- Other malfunctions. Clogged injector channels are washed with gasoline and blown out with air. It is not recommended to clean them with needles or threads, so as not to reduce performance. The gasket between the float chamber and the carburetor body wears out due to contact with gasoline (with frequent aspiration). It is worth looking at it especially carefully so that when moving, air and excess dust do not get into the camera.
It happens that when the engine is running, the unburned mixture sneezes out or enters the carburetor. The problem here is not in the carburetor, but in the Ural ignition system or burnt out valves.
One carburetor for a Ural motorcycle
Among the common options for tuning a Ural motorcycle, it is necessary to note the installation of a carburetor in the Urals, usually for a car. This is mainly done to reduce fuel consumption. After all, as you know, antagonists with native carburetors have a noticeable appetite (6-9 liters per 100 km).
In addition, due to the design features of single-chamber float carburetors, Ural motorcycles have noticeable breakdowns during strong acceleration from a standstill. For some this is unacceptable. Improving the dynamic performance of the motorcycle is another reason why these carburetors are installed.
To install a carburetor in the Urals, it is necessary to make so-called “pants” - inlet pipes for each cylinder with a common flange for attaching the carburetor. Since car carburetors are located (longitudinally) in the center of the engine (where the air filter used to be), the pipes must be exactly the same length and have a smooth interior surface, without burrs or steps.
If the carburetor is installed transversely, the right (left) pipe must be shortened so that the first channel of the diffuser is exactly in the center. This will ensure equal fuel consumption in the cylinders. The air filter is removed above the carburetor or, if there is not enough space, on the side of it.
Another important point. The intake manifold does not have to be solid. It must have at least one elastic connection. The motor has some thermal expansion. Since the motor is quite wide, this expansion is enough to break the tightness of the connection at the joints with the heads and air begins to be sucked in. The solution is trivially simple, an incision is made in any convenient place and connected with a rubber tube.
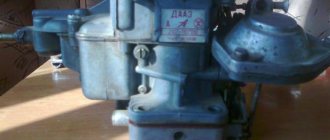
So, the first automobile carburetor for the Ural motorcycle is DAAZ 1111 (1113) from Oka. It’s just designed for a similar volume - 650 cubic meters. cm/cm. But before installation, it will be necessary to replace the standard jets in the first chamber with 90 and in the second with 92.5. The air channels remain the same.
The Zaporozhets K-133 carburetor is installed in the same way. Owners note a noticeable reduction in fuel consumption (3-5 liters per 100 km) compared to two carburetors. Disadvantages of this carburetor include the outdated single-barrel design and processing. Today on the market are the most modern five-system carburetors with an intake, accelerating pump, etc.
One of them is the Solex DAAZ-2108-1107010 carburetor. Initially it is configured for a 1.5-liter V8 engine. Before installation on the motorcycle, you will need to select the appropriate jets.
The filter for the above carburetors is made independently. They make a platform for the filter element and cover it with a decorative lid on top. An adapter for a standard box filter is also made if there is enough space for it.
Need an intake manifold
A separate problem is the manufacture of the intake manifold. Since casting the part at home is not possible, you will have to use thick-walled stainless steel pipes. It is important to meet the following conditions:
- The internal diameter of the pipe must correspond to the diameter of the inlet holes on the cylinders.
- The diameter, flow area and bending of both branches of the collector must be the same.
- The connecting platforms should be made of thick, at least 5 mm, and even sheet. It would be good if all operations could be performed on a milling machine. In the absence of one, you will have to arm yourself with a good plumbing tool, be patient and do everything yourself.
- Internal welds, if any, are carefully ground. Irregularities and protrusions on the inner surface of the intake tract are unacceptable.
Imported carburetors for the Ural motorcycle
Imported carburetors with constant vacuum have proven themselves on Ural motorcycles. In particular, Japanese Mikuni and Keihin with a diffuser diameter of 32 mm. But since they are mainly designed for 400cc cylinders. See, they can be installed in the Urals.
First you need to choose the right jets, otherwise the carburetors will be poorer.
To attach it to the engine cylinders you will need to make adapters from a lathe. It should be remembered that such carburetors are mounted strictly on an elastic suspension!
In addition, opponents like to “remake” the (float) carburetors of their engines with the help of an accelerator pump, which eliminates the same failure that occurs on all St. Petersburg carburetors when the throttle valve is opened sharply. Usually these are the Italian Dellorto PHF 30 (34) and the Chinese Keihin PZ 30.
In the photo: Italian carburetor on a Ural motorcycle
For installation, you will need to select jets, make adapters for attaching to the engine cylinders, and also purchase and modify special cables (each cable has a throttle valve splitter and an accelerator pump). The video below shows all the nuances of installing Chinese carburetors on a boxer engine:
On some Ural Wolf, Solo, etc., it is better to install diaphragm carburetors with constant vacuum; they perform better on straight road surfaces, in the city. Fuel consumption is approximately the same as that of the K-68, even less.
As for wheelchair users and driving on country roads with unevenness and potholes, wiper ones would be preferable here, since they do not have inertia (like vacuum carburetors) and are less sensitive to different types of roads.
As you can see, Ural motorcycles are equipped with many types of carburetors of different series. Everyone has their own advantages and disadvantages. The best domestic option was and remains the K-68, due to its efficiency and wear resistance. But the masters went further and began installing car monocarburetors, imported motorcycle vacuum cleaners or scrapers with an accelerator pump on their motorcycles. Fuel consumption has decreased even more, power has dropped in some areas, but acceleration dynamics have improved. It’s up to you to decide which carburetors to install in your Ural.
Inappropriate installation option
What carburetors are suitable and what is better to install? We will have to disappoint those who plan to use available models from Oka or Zhiguli during the conversion. All car modifications are out of play in this case. There are several reasons:
- The vacuum in the intake tract of a motorcycle differs from the parameters typical for car engines. Because of this, correct adjustment of the carburetor on a motorcycle becomes almost impossible.
- The selection is carried out not simply by working volume, but by the number of aspirations per unit of time. Aspiration can be roughly calculated by multiplying the engine displacement by the maximum speed.
- Car models pose a danger if the motorcycle falls because fuel can splash out and ignite.
Automobile carburetors are not suitable for conversion!
So the idea of using parts from Oka or other automotive equipment will have to be abandoned.