You may have often heard the word “kangaroo”, but know that it has nothing to do with the animal. But how then to decipher it?
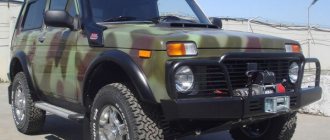
“Kenguryatnik”, or the second name “kengurin”, is a part of the structure that can be attached to a car. Its main function is to protect the headlights and radiator.
Why do you need a car guard?
It is mainly attached when driving through bushes or rough terrain. The guard will also protect the car if there are large snowdrifts on the road or an animal jumps out unexpectedly. In general, it’s a fairly useful device, convenient and practical to use.
If we consider the pros and cons of the installation, we can talk about the following:
- The use of a structure is justified only when it is attached not for beauty, but actually for business. The main role of the guard is to contain the impact of an accident as much as possible, and to become protection for the headlights and bumper.
- It is unsafe for the life of a pedestrian in the event of a collision with a car. In this case, damage to the machine should fade into the background, and human life should be the priority.
- If the impact was insignificant, the bumper will cause more damage to the car than an obstacle on the road. Its use is designed for serious accidents.
How much does it cost to cover a car with film and whether you can do it yourself - see here.
You can learn about Chinese crossovers that will appear in 2016 from this material.
Amounts of the fine for kenguryatnik
The installation of a guardrail on a vehicle is qualified by traffic regulations as making changes to the design of the vehicle. By law, such changes must undergo a registration process with the traffic police.
When changes are made without the consent of the authorities, the owner of the vehicle is held accountable under Article 12.5 of the Code of Administrative Offenses.
This article provides for two types of administrative punishment:
- Warning. Applicable upon initial prosecution, subject to sincere repentance of the car owner and bringing the car to its original condition.
- A fine of 500 rubles.
- Fine 5,000 rubles or deprivation of rights for up to 3 months for repeated violation.
To avoid punishment and get off with a warning, the driver can remove the guard right in front of the inspector. Car owners take the same actions before undergoing the inspection procedure, since it is simply impossible to pass it if there is a guardrail.
The adoption in 2010 of a new technical regulation regulating the installation of guardrails changed the attitude of traffic police officers to the installation of such structures on cars. From this moment on, the power body kit can only be installed on cars of category G. For all other cars, the power body kit is not allowed, and the owners of such cars risk getting a fine for kangaroo.
1. When I bought my UAZ, I had a guard installed, how do I register it now?
1.1. When I bought my UAZ, I had a guardrail installed, how do I register it now?
Good afternoon Have you been denied registration?
2. Is it possible to register a non-factory kanguryatnik on a UAZ Hunter legally correctly?
2.1. You must obtain permission from the State Traffic Safety Inspectorate to make changes to the vehicle (forms and a list of required documents are available at the State Traffic Safety Inspectorate), otherwise: Appendix to the traffic rules list of faults (clause 7.18.) Changes have been made to the design of the vehicle without permission from the State Road Safety Inspectorate of the Ministry of Internal Affairs of the Russian Federation or other bodies determined by the Government of the Russian Federation. “Technical Regulations of the Customs Union “On the safety of wheeled vehicles”. clause 11 section 4. It is prohibited to install on vehicles of categories M1 and N1 structures that protrude forward relative to the bumper line corresponding to the outer contour of the vehicle’s projection onto the horizontal plane of the supporting surface, made of steel or other materials with similar strength characteristics. This requirement does not apply to structures provided for by the standard equipment of the transport TR CU 018/2011 23 means and (or) those that have undergone conformity assessment in the prescribed manner, as well as to metal grilles weighing less than 0.5 kg, intended to protect only headlights, and state registration sign and elements of its fastening. The sanction for this violation of Part 1 of Art. 12.5 Code of Administrative Offenses of the Russian Federation
3. Good afternoon. I bought a UAZ Patriot, model 2007. It has the kangaroo guard on it that it left the factory with, a friend of mine has the same story. But in those “distant” years there were no problems with them and they didn’t put marks anywhere, but what to do with it now? Where can I find documentation and not be a camel? Thank you…
3.1. If it's factory, then you can. if it is not registered anywhere, then register the changes with the traffic police
3.2. just carry out an examination and go to the traffic police to register
Types and purpose
If you still decide to install a kenguryatnik, you need to familiarize yourself with what types there are. Depending on the conditions in which the car moves, it is worth choosing the appropriate option.
The following types are distinguished:
- Horseshoe - often used for SUVs or minivans. Its appearance resembles a horseshoe, which is why it received the corresponding name. Designed to protect the bumper, grille and radiator from impacts in the center and below in emergency situations.
- Safari - also used to protect the bumper and radiator, as well as fenders and headlights. You can install brackets for additional road lighting sources.
Main functions of structures:
- Protection of the car when driving over rough terrain. It is logical that a road that is covered with bushes and branches can damage the paint and ruin the appearance of the car. Therefore, it is better to have a kenguryatnik and avoid unpleasant moments.
- Reducing the impact of an accident. Protection will help save important parts of the car, taking the brunt of the blow. It will be easier to install a new guard than to change half of the car's spare parts. The nuance is that another participant in an accident, faced with a structure, can sympathize. But the insurance company will take care of this.
- Rescue of the driver and passengers. Undoubtedly, given the fact that the suspension will take the main force of the impact, this can save the lives of people who will be in the car.
Why is it used?
First, let's figure out why this part is needed. The main task of the guard is to protect the body from damage during collisions. The first prototype of this element appeared among American farmers in the first half of the last century. They attached wooden shields to the front bumper, and with the help of these devices they drove herds of animals.
In its modern form, the kangaroo appeared in Australia. There is still a problem with animals jumping onto the roads, usually kangaroos. To protect vehicles, they use grilles in front of the bumper. From there they spread throughout the world.
Nowadays, the yoke is mainly installed on SUVs (class M1G), here they also perform a protective function. This part perfectly protects the body from small bushes, as well as grass and stumps found in it. If you often go off-road, then such a modification is completely justified.
Also, some people put up kenguryatniks as a decorative element. This is how crossovers are usually decorated. There is no practical benefit here. Therefore, you can freely use any options and types of yokes, including safety ones.
What to look for when choosing
It is important to approach the purchase with special attention, because the design will help not only protect the car, but also in some cases save lives. When choosing, you should pay attention to the following factors:
- Price. You can fall for a fake that costs 50-100 dollars. But if you think logically and weigh all the factors, it’s better to buy a normal product and not save money. The price of a real kenguryatnik ranges from 200 to 300 dollars, but you will definitely know that you did not spend your money in vain.
- It is better to choose a design with a lower grille made of pipes, which can protect the most “delicate” parts of your car in the event of an impact.
- The installation must be of high quality and correct, otherwise there is no point in purchasing. If you do not know how to install it yourself, then it is better to contact a professional in this field.
- It is not recommended to choose a painted version of the kenguryatnik, because after the first winter the paint may simply crumble.
- The quality of the product must be up to par. All seams must be made smoothly and neatly (this can be seen visually). Pipes should not be folded or deformed.
- It is best to take a stainless steel cage. Prices for it start at an average of $200 per piece.
Requirements of technical regulations and current traffic rules
The existing annex to the current traffic regulations clearly defines the list of faults for which operation of the vehicle is not allowed. Thus, paragraph 7.18 of this list states that you do not have the right to drive on the road if:
7.18. Changes have been made to the design of the vehicle without permission from the State Road Safety Inspectorate of the Ministry of Internal Affairs of the Russian Federation or other bodies determined by the Government of the Russian Federation.
That is, if your car is standardly equipped with equipment of this class, then you will not face any administrative punishment. But, at the same time, keep in mind that you must confirm such standard equipment with documents, including with a mark in the PTS.
It is possible to independently install equipment of this class, but not for all cars
You should pay attention to the requirements of the Technical Regulations of the Customs Union on the safety of wheeled vehicles. So in paragraph 11 (section 4) it is clearly stated:
11. It is prohibited to install on vehicles of categories M1 and N1 structures that protrude forward relative to the bumper line corresponding to the outer contour of the vehicle’s projection onto the horizontal plane of the supporting surface, made of steel or other materials with similar strength characteristics. This requirement does not apply to structures provided as standard equipment of the vehicle and (or) that have undergone conformity assessment in the prescribed manner, as well as to metal grilles weighing less than 0.5 kg, intended to protect only the headlights, and the state registration plate and its fastening elements.
As you can see, the owner of almost any passenger car who decides to modernize will need to know what fine for a power bumper can be issued in 2018. Relevant categories of transport include:
As a result, we have the following situation. You can operate a vehicle with a safety guard installed by the manufacturer. In addition, you have the right to install such devices, but subject to mandatory compliance assessment, that is, an examination. Based on the results of such an assessment, changes made to the design must be registered with the traffic police. Only in this case, you will not face a fine for installing a winch on your car (as well as power bumpers, guardrails).
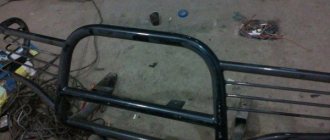
How to make a kenguryatnik yourself
Kengurin is a complex structure that consists of bent pipes. Everything there is much more complicated than it seems at first glance. Companies engaged in production and sales must have appropriate product quality certificates. It’s safest to buy kengurin from trusted, well-known companies, but theoretically, it’s actually possible to make it yourself. If you are knowledgeable in this area, you can build your own design. But if not, it’s better not to risk your health and safety.
To make kangurin, you will need:
- Pipes with diameters of 40mm and 60mm.
- Welding services.
- A grinder with which you can cut pipes.
- Welding machine.
- Bend tool.
- Pipe plugs.
- Bolts of different diameters.
- Use a tape measure to measure the height and width of the car to calculate the exact size of the roof rack. The correct way to do this is from the bottom of the bumper to the top of the hood. Transfer the data to the drawing.
- Calculate the number of pipes you will use for jumpers. To avoid any design issues, pipes should be taken with a small margin.
- For cutting you will need a grinder. Be careful at this stage of work, because in the end all pipes should be joined with a maximum gap of 1 millimeter.
- After cutting all the parts, you need to weld them together.
- For installation on a vehicle, bolts of different diameters will be required. You can buy them in specialized stores, or look in the garage.
See how to make a kenguryatnik on Niva with your own hands
As you can see, creating a design yourself is not so difficult. This will allow you to save a significant amount and gain invaluable experience in the craft.
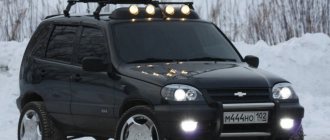
The kenguryatnik is a structure made of metal pipes, the purpose of which is not only to make the car look better, but also to protect it. Initially, such a device was installed mainly on SUVs. After all, when driving over rough terrain, additional protection is clearly not superfluous.
Now kenguryatniks can be installed on almost any type of car. True, they are not intended by the manufacturer for every car model. And if you order them from special tuning studios, it will turn out to be too expensive. Therefore, it will be useful for amateurs to know how to make a protective boot for the front bumper so that the car looks good and is quite reliable.
I want to install a kenguryatnik, is it possible and what is prohibited?
It is forbidden. But only if the kenguryatnik is not provided for by the design. Clause 7.18 of the Basic Provisions of the Traffic Regulations states that it is prohibited to make changes to the design of the car without registering them with the traffic police.
The Niva and most other SUVs and crossovers are precisely vehicles on which the plant has never installed guardrails, unless we are talking about a single or specially designed model for special operating conditions, but, as far as we know, there have never been any in history.
Stop! A kenguryatnik is not a structure!
The fact of the matter is that the kenguryatnik is not a design element if it is not provided for by the manufacturer. This is an additional equipment
. But it’s easier to consider this subtlety with a quote from the Technical Regulations:
Kenguryatnik - equipment? Yes. Does it affect road safety? And how! Not for the safety of the driver, but of the pedestrian in the event of a head-on collision with the latter. In general, “kangurins” were originally invented in Australia to reduce the consequences of an accident with wild animals - for the car, of course. You can guess this from the name of this device.
What if you register it with the traffic police?
And here is a quote from point 3:
This is how easy and simple it is to stop registering for a kenguryatnik. In this case, your registration certificate and license plate number will be confiscated.
To return them (the numbers will be different if they are actually cancelled), it will be enough to remove the guard and bring the car to the MREO traffic police department.
The procedure for making a kenguryatnik
To make a kenguryatnik with your own hands, you must follow the following step-by-step instructions:
- First, make markings on corners and pipes of the same diameter (if you have a pipe bender, then making bends, the corners will not be useful).
- After marking, you can begin to cut the pipes to the required length using a grinder. At this stage, the most important thing to remember is symmetry.
- When connecting the T-shaped jumper to the base pipes, try to make smaller gaps (no more than one mm). This is where a pipe cutter comes in handy. After this, check several more times to see if all the parts are the same.
- Now you need to mark all the welding spots. This way you can save a lot of time.
- Tack the parts by welding. You should start with the folds. In this case, polishing the seams will be easier.
- Now grab the bent pipes to the base itself.
- After checking everything several times for symmetry, you can begin to finally cook.
- After welding comes final finishing, sanding and painting.
What you need for work
A stainless steel kenguryat will look very good on a car of any color. But stainless steel is much more expensive than regular steel. A logical question arises: what will you use to cook it with? Therefore, it would be better to weld a structure from sections of ordinary steel pipe using a semi-automatic machine. If you paint it “Snow Queen” and cover it with car varnish, it will also look good. If this option is suitable, you need to have the following materials and tools.
- Steel pipe.
- Angle grinder with cutting, cleaning and grinding discs.
- Semi-automatic welding.
- Waterproof sandpaper No. 400 and 800.
- Phosphoric acid or a rust converter based on it.
- Degreaser.
- Primer, paint and varnish in aerosol cans, if you don’t have a compressor and a spray gun.
How to do it without a pipe bender
Many people know that when bending a steel pipe without special tools at the bend, it can become flattened or even break. Of course, you can buy several corners from a pipe of the required diameter. But this will increase the number of welding seams, and their processing is very labor-intensive. There is a simple way to bend metal pipe that avoids unnecessary expense and unnecessary processing. You can carefully bend a steel pipe as follows.
- Cover one end of the pipe with a plug (the easiest way is to cut it out of wood). Do not forget that after bending the pipe, the plug will need to be removed; leave at least 10 cm outside.
- Fill the pipe full with fine sand.
- Close the other end in the same way.
- Drive two pieces of pipe into the ground, the diameter of one of which is equal to twice the bend radius.
- Place the bendable pipe between the driven sections.
- Heat the folded area evenly on all sides until it glows faintly. You can heat it with a gas burner or a regular blowtorch.
- After pulling the pipe, bend it. If the length of the free end is short and you do not have enough strength, put a piece of pipe of a larger diameter of a suitable length on it.
Installing an accessory
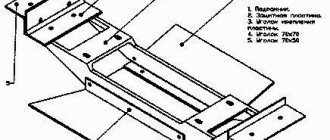
How long the kenguryatnik can serve you in the future depends on correct installation. Installation of a kanguryatnik begins with the fact that you measure the side members on your car. Now weld the fasteners to the protection pipes at this distance. These can be plates of approximately 10 mm with M12 holes for bolts.
Now you will need an assistant to finally install the cage. Place it on the front of your car. The fastenings must be level with the side members.
Benefits of working independently
It is generally accepted that a homemade reinforced bumper has a number of advantages over a purchased one. And the point is not that equipment for off-road driving costs a lot of money - many car enthusiasts are interested in independently developing an original bumper design for a UAZ.
There is something to be proud of here - a person makes a “kenguryatnik” on a UAZ 469 with his own hands, posts drawings and descriptions on the forum and studies the reviews of his colleagues, taking into account the comments.
Drawing of a power bumper for a UAZ
Let's look at what advantages a UAZ bumper created on its own has:
- Saving money. By making a reinforced bumper with your own hands, you can avoid significant expenses.
- Opportunity to add your ideas to a ready-made solution. Even using ready-made drawings, you can go your own way during production, improving the designs of others.
- The ability to take into account all the features of your own car by installing a reinforced bumper on it.
- The prospect of making money by creating a bumper for a UAZ 469 with your own hands, drawings, descriptions for friends or neighbors who are not able to solve this problem themselves.
Even though the list given is not too long, but, firstly, it is not complete, and secondly, each item in itself is a sufficient reason to spend time and effort on making a bumper for a UAZ.
Installation of a kenguryatnik on Niva-2121
Installation of the kenguryatnik on the VAZ-2121 is simple. Installation is carried out on a platform, preferably with a pneumatic lift.
It should also be mentioned that the VAZ-2121 kenguryatniks come in different sizes.
Installation of a kenguryatka conditionally consists of several stages:
- fitting (there will be no problems with this, since all kenguryatniks for the VAZ-2121 are made identical with differences only in the lower part);
- It is temporarily recommended to remove the hood to avoid damage during installation;
- if collapsible kangurins are used, which consist of two parts, then they are mounted separately on the fastenings (naturally, this possibility is provided only in the 4th and 3rd revision models with article number “M”);
- securing the structure with bolts.
If, in addition to the front one, you also plan to install a rear guard, then you should make sure that the fastenings are not covered with corrosion. Otherwise, you will have to completely clean it, boil all the brackets and only then install it.
To install the rear guard, you can also use those variations that adhere to the bumper. By the way, they also protect the car’s rear lights and license plates (you don’t have to worry about losing them when driving through tall vegetation, for example).
Russian cars with kengurins
“Europeans” intended for off-road driving, almost all were originally designed with kangurins. The creators of such foreign cars carefully consider the weight of the vehicle and its feasibility before launching a new SUV model into industrial production. How are things going with the Russian auto industry?
For a long time, experts and representatives of the State Duma have been unable to agree on whether to allow the installation of such a tuning element on personal cars.
Important! Experts do not advise installing a guardrail on a car that is not intended for such tuning.
- Traffic rules allow the installation of an additional body kit on the bumper only for vehicles with an off-road class. For all other cars, according to traffic regulations, the installation of a guardrail is prohibited.
Drawings and measurements
Creating a drawing of the future product is the first and most important stage. It will require you to use your imagination and certain design skills, so make sure you are confident in your abilities in advance. You need to measure the nose of the car: the length and width of the bumper you will be protecting. You should also consider all the jumpers and their sizes. Based on the data obtained, create a project for a kenguryatnik.
Build a circuit similar to this using your measurements.
If you are not sure that you can handle such a responsible job, contact more experienced colleagues. The easiest way to find information is on the Internet: the network contains drawings for almost every SUV model. But be careful, because the width and height of the car play a decisive role, which means that the design of the kenguryatnik for the Niva cannot be used for the UAZ Patriot, for example.
Experts recommend using stainless steel tubes as the material for making the cage. Their optimal diameter is 45–50 cm. For particularly large cars, tubes up to 60 cm in diameter can be used. In addition, you can combine pipes of different sizes, using more massive ones for the frame and narrower ones for the lintels.
As a material, use stainless steel tubes of different diameters
In addition to the material itself, you will need the following set of tools:
- cardboard and glue for making a template;
- grinder for cutting metal;
- welding machine (for stainless steel it is optimal to use the argon-arc type, but it can cause difficulties for beginners);
- pipe bender (can be replaced with pipe angles)
- corners for pipes at 90 and 45 (if it is not possible to use a pipe bender);
- trimmer for joining pipes;
- plugs (optional);
- abrasive for grinding joints;
- fine-grained sanding paper;
- antistatic cloth;
- degreasing composition;
- anti-corrosion primer and spray gun for it;
- spray paint;
- plates with holes for bolts;
- bolts for fastening the structure;
- jack for installing a kenguryatnik.
Whatever one may say, welding is not the easiest process. It requires attention and accuracy. Metal cut in the wrong place will be difficult to glue into place, so all work should be carried out with extreme caution. To minimize the possibility of errors, make a template from cardboard according to the drawing before cutting the pipes. Assemble it with glue or regular tape, and then try it on your car.
Before you start cutting metal, make a template from cardboard and try it on your car
If you are satisfied with everything: the dimensions correspond to the dimensions of the car, and the overall design looks symmetrical and attractive, you can begin making a metal cage.
- In accordance with the parameters specified in the drawing, mark the pipes and mark the locations of the cuts.
- Cut the pipes along the lines.
- If you have a pipe bender, you can cut one pipe for the frame and then bend it to the desired angle using this device. You should be especially careful here, because the bends on both sides must be absolutely symmetrical.
- If you do not have experience in bending pipes, you should use metal angles. It will be easier to work with them: you need to weld a part of the tube to each side of the corner.
- In order to make T-shaped joints and install jumpers, it is best to use a trimmer. It can be used to cut sections of pipes.
- The resulting jumpers are also welded to the frame.
- All seams should be abraded and polished. This way the joints will become completely invisible.
- Install plugs on the open ends of the pipes.