After purchasing a car, it is often necessary to modify some of its components, elements, and mechanisms. The reasons are the most banal: upgrading the audio system, installing additional speakers, a subwoofer, etc.
Standard designs do not allow placing a row outside the factory components. Depending on the complexity of the task, we carry out the Lada Granta upgrade both independently and with the help of workers from a specialized studio.
Choosing an acoustic shelf for the Lada Granta brand
When purchasing such elements for a car, you need to understand that not only the appearance of the structure is important, but also its quality. Therefore, it is worth finding out in advance more information about different manufacturers and their products.
LADA Granta
In terms of price range, shelves with plywood reinforcements are popular. Most auto stores have these acoustic shelves in stock. Along with the main elements, you need to purchase special wires to connect the system. They are sold separately.
Many people focus on the practical appearance of the top covering, choosing the most attractive options. Faux leather or carpet looks beautiful in the cabin. Such materials are easy to clean.
Acoustic shelf models vary. Their designs, appearance, and materials differ. And speaker pedestals can be either protrusions or holes. When choosing, it is recommended to choose the modification that will match the interior color and fit well in all respects.
Speaker shelf
What should be the power of good speakers?
When analyzing the concept of speaker power, it is worth remembering that the value of this indicator should be slightly greater than the outgoing power of the car radio. Otherwise, all attempts to obtain more or less high-quality sound will be reduced to zero.
Video: how to find out the power of the speakers
Typically, speakers are labeled with a rated and peak power rating, with the former indicating the power at which the speaker can be operated for long periods of time without the risk of damaging the cone or overheating the coil, and the latter indicating the maximum power the speaker can withstand for a short period of time. .
Removing the old shelf
Installation of the acoustic shelf is carried out behind the seats, in the place provided for this. The correct placement of the shelf in both the sedan and the liftback interior enhances the sound. Therefore, installation must be done responsibly. Initially, the factory acoustic shelf of the Lada Granta sedan is removed as well as the liftback.
Acoustic shelf
This is done this way:
- All rear seats are pulled out.
- The seat belt fastenings are unscrewed.
- Plastic pistons are wrung out.
- The factory shelf is removed.
Speaker shelf
General information about music in Grant
In this section, we will consider general non-professional points about music in the Lada Granta.
Installing music
If you have a VAZ 2190 in the basic configuration (or Norma) with audio preparation, then installing music will entail the following steps:
- Removing the radio cover - on the back side there are ISO connectors for power and speaker wires. You will have to run the wires to the rear speakers yourself if you plan to install an acoustic shelf, since from the factory the wires are routed only to the doors;
- Installation of a 1-DIN radio (for 2-DIN you will have to farm, cutting out a jumper in the panel and looking for a suitable frame);
- Finding and connecting the plug of the pre-installed antenna - often the antenna wire on the roof is lost under the ceiling trim and it turns out to be easier to install the antenna separately than to find the factory cable;
- Pulling wires into the trunk to connect an amplifier, subwoofer and speakers installed in an acoustic shelf.
- To install the amplifier, you will also need a separate power cable from the engine compartment directly from the battery terminal through a fuse.
Removing the jumper in the panel trim is mandatory when installing a 2-DIN GU. Installing an acoustic shelf entails dismantling it behind the back of the rear seat. The non-standard shelf will cover the ISOFIX mounts!
If your car does not have audio preparation, you will have to separate the power wires for the radio and the speaker wires in the door.
What kind of acoustics to put in Granta
Common budget music option:
- radio tape recorder within 5000 rubles with the ability to adjust the equalizer;
- 16 cm component speakers with tweeters at the front;
- acoustic shelf with speakers 6*9;
- amplifier with subwoofer in trunk.
Let's look at an example of such a configuration with a price tag in the table (the calculation is for ordinary people, not audiophiles) based on Pioneer devices:
| Example of a Pioneer device | Average price tag in rubles | |
| Head unit (radio) | DEH-S101UB | 4000 |
| Front 16cm acoustics | TS-G1733i | 2000 |
| Acoustic shelf | 1500 | |
| 6*9 “pancakes” | TS-R6951S | 2200 |
| Amplifier 2-channel | GM-A3702 | 4300 |
| Passive subwoofer in a box | TS-WX305B | 5200 |
| Subwoofer installation kit | 1500 |
As a result, we get budget sound in the region of 20 thousand. If we consider professional head units, premium-segment speakers, installation of custom podiums and other delights, the price tag can easily jump over a hundred thousand, amounting to a third of the cost of the car itself.
The choice of podium depends on the type of windows, budget and number of speakers.
Podiums in the front doors
We will not describe the technology for making podiums with our own hands. Next is a selection from various resources for ready-made podiums and manuals for self-production.
Please note that most of the podiums in the front right doors interfere with the opening of the glove compartment.
- Here is a link to a store with ready-made options and prices. It's not advertising that's a source of inspiration.
- Here is a photo report on self-production with comments.
- This link is just a photo report without comments.
Professional acoustics
For car audio fans who are ready to invest large amounts of money in Granta, we have selected a couple of bright videos. Look what you can build on the Lada base and look decent in the area and at local car audio competitions. Enjoy.
Correct installation of the shelf
The second stage of work will be preparing the space for the new acoustic shelf. First, you should soundproof the interior of the Lada Grant. So that there are no rattles and no noise is heard when moving. The layer of insulating material must be very thin. Otherwise, the new design will not fit into its place.
Shelf Lada Granta
After insulation, the element with speakers is installed. It is important to take into account the rules for connecting to the audio system, since the rear shelf on the Lada Granta is connected to the front panel. The wires are laid along the thresholds. To prevent damage, the wires are hidden in special tubes. After this, the wiring is connected to the radio wires.
Installing speakers in Granta rear doors
The procedure for working with the rear doors is identical to the front ones.
An important difference: homemade spacers are not required here. The plant produces a set of special mounts for installing 13 cm speakers in the rear doors
Articles for ordering online:
| Speaker Mount - Rear Left | 21907901033 |
| Speaker Mount - Rear Right | 21907901032 |
| Rear left column trim | 21906202095 |
| Rear right column trim | 21906202094 |
| Trim for front left door | 21906102097 |
| Trim for front right door | 21906102096 |
Installation sequence:
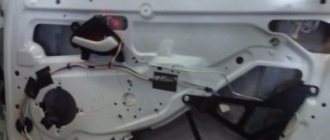
- Disassemble the door;
- Cut a hole in the door card for the lining;
- Install the speaker mount on the door;
- Replace the standard audio terminals with normal ones;
- Connect the wires to the column, secure it;
- Install the trim and assemble the door.
Installation features
It is not recommended to install speakers in the standard shelves of the Lada Granta interior. Because, regardless of manufacturer and quality, factory standard shelves are not designed to hold a ton of speakers. Once the holes are cut and the acoustic elements are installed, the shelf will quickly sag and the entire sound system will deteriorate.
Shelf Lada Granta
The acoustic shelf of the Lada Granta liftback differs from the shelf for a sedan in shape. This is worth considering when purchasing a unit. Also, you need to carefully study the tips and instructions written in the documentation for the elements. Even better, before installation, watch a video from specialists in replacing shelves in Lada Granta.
You should have a good understanding of wires and their connection to the radio. And also, find out in detail how to hide them inside the cabin.
Beginning car owners, when installing sound, will learn for the first time about such a device as the Lada Granta acoustic shelf. What is this device, what functions does it perform, and most importantly, how to make it yourself?
Some points of sound insulation
You can increase the level of noise and vibration insulation in various ways. If we are talking about a standard design, then they practice pasting with felt fabric on the outside / underneath.
When it comes to a liftback shelf, it is already soundproofed from the start; there is no need for additional noise reduction.
We’ll look at how to remove the Grant liftback trunk shelf below.
When installing custom shelves, they are soundproofed by default during the manufacturing process.
Purpose of the acoustic shelf
An acoustic shelf is a device that serves to soundproof the trunk and is a mounting location for the rear audio speakers. As a rule, when replacing standard speakers, a situation arises when the installation holes are widened with a handy tool to install new ones. This is strictly forbidden, because in addition to the above functions, the shelf serves as a kind of stiffening rib, and if its configuration changes, the car body may move. Let's look at everything in order.
When purchasing a car, it is not always possible to immediately determine how well the vehicle is prepared for the subsequent installation of an audio system. The standard version, which includes a standard radio and speakers with low sound quality, usually does not satisfy the sound preferences of most drivers. Then the question arises of replacing all components of the car's audio system.
Audio system installation
When buying a Lada Granta, a car enthusiast cannot always determine whether the vehicle is prepared for the subsequent installation of an audio system. Typically, such a system includes simple speakers with average sound quality. However, this option rarely satisfies drivers.
Lada Granta is quite well prepared for the installation of modern audio systems. This preparation includes having the necessary wiring to connect the car radio and speakers. To carry out this work, you will need a screwdriver, bits, edges, a knife and insulating tape.
Before installing the acoustics, you need to turn off the power to the vehicle. To do this, remove the minus terminal from the power supply. Please note that the antenna is often installed in the upper right corner of the windshield. A place for it is cleared in advance.
The electrical wiring must be routed under the dashboard to the glove compartment. There is a small plastic trim on the right side of the glass that will need to be turned off. The modern antenna is equipped with an excellent self-adhesive panel that can be easily and quickly mounted to the windshield. In order for the antenna surface to bond well with the glass, you will need to degrease it. A special tool is used for this. A similar technique is used when installing speaker systems on various brands of cars.
The next step involves installing the main instrument holder. Before installation, the serviceability of the radio is checked. To do this, you need to turn it on and listen to the radio station.
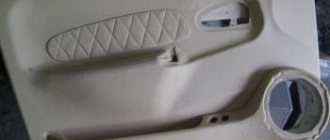
To ensure the speakers are installed correctly, first remove the door trim. To do this, glue a special ESP connector located on the back side. The manufacturer took care of the presence of an opening with a diameter of 30 cm for the speaker. Speakers are installed in these places. The final stage is to turn on the minus terminal and tighten the screws.
Selecting and installing a radio
The car radio is not included as standard equipment.
For many owners of the basic configuration, this question is far from idle, since a standard radio is simply not provided for in it. The designers of the Lada Granta Standard allow for the possibility of self-installation of the radio. To do this, just read the instructions carefully, follow them carefully and precisely, and be sure to carry out the installation on a completely de-energized vehicle. To ensure that the installation of a radio tape recorder causes a minimum of problems when choosing, the following factors must be taken into account:
- To make installation easier, it is recommended to buy a 1 DIN radio;
- speaker elements should not protrude as much as possible;
- optimal size is about 16 cm;
- It is preferable to install acoustics in the front doors.
And now, the radio and speakers have been selected, the instructions have been read, it’s time to get started. This is what the step-by-step installation of the radio looks like:
- Using a screwdriver, you need to remove the plastic pocket in the place where the radio will be installed.
- On the reverse side we find wires and slots that we will connect to the radio connectors.
- Next, you need to install a metal frame in the pocket. It is secured in your pocket by folding metal tabs. They are called clips.
- All that remains is to connect the wires and connectors to the slots and install the radio in the frame.
This is the simplest installation option, which is possible provided that the selected device fully complies with the parameters specified by the Lada Granta Standard designers. But, as always, in life there are options. If you select a 2 DIN radio, installing it is also possible, it will only require a little more preparation, since you will have to use improvised means to change the shape of the pocket itself. If the connectors do not match the slots, adapters are provided. You can watch the video for more details on the installation process.
General information about music in Grant
In this section, we will consider general non-professional points about music in the Lada Granta.
Installing music
If you have a VAZ 2190 in the basic configuration (or Norma) with audio preparation, then installing music will entail the following steps:
- Removing the radio cover - on the back side there are ISO connectors for power and speaker wires. You will have to run the wires to the rear speakers yourself if you plan to install an acoustic shelf, since from the factory the wires are routed only to the doors;
- Installation of a 1-DIN radio (for 2-DIN you will have to farm, cutting out a jumper in the panel and looking for a suitable frame);
- Finding and connecting the plug of the pre-installed antenna - often the antenna wire on the roof is lost under the ceiling trim and it turns out to be easier to install the antenna separately than to find the factory cable;
- Pulling wires into the trunk to connect an amplifier, subwoofer and speakers installed in an acoustic shelf.
- To install the amplifier, you will also need a separate power cable from the engine compartment directly from the battery terminal through a fuse.
Removing the jumper in the panel cladding is mandatory when installing a 2-DIN GU.
If your car does not have audio preparation, you will have to separate the power wires for the radio and the speaker wires in the door.
What kind of acoustics to put in Granta
Common budget music option:
- radio tape recorder within 5000 rubles with the ability to adjust the equalizer;
- 16 cm component speakers with tweeters at the front;
- acoustic shelf with speakers 6*9;
- amplifier with subwoofer in trunk.
Let's look at an example of such a configuration with a price tag in the table (the calculation is for ordinary people, not audiophiles) based on Pioneer devices:
| Example of a Pioneer device | Average price tag in rubles | |
| Head unit (radio) | DEH-S101UB | 4000 |
| Front 16cm acoustics | TS-G1733i | 2000 |
| Acoustic shelf | 1500 | |
| 6*9 “pancakes” | TS-R6951S | 2200 |
| Amplifier 2-channel | GM-A3702 | 4300 |
| Passive subwoofer in a box | TS-WX305B | 5200 |
| Subwoofer installation kit | 1500 |
As a result, we get budget sound in the region of 20 thousand. If we consider professional head units, premium-segment speakers, installation of custom podiums and other delights, the price tag can easily jump over a hundred thousand, amounting to a third of the cost of the car itself.
The choice of podium depends on the type of windows, budget and number of speakers.
Podiums in the front doors
We will not describe the technology for making podiums with our own hands. Next is a selection from various resources for ready-made podiums and manuals for self-production.
- Here is a link to a store with ready-made options and prices. It's not advertising that's a source of inspiration.
- Here is a photo report on self-production with comments.
- This link is just a photo report without comments.
Professional acoustics
For car audio fans who are ready to invest large amounts of money in Granta, we have selected a couple of bright videos. Look what you can build on the Lada base and look decent in the area and at local car audio competitions. Enjoy.
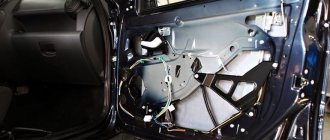
Installation of front speakers
A distinctive feature of installing acoustics on the Lada Granta is that the designers of this model made this process a little easier by providing standard places for placing the speakers. All wires are routed, only minor modifications will be required if the speaker diameter is slightly off. In addition, another problem may arise during operation.
Due to the discrepancy between the dimensions of the installed speaker and the expected dimensions included in the design, after installation the process of lowering the front side window may be disrupted. In this case, modification will be needed. Let's return to the front speakers. In short, the installation process will look something like this:
- We make a podium. It is a ring, the thickness of which is 1 cm, and the outer diameter coincides with the diameter of the column, for which we first draw it on paper. Then you need to cut out the blanks from plywood. Important! If the thickness of the plywood is less than 11 mm, each podium will require two identical parts, which will then need to be glued together. If the problem described above occurs with opening the front side windows, it becomes necessary to increase the thickness of the podium. The desired result can be achieved by increasing the number of glued parts.
- To install the podiums, you need to make markings on the door. In this case, there is no need to remove the casing.
- After marking, you can remove the trim, use a drill to prepare holes in the metal for attaching the podiums, and securely fasten them to the door.
- Then you should lay the wires, return the casing to its place and secure the mesh.
Before you begin installation, watch the video carefully.
Now let's move directly to the acoustic shelf. Currently, manufacturers offer ready-made models, designed taking into account the dimensions of the car and the sizes of the speakers of popular manufacturers. But experienced auto mechanics advise using a rear shelf made of wood. They improve sound quality due to the fact that the trunk acquires the properties of a closed box. Of course, you can select the required model in a store and buy it, but can you be sure that this shelf meets your requirements?
You can make an acoustic shelf from plywood yourself
Materials and tools for making a shelf:
- plywood;
- glue;
- fabric for covering;
- sound insulation material;
- wires;
- self-tapping screws;
- screwdriver;
- jigsaw
Shelf material
The standard design is made of impact-resistant polymer material.
A tuned version of a shelf made of wooden inserts - supports, covered with felt fabric, which also serves as a noise absorber.
At the customer's request, the shelf for acoustic speakers can be made of special wood. This is practiced if you want to achieve an “ideal” sound. Obviously, the cost is several times more expensive than analogues.
How to install and connect a shelf
First you need to dismantle the casing of the old shelf. The manufactured structure is installed in this place. The wires are hidden in the thresholds and connected depending on the chosen circuit: through an amplifier or directly to the radio. Installation completed.
For car owners, an important aspect when modifying a car is to achieve maximum sound quality from the car radio. Each car enthusiast who modifies a purchased car according to his own criteria begins to master this difficult task in his own way. Someone installs high-quality acoustics and the same radio and hopes to get high-quality sound.
And someone packs their car with the latest technology and tries to understand why the sound is far from ideal. This is especially true for the VAZ middle-class car, which is in great demand among owners.
Acoustic shelf for Lada Granta
The acoustic shelf for the Lada Granta is designed to maximize the extraction of high-quality sound from the installed speakers, transform an ordinary trunk into an acoustic box, and also securely mount the rear speakers. The factory version has the right to life only for the undemanding average person. It does not meet the needs of an experienced music lover at all. There is only one way out in this situation - a complete replacement, during which the Grant acoustic shelf along with the standard speakers is placed at the back in the intended place!
Reliable fastening
The purity of the sound depends not only on the speakers and receiver, but also on the conscientiousness of the technician installing the acoustics. The stronger the midbass is installed, the better. He doesn't need any extra vibrations! If the speakers are installed in doors, spare no expense on noise and vibration insulation (of the doors). Then the doors won’t rattle at high volumes, and the bass will sound much better. If you decide to install the speakers backwards, remember that there must be enough free space between them and the subwoofer (if you install one). The best solution in this case: speakers. in the rear doors, subwoofer. in the trunk.
If possible, ?query? receiver and amplifier directly from the battery to avoid interference, wheezing and sound distortion when the engine is running. But the wires that come from the “head” to the speakers, contrary to popular belief, they do not have a special effect on the sound quality. Only a true music lover can notice the difference in sound, and only if the audio equipment installed in the car is of very high quality. Therefore, it makes sense to replace the “standard” ones included in the kit. wires are special “gold plated” No. A special set of wires is required only when equipping a car audio system with an amplifier. But even in this case, buy very expensive “cores”. not worth it.
Where is the ?ringing??
It is advisable to install mid- and high-frequency speakers in the front part of the cabin. There should not be so-called rear speakers in a car. Put the acoustics back. It's like listening to an orchestra with your back to the stage! For proper sound in a car, good front speakers and tweeters are enough. in the A-pillars. It is advisable to connect them as close to the “midbass” as possible. However, this is often very difficult and requires a global rework of the interior trim. Therefore, install “high-frequency” speakers. near the mirrors, in the lower part of the A-pillar.
The direction of the tweeter (to the cabin or to the windshield) is determined by ear during preliminary connection. If the standard seats of the car do not allow installing a 6-inch speaker, then you can buy a ready-made “podium?” (usually available for sale for VAZ cars), install the speaker on an adapter plywood ring or order a podium from a specialized studio.
The only acoustics that can be placed in the rear are . subwoofer. The direction of low-frequency sound, unlike higher ones, is not picked up by the ear, and such a placement of the subwoofer will not affect the sound quality. How to choose the right subwoofer for your car If you are determined to achieve the best sound in your car, you cannot do without a subwoofer. The subwoofer ensures deep, loud bass, making the car's acoustic design complete and impeccable.
Many reputable magazines talk about subwoofers, test various models of famous brands, choosing a winner from them
But is it so important for the average consumer that a certain subwoofer received the highest score as a result of the tests? After all, they mainly test models from such giants as KENWOOD, PIONEER, SONY, not to mention manufacturers of Hi-Fi equipment. MTX, JL Audio, etc.
They are so good that the average ear simply cannot feel much difference in their sound. So, if you are not going to participate with your car in competitions for the best car acoustics, then the cost of music in the car should not exceed 20% of the cost of the car.
And no matter how connoisseurs of good car audio resist. The starting point should be the car. It’s hardly worth buying a powerful, expensive subwoofer in order to voice the already singing details of the interior of a domestic product. Therefore, it is recommended to use this standard system for calculating the cost of installing equipment for many: if the car cost $1,500, you should not spend more than $300 on music. those same 20%.
Subwoofers
There are two types: active and passive. Active subwoofers, unlike passive ones, have a built-in amplifier. At the same time, you are sold a certain set of “instant preparation and ready-to-eat”, i.e. you just need to connect two contacts from the head unit, and the system is ready to work. In this case, there is no need to coordinate components (head unit, amplifier, subwoofer).
However, active subwoofers have their drawbacks, namely: their manufacture uses simpler and cheaper components, which inevitably affects the sound quality. To connect a passive subwoofer, you must select an amplifier that, when bridged, provides the same power that is indicated in the passport of this subwoofer as nominal.
Lada Granta and acoustics
Acoustic shelf on grant
One cannot but rejoice that among all the new products in our automobile industry, Granta is best designed for modification to modern radios and speakers. This is a convenient, competent car device and pre-installed factory cables for any powerful acoustics.
Acoustic shelf grant
The market offers a wide selection of colors of ready-made shelves to suit any style and interior design. Ready-made models to suit the dimensions of any car are offered for purchase. But often, already during installation, it turns out that the dimensions are incorrect and the shelf does not fit. You have to waste time, make a replacement and return the money (the price of the shelf is not that low). From experienced experience: if you want to do it well, you have to do it yourself! Moreover, you can mount the shelf yourself, even in your garage, without resorting to the services of dubious and expensive craftsmen.
How to remove the rear parcel shelf on a Grant sedan
After purchasing a car, it is often necessary to modify some of its components, elements, and mechanisms. The reasons are the most banal: upgrading the audio system, installing additional speakers, a subwoofer, etc.
Standard designs do not allow placing a row outside the factory components. Depending on the complexity of the task, we carry out the Lada Granta upgrade both independently and with the help of workers from a specialized studio.
Do-it-yourself manufacturing and installation
Shelf acoustic fret grant
For installation you will need simple standard materials:
- Plywood sheet;
- Wooden blank;
- Cardboard or fiberboard sheet;
- Rag;
- Set of bolts and screws;
- Saw;
- Drill;
- Glue;
- Covering fabric (fleece or carpet);
- Jigsaw;
- Soundproofing material;
- New acoustics;
- Wires;
- Sharp knife or scissors;
- Insulating tape;
- Construction hairdryer.
Preparatory work
So, if the owner has firmly decided to upgrade on his own, then we prepare the following:
- set of automotive tools;
- new shelf, insert;
- speakers (optional);
- blocks with electrical wires for connecting to the central power circuit;
- other components at the discretion of the owner.
The shelf on the Granta sedan is located behind the rear row of seats. By default, the design does not have holes for speakers. This is precisely the stumbling block for many owners.
The final stage
Note. The life expectancy of the speakers directly depends on the density and thickness of the protection. The less chance of large debris getting in and causing mechanical damage to the speakers, the better. Be sure to check that they are not catching on the seats and headrests.
- We fasten the speakers to the shelf with self-tapping screws, connect the wires with a screwdriver;
- We install the finished shelf in place and fasten it with bolts.
Advice. You should definitely make sure that the standard ventilation holes are open, otherwise the window will quickly fog up.
Acoustic shelf installed
Operation completed! We take photos, shoot videos, share instructions with friends, and enjoy the results of the work done with our own hands.