| Sooner or later, the lamps in the headlights begin to burn out, so you may need instructions on how to replace the lamps in Kalina's headlights. This photo report will also be useful if you decide to replace conventional headlight bulbs with LED ones. |
You can replace the lamps without removing Kalina's headlights. For clarity, the replacement process is shown with the headlight removed. Remove the negative terminal from the battery.
What lamps are used on Kalina
The first generation Lada Kalina uses several types of light bulbs and indicator lights.
The location and names of the elements are as follows.
- Distant lights - H1;
- Low beams - H2;
- Front marker light and side direction indicators – W5W;
- Turn signals – PY21W;
- Front fog lights – H11;
- Fog lights at the rear of the vehicle - P21;
- Stop and reverse lamp – P21W;
- License plate backlight – W5W.
Standard illuminators often do not meet the requirements of motorists. They poorly illuminate the road and quickly fail. Therefore, some users replace the low beam bulbs on the Lada Kalina with diode models. To do this, you should select the appropriate elements on the market and modify the optical elements of the car.
Some drivers believe that simply replacing light bulbs is enough. However, it is not. The factory optics of the first viburnum are not adapted to work with such elements and will quickly fail. There is not enough space in the headlight to remove large amounts of heat from the diode, which leads to deformation of the lens and the plastic housing itself.
To tune the device, you must replace it completely. There are many offers and options for optics modifications on the 2022 market. Just select the appropriate option and install it instead of the standard one.
A similar replacement of a 2nd generation Lada Kalina light bulb is not required. The latest generation factory optics are already capable of working with diodes and have the necessary margin for full operation. The manufacturer insists that the most advanced versions of cars are launched on the market with diodes and replacement as such is not required.
step-by-step instructions, features and recommendations :: SYL.ru
Your vehicle's side lights must be in good working order for it to drive safely on the road. But not every driver changes burnt-out lamps immediately. This is usually done when visiting a service station, and before that you can drive hundreds of kilometers without working lamps. Let's figure out how to replace the side light bulb on some domestic and foreign cars. Often the work is carried out according to a similar principle, but there are also minor differences.
General information
To indicate the vehicle at night when parked, the design provides side lights. They are present both in front and behind the car. Usually these are low-power lamps, which, unlike the head light, are not in the focus of the reflector. For this simple reason, it makes no sense to install more powerful halogen or LED lamps. Moreover, this can lead to melting of the wiring, which is not designed to withstand such a large load.
Replacing lamps on Kalina with your own hands
The vehicle's optical devices are made according to a modular system. Therefore, replacing Lada Kalina light bulbs is possible without outside help. To complete the procedure you will need.
- Flashlight. Light bulbs are removed from the inside of the lighting fixtures and the fasteners are poorly illuminated. To make work easier, you need to illuminate the workspace. Under ideal conditions, assistance will be required. The second number will only highlight.
- Standard wrenches and flathead screwdriver. Keys free access to required parts. Use a screwdriver to remove the stoppers. You can also use an awl or a special puller. To work with the tidy, you will need a Phillips screwdriver.
- Paper napkins and alcohol, without this, replacing the low beam bulb of the Lada Kalina 1 and other elements will be impossible. If the user accidentally touches the working area of the emitter or headlight, fingerprints and accumulated dirt will need to be wiped clean. Otherwise, grease can greatly reduce the efficiency of the optics and shorten its service life.
- You may also need a fastening compound like VD 40. Some screws are prone to boiling and oxidation, which makes them very difficult to unscrew.
- Set of TORX keys. Some drivers complain that the car uses “stars” that cannot be unscrewed with ordinary keys. It is unknown where such elements come from.
It is also recommended to wash the car before performing the procedure - it is much more pleasant to work with clean surfaces.
LED alternative
When deciding which H7 low beam lamps are the best for a Nexia, Ford or any other car, many experts unanimously agree that the future lies with LEDs. Moreover, this applies not only to the automotive industry, but also to most other industries where there is a need for high-quality lighting.
Such lamps are the most economical among all other analogues. Compared to incandescent elements, energy consumption is 10 times lower. As for the service life, there is an opinion that LEDs can work up to 100 thousand hours. They also withstand vibrations and shocks, and the luminous flux meets many requirements. Due to the absence of mercury, such lamps are completely harmless, so they can be safely disposed of. There is only one important detail here - their use requires special optics. Due to their characteristics, LEDs cannot shine at a point, which imposes certain difficulties, since conventional optics do not allow you to adjust the luminous flux.
What are the best H7 low beam bulbs in the rain? The choice fell on LEDs, but it is worth knowing about a number of disadvantages. The most important of them is the very high cost, due to which this market segment is not so widespread. Another equally important point is that the stated deadline is completely refuted by practice. Instead of 11 years, the manufacturer itself guarantees good performance for 3-5 years. This is due to one phenomenon called LED degradation. That is, the crystals gradually die off - first they lose their brightness, and then they become completely silent. Another drawback is the unpleasant spectrum. As experts in the field of psychology note, approximately 80% of respondents have a negative opinion regarding the use of such lamps at home.
Replacing low beam lamps
The standard replacement of the low beam bulb on a Lada Kalina is quite simple. The procedure does not require deep knowledge of auto electrics or the presence of specialized tools.
To perform the procedure correctly, you must prepare all the tools and follow the sequence of actions.
- Place the car on the handbrake and remove the terminals from the battery. It is recommended to drive the car into a well-lit garage or leave it outside, this will make it easier to see small parts and fasteners.
- Remove the plastic block cover. Here you can tighten the element by hand without using tools. In some configurations, the plug can be made of hard rubber (what it depends on is unknown). It is important to consider that the element often dries out and cracks. Therefore, you need to buy it in advance.
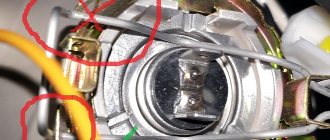
- The replacement of the low beam bulb on the 1st generation Lada Kalina continues, at the stage of disconnecting the wiring. The contact group often gets stuck, which forces the master to tense up a little. By rocking the block from side to side, you will need to pull it off its seat. In this case, you need to hold the device body so as not to damage the element. If a part is broken, it cannot be repaired - the entire unit is replaced.
- Next, remove the lamp retaining spring from the hook. Then you will need to move it to the side so that it does not interfere.
Important! You should not completely pull out the latch - it will be extremely difficult to install it in place. The bar simply slides out so that the light bulb can be removed.
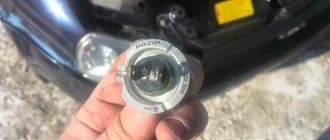
- Next, the light bulb itself is pulled out of the socket. You only need to support the emitter by its metal elements; you should not even touch the glass part of the lamp.
- Installation of the new part is carried out in the reverse order. At the same time, it is important to check the reliability of the device. If there is increased vibration, the lamp may fall out of its socket, which may cause an accident.
Replacing a 2nd generation Lada Kalina light bulb is done in the same way. The headlights of the cars are almost identical in terms of design.
Difficult choice
A wide variety of lamps for low beam lighting sometimes confuses when choosing a worthy product. However, it is worth highlighting important criteria for yourself and adhering to them as strictly as possible:
- luminous flux brightness;
- how comfortable the lighting is for the eyes;
- life time;
- Energy consumption;
- price.
At the same time, when deciding which H7 low beam lamps are the best, you should not be guided only by cost and purchase models that do not inspire confidence due to their low price. The personal safety of the driver and his passengers depends on the correct choice. From the total number of manufacturers, several companies can be identified that offer products of decent quality:
When giving preference to one brand or another, it is worth asking what its reputation is. Although there are pleasant exceptions, when products from a little-known company are not inferior in quality to world leaders.
Replacement of dimensions and DRLs
Dimensions are more likely to fail than main optics. Therefore, replacing light bulbs of Lada Kalina dimensions is a more popular procedure. Repairing a breakdown is as simple as repairing other parts of the optics.
- Open the plastic cover of the illuminator and remove the lamp base from its seat. All actions are carried out with extreme caution - despite the external quality factor, the light bulb is quite fragile.
- Next, the standard emitter is removed from its socket and replaced with a new one.
If the cause of the failure is moisture, you can protect the contacts with hot melt adhesive or a similar sealant that is resistant to elevated temperatures. Replacing the running light bulb of the 2nd generation Lada Kalina is carried out in the same way as the first modification.
Recommendations for lighting devices
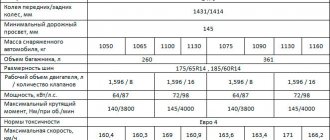
In the second modification of Kalina, the designers used an H7 type base for low-range lighting. The main source for installing such lamps is the OSRAM brand, owned by the Germans. Lighting devices with a power of 55 W are installed, which is a sufficient parameter for this type of car.
The light bulb consumes a standard on-board voltage of 12 V. Motorists have the right to choose analogues when replacing them themselves. Products labeled GE SportLight or Philips Extreme Vision are in demand. Although the price tag for such products is above average, the cost is offset by a longer service life than competitors.
If you are using a budget option with optimal parameters, we recommend paying attention to the domestic product offered by the Mayak brand. The actual service life of the lamps is decent, and the price will please any car owner. There are few negative reviews about the product online.
It is important to know that the VAZ company does not guarantee the performance of lamps that are not covered by the recommendation, and there is no explanatory text in Russian on the packaging.
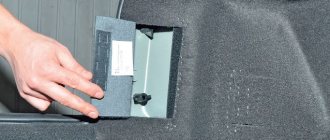
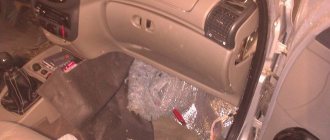
Replacing light bulbs in the dashboard of Lada Kalina
Cleaning the viburnum is a separate matter. There are a large number of lights, indicators and alarms here.
The procedure is performed like this.
- As usual, set the car to the handbrake and remove the terminals from the battery.
- Next you will need a Phillips screwdriver. Using the tool, remove the two mounting screws. It is important to carry out the change very carefully - the panel is in a visible place and scratches can significantly spoil the appearance.
- After the decorative trim is released, you can carefully pull it out, overcoming the resistance of the latches. The lower part of the panel is equipped with special rollers. The guides must “survive” after repair,
- Under the decorations there is a mount for the tidy itself. The screws are also unscrewed with a Phillips screwdriver and the panel is removed.
- Next, the actual replacement of light bulbs in the Lada Kalina panel begins. To do this, you need to remove the device from the mounting socket and disconnect all contact groups and wires from the device.
- Once the panel is completely removed, you will need to move to a well-lit area to continue the repair procedure.
- Subsequent replacement of light bulbs in the Lada Kalina dashboard is carried out with a thin tool. After finding the required element, it should be disconnected from the socket and removed from the seat. This is done with pliers or special pliers. Grasping the cartridge, you need to turn it clockwise and pull it towards you.
- Next, you need to diagnose the cartridge; if the latter is working, only the illuminator is changed.
- Installation and assembly are performed in reverse order. At this point, the replacement of light bulbs in the Lada Kalina panel is completely completed.
Fog lights
PTFs for Kalina are installed only on expensive trim levels. However, all wiring is installed from the factory and there are “ears” for mounting on the bumper. To install headlights, you will have to purchase a power button, frames in body color and a relay.
Installation of fog lights:
- Use a screwdriver to remove the plugs under the PTF.
- Screw the lights into the standard recesses.
- Snap frames to hide excess cavity.
Lada Kalina Cross uses matte black plugs that do not require painting. When installing on your own, you should buy bolts for fastening the headlight in advance.
How to connect the electrical part
Connecting the PTF to the standard wiring does not take much time. To search for the braid, you should inspect the area of the spar at the entrance of the main beam. The PTF plug is taped to the wires with electrical tape.
Fog lights Kalina 2 are often equipped with detailed instructions and an additional switch that must be installed instead of the old module to turn on the light. Connecting to pre-laid wiring does not take much time and does not require laying additional contacts.
If there are no power cables in the braid, you will have to independently pull the wires into the cabin, connect them to the connector, fog lights with plus and minus, and connect them through a relay. A detailed description of the connection is included with the part in the form of a diagram.
During the installation process you will need:
- insulating tape;
- copper wires;
- corrugation;
- connectors suitable for lamps.
Stern maintenance
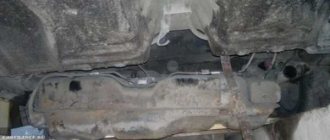
On a Lada Kalina, replacing the brake light bulbs may be necessary if the headlight is damaged or the element itself burns out. Due to the design features of the car, repairs can only be performed by completely disassembling the rear panel and removing the entire headlight.
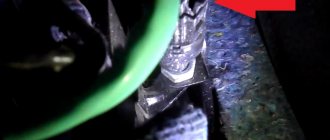
- On a Lada Kalina, replacing brake light bulbs begins with dismantling the headlight. To do this, you need to remove the plastic cover from where the seat belt comes out. The second part is attached a little lower - near the belt reel. The nuts are unscrewed with a No. 10 wrench. You should be extremely careful when doing this. If a part flies into the body panel, you will not be able to get it out.
- As soon as the device is freed from its mounts, all lamps will be accessible. You can remove them from the mount by turning the base 45 degrees clockwise.
- Next, the light bulb itself is removed and replaced with a new one.
- Reassembling the headlight is performed in reverse order.
Conclusion
Replacing lamps or restoring their functionality is not a difficult task, so it can be done without involving car service specialists right on the road. To do this, you need to make sure that you always have the necessary spare parts - a set of fuses, a relay and the appropriate light bulb. The video in this article will give you the opportunity to find additional information on the above topic.
Any car enthusiast, even with little driving experience, is well aware of the importance of good lighting on the road. Especially in cases of poor visibility, which include heavy rain, dense fog and other natural phenomena. At the same time, many drivers are interested in the question of which H7 low beam lamps are the best. Most car manufacturers equip their products with this type of headlight lamps. But not every vehicle owner knows what they are.
Headlights
Replacing a headlight yourself will require preparation of the car and tools. To work you will need:
- set of wrenches;
- screwdrivers;
- rag;
- gloves to protect hands.
For ease of work, you need to wash Kalina in advance and clean the space in the garage. To replace the headlights, you need to remove the bumper and unscrew several mounting bolts.
Dismantling
Steps required to remove headlights:
- Open the hood lid.
- Disconnect the battery terminal.
- Pull out the clips from the front of the fender liner.
- Unscrew the radiator grille fasteners and remove it.
- Unclip all the clips along the contour of the bumper and unscrew the screws.
- Remove the bumper without scratching the corners of the fenders and headlights.
- Disconnect the optical power plug.
- Remove the two screws holding the light on top.
- Remove the lower headlight bolts.
- Carefully remove the part.
Repair
To disassemble the Kalina headlights, they will need to be dismantled. You can repair the Kalina headlight by polishing the glass, replacing it, washing the internal parts, or restoring the reflector.
To remove the glass you will need:
- Dismantle the part.
- Heat the headlights in the box using a hair dryer.
- Tear off the glass.
- Carry out all the required work and assemble the lantern using a special sealant.
To disassemble the headlight, it will take several hours, depending on the experience of the car owner. Replacing Kalina's headlight glasses will improve the exterior and increase light transmittance.
While working, it is important to follow safety precautions, do not leave the hair dryer unattended and use gloves
Installation
Before installing the lights, you should wash the mounting points and mounting space. Installation is carried out in the following order:
- The power plug is connected.
- The Kalina headlight mounts are aligned and secured with standard bolts.
- The bumper is hung from the front and screwed onto self-tapping screws.
- The radiator grille is installed.
- The left and right fender liner clips are being returned.
In versions with fog lights, you will have to additionally connect the connectors to the lamps when installing the bumper and disconnect them during removal.