The timing belt (gas distribution mechanism) is an extremely important component of the engine in every car. Any damage, let alone a belt rupture, will lead to a breakdown, after which the vehicle will no longer start. Therefore, the timing belt requires regular diagnostics and replacement. Below we will talk about how the timing belt is replaced on Renault Logan with 8-valve engines of 1.4–1.6 volume.
Frequency of replacing the timing belt on Renault Logan
According to the regulations, the timing belt must be changed every 60,000 km or after 4 years of active use. Nothing bad will happen if the replacement occurs even at 70,000 km, according to the regulations. But in practice, everything depends on driving style: for some car enthusiasts, the belt loses ground already at 50,000 km, for others it lives quietly up to 100,000 km. Motorists recommend changing the belt after 45,000 km, slightly adjusting this figure based on diagnostic results.
When exactly should you change the belt?
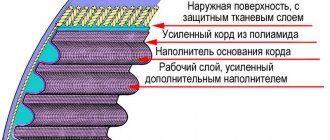
According to the regulations, Logan must undergo maintenance every 15,000 km. Even if the planned replacement of the timing belt is still far away, it must be carefully inspected during maintenance. The fact that it will soon fail is signaled by:
- delamination of the rubber-metal base;
- the appearance of cracks and cuts;
- separated cord threads;
- folds, bends, dents and other deformations;
- damaged teeth;
- oily belt material.
If the belt is in order, and the scheduled replacement is still far away, it is simply tightened and left until the next diagnosis.
What happens if you don't change the belt on time?
The result of untimely replacement of the timing belt can be severe deformation of the valves in the cylinder head. In this case, repairs can be very expensive. The valves bend on both versions of the 8-valve engines installed on Logan, both on the K7M and on the K7J.
Timing belt diagram
The gas distribution system looks like this:
- Timing kit
- Camshaft
- Thrust washer
- Camshaft pulley
- Timing belt
- Tension roller
- Bolt M6
- Camshaft pulley bolt 8200651816
- screw
- Hairpin
- Washer
About the car
This car of this model is equipped depending on the country to which it will be delivered. This also applies to motors, the working volume of which can be from 1 thousand cm 3 to 1600 cm 3. Motors of the following modifications are intended for the regions of the Russian Federation:
- The 1.4 MPi engine has a displacement of 1400 cm3, 8 valves in the cylinder head.
- Engine 1.6 MPi with a displacement of 1600 cm3, 8 valves in the cylinder head.
- K4M engine with a working volume of 1600 cm3, 16 valves.
The main feature of this line of engines is the fact that the timing valve mechanism uses a toothed belt. The difference between belts for engines with 8 and 16 valves is their length and number of teeth. Power units can work together with both manual gearboxes and automatic transmissions. This car model is very popular among taxi drivers in the Russian Federation and CIS countries, as it is easy to maintain and has a decent service life before major repairs.
1.6 MPi engine on Renault Logan
Chain or belt
When considering the technical conditions of the car being developed, the designers considered the question of how to drive the timing valve mechanism. The chain was considered a more reliable drive element in this mechanism, but many motors in this drive already have a belt. Its use in the drive makes it possible to reduce the length of the power unit, which is mounted transversely in the engine compartment.
If you follow all recommendations for engine maintenance and use high-quality consumables, this will allow you to use the engine for a long period without significant problems. Therefore, in the debate about whether to use a belt or a chain in the drive in Renault Logan engines, the toothed belt won.
What is needed to replace the belt?
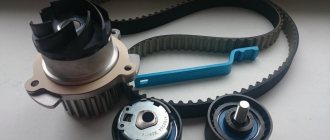
New timing belt
For engines with a volume of 1.4 and 1.6 liters, the same set is always used: a belt and a tension roller. Therefore, manufacturers sell them as a set. The table shows the article number of the original timing belt for Renault Logan with 8 valves, article numbers of several popular analogues, as well as approximate prices for them.
| Manufacturer | vendor code | Approximate price, rub. |
| Renault (original) | 7701477024 | 2 100 |
| Contitech, Germany (analogue) | CT988K2 | 1 800 |
| Dayco, Italy (analog) | KTB259 | 1 510 |
| Amd, Korea (analog) | AMDKITBR63 | 1 340 |
Tools
To work you will need:
- heads and keys for 8, 10, 16, 18;
- extension;
- jack;
- engine support;
- ratchet with 10mm head;
- fork for tensioning the roller.
Articles
Belt + Tensioner Pulley Kit for Various 8-Valves:
- For internal combustion engine K7M (K7J) 710-7701477024, width 17.3 mm, number of teeth 96;
- For internal combustion engine K7M (K7J) 800 - 130C17480R. The difference between the two sets is small. The belts are the same, the rollers are different.
Set “belt + two rollers (tensioner, guide)” for 16-valve gasoline engines:
- K4M 690 or 697 - 130С17529R, 27.4 mm, 132 teeth.
All items are taken from the Renault catalog.
Kit for 16 valves
Step-by-step instructions for replacing the timing belt
If everything is prepared, it’s time to start the procedure. Typically it takes about 2.5 hours. For beginners - a little more, for experienced drivers - a little less.
Video: Replacing the timing belt on Renault 1.4–1.6 8V (K7J, K7M) until 2010. Logan, Sandero
The procedure follows the following algorithm:
- Jack up the front right wheel and remove it. Then snap off the dirt-proof plastic casing, under which the generator drive belt is hidden. Remove the belt.
- Next, you need to unscrew the crankshaft pulley, which is held in place by an 18mm bolt. If you have a pneumatic impact wrench, the procedure will go without any problems. Otherwise, you need to stop the flywheel with a large flat-head screwdriver and then unscrew the bolt. It is better to involve an assistant in the process.
- The right engine mount must be removed. Before this, a reliable stand is placed under the engine (it is better if it is made of wood, so as not to damage the crankcase protection). The support rests against the connector, which provides access to the drain plug.
The other end of the block rests on the floor
- After making sure that the engine is securely fastened, snap off the absorber purge tube and wire and put them aside.
- Then you need to unscrew the 5 16mm bolts connecting the right engine mount, body and timing cover. After this, the support assembly is removed.
- To avoid breaking the plastic tip during operation, the probe is removed. The hole must be plugged with tow or plug. After this, they begin to dismantle the timing belt casing. First, remove the lower part, which is secured with 3 bolts. The heads can be 8 or 10 (depending on the year of manufacture). The unscrewed casing is removed through the bottom of the engine compartment.
Easier to display with engine removed
- The upper cover of the iron casing is held in place by 5 bolts - 4 by 13 and 1 by 10. If the car was manufactured before 2008, it will have 16 bolts. According to the manufacturer, the lower bolts are secured with sealant, because oil channels pass through this place. To unscrew these bolts you will have to make additional efforts. In addition, when assembling the unit, they again need to be “seated” on the sealant.
- Once the bolts are removed, the top cover can be removed. Access to the timing belt will open.
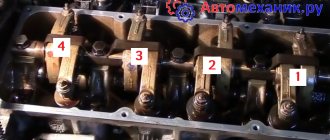
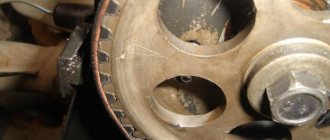
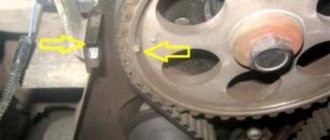
- Next you need to distribute the pulleys according to the marks. The arrow on the camshaft gear is pointed at the DACIA badge (letter D), which is cast on the valve cover. The gear will not give up easily, so you need to use a bolt holding the crankshaft pulley. Place a large nut on it and screw it all the way, then turn it clockwise until the marks connect. To make it easier to grip the key, you can install a stand under the head.
- When the marks are set, it is necessary to remove the tension roller. To do this, take a 16mm socket, unscrew the bolt, remove the roller and timing belt from the axle.
- So, the old belt is removed. Before installing a new one, you need to clean the gears and all other parts usually hidden under covers. They are washed and blown with a stream of compressed air.
- A roller is installed on the cleaned axle and not fully tightened with a nut.
- Installation of a new belt begins with the crankshaft gear. There are indicators on the belt that will help you align the lower and upper parts with the marks on the gear. Next, the belt is pulled over the pump, camshaft and roller. It is important to ensure that the mark on the belt is connected to the pointer on the camshaft. To avoid confusion, the inscriptions on the belt are carefully studied: the part with arrows and inscriptions about the manufacturer is the top of the belt. The near mark will go to the camshaft, the far one to the crankshaft.
- Immediately after installation, the belt will sag between the pulleys. The slack is removed by slightly turning the camshaft gear against the direction of engine rotation.
- Next, you need to properly tension the belt. To do this, use a special fork key (if there is no original one, you can use a key for VAZ models with front-wheel drive). The fork is inserted into the roller, slightly pulled up and scrolled counterclockwise. The optimal tension is considered to be in which the timing belt deviates from its original state by 60 degrees. Once a suitable tension is found, the roller is tightened with a nut.
- Then you need to check the work. The crankshaft pulley mounting bolt is turned 2 turns and checked to see if the marks match and if the belt tension is maintained. If something is wrong, loosen the roller nut and tighten the belt again.
- If everything is in order, reassemble it. It is important to remember that the two lower bolts of the upper timing cover must be secured with sealant to prevent oil leakage from the internal channels.
Causes!
The timing belt can break for various reasons.
From all of the above, we understood that on all types of Renault Logan car engines, when the timing belt breaks, the valves bend. And below we will describe the reasons why breaks occur in general and how to avoid it.
- Timing belt wear (poor quality or technical wear), oil ingress, etc.
- Various foreign bodies getting under the belt
- Pump jams
- Tension roller(s) jam or loosen
- The crankshaft or camshaft is stuck
In order not to worry about the condition of the timing belt, you must constantly monitor its external condition, the degree of tension, replace it according to the regulations or change it immediately if there is any damage to it. Make sure that oil and other liquids do not come into contact with the belt (this will cause premature wear).
Consequences of a broken timing belt
This was once a piston and part of an engine
If, when the timing belt breaks, only the valves are bent, we can say that this is great luck. In some situations, such a breakdown may cause damage to the pistons themselves and the surfaces of the cylinders.
Symptoms and behavior of the car that require replacing the timing belt
As a result of increased loads or wear of the connecting rod and piston group, the timing belt may jump one turn, as a result of which the engine will begin to trip and operate unstably. This phenomenon is a symptom of checking the condition of the belt and its correct installation.
And now the hard way
We place a mark on the camshaft opposite the icon on the cylinder head, which was circled in the previous photo. This is top dead center. Unscrew the plug on the cylinder block.
We screw in a special tool, which is a bolt with an M10 thread and a long thread of 75 mm. We tighten it instead of the plug, thereby locking the crankshaft at top dead center. We install a new timing belt and tension it. And the question arises: why these extra operations?
2271-3-8-06-01
Timing mechanism drive:
- 1 — crankshaft toothed pulley;
- 2 — timing belt;
- 3 — tensioner roller;
- 4 — toothed pulley of the camshaft driving the exhaust valves;
- 5 — toothed pulley of the camshaft driving the intake valves;
- 6 — support roller;
- 7 - coolant pump gear pulley
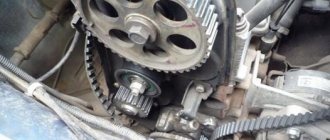
To assess the condition and replace the timing belt, the right support of the power unit should be removed.
This is interesting: What is a grenade and CV joint
2271-3-8-06-09
We insert a mounting blade through the window in the clutch housing between the teeth of the flywheel ring intended for starting the engine with the starter.
Attention! Be careful not to damage the surface of the teeth needed to operate the crankshaft position sensor (they are much larger).
Advantages and disadvantages of power units
Considerable experience in operating Renault cars with all three types of liquid-cooled engines allows us to draw up a fairly objective picture of their strengths and weaknesses, and for the two models K7J and K7M these characteristics are almost identical, and only the K4M engine has significant differences due to more modern technological solutions, and which one is better is up to the buyers to decide.
Advantages of K7J and K7M:
- low cost and simplicity of engine design;
- reliability: confirmed service life is more than 400 thousand km;
- versatility and maintainability;
- ease of maintenance;
- high torque;
- good “elasticity” of engines, equal to 1.83.
Disadvantages of K7J and K7M:
- relatively high fuel consumption;
- instability of speed when idling;
- the absence of hydraulic compensators in the design, as a result - the need for constant adjustment of the valves (after 20-30 thousand km);
- “bending” of valves when the timing belt suddenly breaks;
- increased “fluidity” of crankshaft oil seals;
- poor reliability of cooling system elements;
- noisy and prone to vibration.
The advantages of the K7M model over the K7J include only an increase in maximum power by 12% and maximum torque by 11%. But the 1.6 liter internal combustion engine also pays for these advantages with an increased appetite of 4.5%, so which is better is a moot point.
- reliability, practical service life exceeds 400 thousand km;
- compliance with Euro-4 environmental standards;
- increased power (102 hp);
- low noise and vibration resistance;
- more modern and reliable cooling system.
Compared to 8-valve engines, the K4M 16V is much quieter, vibration-free and has the same service life, but significantly more power and torque. Disadvantages of the K4M motor:
- expensive spare parts;
- “bending” of valves when the belt breaks;
- weak “elasticity” of the engine, equal to 1.53, as a result - problems with car acceleration when overtaking.
Thus, a detailed analysis of the technical characteristics of all three ICE samples, as well as practical experience in operating Renault Logan with these power plants, allows us to determine which engine is better. The more powerful 1.6 liter internal combustion engine with liquid cooling is still somewhat preferable to its “big brother” 1.
4 l. Power 75 l. With.
It’s simply not enough for comfortable driving of a loaded car, either on a country highway or during short “jogs” around the city. And in the debate between a 16V motor and an 8V motor, the first sample is the undisputed leader. The only characteristic in which 16V is inferior to its opponent is “elasticity”.
For other characteristics, 16V is better. Renault's liquid-cooled V16 engine is simply much more modern and gives the driver more options.
Adjustment
On engines with 8 and 16 valves, the tension is adjusted differently. On the K4M motor, you need to unscrew the screw with a “13” key. Then a hexagon is installed in the slot on the roller (see figure). One edge is 6 mm.
Automatic timing belt tensioner
By turning the hexagon, the rectangular marks coincide. Then the screw is tightened again.
As for 8-valve engines, there is no “automatic tensioner” here. Everything is adjusted manually. First, loosen the fastening using a 16mm wrench.
Tension roller, 8-valve Renault
Using a special key shown in the photo, the roller is turned to the right or left and the desired tension is obtained. The mounting screw is then tightened.
The special tool in question is a key for 8-valve VAZ engines. Good luck with your choice!
DSC_9570
In the clutch housing window, use a bright helmet to mark the flywheel and the edge of the clutch housing window.
This way we fixed the position of the crankshaft.
Next, without touching either the camshafts or the crankshaft, carefully remove the old belt using the technology shown in the first method.
This is where some difficulty awaits us. The fact is that the camshafts, as soon as they are no longer connected by a belt, spontaneously rotate at small angles under the action of the valve springs. For now, we leave them in the positions in which they themselves stopped. Under no circumstances do we change the position of the crankshaft. We replace the rollers and, having first put the belt on the camshaft pulleys, ask an assistant to tighten the camshafts until the marks on them are exactly aligned.
And now the easiest way
We set the camshaft mark simply up. We specially adjusted the old mark on the timing belt for clarity. The mark on the belt may not match due to the fact that the belt arms between the marks are different and with each revolution it will shift by two teeth. If it suffers, then after a certain number of revolutions all the marks will fall into place, but we don’t need this.
The circled icon will be needed if we are going the long way; more about it at the end of the article.
If the old mark on the belt and camshaft match, then the second one on the belt and crankshaft too.
If you have a newer Logan, the camshaft sprocket will look like this.
And here one nuance arises: in order to pull out the belt, you will have to move the sprocket toward you, using a special puller or a homemade device.
We mark the marks on the belt with a marker; if they are not preserved, we remember which camshaft. Loosen the tension roller nut and remove the belt along with the roller.
For the new generation, the roller is already automatic and the belt is tensioned until the indicator matches the cutout on the roller, always in the direction indicated by the arrow on the roller.
The new timing belt has marks and direction of movement.
We apply the old belt to the new one and are amazed at how clearly all the marks match.
We put the new timing belt in place, aligning the marks on the belt with the marks on the camshaft and crankshaft. We tighten it with a roller using the usual VAZ device. We check the tension of the belt, turn the long branch with two fingers and if it can be turned more than ninety degrees, then tighten it again. That's all. You can put back everything that was removed earlier.
2271-3-8-06-04
With normal belt tension, the movable pointer should coincide with the recess of the fixed pointer of the tensioner (for clarity, shown with the lower timing cover removed).
If the moving pointer is offset relative to the fixed one:
- counterclockwise - belt tension is insufficient;
- clockwise - the belt will be tightened.
In both cases, the belt tension should be adjusted.
2271-3-8-06-23
Remove the support roller and roller bushing.
Install the new support roller in reverse order.
When installing a new timing belt with arrows on it, we orient it so that the arrows coincide with the direction of movement of the belt (clockwise).
We install the belt on the toothed pulleys of the crankshaft, coolant pump and camshaft pulleys.
Then at the same time we put the belt on the tensioner roller and install the device on the stud of the coolant pump housing.