The Priora has three brake lights: two in the rear lights and an additional one installed in the spoiler. Their purpose is to warn drivers of cars moving behind about braking. Operating a vehicle with non-functioning brake lights is prohibited. If the lights on the Priora do not light up, you need to contact an auto electrician or fix the problem yourself. In the latter case, the driver needs to have a minimum set of tools to find and eliminate the causes of the malfunction.
Removing and installing the flashlight
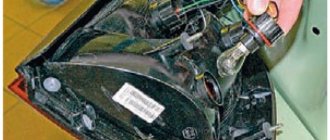
The rear light is accessible from the luggage compartment of the Priora. To directly get to the lamp, you need to pull back the trunk trim.
The process of removing the rear light
- We open the trunk and fold back the upholstery in the rear part of the wing.
- Then you can see 3 wing nuts that hold the flashlight on. We unscrew them while holding it on the other side.
- Next, pull the flashlight towards you and remove it from the rear fender.
- Removing the lamp socket is done by turning it counterclockwise and pulling it towards you.
- Installation is carried out in reverse order.
Led lights
Making rear diode headlights on a Priora is becoming an increasingly popular way to decorate the optical elements of a car.
This method will not allow you to change the appearance of the equipment, since standard lighting devices act as the basis, but they are significantly altered.
Despite this, diode taillights on Priora have better luminescence efficiency than standard light elements - incandescent lamps
Another positive quality of replacing rear light bulbs on a Priora (station wagon, sedan, hatchback - no matter what body type) is the ability to create certain patterns from ribbons, for example, you can arrange light elements in turn signals in the form of arrows, in brake lights - in circles and etc.
The essence of creating rear diode lights on a Priora comes down to the fact that the headlight is disassembled, the standard lighting elements are removed from it - light bulbs along with sockets, and everything inside the housing is painted over with black paint (along with the reflector).
Then tapes in the form of the previously selected pattern are glued to the inner surface of the glass. Next they are connected to the on-board network. All that remains is to assemble the lantern, and that’s it – the diode headlights for the Priora are ready.
Read Installing a laser brake light on a car with your own hands
Replacing lamps
After the lamp is removed, you can begin replacing the lamps.
- To do this, unscrew the lamp socket by turning it counterclockwise.
- We take out the cartridge. The lamp should be removed from the socket by slightly pressing it and turning it counterclockwise 90 degrees. After this, the lamp should come out of its seat.
- Install new lamps in reverse order.
Brake lights don't come on completely
If the brake lights on the car stop lighting completely, then you should look for a break in the wires, in the limit switch or a faulty fuse. The search for a breakdown should begin with the fuse box. On its cover there is usually a table showing which circuit is protected by which fuse link. If it is missing or the information in it is unreadable, you can use the owner's manual for the vehicle.
If the required fuse has blown, it cannot be replaced until the cause is determined. This usually happens when there is a short circuit or the insulation of the wires is damaged and they touch the housing. A similar effect is observed when water gets into electrical connections. In this case, it is necessary to dry the area where moisture has entered.
To speed up the process, you can use a hair dryer (being careful not to melt the wire insulation or sheathing elements). Then you need to remove the fuse from the holder and test the circuit after it with a multimeter
Often the wires fray at the point where they pass from the body to the trunk lid. Typically, the casing must be removed to detect cable damage. Therefore, in the absence of proper experience, it is better to entrust this work to a service center. If damage is found, the insulation coating must be restored. To do this, you can use ordinary insulating tape.
If the fuse is OK, you can assume the limit switch is faulty. It is located in the pedal assembly. It is necessary to inspect the condition of the switch and test it with a multimeter while the brake pedal is pressed. The multimeter should show a resistance of less than 1 ohm. If it is large or the switch has mechanical damage, it must be replaced. Due to the complexity of such an operation, it is better to entrust it to experienced car service workers.
If both the fuse and the limit switch are not damaged, this indicates a broken wire. To find such a fault, you will also need to open the casing. If you lack experience, it is better to entrust these actions to a car service.
If a wire break is detected, it is necessary to strip the insulating layer from the wire, make a connection and insulate the joint. A break in a section of wire is repaired by soldering. To insulate the connection, you can put on heat shrink tubing and heat it until it is fixed to the wire. If the terminal breaks, it is removed from the plastic case and replaced with a new one, crimping the stripped end of the wire into it, then inserted back.
What kind of lamps are installed in the Priora headlamp?
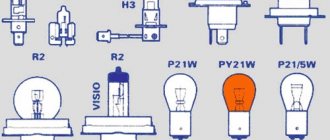
The Priora's rear light has 4 lamps, which are responsible for turning on the turn signal, dimensions, reverse, brake light and PTF. They are almost the same, but have some differences.
- The turn signal lamp is marked PY21W and is orange; when installing a regular white lamp, the turn signal will blink white.
- The size and brake lamp has two spirals, which are responsible separately for braking and illumination.
- The reverse lamps and PTF lamps are the same.
Tail light lamp marking table
| Purpose of lamps | Marking | Peculiarities |
| Reverse | P21W | White |
| Turn signal | PY21W | Orange color |
| Brake light and dimensions | P21/5W | Two spirals for dimensions and a brake signal |
| Rear PTF | P21W | White |
H4 car lamp tests
1. Which lamps are the brightest were determined by the Test Lab channel (June 2020). The rating is as follows:
- OSRAM Night Breaker
- Philips X-Treme Vision
- Philips Vision
- Philips Vision Plus
- Philips Longlife Ecovision
- OSRAM U37R
- Narva
- OSRAM Cool Blue
- GE 50440U
Out of the standings:
- MTF Argentum
- OSRAM Super Bright
2. Test of H4 automobile lamps “Behind the Wheel” in the laboratory and on the roads (March 2022):
| Zone III (measurement direction: 0°-0°), lx | Counter. point B50L (measurement direction: 34′ up, 3°26′ left), lx | Counter. point 75R (measurement direction: 34′ down, 1°09' to the right), lux | Counter. point 50R (measurement direction: 52′ down, 1043′ to the right), lux | Notes | |
| Standardized values, lux | 1,00 | <0,60 | >9,60 | >9,60 | |
| Standard Philips H4 lamps | 1,00 | 0,60 | 9,60 | 9,60 | the light is visually white |
| ClearLight X-Treme Vision H4 | 1,00 | 0,34 | 15,30 | 26,50 | the light is visually white |
| Narva Xenon White H4 | 0,64 | 0,22 | 8,00 | 12,40 | light visually blue |
| MTF Light Aurum H4 | 2,04 | 1,00 | 12,88 | 28,40 | the light is visually yellow |
| LED MAS H4 | 1,20 | 1,20 | 1,40 | 1,40 | no cut-off line |
| DLED H4, 270 lm | 0,40 | 0,40 | 0,40 | 0,40 | no cut-off line |
| DLED H4, 900 lm | 7,60 | 4,24 | 7,20 | 5,70 | no cut-off line |
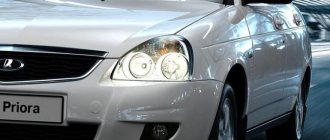
Replacing brake light bulbs and parking lights
With the release of the restyling of Priora 2, a large number of details have changed in it. The rear lights are especially noticeable; they have become LED. Now the dimensions have become lower, which gives the car a wider appearance in the dark. To achieve this effect, it is not at all necessary to buy and install LED lights.
To do this, just swap the backlight from the top position to the bottom. We don’t touch reverse and turns!
After such a replacement, when you press the brake pedal, the brakes will light up where the side lights and fog lights were previously illuminated. And the dimensions and rear PTFs will glow from the bottom of the lamp.
Replacing the brake light bulb of a Priora hatchback
1200 rub. for the photo report
We pay for photo reports on car repairs. Earnings from 10,000 rubles/month.
Write:
The light bulbs for the dimensions, brake light, reverse and turn signals in the Priora's taillight essentially change in the same way as on the Kalina, that is, to replace the bulbs you will first need to remove the taillight. To unscrew the headlights, you will need to partially bend the carpet (trunk lining) in order to get to the fastening bolts. It is not necessary to disconnect the light bulb connector because the length of the wires will be enough to set the flashlight a little to the side and unscrew the socket of the required light bulb. All bulbs in the taillight are replaced in the same way. To illustrate the process of removing the rear light of a Lada Priora hatchback and changing the brake, parking, reverse or turn signal lamps, watch the video.
We will show you how to replace the brake light, clearance and turn signal lamps in the rear lights of a Lada Priora Hatchback with your own hands. In essence, the light bulbs are changed in the same way as on the Lada Kalina; you first need to remove the entire headlamp and only then can you get to the light bulbs. With the trunk open, we need to unscrew at least one screw securing the trim and then disconnect the trim from the latch, pull out the latch and move the trim to the side to make it more convenient to continue working:
Or do this work through special technological holes in the carpet (with Velcro):
We choose the first method, it is much more convenient and everything is clearly visible. First, we’ll tell you how to remove the rear lights, two plastic screws are located in the photo at finger level, one is a little further away, you need to unscrew them immediately:
All this can be unscrewed by hand. When you unscrew the third one, it is advisable to hold the lantern so that it does not fall. After this, you can move the flashlight away and remove the light bulb we need. To do this, take it by the base and turn it counterclockwise. Insert the new light bulb all the way and turn it a little.
Video of replacing the brake signal lamp, dimensions, turn signal in the rear lights of the Lada Priora Hatchback:
Backup video instructions for replacing rear light bulbs in Lada Priora:
Replacing the brake light bulb, tail lights and turn signals on Priora Hatchback and Sedan
Video review of replacing light bulbs in the rear lights on a Lada Priora hatchback
Installing LED tail lights on Priora
As for LED tail lights for Lada Priora cars, their prices are of course a little higher. Namely, a set of such lighting equipment can be purchased for around 3,200 rubles. As for installing a flashlight instead of a standard one, there is absolutely nothing unusual here.
It is necessary to disconnect the power connector for the flashlight, which is standard for all types of Priora, and then, after removing the old flashlight, install a new one with LED lights in its place. There is no need to perform any additional actions or manipulations. And the result of the work done can be seen in the photo below:
Why do the brake lights on the Priora not light up?
There are several options for the malfunction:
- three brake lights do not light;
- one or two stops do not work;
- brake lights flash.
One brake light usually won't light because the bulb is burned out. In other cases, the problem lies in the wiring, fuses or in the limit switch that is responsible for turning on the brake lights when braking. A faulty switch can also cause another type of malfunction, when the brake lights do not go out and are constantly on.
A faulty switch, such as a lamp or fuse, is not repairable and must be replaced. Also, if the brake lights on a Priora do not light up, the reason may lie in oxidized contacts of the rear lights.
To solve the problem yourself, you need to have the minimum tools necessary to find a solution to the problem:
- screwdriver;
- multimeter
What kind of base is in the Priora fogs ~ AUTOINTERLINE.RU
Societies › Lada Priora Club › Blog › Who installed xenon in fog lights
I'm thinking about installing xenon foglights on my Priorka. In this regard, several questions arose:
1. Who did it, tell me how (links to blog posts are welcome)
2. How much does this business cost?
3. What you need to buy
4. What tasks may arise during operation
5. How difficult is it to do all this and can a new person do it?
Thanks in advance for your help!
Comments 25
you buy h21 xenon in the store. costs about 2 thousand, not bad. take off the bumper. look for a place for the blocks, attach it. insert xenon into the fog lights. connect the wires and enjoy
Is it possible to install it so that the bumper does not need to be removed?
4. What obstacles may arise during operation?
Only one so far, the light bulb is burned out, I can’t buy a new one, I drive like one-eyed)
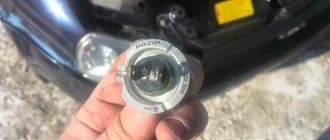
Replacing the light bulb in the fog light of LADA PRIORA Replacing the light bulb in the fog light of LADA PRIORA
Replacing the light bulb in the fog light of LADA PRIORA
Hi all! This video will talk about replacing the light bulb in the fog light on a LADA PRIORA
How to film... Test of H11 LED lamps in PTF. Choose which is brighter LED or Halogen
Test of LED lamps h21 in PTF. Choose which is brighter LED or Halogen
Buy Led lamps CL6 H8,H9,h21...
There are no problems. You buy fog lights, auto lights are better, Bosch often sweat, they cost me 1700. You buy a set of xenon lights with an H11 base, our set costs 1700-2000. You buy wiring for connecting fog lights for 500 rubles, if you don’t know anything about electrics, then go to an electrician so that he can connect the wiring and remove the button. Install the fog lights yourself, remove the bumper, unscrew the plugs and screw the fog lights in their place. The ignition units can be screwed to the lower headlight mounting brackets. When connecting fogs, do not forget to connect the ground and do not confuse the polarity.
I think the base would be h21, maybe I don’t understand it naturally, but I had one on the Boche.
I think the base would be h21, maybe I don’t understand it naturally, but I had one on the Boche.
listen exactly, confused, N 11, N7 - in my head
There are no problems. You buy fog lights, auto lights are better, Bosch often sweat, they cost me 1700. You buy a set of xenon lights with an H11 base, our set costs 1700-2000. You buy wiring for connecting fog lights for 500 rubles, if you don’t know anything about electrics, then go to an electrician so that he can connect the wiring and remove the button. Install the fog lights yourself, remove the bumper, unscrew the plugs and screw the fog lights in their place. The ignition units can be screwed to the lower headlight mounting brackets. When connecting fogs, do not forget to connect the ground and do not confuse the polarity.
Thanks for the instructions)
I had a problem, the lamps did not fit into the socket, but Ratfil solved the problem. Now on bumps one lamp turns off, my fault is that the block is not fixed, otherwise everything is trivial there))))
There is nothing complicated, the main thing is that the arms grow from a suitable place))
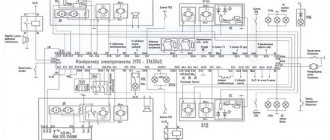
Additional mounting block Priora
- F1 (15 A) – main relay and starter interlock circuit fuse;
- F2 (7.5 A) – fuse for the power supply circuit of the ECU (controller);
- F3 (15 A) – Priora fuel pump fuse;
- K1 – main relay;
- K2 is the place where the Priora fuel pump relay is located.
Attention!
The relay and fuse diagram may differ depending on the configuration and production date of the vehicle. Current diagrams of the mounting block are presented in the operating manual for the date of manufacture of the vehicle (download from the official website).
Let us remind you that on our website you can find detailed instructions for repairing the Lada Priora with your own hands.
Often, car owners have a situation where the rear brake lights do not light up. An experienced motorist can guess what the reason might be. Therefore, it will not be difficult for him to determine the source of the malfunction and eliminate the problem. For beginners and inexperienced owners, it is advisable to contact specialists or study reliable information on car repairs.
This article outlines the main causes of this malfunction and provides recommendations for eliminating it. The owner of the car can make the repairs himself or contact a car service center.
Lamps in the rear combination lamp
Note: The following describes how to replace the bulbs in the rear combination lamp on the left side. Replacement on the right side is carried out in the same way.
1. Disconnect the wire from the negative terminal of the battery.
2. Open the tailgate.
3. Inside the luggage compartment, bend the two flaps of the upholstery, covering the three wing nuts of the studs that secure the combination light.
Note: Shown below with luggage compartment trim partially removed for clarity.
4. Unscrew the two wing nuts of the combination light mounting studs, shown below.
5. Holding the taillight with one hand, unscrew the remaining third wing nut with the other.
6. Remove and move the rear combination lamp slightly to the side to gain access to its lamps.
7. Now you can replace the burnt out lamp(s). As an example, let's replace the side light and brake signal lamp (all lamps in the rear combination lamp are changed in the same way).
8. Take the lamp socket and turn it counterclockwise.
9. Remove the socket with the lamp assembly from the flashlight body.
10. Pressing the lamp, turn it all the way counterclockwise and...
... remove the lamp from the socket. Dispose of the burnt-out lamp as waste.
11. Take a new lamp with similar characteristics (markings) and install it in the socket all the way in the reverse order.
Note: When installing the lamp, two protrusions located asymmetrically relative to the axis of the lamp must fit into the corresponding grooves of the socket.
12. After replacing the lamp(s), install the rear combination lamp on the car in the reverse order.