The Niva family of cars differs from VAZ passenger cars in permanent all-wheel drive - they have two drive axles. In total, the VAZ SUV has three differentials in its transmission - one for each axle and another center differential.
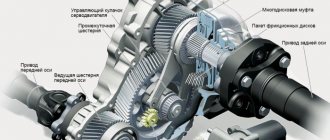
1. Oil seal; 2. Thrust ring of the front bearing of the drive shaft; 3. Front bearing cover; 4. Front drive shaft bearing; 5. Transfer case front cover; 6. High gear; 7. Gear clutch hub; 8. Gear clutch; 9. Low gear; 10. Transfer case housing; 11. Rear drive shaft bearing; 12. Drive shaft; 13. Transfer case rear cover; 14. Intermediate shaft; 15. Rear intermediate shaft bearing; 16. Rear differential housing bearing; 17. Installation ring of the rear axle drive shaft bearing; 18. Rear axle drive shaft bearing; 19. Oil seal deflector; 20. Rear axle drive shaft flange; 21. Rear axle drive shaft; 22. Bearing thrust ring; 23. Differential housing; 24. Rear axle drive gear; 25. Satellite; 26. Axle of satellites; 27. Retaining ring of the satellite axis; 28. Spring washer; 29. Driven gear; 30. Differential housing bearing retaining ring; 31. Differential locking clutch; 32. Front axle drive shaft; 33. Front axle drive housing; 34. Retaining ring of the front axle drive shaft bearing; 35. Differential bearing spring washer; 36. Front differential housing bearing; 37. Driven gear of the speedometer drive; 38. Speedometer drive housing; 39. Front intermediate shaft bearing; 40. Gearbox; 41. Elastic coupling; 42. Constant velocity joint; 43. Transfer case; 44. Shims; 45. Transfer case suspension bracket; 46. Rear engine mount bracket.
I. High gear engaged; II. Low gear engaged; III. Low gear is engaged, differential is locked.
The Niva transfer case is designed to distribute traction forces between axles, and operates on the principle of a 2-speed gearbox.
The device of the VAZ Niva transfer case
The transfer case is not present in all VAZ passenger cars, but only on cars with two drive axles. In the transmission, the transfer case (TC) is installed at the rear of the gearbox; a rear driveshaft is attached to its shank, which connects the transfer case to the rear axle. The front axle is also driven by the steering wheel; it is connected to the transfer case by a front driveshaft.
The reduction gear in the Republic of Kazakhstan is designed to obtain high torque, it is used to overcome difficult sections of the road, and helps to cope with off-road conditions. The VAZ Niva transfer case contains the following main parts:
- the body itself;
- front axle drive shaft;
- intermediate shaft;
- drive shaft;
- gears;
- bearings;
- differential housing;
- satellites;
- differential lock clutch;
- gear shift clutch;
- flanges (for connection to cardan shafts);
- oil seals;
- control levers.
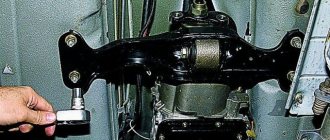
Additional transfer case support
In the classic version, the transfer case is attached to the floor of the car body using a pair of rubber-metal brackets. To adjust it in relation to the shaft flange, oval-shaped holes in the brackets are used. Regulating gaskets are sometimes placed between them and the body.
Many people know the Niva as a car with a high level of vibrations, which annoy a number of drivers. Therefore, many car owners install a third support, which allows them to reduce vibrations of the transfer case in longitudinal planes, which can relieve the load on the shaft with an elastic coupling. This design, welded by hand or bought for a small amount in a store (you’ll have to look), when moving on any roads at any speeds, should reduce vibration from the Niva transfer case levers to zero.
Read more: Where to look up traffic police fines by number
Installing a “device” purchased in a store is quite simple. It is necessary to replace three studs on the rear cover of the transfer case with longer ones from the kit. After this, you can screw the transfer case, center it and drill holes in the floor, onto which you can attach the box using washers, nuts, and bolts. That's it, the third support is ready. The mount is located somewhere behind the handbrake.
Transfer case Niva 21213
Model VAZ-21213 is an all-terrain passenger car with permanent all-wheel drive and differential lock. Brand 21213 is a restyled version of the first VAZ SUV, VAZ-2121. RK Niva 21213 has three gears:
- the first - with a gear ratio of 1.2;
- the second, lowered – with the number 2.135;
- neutral
21213 is equipped with 4-speed and 5-speed gearboxes, and when the first speed of the transfer case is turned on, the car operates in standard mode, the gear ratios in the transmission are from 5-speed. The checkpoints are as follows:
- 1 – 4,4;
- 2 – 2,52;
- 3 – 1,63;
- 4 – 1,2;
- 5 – 0,98.
When you turn on the second position of the transfer case lever (reverse position), the gear ratios change (lower):
- 1 – 7,83;
- 2 –4,48;
- 3 – 2,90;
- 4 – 2,14;
- 5 – 1,75.
On ordinary roads, the transfer case is always in first gear, the transfer case control lever (reduction gear) is pushed forward. The neutral gear of the RK disconnects the transmission, and in this position the car does not drive; there is also a neutral in the gearbox.
Motorists often ask the question: why is neutral gear needed in a transfer case? The neutral is used when connecting additional units to the transmission, for example, a mechanical winch; in this case, a power take-off must also be installed.
Lada 4×4 3D 2004, 81 l. With. — tuning
Lada 4×4 2121 Niva, 1987
Comments 20
I'm definitely saving money! Third support of transfer case 0 r! I cooked everything myself
1) Bulgarian 2) Metal 3 mm is enough 3) Freewheel electrodes 4) 3 bolts for 10 5) Hands
Everything works and makes me and the car happy!
This kind of support scares me, to be honest. And a lot of time has passed since then. This support is attached to the subframe.
The thing is cool, the soul is already happy for the owner! I now recommend installing “quiet” RK levers or making them yourself, how to make them yourself here is the link www.niva-faq.msk.ru/tehni...ansmis/pazdatka/com_r.htm saving almost 1300 rubles than buying from hucksters from Niva-Comfort
Thank you) True, this support required reworking so that everything would fall into place. I think I’ll do this somehow, but first of all I have to improve the stove! and then maybe I’ll work on the levers!
Congratulations! There is, however, one drawback to this support :-(. With it, the rear gearbox bearing breaks faster.
Thank you! For this reason, it seems to me that the industrial shaft will live longer! especially when driving in a swing!
It will need to be remade a little! otherwise it was not possible to set the correct angle of inclination of the RC. The rear part of the RC had to be lowered to the bottom (by about 5-10mm) so that everything would fall into place. I think this is not a buzz, what do you think?
Yes, Dim, the shaft will undoubtedly live longer. About the angle of inclination of the Republic of Kazakhstan. That’s exactly why it breaks, because of misalignment :-(. So it needs to be corrected. That’s why I switched to a support from the entire shnivy.
Clear! I will rule! I haven’t quite figured out how to do this yet (I think if the holes for attaching the support to the RC are drilled out to 10 and the hole for attaching the support itself to the pillow is drilled to 12, this still won’t be enough. Then do I have to cut and cook?
I think drilling out is not the best option. It will probably be better and faster to digest it right away...
I’m thinking of welding some fish soup and then drilling them on site! oh how!
Yes, Dim, the shaft will undoubtedly live longer. About the angle of inclination of the Republic of Kazakhstan. That’s exactly why it breaks, because of misalignment :-(. So it needs to be corrected. That’s why I switched to a support from the entire shnivy.
Hello! Damn, I installed such a crap, began to rejoice at the effect and came across this post :(((it just happened that the third support lowered the flange of the shaft by 2-3 mm. Just with all this, I replaced the shaft from a cross to a CV joint and I stuck a donut from Shnivy on it instead of my own one. If it’s not difficult to enlighten me about the misalignment that the third support introduces, otherwise the brain begins to sparkle from the abundance of contradictory information from the Internet
Malfunctions of VAZ transfer cases
The transfer case on the Niva is a fairly reliable unit; problems with repairs in the mechanism itself arise mainly due to insufficient oil level in the valve - if for some reason the oil leaks out, intensive wear of all parts occurs. Among the frequently occurring malfunctions are:
- vibration in the body at various speeds when the car is moving;
- vibration when the vehicle starts moving;
- noise in the transfer case when the car is slipping or turning;
- difficult upshift or downshift, difficult engagement of the lock.
Vibration
Vibration in the body is the main “disease” of the Niva; it often occurs due to improper alignment of the transfer case. Most often, vibration occurs on VAZ 21213/21214 cars, since the transfer case is mounted only on two supports on the sides of the body; on the Chevrolet Niva, the transfer case is already installed on three supports. But before you start adjusting the position of the transfer case, you should check the condition of other parts of the chassis - vibration can occur for other reasons:
- driveshafts are poorly secured;
- wheels are not balanced;
- there is play in the cardan crosspieces (vibration is especially affected by play in the rear driveshaft crosspieces);
- The vibration comes from the engine itself.
Vibration when starting off on a Niva can also occur for the following reasons:
- the mounting supports of the transfer case have become loose;
- The rubber on the RK supports themselves broke.
Ways to strengthen the structure
If the machine is often used in extreme conditions, it is necessary to take some measures to enhance the locking strength. For example:
- Change the profile of the side parts of the channel, making it lower.
- Install additional corners. They are welded to the side shelves.
- Reinforce the protective plate with corners.
If you have any questions when installing the subframe, you should watch the following video:
If you have at least basic knowledge about the structure and parts of the car, making and installing mounts for the transfer case will not be difficult. The most important thing is to choose quality materials and perform the installation correctly. Then the fastenings will last a long time.
Did you manage to solve your problem using the recommendations from the article?
Yes!
46.39%
No. More answers required. I'll ask in the comments now.
38.56%
Partially. There are still questions. I'll write in the comments now.
15.05%
Voted: 804
Transfer case alignment
Correct installation of the transfer case can be done in several ways. Most often in auto repair shops, repairmen use the following method:
- hang the car on a lift;
- loosen the transfer case;
- start the engine;
- engage the gear and accelerate the car according to the speedometer to the speed at which vibration occurs (often it occurs at speeds from 40 to 80 km/h);
- without using the brakes, reduce the engine speed, then turn off the ignition.
The transfer case itself is centered in place, all that remains is to tighten the fastenings of the supports.
You can also adjust the position of the RC using a wire; we do it as follows:
- loosen all four fastenings of the transfer case supports;
- fasten one end of the wire to the rubber coupling of the propeller shaft;
- we attach another piece of wire to the CV joint, bring the other ends of the wire to each other;
- rotate the shaft; if the transfer case is not centered, the ends of the wire will diverge during rotation;
- the task comes down to installing the transfer case using the selection method so that the ends of the wire practically do not diverge from each other in any position when turning the shaft.
Transfer case height alignment — Lada 4×4 3D, 1.7 l., 1995 on DRIVE2
Hello everyone! When I was patching the bottom, I cut off the transfer case mounting bolts, welded a thicker plate, drilled it through the old holes, inserted new bolts and grabbed them for welding. And what happened, what happened was that when I tightened the transfer case, the original floor sank in because... The new plate did not lie tightly. This means that you need to center it, and here’s how I did it. I screwed two pieces of wire onto the drive shaft, adjusted them so that the ends came together end-to-end when you lift them up, then twist the drive shaft and look, I got a gap of about 7 mm at the bottom. Since I didn’t find anything except thick paronite, I had to cut it. First I placed one plate at a time, and saw that the gap had become approximately half as large, then I placed another one at a time. Let's check... Now the wires don't diverge, at least I didn't notice it with my eyes! Now the transfer case is centered in height. Then I put the car on chocks, loosened the transfer case mounting nuts, accelerated it to 80 km/h using a choke and tightened the nuts. Let's hope that the vibration will become less!
All the best!
Eliminate vibration with additional fasteners
Installing the third support of the transfer case on VAZ 21213/21214 vehicles allows you to reduce the level of vibration of the transfer case; with this support it is easier to center the transfer case. The part can be purchased at auto stores or made yourself. The finished product comes with three long studs (for model 2121); to install the third support on this machine, you will need to unscrew the short studs from the transfer case housing and install new studs from the kit. We carry out repairs as follows:
- dismantle the front passenger seat in the cabin;
- remove the floor tunnel lining;
- in the cabin we move aside the carpet covering the body amplifier (in front of the handbrake lever);
- remove the transfer case (alternatively, you can simply hang it up, but removing the third support makes it easier to install);
- We attach the bracket of the new support to the body of the RC;
- we install the transfer case in place, center it in the optimal position, and fasten the side supports;
- we combine the third support with the body, drill two holes in the bottom;
- Using washers, bolts and nuts (from the kit) we attach the support to the bottom of the body.
Vibration is eliminated more effectively by installing a subframe under the transfer case. You can also make such a device yourself or buy a finished product at a car store.
In order to install the subframe, the transfer case must be removed. It is more convenient to carry out such work in a pit; we carry out repairs as follows:
- leave the car in neutral gear;
- disconnect the propeller shaft from the transfer case, it is advisable to mark the driveshaft flange and the drive shaft so that during installation, align the driveshaft according to the marks - this way, the occurrence of unnecessary vibrations is eliminated;
- dismantle the muffler mounting bracket;
- remove the gearbox traverse;
- jack up the transfer case, remove the side fastenings of the transfer case;
- We treat the places where the subframe fits to the body with Movil;
- place the subframe on the gearbox studs;
- we mark the attachment points of the subframe on the side members, drill holes, attach bolts to the body;
- we tighten all fastenings, except for the transfer case supports themselves;
- we perform alignment of the steering wheel;
- Finally tighten the transfer case supports.
It should be noted that installing an additional support or subframe on the steering wheel does not always lead to the desired effect; in some cases, vibration only increases.
Eliminating prerequisites
The misalignment of the transfer case occurs due to an undeveloped design. Therefore, many craftsmen strive to modify the fastening so as not to bother with alignment once a year. A special frame is used for this. In recent years, it can be purchased in stores, but you can also make it yourself.
The advantages of this modification are the following:
- The transfer case is mounted on the rigid base of the subframe. The attachment to the body is made through a subframe, this allows to reduce the level of vibration transmitted to the body;
- It plays the role of a kind of protection for the crankcase;
- Also worth mentioning is adding additional rigidity to the side members.
- Among the disadvantages, we can mention a slight decrease in clearance. Although, in light of the advantages, this does not play a special role.
To assemble the subframe you will need a square pipe. Some people use a corner, but in this case the structure will be less durable. The support plates are made of sheet steel.
Before assembly, you should cut off the old transfer case mounting bolts. Now it will be installed on the subframe. The pipe is cut to size and the frame is welded. After that, holes are drilled in the crossbars for fastening the transfer case. It is important not to make a mistake with the sizes. The next step will be assembling the mount to the body. Sheet steel support plates are welded to the subframe. Holes are drilled in it. After fitting, you need to drill holes in the floor of the car.
M12 bolts should be used for fastening
, as well as thick washers. After installing the subframe, do not forget to treat it with an anti-corrosion compound. This will increase the service life of the part. This is how, through simple manipulations, you can get rid of one of Niva’s sores.
Conclusion
. Even great cars have flaws. The domestic SUV Niva is no exception. During active use, vibrations emanating from the transmission may occur. That’s when the question arises of how to center the transfer case on the Niva. In fact, this work is not difficult, but there are some nuances that are better to know before starting work. Some people, knowing this feature of this car, install a subframe, this can significantly reduce the noise of the transmission.
The Niva family of cars differs from VAZ passenger cars in permanent all-wheel drive - they have two drive axles. In total, the VAZ SUV has three differentials in its transmission - one for each axle and another center differential.
The Niva transfer case is designed to distribute traction forces between axles, and operates on the principle of a 2-speed gearbox.
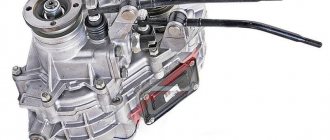
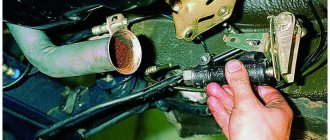
Removing the Niva transfer case
To repair the transfer case on a VAZ 21213 (21214), the unit must first be removed. We carry out removal in the following order:
- in the cabin we dismantle the plastic lining of the gearbox and gearbox levers;
- unscrew the knobs of the transfer case shift levers, remove the casing under them;
- disconnect the speedometer cable, for RK 21214 you will need to additionally disconnect the speed sensor;
- we unscrew the bolts with nuts securing the elastic coupling of the front and rear propeller shafts; in order to remove the bolts, the cardan shafts must be turned - they are removed one at a time in one specific position of the shaft;
- We install a jack (or other support) under the transfer case and mark the places where the side supports of the RC were attached. This is done in order to minimize the alignment of the transfer case during installation;
- unscrew the 4 nuts securing the gearbox to the gearbox;
- unscrew the 4 fastenings of the RC supports to the car body;
- Now all that remains is to dismantle the transfer case.
Installation of subframe step by step video
Video 2 off-road rides
For all its popularity, the Niva 2121 has a number of disadvantages. One of the most common problems with this SUV is increased vibration in the cabin. Moreover, the more the car is used, the more noticeable the vibration becomes.
The reason for the increased vibration is a structurally incorrect solution for securing the transfer case (transfer case). The fact is that this box on the Niva is attached directly to the bottom using silent blocks. And since during operation the vibration of the transfer case is significant, all this is transmitted to the cabin.
As a result, strong vibration affects the transmission and it wears out faster. Although the metal of the bottom in the area where the transfer case is attached is reinforced, due to strong vibration, the bottom is destroyed over time due to exposure to vibration.
Often, Niva 2121 owners, in order to reduce vibration in the cabin, install a subframe under the transfer case. This device is made of metal. The Niva subframe absorbs any vibration impact from the transfer case.
The subframe has enough advantages:
- Receives the oscillatory movements of the transfer case.
- Protects its body from possible damage when driving off-road.
- When installed correctly, there is virtually no displacement of the axis between the transfer case and the gearbox, which has a positive effect on the durability of both transmission units, as well as cardan and intermediate shafts.