Some motorists think that the air filter is not a very important element of the car, and you shouldn’t think about replacing it in advance. But the quality of air purification also determines how comfortable the operation of the vehicle will be.
Air is a necessary component of the working mixture, since its amount in this mixture is more than 90 percent. Therefore, if the air purity is insufficient, then the operation of the motor will be difficult. For example, in desert conditions, one day of operation without a filter would be enough for the engine combustion chamber to become completely unusable.
Removing the air filter and air intake of Lada Granta (VAZ 11183, 21116)
We remove the air filter to clean the cavity of the filter housing from dirt, replace it, and also to gain access to parts and components located in the front left part of the engine compartment.
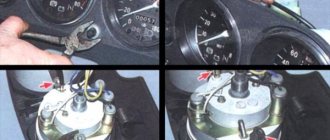
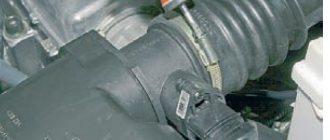
By pressing the lock of the engine control system wiring harness block, disconnect the block from the mass air flow sensor connector. Use a Phillips screwdriver to loosen the clamp securing the corrugated hose to the air filter cover pipe...
...and remove the hose from the pipe.
Using a Phillips screwdriver, unscrew the four screws securing the air filter cover...
We remove the canister purge valve from the filter housing holder without disconnecting the tube and the wiring harness block from the valve (see “Removing the canister purge valve”).
Remove the replacement element from the filter housing. The air filter housing is mounted in the engine compartment on three rubber supports. The two front supports are located on the upper cross member of the radiator frame, and the rear one is located on the battery platform bracket.
We remove the front right support from the slot in the filter housing bracket. Similarly, we remove it from the slots of the other two brackets of the air filter housing...
We remove the filter housing pipe from the rubber coupling of the air intake...
...and remove the air filter housing. Install the air filter in reverse order.
We remove the air intake for replacement, as well as when dismantling the fan or radiator of the engine cooling system.
Using a 10mm socket, unscrew the air intake nut. Remove the air intake from the radiator bracket stud and disconnect the rubber coupling of the air intake from the air filter housing pipe.
Remove the air intake from the engine compartment.
Remove the rubber coupling from the air intake pipe. Install the air intake in the reverse order.
Video on the topic “Lada Granta. Removing the air filter and air intake"
Quick release for VAZ air filter, injector. Advice from an auto electrician Removing the air filter with housing Lada Kalina
How to remove the filter housing on a VAZ 2110.
Source
Other FILTRON selections for this brand
| Automobile | Selection |
| Selection of FILTRON filters for LADA (BA3) 110 (VAZ-2110)(1.3 Wankel) | View selection |
| Selection of FILTRON filters for LADA (BA3) 110 (VAZ-2110)(1.5) | View selection |
| Selection of FILTRON filters for LADA (BA3) 110 (VAZ-2110)(1.5i) | View selection |
| Selection of FILTRON filters for LADA (BA3) 110 (VAZ-2110)(1.5i 16V) | View selection |
| Selection of FILTRON filters for LADA (BA3) 110 (VAZ-2110)(1.6) | View selection |
| Selection of FILTRON filters for LADA (BA3) 110 (VAZ-2110)(1.6) | View selection |
| Selection of FILTRON filters for LADA (BA3) 110 (VAZ-2110)(2.0i 16V) | View selection |
| Selection of FILTRON filters for LADA (BA3) 111 (VAZ-2111)(1.5i) | View selection |
| Selection of FILTRON filters for LADA (BA3) 111 (VAZ-2111)(1.5i) | View selection |
| Selection of FILTRON filters for LADA (BA3) 111 (VAZ-2111)(1.5i) | View selection |
Replacing the air filter and filter element of a Lada Granta car
The filter element should last 30,000 km. But in the conditions of Russian roads, it is necessary to change the air filter as often as possible, or at least blow it with compressed air.
Fuel consumption and proper engine operation largely depend on this.
1. Disconnect the negative terminal from the battery.
2. Using a Phillips screwdriver, unscrew the four screws securing the air filter cover.
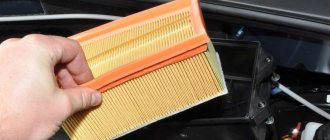
remove the filter element from the cover.
4. Clean the internal cavity of the filter housing from dust.
5. Insert the new filter element into the filter housing.
The corrugations of the filter element should be located along the arrows marked on the inner surface of the air filter housing.
6. Reinstall the cover.
7. Tighten the screws securing the cover.
In order for the housing cover to hermetically seal the filter element seal, the screws should be tightened evenly, half a turn, in several steps
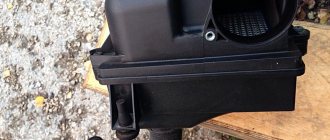
Removing and installing the air filter housing
Typically, the filter housing is removed when repairing the engine and its systems.
For a better approach to the units and components, we therefore remove the filter housing together with the mass air flow sensor and the supply hose to the throttle.
1. Disconnect the negative terminal from the battery.
2. Loosen the tightening of clamp 1 securing the air duct to the branch pipe of the mass air flow sensor.
Disconnect the wiring harness from the mass air flow sensor.
Use a Phillips screwdriver to loosen the hose clamp to the air filter cover fitting.
Using a Phillips screwdriver, unscrew the four screws securing the air filter cover.
Remove the canister purge valve from the filter housing holder without disconnecting the tube and wiring harness block from the valve
Remove the replacement element from the filter housing
The filter housing is mounted in the engine compartment on three rubber supports.
The two front supports are located on the upper cross member of the radiator frame, and the rear support is located on the battery platform bracket
We remove the front right support from the slot of the filter housing bracket
We also remove them from the slots of the other two brackets of the air filter housing
We remove the filter housing pipe from the rubber coupling of the air intake
And remove the air filter housing
Install the air filter in reverse order
We remove the air intake for replacement, as well as when removing the radiator fan
Using a 10mm socket, unscrew the nut securing the air intake.
Remove the air intake from the radiator bracket stud and disconnect the rubber coupling of the air intake from the air filter housing pipe
We remove the air intake from the engine compartment
Remove the rubber coupling from the air intake pipe
We install all the parts in the reverse order.
Necessary tool
To carry out preventive maintenance you will need: a Phillips-head screwdriver, rags, and a new cleaner. The rubber seal on the top cover of the housing must be replaced if it is damaged, deformed, or dried out.
Carry out work at home - prepare a household (car) vacuum cleaner to remove dust and leaf particles from the body cavity. During the filtration process, a large amount of debris from outside settles to the bottom of the plastic housing. Replacing one filter is not as effective as in combination with blowing with a vacuum cleaner or cleaning with a damp cloth.
Working principle of the air filter
In order for the combustible mixture, which is necessary for optimal operation of the Lada Granta engine, to form, a combination of air and fuel is required. On average, a vehicle absorbs fifteen liters of atmospheric air per liter of fuel. The presented air enters the car system through the air intake, as well as through the air filter pipe, which is often mounted by manufacturers next to the radiator grille of the vehicle. The quality of atmospheric air entering the system leaves much to be desired. Particles of street dirt and dust rush to the power unit of a Lada Granta car along with the air flow entering through the manifold. This action can seriously clog the air filter. In addition, the consequences can be more serious than a contaminated air purifier, namely the failure of the power unit of a Lada Granta car, followed by subsequent repairs, for which the car owner will have to pay a huge amount of money. Auto industry specialists have calculated that the average amount of dirt and dust that can get into a car engine during the period between two maintenance services ranges from 100 to 1500 grams. This will inevitably lead to breakdown of the power unit of the Lada Granta vehicle.
Typical signs of a clogged interior cleaner
- insufficient air flow from the deflectors;
- there is a foul smell of rot in the car interior;
- Debris flies out of the deflectors;
- there is a layer of dust on the center instrument console;
- there is a lack of fresh air in the cabin after activating the stove heater fan;
- it is constantly difficult for the driver and passengers to breathe while in the car.
The consequences of such air are extremely unfavorable. Replace the filter as soon as possible.
Air filter Lada Granta: removal and replacement
In this review, we will tell you how to avoid loss of engine power and how often it is necessary to remove and replace the Lada Granta air filter in the engine. It is very important to promptly change consumables in the car for its normal operation, for example, the Granta air filter needs to be replaced every 20 thousand km. If replacement is not done in a timely manner, malfunctions in the air flow sensor may occur. To replace it, we bought a Granta air filter from TSN, which has earned its reputation as a quality manufacturer on the market at a reasonable price. You will also need a standard set of screwdrivers.
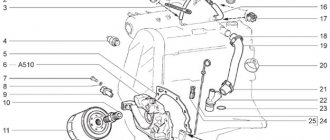
Design features of the “air filtration system” of 8 and 16 valve engines
The air supply elements in the 8 and 16 valve engines of the Lada Granta do not have any special design differences. Therefore, we will look at the process of replacing the air filter using the example of an 8-valve engine 21116.
Of all the tools we need, we will need moderately straight hands and a crosswise screwdriver. Difficulty : minimal. But the result can exceed all expectations. A clogged filter may result in loss of power and increased fuel consumption (factory fuel consumption data).
Replacement process with photo
- Open the hood.
The air filter housing is outlined in red.
These bolts need to be unscrewed
We screw everything back
Air filter life
The service life of the air filter is marked on its housing.
The service life of the air filter is 30,000 km.
This is the number indicated on the case. But it should be remembered that if the car is operated in poor external conditions, then this figure can be reduced. In this case, it is necessary to regularly check the cleanliness of the filter.
If you mainly drive on dirt roads, then replacement may be required after six or even five thousand kilometers. In desert areas the situation will be even more complicated.
Part numbers
There should be no problems purchasing an air filter. They are available in any self-respecting auto store. But just in case, we will write a couple of proven articles.
- GB-9597 E4 - Big Filter - (in the autodoc 146 rubles in total)
One of the cheapest filters
Cabin filter Lada Granta: where is it located, replacement - AutoExpert
Every car owner cares about the comfort of travel in his car. A very important component of this comfort is the air entering the cabin through a filter. The condition of the cabin filter affects the operation of the heater or air conditioner.
If the cabin filter has not been changed for a long time, the air flow will decrease, and when the heater is running, the windows may fog up in winter. As for the summer period, the air conditioner will not work efficiently.
If the filter element is damaged, mechanical clogging of the heater or air conditioner radiator may occur, which will entail even greater problems than replacing the filter element. The cabin filter is a consumable item and requires systematic replacement. More on this later in the article.
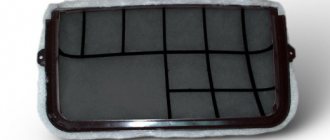
Where is the cabin filter of the Lada Granta?
The cabin filter in a Lada Granta car is located under the hood on the left (near the windshield on the passenger side) - between the windshield and the engine compartment. The top is covered with a plastic decorative cover.
Why does a car need a cabin filter, types of filters
Cabin filters installed on a car are divided into two groups:
The task of the cabin air filter is to remove particles that can enter the cabin through the air ducts of the ventilation system. In addition, the filter cleans the air in the cabin from soot from the exhaust gases of the vehicle in front, because they may contain harmful substances that exceed the maximum permissible limit.
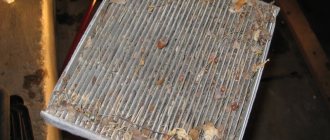
Dirty cabin filter, signs of contamination
There are a number of signs indicating that the cabin filter is dirty:
- Gradual or sharp deterioration of the microclimate in the car interior, an increase in the air temperature in the car in the summer and deterioration in the performance of the heating system in the winter.
- Penetration of various odors from the street into the cabin (when the carbon filter is clogged - when the filter is combined or double-layered).
- Fogging of windows (as a result of clogging of the ventilation system).
- Quite quick contamination of the instrument panel and glass from the inside.
Sequence of operations
Open the hood and find the place where the filter is located on the right side of the decorative trim between the hood and the windshield. Tip: for convenience, you can turn on the wipers and lock them in the up position by turning off the ignition.
The grille is attached with self-tapping screws, some of which are covered with plugs. Exactly how long it will be closed depends on the year of manufacture of the car.
Remove the plugs by picking them up with a sharp object (a slotted screwdriver will also do the job).
Unscrew all the screws (there are 4 of them in total: a pair under the plugs, a pair under the hood).
Having freed the grille, carefully move it, releasing first the right, then the left edges.
Unscrew three screws, two of them hold the protective casing over the filter, and the third one secures the washer hose.
Slide the cover to the right until the left edge comes out from under the bracket, then pull it upward to the left. Caution! The opening may have sharp edges!
By bending the latches on the sides of the filter, remove the old filter.
After cleaning the seat, install a new filter. Reassemble everything in reverse order.
Replacing the air filter on Grant
The air filter on a Lada Granta car must be changed every 30,000 km. It is this mileage declared by the manufacturer and marked on the air vent cover. But in reality, it is best to reduce this gap by at least half. And there are reasons for this:
- Firstly, the operating conditions of cars are different, and if you constantly drive on country roads, there is a high probability that after 10,000 km, the filter will be very dirty.
- Secondly, the cost of the filter is so low that this can be done along with changing the engine oil. And for many Granta drivers, this procedure occurs consistently once every 10,000 km.
Instructions for replacing the Lada Granta air filter
First, open the hood of the car. After this, release the lock of the DMRV harness block and disconnect it from the sensor. This step is clearly shown in the photo below.
After this, using a Phillips-blade screwdriver, unscrew the 4 screws securing the upper housing cover, under which the Granta air filter is located.
Next, lift the lid up until the filter becomes accessible for removal. All this is clearly visible in the photo below.
When the old filter element is pulled out of the housing, it is necessary to remove dust and other foreign particles from the inside of the recess. And only after that we install the new one in its original place. Be sure to place it in the same position, with its ribs in the direction of travel of the car. Don't forget that the more often you replace it, the fewer problems there will be with your car's fuel system.
Reviews
| № | Positive |
| 1. | Vitaly, 32 years old, owner of Lada Granta: I bought the car six months ago, under warranty service, I buy only original consumables. By the way, the air filter is completely identical to the Datsun from Nissan, the catalog number of the Grant air filter is 272775PA0D. Cost 150 – 180 rubles, for Datsun 200 rubles. |
| 2. | Konstantin, 35 years old: before each scheduled maintenance I buy the consumables specified in the operating instructions. I think that native people are more effective than foreign ones. This is a subjective opinion, of course, but I’m happy with the quality. My advice to car enthusiasts. |
| 3. | Vladimir Ivanovich, 55 years old: after retirement, I have more free time, which I devote to Grant. I change oils, filters, and other consumables myself. I give preference to domestic producers. Optimal price-quality ratio, accessibility, developed network of official representative offices, dealers, and authorized service centers. |
| 4. | Kirill, 44 years old: at the previous maintenance, the technician pointed out the need to replace the air system filter; the old one was very dirty. Since I don’t understand brands, I entrusted the choice to a specialist. They installed domestic, “native” ones. My positive feedback and support from the manufacturer. |
| 5. | Vyacheslav, 28 years old: I bought Grant second-hand, the second owner, to clean it, I went to a service station and carried out a comprehensive diagnostic. There are no comments, the condition is good, all consumables need to be replaced. When purchasing, I made the choice in favor of the domestic one. |
| Negative | |
| 1. | Savely, 39 years old: at the previous maintenance I bought “original” filters, I was dissatisfied with the quality, the accordion began to peel. I had to buy new ones, but foreign ones (Filtron AP 006). There are no complaints, it has been in use for several months. |
| 2. | Stanislav, 41 years old: I bought my own air purifier at the car market. Apparently, it was defective, served for several months, and then had to be thrown away. Since then I only buy MAHLE LX 220. Good quality at an affordable price. My advice to motorists. |
| 3. | Alexander, 47 years old: I have been working as a mechanic at a service station for five years, I know a lot about spare parts. I don’t trust domestic ones, only foreign analogues. I buy filters from Mann. Quality you can trust. |
Conclusion The process of removing the Grant air filter is not at all difficult, and can be done by the average driver. It is not necessary to have experience or skills; it is enough to follow the instructions in the instructions. You are guaranteed to replace the air filter yourself within 10 minutes. Depending on operating conditions, subsequent maintenance is required after 12 - 15 thousand km.
Working principle of the air filter
Left - old, right - new air filter
Air intake usually occurs from outside the vehicle. And, given that the conditions outside can be very different, sand, dust, pieces of asphalt and even pollen can get inside with the air. All these inclusions do not allow the engine to operate properly. So, on the way from the air intake to the engine there is an air filter in which these particles are retained.
Most often, so-called dry air filters are used, which have the structure of a regular paper cartridge. As the practice of the automotive industry has shown, it is this filter format that has the best ratio of cost and degree of purification.
Air filter devices
The design of such a filter requires the presence of a plastic casing in which the cartridge is located. It, in turn, includes a frame with a special sheet of paper folded like an accordion. The paper should have a pronounced porous structure. And additional processing of the paper allows us to talk about reliable protection against moisture, which can damage ordinary paper products. And the peculiarities of the interweaving of cellulose fibers are such that air can pass between them, but anything larger than microscopic sizes will be retained.
Injection car models, as a rule, use rectangular-shaped filters, while carburetor options use oval and round shapes. The box can last quite a long time, but the filter element itself needs to be changed regularly.
Useful tips
Please note that when replacing the filter, it is necessary to simultaneously clean the drainage hole of the drainage box. You need to clean both from the side of the box and from the side of the front right wheel niche
Let us remind you once again that when installing the filter, the pointer arrow (on the original filter and a number of analogues) should be directed downwards, and the “front” inscription should be directed towards the front of the car.
Also, when installing the right windshield trim, both protrusions of the trim must extend beyond the front fender flange. In practice, the Kalina cabin filter with a plastic circuit, which also has an additional seal, is best suited for replacement. This type of filter element means that the protection will be better and no debris will get into the stove.
After installing a new cabin filter, do not rush to tighten the cap and begin reassembly. First you need to check that the latches securely fix the element, since a filter that is not fastened well enough can fly off when driving.
Replacing the air filter in Lada Priora with your own hands
The manufacturer of Lada Priora recommends replacing the engine air filter after every 30 thousand km. mileage, however, do not be lazy to look under the hood and, if necessary, change the filter before the established interval.
Replacing the Lada Priora air filter is not a complicated procedure; any novice motorist can do it. To work you will need:
- New air filter
- Phillips screwdriver
- Vacuum cleaner
- Approximately 20 minutes of time and “straight hands”