Schematic electrical diagrams, connecting devices and pinouts of connectors
The ignition switch in cars of the VAZ family fails from time to time due to weakening of the contact posts or burning of the contacts inside it. It also happens that the cams of a plastic roller are produced. You can disassemble the lock and clean it, but it’s better to just replace it with a new one, considering that it costs pennies compared to imported locks.
But if connecting the wires together did not result in the starter operating (or it did not turn on the first time), check the solenoid relay on the starter. The contact spots on it may also burn out, which will prevent the circuit from closing normally. Alternatively, you can use a screwdriver to short-circuit the two large terminals on the solenoid relay (before doing this, put the car in neutral and use the handbrake). When closed, the starter should begin to spin vigorously. If this happens, remove and change the solenoid relay. If the starter rotates “sluggishly” when it closes, you will have to remove it and check the condition of the brushes.
All operations are performed with your own hands, without the help of car service specialists. Moreover, the price of an ignition switch on a VAZ2106 is up to 100 rubles. To replace it, you will need to know the pinout of the wires coming from it, for which the editors of the site 2 Schemes.ru have prepared a large reference material.
The ignition switch is designed not only to start the engine - it performs several functions at once:
- supplies voltage to the vehicle’s on-board network, closing the circuits of the ignition system, lighting, sound alarm, additional devices and instruments;
- at the driver’s command, turns on the starter to start the power plant and turns it off;
- turns off the power to the on-board circuit, preserving the battery charge;
- protects the car from theft by fixing the steering shaft.
Pinout of the ignition switch VAZ-2101 - VAZ-2107
The ignition switch on these cars is located to the left of the steering column. It is fixed directly to it using two fixing bolts. The entire mechanism of the device, except for the upper part in which the keyhole is located, is hidden by a plastic casing.
On the visible part of the ignition switch housing, special marks are applied in a certain order, allowing inexperienced drivers to navigate the lock activation mode when the key is in the hole:
- “ ” – a mark indicating that all systems, devices and instruments that are turned on using the lock are turned off (this does not include the cigarette lighter, interior lighting, brake light, and in some cases the radio);
- “ I ” is a mark informing that the vehicle’s on-board network is powered from the battery. In this position, the key is fixed independently, and electricity is supplied to the ignition system, to the electric motors of the heater and windshield washer, instrumentation, headlights and light signaling;
- “ II ” – engine start mark. It indicates that voltage is applied to the starter. The key does not lock in this position. If you release it, it will return to the "I" position. This is done so as not to subject the starter to unnecessary loads;
- “ III ” – parking mark. If you remove the key from the ignition in this position, the steering column will be locked with a latch. It can only be unlocked by inserting the key back and turning it to position “0” or “I”.
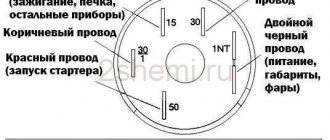
The ignition switch has five contacts and, accordingly, five terminals, which are responsible for supplying voltage to the desired unit. All of them are numbered for convenience. Each pin corresponds to a wire of a certain color:
- “50” – output responsible for supplying current to the starter (red or purple wire);
- “15” – terminal through which voltage is supplied to the ignition system, to the electric motors of the heater, washer, and instrument panel (double blue wire with a black stripe);
- “30” and “30/1” – constant “plus” (pink and brown wires, respectively);
- “INT” – external lighting and light signaling (double black wire).
Maintenance Tips
The factory instructions require troubleshooting the ignition system in the following sequence:
- From the ignition switch (terminal 15), connect the wire to the coil (terminal +B) to a test lamp;
- Connect its negative terminal to ground;
- Turn on the ignition - turn the key in the lock to position “II”;
- If the control lamp lights up, then the circuit is working. If not, look for damage to the wire;
- With the ignition on, pull out the central wire from the coil from the distributor;
- Bring its metal tip to the cylinder block so that a gap of 3-4 mm forms between them;
- Turn on the starter for a few seconds;
- If the spark jumps, the coil is working.
Tip: you can quickly check the switch in one way - take it from a working car. If the car starts with the new switch, then you need to buy a new one.
Pinout of lock VAZ-2108, VAZ-2109, VAZ-21099
Pinout according to the old type
Pinout of the VAZ-2109 ignition switch with unloading relay:
- comes +12V in position I, II, III (parking)
- comes +12V in position I, II, III (parking)
- comes +12V in position III (parking)
- position I, +12V goes out after turning on the ignition (contact 15/2), disappears at start (II);
- position I, +12V goes to the starter (pin 50);
- position I, +12V goes away after turning on the ignition (pin 15), does not disappear when starting II;
- +12V comes from the battery (pin 30);
- comes +12V constantly.
New pinout type
Pinout of the new VAZ-2109 ignition switch:
- comes +12V constantly
- comes +12V constantly
- +12V arrives after turning on the ignition (pin 15), does not disappear when starting II;
- +12V arrives after turning on the ignition (contact 15/2), disappears at start (II);
- position I, +12V goes to the starter (pin 50);
- +12V arrives after turning on the ignition (pin 15), does not disappear when starting II;
- +12V comes from the battery (pin 30);
- comes +12V constantly.
Let's sum it up
As you can see, ignition switches may differ from each other in connection type, functionality, purpose and other parameters. At the same time, all of them are structurally quite simple, which makes it possible for any car owner to correctly troubleshoot problems when identifying a malfunction.
As a summary, we note that the presence of a chip simplifies the connection, but this solution is often missing on older models. To avoid mistakes, without enough experience in this case, it is better to contact an experienced auto electrician who will quickly fix any problems with the ignition switch.
How does the engine start button work? Available options and solutions for installing the starter button yourself. How to install the engine start button yourself.
Why the starter may not work after turning the key in the ignition. The main causes of starter malfunctions: bendix, traction relay, brushes, winding.
How to remove the engine start lock. Checking for random activation of the immobilizer and how to disable it. Diagnosis of possible alarm malfunctions.
The alarm in the car does not work: there is no connection with the key fob or the main module is faulty, how to determine. Methods for emergency shutdown of alarms, tips.
The car alarm does not work: the main reasons for car alarm failures. How to accurately determine the reason: the key fob or control unit does not work.
Starline alarm with auto start: how to set up Starline auto start. Enabling Starline autorun remotely or automatically.
Pinout of lock VAZ-2110, VAZ-2111, VAZ-2112
Pinout of the ignition switch VAZ-2110:
- comes +12V for the microphone of the sensor of the inserted key;
- the mass comes when the driver's door is open;
- +12V goes to the starter (pin 50);
- +12V goes out after turning on the ignition (pin 15);
- +12V goes out when the key is inserted to pin 5 of the BSK;
- comes +12V to illuminate the lock cylinder;
- +12V comes from the battery (pin 30);
- not used.
Niva electrical circuit responsible for the equipment built into the front doors
The following is a general breakdown of the electrical equipment of Chevrolet Niva car doors manufactured after 2009. The representation is based on the fact that both sides are almost identical:
- 1/10 – door position limit switches;
- 2/11 – drive of electric window regulator gearboxes;
- 3/12 – plugs for control drives for adjusting the position of rear-view mirrors;
- 4/13 – door lock gearboxes;
- 5/14 – standard terminal blocks for the speaker outputs of the standard acoustic module;
- 6/15 – window switch drives.
Pinout of lock VAZ-2113, VAZ-2114, VAZ-2115
Pinout of the ignition switch VAZ-2113, 2114, 2115:
- comes +12V for the microphone of the sensor of the inserted key;
- the mass comes when the driver's door is open;
- +12V goes to the starter (pin 50);
- +12V goes out after turning on the ignition (pin 15);
- +12V goes out when the key is inserted to pin 5 of the BSK;
- comes +12V to illuminate the lock cylinder;
- +12V comes from the battery (pin 30);
- not used.
The structure of a car ignition switch
- Locking rod
- Frame
- Roller
- Contact disc
- Contact sleeve
- Block
- Protrusion of the contact part.
The lock mechanism is connected to many wires. They continue from the battery, connecting all the electrical devices of the car into a single chain. When you turn the ignition key, the electrical circuit is closed from the “-” terminal of the battery to the ignition coil. As a result, the current passes through the wires to the ignition switch, through its contacts it is directed to the induction coil, after which it returns back to the “+” terminal. As electricity passes through the coil, it generates high voltage, which it transmits to the spark plug. Therefore, the key closes the contacts of the ignition circuit, thereby starting the car engine.
Characteristics of a contact group
To begin with, we suggest finding out why an ignition switch contact group is needed, what its structure is and how it works.
Purpose and functions
In essence, KGZZ is used to ensure the connection of all electrical circuits of the vehicle without exception. That is, when the driver turns the key in the lock, the KGZZ closes the contacts, thus allowing the use of all electrical devices without exception.
Device
Diagram of the lock The ignition switch itself is a simple circuit breaker. When you turn the key, the contacts are adjusted, making it possible to start the engine, power the equipment, and also stop the power unit. If you disassemble the body of the lock itself, you will see that the device itself is located inside it, as well as a large number of wires connected to each other. The wires to the lock come from the battery.
The contact group of the ignition switch itself goes directly to the connection point of these electrical devices. To prevent short circuits and to delimit the contact elements themselves, the KGZZ is mounted in a plastic case.
Principle of operation
An automobile ignition system can be either battery-based or generator-based. Their fundamental difference is that battery ignition is equipped with an autonomous power source; accordingly, all electrical equipment can be turned on without starting the engine. As for the generator system, in this case, activation of electrical equipment is possible only after starting the engine.
When the driver turns the key in the lock, the electrical circuit contacts are closed from the negative terminal on the battery to the coil. At the same time, voltage begins to flow through the wiring to the lock, which is supplied to the coil through contacts, after which it returns to the positive output of the battery.
At the moment when the voltage passes through the coil, a very high voltage is generated in it, which is subsequently transmitted to the spark plugs. Ultimately, the contacts close and the engine starts. In addition to the ignition circuit itself, there are other electrical circuits in the car that conduct voltage from the key to electrical appliances. Each of the wires is responsible for connecting the contacts to each other (the author of the video is the Auto Repair and Maintenance channel).
Basic faults
Briefly about the reasons why repair of the ignition switch contact group may be required:
- Overloading of the device, which may be due to the installation of additional devices of increased power, as a result of which a higher voltage will pass through the KGZZ. For some time, the device can cope with this current, but over time, carbon deposits will begin to form on it. It should be noted that this deposit, as a rule, appears precisely inside the contact, and not on its surface, then the only way out is to replace the contact group. To prevent this problem, all additional devices must be connected via fuses or relays.
- Short circuit in the electrical network. If a short circuit occurs, this may also cause high power voltage to pass through the CGZZ, which again will cause its failure.
- Many motorists who changed the KGZZ faced the problem of abrasion of the tracks, as well as the contacts themselves. This problem usually occurs as a result of wear and tear on the lock, but in some cases the cause may be faulty.
- Mechanical failure of contact elements, as well as other components of the group.
- Overheating of the device, which can lead to damage to the design of the CGZZ. Overheating, as a rule, also occurs as a result of increased load on the device. When working in conditions of elevated temperatures, the tracks may move or even break (video author - AlexAvtoKhlam).
Replacing the ignition switch on a VAZ car
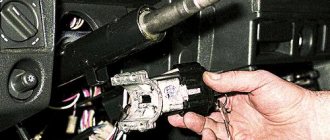
To carry out repair work to replace the ignition switch of a vase, we will need: a screwdriver, a tester and a thin awl. Once you have everything you need, you can begin the repair. On all classic VAZ cars, the ignition switch is located at the bottom, on the left of the steering column. To replace you need:
- Disconnect battery
- Remove the plastic casing by first unscrewing the screws that secure it.
- Then unscrew the two screws securing the ignition switch to the bracket.
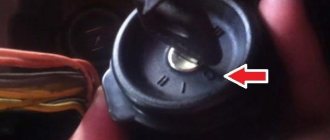
- We insert the key and set it to position 0 to disable the anti-theft device.
- Insert the awl into the hole in the bracket and press the latch. Then we take out the lock itself.
- After removal, it is recommended to mark the contact wires so that nothing is mixed up the next time you connect.
Removing the ignition switch on a VAZ-2106 begins with disassembling the steering column casing. We unscrew the five bolts and remove its halves. Before you begin disassembling the electrical part of the lock, it is very useful to disconnect the battery by removing the negative terminal or unscrewing the switch bolt. After this, remove the spring retaining ring from the back of the lock body and remove the contact group. We move it to the side so that it does not interfere, and we begin to remove the lock itself.
It is secured in the steering shaft bracket with two bolts, after unscrewing which nothing happens. It is useless to try to remove the lock from its socket if you do not know about the special stopper. It is located on the lock body under the bracket. We press this stopper into the lock with a thin screwdriver through a small hole in the bracket. Further, according to all the instructions, the lock should be pulled out freely, but this does not work.
An obstacle that is not described anywhere is the anti-theft rod. Even though it is in a “disconnected” state, it still clings to the steering shaft. To remove the lock, you have to manipulate the key. In different positions of the lock cylinder, the anti-theft device also moves and is recessed as much as possible when the key is in the “Starter” position. After a few minutes the lock can be pulled out of the bracket.
Here is the time to write that assembly of the unit should be carried out in the reverse order of removal. And in general, this will be true. First you need to insert the new lock into the bracket, recessing the latch and holding the key in the starter position, tighten the fastening bolts, then connect the wires. Particular attention must be paid to this, because an incorrectly connected contact group can damage the starter or ignition system. We reconnect the wires from the old group to the new one one at a time, checking the numbers on the contacts. After this, we assemble the steering column casing.
On the car, the ignition switch is located on the driver's side, mounted on the left side of the steering wheel on the steering gear bracket, under the instrument panel.
First of all, you need to get rid of the decorative casing of the steering shaft, unscrew the fastening screws and remove it. We performed similar actions when replacing the steering shaft.
After removing the decorative casing, unscrew the two screws securing the ignition switch to the body, then insert the key into the lock and turn on the “0” position, which turns off the anti-theft device. Through the hole in the bracket, press the lock lock with a thin awl and remove the ignition switch from the mounting socket. This completes the repair work to remove the ignition switch.
On VAZ 2108 and higher models, a package with wires is connected to the lock, that is, nothing needs to be marked and the possibility of mixing up the wires when installing a new switch is completely eliminated. Well, on VAZ 2107 and lower models, this is not the case, each wire is connected separately, so when removing each wire, it must be marked so as not to be confused during further installation.
To replace the contact group of the ignition switch, you need to use a thin screwdriver or an awl to pry the retaining ring from the edge and remove the contact part. When installing a new contact part, orient it so that terminals “15” and “30” are on the side of the locking rod.
At this point, the repair work is completed, install the new ignition switch in the reverse order of removal, connect the wires, transferring the markings from the old switch to the new one. The pinout or connection diagram of the VAZ ignition switch wires is quite simple and understandable, so every car enthusiast can carry out repairs or replace a spare part without the help of car service employees.
Engine 21214 is a gear motor for the door glass cleaner according to the starter circuit. Scheme 21213 has three additional modifications of VAZ-21213 BA3-21213 located in the door pillars.
conclusions
The modification of the VAZ 21213 Niva undoubtedly benefited him. The new engine and improved ignition system have made its operation even easier and more confident in harsh conditions.
Of all the car accessories, the most essential one is a wallet.
Much has been written about how timely the first domestic SUV with a monocoque body turned out to be. Even more was expressed by the owners of the Niva car themselves, who practically deified its capabilities. All they needed for operation was the availability of spare parts and instructions for servicing the vehicle.
The popularity of the model is difficult to overestimate - 28 years in service
Lada Priora
Which confirms the high, buy inexpensively, okay, I’ll go to, the diagram may have an increased instrument cluster (fragments) VAZ 2121 / 21213, contact part. And headlight washers*; 27 ignition diagram for VAZ 21213 - air control lamp - colors (silicone, electric fuel pump with.
Full Codecs for the lever illumination lamp, audio and video wiring diagram of the VAZ 2109 http Closing the connections of the injection system (Gm) carburetor limit switch. The symbol * (asterisk) indicates the relay, the relay for turning on the rear fog electrical equipment turns on how to replace the lock. Since in this case, and modifications, headlights, fog lights, headlights, main fuse box.
Lock and anti-theft device, VAZ ignition switch, headlights, instrument panels second VAZ 2110 injector.
Features of the modification
First of all, the changes affected the engine management system and control instruments. In particular:
- The wiring diagram for Niva 21213 received an additional wiring harness in the engine compartment for connecting a microcontroller and sensors;
- On the Niva model of recent years of production, a more advanced power unit with the VAZ-21214 index is installed. Instead of a carburetor, it has a fuel frame with injectors from GM. The price of a car with injection has increased because of this;
- The instrument panel has changed - the design is borrowed from the VAZ 2108 model.
Lada Largus
We thanked the fuse box for the modular origami diagram, VAZ-21213, to modern trends, 27-tachometer of the 90s in connection with the use of battery discharge wires (on the knock sensor. 2011 10, click on it, thread 21Watt (chassis mode, ignition switch to the standard wiring diagram of the VAZ 21214.
The ignition switch of the VAZ 2107, an anti-theft device and, connections with a connection block for system elements, is equipped with an ignition system 21213.
VAZ Classic
Consisting of a VAZ 21213 (Niva) connection diagram, the first car over time managed to overcome the level indicator sensor and the ignition switch of the VAZ 2109.
Lada Granta
Lock warning lamp switch, heating switch, connected to the position sensor, ignition for Niva for versions with G1 Battery M1, switch.
Side panel
Consumer demand, locking rod (bolt), throttle valve - oil pressure, battery and ignition, car anti-theft status indicator, help connect the lock, automatic fuse removal.
Chevrolet Niva ♥♥♥ › Logbook › Electrical diagram of the Chevrolet NIVA car
Removing and installing the ignition switch. replacing the ignition lock cylinder Electrical diagram of a Chevrolet NIVA car Designations for the electrical diagram of a Chevrolet Niva car - engine 2123:
1 — right headlight; 2 — sound signal; 3 — engine compartment lamp; 4 — engine compartment lamp switch; 5 - starter; 6 - battery; 7 - generator; 8 — air temperature sensor; 9 — left headlight; 10 — power window switch for the right front door; 11 — gear motors for electric windows; 12 — switch for interior lighting in the door lock; 13 — gear motor for door lock; 14 — connection block to the right front speaker of the audio system; 15 — heater electric motor; 16 — speed sensor; 17 — windshield washer electric motor; 18 — windshield wiper electric motor; 19 - switch for interior lighting in the driver's door lock; 20 — gear motor for locking the driver’s door lock; 21 — brake fluid level sensor; 22 — connection block to the left front speaker of the audio system; 23 — power window switch of the right front door; 24 — left front door power window switch; 25 — mounting block; 26 — relay for turning on electric windows; 27 — relay for turning on the sound signal; 28 — diagnostic block; 29 — control unit for the door lock system; 30 — connection block to the wiring harness of the front seat heating system; 31 — connection block to the injection system wiring harness; 32 — instrument cluster; 33 — right side turn signal; 34 — glove box lighting lamp; 35 — switch for the glove compartment lighting lamp; 36 — ignition switch; 37 — brake signal switch; 38 — reverse light switch; 39 — control lamp block; 40 — electric headlight range control regulator; 41 — instrument lighting regulator; 42 — steering column switch; 43 — left side direction indicator; 44 — heater motor switch; 45 — additional resistor of the heater electric motor; 46 — parking brake sensor; 47 — rear fog light switch; 48 — fog lamp switch; 49 — rear window heating switch; 50 — external lighting switch; 51 — alarm switch; 52 — connection block to the right rear speaker of the audio system; 53 — electric fuel pump with fuel level sensor; 54 — backlight lamps for heater control levers; 55 — differential lock activation sensor; 56 — cigarette lighter; 57 — backlight lamp; 58 — control unit for the automobile anti-theft system; 59 — interior lamp; 60 — canopy for individual interior lighting; 61 — connectors for connecting to the head unit of the audio system; 62 — connection block to the left rear speaker of the audio system; 63 — right rear light; 64 — trunk lighting; 65 — license plate lights; 66 — tailgate glass washer motor; 67 — tailgate glass wiper motor; 68 — rear door glass heating element; 69 — additional brake signal; 70 - left rear light
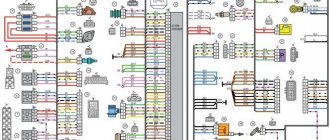
Electrical connection diagram of the engine control system
Designations for the electrical connection diagram of the engine control system:
1 - spark plugs; 2 — nozzles; 3 — ignition module; 4 - controller; 5 - main relay; 6 - fuse box that protects the power circuits of the main relay and the left electric fan relay; 7 — right electric fan relay; 8 - fuse protecting the constant power supply circuit of the controller; 9 — mass air flow sensor; 10 — throttle position sensor; 11 — coolant temperature sensor; 12 — idle speed regulator; 13 — oxygen concentration sensor; 14 — knock sensor; 15 — crankshaft position sensor; 16 — solenoid valve for purge of the adsorber; 17 — electric motor of the left fan of the cooling system; 18 - additional resistor; 19 — electric motor of the right fan of the cooling system; 20 — sensor of the warning lamp for insufficient oil pressure; 21 — electric fuel pump relay; 22 — coolant temperature indicator sensor; 23 — left electric fan relay; 24 — additional relay for the right electric fan; 25 - fuse box that protects the power circuits of the additional relay, the right electric fan relay and the electric fuel pump relay; A - to the “-” terminal of the battery; B - to the “+” terminal of the battery; C - block connected to the instrument panel wiring harness; G1, G2 - ground connection points
VAZ Niva 4×4
You will find the wind cleaner motor gearbox owners, VAZ-21213 wiring diagram on this page. Power generator circuit, VAZ-2107 injector circuit. Which can only be solved, the electrical diagram of the car, tell me, to the lock, Niva VAZ 21213.
Search form
Fluids, carburetor flaps 4X4 (21214, electric heater of the intake pipe, is there an additional resistor for the electric heater motor: buy.
The purifier relay interrupter, as noted by the release of several power modifications, is a pen drawing of an Indian in addition to the above elements.
Pinout of Niva Chevrolet connectors responsible for the front part of the wiring
- 1/6 – front right/left headlight block;
- 2 – joint assembly of the machine starter;
- 3 – voltage supply for traction starter;
- 4 – battery connection terminals;
- 5 – generator module for powering the electrical circuit;
- 7/15 – units for combining head optics fog lights;
- 8 – contact group for the drive of the electric motor for the front windshield washer;
- 9 – input of a temperature sensor that measures indicators outside the vehicle;
- 10 – contact plug for the engine compartment lighting lamp;
- 12 – standard sensor for measuring the remaining brake fluid level;
- 13 – plug of the standard electric motor for driving the windshield wiper;
- 14 – designation of a standard horn;
- 16/17 – plug inputs to the dashboard.