Over time, any work on your vehicle may require the seats to be removed from the vehicle. This is not a difficult task, but it requires some skills and the use of the necessary tools, which will be needed in the process of dismantling the Priora seats.
It is quite rare to remove the seats, but often such a task arises. I will introduce some circumstances due to which the removal of the seats is necessary:
- Soundproofing of the floor;
- Replacement of seat upholstery;
- Installation of heated seats, etc.;
This article will talk about how to quickly and effortlessly remove Priora seats and what tools you need to use to carry out this work.
Tip 4: How to remove roof trim in Priora
Fans of the Lada Priora like everything about the car, but they also notice that the car’s ceiling lining is rapidly wearing out. In order to update the ceiling by covering it with a different covering, you must first remove the dilapidated roof. But how to do that?
You will need
- -screwdriver;
- -wrench.
Instructions
1. In order to remove the inner headliner , remove all interior parts that are in one way or another in contact with the roof. Pay attention to the order in which the parts are disassembled. Pre-prepare a place where you will then neatly place the fasteners and the parts themselves.
2. Start with the ceiling light. It is best not to drop the lampshade, because it is made of a very fragile material. All ceiling lighting fixtures must be unscrewed in order. After this, proceed to dismantling the sun visors and handles in the car interior. They also need to be removed with caution.
3. Pay attention to the soiling of the ceiling material. Before you begin the process of dismantling the interior of the ceiling of a Lada Priora, stock up on two liters of water and detergent.
Removing and installing the rear row of seats on Priora hatchback 2172
So, the first step is to remove the lower part of the seat, since it is the easiest to dismantle. To do this, use a flat-head screwdriver or use your hand to pry up the canopy cover, as shown in the photo below:
And in the recess we unscrew the nut using a 10 mm socket:
Now the canopy is moved to the side, because nothing else holds it.
We perform the same procedure with the second half. Then, by pulling the special belt in the back of the seat, on both one side and the other, we lift them and remove them from the passenger compartment.
As for the back, everything is also quite simple to do here. First of all, we recline the backrest, lifting the clamps next to the headrests, and from the inside we see several fastening nuts, both on one side and on the other. We unscrew them with a key number 13.
To show everything more clearly, below is another photo.
Also, on the back side there are still nuts that need to be unscrewed:
On the other side we do the same. After which you can begin removing the seats from the Priora. Once again, it is worth noting that the fastenings on the sedan will be different, so this procedure will have to be considered in the following articles. Installation occurs in reverse order.
How to open the rear seats on a Priora
nik_bel72, I had a metal creaking in the place where the backrest clings to the body from below, I wrapped this place with electrical tape, the sound disappeared, then it appeared again, there was already a problem in the shelf: the body plays on bumps and the shelf creaks, I screwed it in with self-tapping screws, now it’s quiet
Same symptoms. The creaking at the bottom of the backrest disappeared after removal, now it creaks in the area of the shelf on large bumps. We will treat...
There are 2 options: 1, try to snap it firmly or press harder; 2 cut a little splen around the fastening.
I also glued it with 8mm splenium, everything turned out fine for me, just like my own :)
and tried this way and that: on one side it closes, but on the other it doesn’t work. I'm already stuttering)))) what other options??
Hm. Does your seat not reach the mount or does it not fit into it? Is the seat screwed down well and level? Alternatively, look at the lock on the seat.
Has anyone ever had this happen? The ribbon has come off and you have to pull it so that the hook will come off :))) How can I recline the seat now?
Try unscrewing the two front hinges under the seat (they are covered with plastic covers). Approach the nuts on the side with a 10mm wrench. Unscrew it, lift the seat, and then reach the hook.
It didn’t come off for me, but it happened that I fastened the back and there was a ribbon inside)) well, nothing came out of the trunk, something like an electrode, only a thin one (the knitting needle was opened))
You can try this too.
Then it is not a “loop”, but a handle for the back lock. If the T-shaped plastic handle is not lost, then it is put in place and secured through the hole with a new cotter pin or piece of wire. I've already had this happen. If it is lost, then you buy a new one in the store, complete. I think if you look in stores, you will find it.
Removing the rear seats of Lada Priora
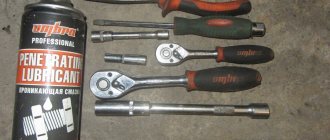
Required tools : 10mm socket, Phillips screwdriver.
- Release the latch by pulling the loop.
- Fold the right side of the seat back forward and unfasten the fastening buttons for the trunk trim.
- Pull the backrest hinges out of the body hooks and remove the right side of the backrest.
The left side of the seat back is removed in the same way.
- Press the latches on both sides of the seat cushion.
- Remove the pillow.
- Unscrew the 2 screws of the upper fastening of the plastic partition using a Phillips screwdriver.
- Unscrew the 2 nuts securing the armrest hinges to the body using a 10mm socket.
- Remove the armrest.
- Remove the plastic partition.
Installing the rear seat of the Priora is carried out in the reverse order.
Tip 3: How to remove the rear springs of a vase
springs need to be replaced if they sag or are damaged in any way. Regardless of which spring the damage is found on, be sure to replace both springs at the same time and install identical springs. Also, removing the springs is necessary when replacing a shock absorber or compression stroke buffer.
You will need
– lift or jack;
Instructions
1. To remove the rear springs on classic VAZ , before starting work, place the car on an inspection hole or overpass with excellent lighting. Stop the car with the hand brake and chock the wheels. The ignition must be turned off.
2. Using a 10mm wrench, unscrew the nut securing the pressure regulator rod to the rear axle. In this case, support the bolt with a suitable wrench. Disconnect the lower end of the pressure regulator rod. Using the same wrench, unscrew the brake pipe tee fastening. If the car has a lot of mileage, lubricate this connection with penetrating lubricant. Remove the tee.
3. Disconnect the rear shock absorber from the mounting bracket. Hang up the rear wheel. Remove the rear spring together with its plastic spacer. Remove the upper rubber spring gasket from the support cup. Inspect all gaskets and, if damaged, replace them with new ones.
4. To remove springs on front-wheel drive VAZ , also place the car on the inspection hole and fix it. Remove the rear seat back and move the rear wheel well trim aside. Using a 17mm wrench, unscrew the nut located on top of the niche. At the same time, hold the shock absorber rod with a key at 6.
5. Remove the nut, backing washers, spring washers, and top pad. Using two 19mm wrenches, unscrew the nut securing the shock absorber to the beam. Remove the shock absorber bolt, using a drift if necessary.
6. Remove the shock absorber and spring. Remove the spring, bottom pad and compression buffer from the shock absorber. Often the spring gasket “sticks” to the body. If there are deformations or breaks on it, replace it with a new one.
7. To remove the spring on “Kalina” and “Priora”, hang its rear part. Remove the rear wheels. Lower the rear until the springs begin to compress. Remove or recline the rear seatbacks. Having locked the rods of the rear shock absorbers, unscrew the two nuts securing them to the body.
8. Remove the spring washers, upper cushion washers and upper rubber cushions. Hang the rear part again so that the springs relax. Disconnect the shock absorber from the suspension arms and remove the shock absorber assembly. Remove the spring, spacer, bushing, washer, bottom pad, housing and compression buffer from the shock absorber.
Video on the topic
Tip 2: How to remove seats
Drivers who occasionally transport large cargo in their cars often try to increase the interior space by removing the seats of both the second and first rows. Occasionally, seat dismantling is performed for other reasons. In any case, it would be useful for every motorist to know how to remove the seats by himself if such a need arises.
- In order to dismantle the seats, you will need the most primitive tools - a wrench, a socket wrench and 2 screwdrivers - a Phillips and a slotted one. You will spend no more than 15-20 minutes of your personal time dismantling one seat.
- To remove the seats of the first row, you need to open the cover (the easiest way to do this is to use a flat screwdriver, prying the cover from above). Under the cover you will see a bolt, the one that needs to be unscrewed and removed. Each seat is secured with four such bolts, therefore, after performing this operation four times, you will disconnect the seat from the base and be able to remove it.
- In some vehicles, the second row seats are slightly more difficult to remove than the first row seats. But they can also be dismantled without any special difficulties. First you need to unscrew the screws that hold the decorative plastic trims in place and remove the decor. After this, the rear part of the lining must be bent back, slightly moved to the left, and then moved forward and removed in one motion.