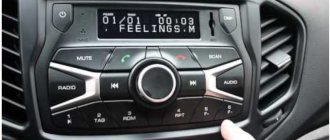
The cigarette lighter socket is rarely used by the owners of the practical Lada Kalina model for its intended purpose. Many people connect “charging” for mobile devices or other electrical consumers to this socket. Over time, the cigarette lighter becomes damaged and does not work.
Some Lada Kalina owners are disheartened by this “incident”, after which they furiously head to the service center to fix the problem. However, the breakdown is not quite as complicated as it might seem at first.
For repairs, the owner needs to stock up on the usual set of hexagons, as well as a screwdriver, pliers and a small soldering iron. And also study a small manual on how to remove the cigarette lighter, and then how to change it and fix the breakdown.
What are the reasons why the cigarette lighter does not work? How to repair it? Read about all this in our material.
Replacing the cigarette lighter on Kalina 1st or 2nd generation
The repair process is practically the same for these Lada models. It is also relevant for the Grant or Priora family. To replace the cigarette lighter with your own hands on Kalina 1st or 2nd generation, just follow the following procedure.
- Open the hood, find the battery and disconnect the negative terminal from it. It is recommended to remove it, because the mass is powered through the car body. If you turn off the plus, it will touch the body.
- We unscrew the three mounting bolts around the parking brake handle, which is located on top of the central tunnel. We dismantle the hand brake limit switch.
- We unscrew the rear fastening screw and additional screws on the sides.
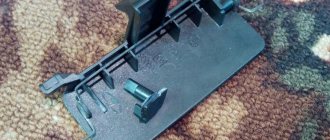
- Remove the cover from the gear lever, and then lift the tunnel cover. Now you can remove the Kalina cigarette lighter itself.
- We disconnect the power plug coming to the electrical wiring circuit.
- We press the special latches that hold the cigarette lighter. After it pops out, it can be replaced.
- We install a new part on the Lada Kalina. After replacement, we carry out the assembly process. We perform all steps in reverse order.
Replacing the socket in the Kalina cigarette lighter
The device may not work due to a faulty seat. You should replace the socket of a broken cigarette lighter on a Lada Kalina by following the same procedure.
- Disconnect the terminals from the battery.
- Remove the gearshift lever casing and the central tunnel cover by unscrewing the screws holding the decorative plastic.
- Disconnect the contact chip and then remove the socket.
- Replace the part with a new one.
- Reassemble in reverse order.
Detailed step-by-step instructions are presented in the profile video.
Cigarette lighter repair
If the device on a Kalina car does not work, this is not always evidence of a breakdown of the part itself. Therefore, before replacing the cigarette lighter, it is necessary to check the most common locations of other faults. It is worth making sure that the appropriate fuse is intact or that there is constant contact with the ignition. These places should be checked before proceeding with replacement or full repair.
Frequent malfunctions
There are certain reasons why the Kalina device may not work. The most common of them.
- Burnt fuse. The block with it is located under the front panel. We are interested in the fuse element number F20.
- Broken filament.
- Triggered fuse protection against overheating and fire.
- Corroded contacts responsible for the terminals and ground connections.
Replacing fuses on a Lada Granta car
The Lada Granta car has two mounting blocks: the first is located in the cabin and protects almost all electrical circuits of the car, except for the power ones; they are protected by the fuses of the power unit, which is located under the hood.
Let's consider replacing the fuses in the cabin unit.
Firstly, experts recommend disconnecting the negative terminal of the battery whenever tampering with the car’s electrical equipment. Then you need to remove the cover on the instrument panel, it is located near the headlight control unit. No special tools are required here, you just need to gently pull the upper left part of the cover with your hand and remove it from the latches one by one:
In the Norma and Luxury trim levels, below the headlight control unit there is a trunk opening button; when removing the cover, you need to carefully disconnect it from the plug:
To do this, simply grab the plug with your fingers and lightly pull it up. Of course, when reinstalling, do not forget to connect it back - the simplest mechanism will not allow you to reverse the polarity of the wires:
So, the cover is removed, you can proceed directly to replacing the fuses.
The mounting block looks like this:
On the back of the cover, as in the instruction manual, there is a diagram of the location of the fuses, the current rating and which circuit they protect:
Electrical circuits protected by fuses installed in the mounting block located on the instrument panel
| Fuse no. | Current strength, A | Protected electrical circuits |
| F1 | 15 | Controller, engine cooling fan relay, short circuit 2x2, injectors |
| F2 | 30 | Window lifters |
| F3 | 15 | Emergency Signal |
| F4 | 20 | Windshield wiper, airbag |
| F5 | 7.5 | 15 terminal |
| F6 | 7.5 | Reversing light |
| F7 | 7.5 | Canister valve, mass air flow sensor, DC1/2, speed sensor |
| F8 | 30 | Heated rear window |
| F9 | 5 | Side light right |
| F10 | 5 | Side light left |
| F11 | 5 | Rear fog light |
| F12 | 7.5 | Low beam right |
| F13 | 7.5 | Low beam left |
| F14 | 10 | High beam right |
| F15 | 10 | High beam left |
| F16 | — | — |
| F17 | — | — |
| F18 | — | — |
| F19 | — | — |
| F20 | 15 | Horn, trunk lock, gearbox, cigarette lighter, diagnostic connector |
| F21 | 15 | Gasoline pump |
| F22 | 15 | central locking |
| F23 | 10 | DRL |
| F24 | — | — |
| F25 | 10 | Interior lighting, brake light |
| F26 | — | — |
| F27 | — | — |
| F28 | — | — |
| F29 | — | — |
| F30 | — | — |
| F31 | — | — |
| F32 | 30 | Heater, EUR |
Accordingly, we determine which fuse has failed, remove it, and if the thread is really burned out, replace it with a new one of the same current rating. This means that the problem of constantly blowing the same fuse is not recommended to be solved by installing a fuse with a higher rated current: such a fuse does not protect the circuit, and in the event of a short circuit, all the wiring and electrical appliances that it powers will burn out; a fire cannot be ruled out.
Let's look at the power fuse box. It is located under the hood:
Remove the cover by pulling it up. Determine which fuse has failed:
Electrical circuits protected by fuses installed in a mounting block located under the hood of the car
| Fuse no. | Current strength, A | Protected electrical circuits |
| F1 | 50 | Electric power steering |
| F2 | 30 | Heater fan |
| F3 | 60 | Generator |
| F4 | 60 | Generator |
| F5 | 30 | dipped headlights |
So, we looked at replacing fuses on the Lada Granta, but fuses may not always be the cause of electrical equipment failure. Before directly replacing the fuse, it is necessary to check the condition of the entire electrical circuit that was protected by the blown fuse, including the condition of the wiring and electrical appliances. Only after identifying and eliminating the cause of the problem, you need to change the fuse and continue operating the car.
One of the common reasons for the failure of fuse No. F20, which powers the cigarette lighter in particular, may be the use of non-standard plugs for a video recorder, radar detector and other electrical devices powered through the cigarette lighter, that is, it has a certain shape, and the plug for additional equipment can close the circuit at a certain position in the cigarette lighter socket. Thus, when purchasing such equipment, you need to pay attention to the plug; If you have already purchased a radar detector or video recorder and have problems with their operation, replace the plug.
Also, the cause of blowing of fuse No. F20, if the audio system is powered from it, as well as fuses No. F2 and No. F22, may be due to the ingress of water due to insufficient factory sealing of seams and technological holes in the doors and engine compartment. Experts recommend carefully studying the entire electrical circuit route to avoid subsequent malfunctions and taking appropriate measures.
We remove and change the Lada Granta fuses ourselves
If you are the owner of a Lada Granta car and you have problems with electrical equipment, then first of all you will need to check the fuses. In most cases, replacing one of the elements is enough.
If the fuse is intact, then it is likely that you will need to contact the services of a service station. Or, in order to save money and time, troubleshoot the problem yourself. Remember - the main thing in such situations is to slowly figure out what the problem is.
An electrical fuse or relay is a small device that is designed to protect the specific electrical circuit in which it is installed. In fact, all consumers of the Lada Grant are protected by fuses, not counting the battery charging circuit, generator and starter.
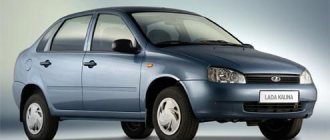
Car Lada Granta
Any Lada Granta circuit that is protected by a fuse is designed for the maximum current flowing through it. Taking this indicator into account, a safety element is installed. If a situation arises when one of the elements of the circuit fails and the current exceeds the design norm for this circuit, the conductive part in the fuse will burn out and the system will be de-energized. This is what guarantees the safety of the car's electrical wiring and prevents fire.
Where are the fuses for the Lada Grant?
The developers decided to place the main block with electrical fuses and relays in the Lada Granta to the left of the steering wheel, next to the light switches. This is a very good solution, the elements are located at hand and there is no need to remove any additional components. All work can be done without getting up from the seat.
Location of the compartment located in the cabin
The second power fuse block is located in the engine compartment next to the battery. It looks like an ordinary black box.
Location of the compartment located under the hood
Removal and replacement instructions
All car mechanics, without exception, recommend disconnecting the “-” terminal of the battery when working with the vehicle’s electrical equipment.
Where is and how to remove the cigarette lighter fuse for Lada Granta
- Why doesn't the cigarette lighter work?
- Fuse problem
- Where is
- Which one can I put in place?
- Cigarette lighter repair
- How to remove the cigarette lighter
- Diagnostics
- How to replace with a new one
If problems arise with the car cigarette lighter, first check the cigarette lighter fuses on the Grant. Burnt out parts are replaced with new ones, but before this the cause of their burnout is established.
Why doesn't the cigarette lighter work?
The cigarette lighter on a Lada Granta car may not work for various reasons. The most common faults are:
- blown cigarette lighter fuse;
- poor contact;
- broken wiring.
Simple folk method
Replacing and adjusting kingpins on an UAZ: detailed instructions for selection, repair and complete replacement.
Required
: screwdriver, awl, remove the negative terminal from the battery or pull out the cigarette lighter fuse.
- Remove the metal cartridge by squeezing out the antennae with an awl.
- Disconnect the connector with wires from the socket by pressing the latch.
- Remove the illuminated plastic ring by squeezing the antennae.
- Disconnect the connector with wires from the lamp socket.
For those who like to repair their car themselves, collections of technological instructions (for Granta and Kalina) will be useful.
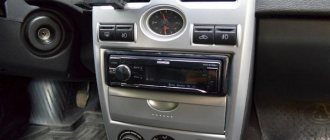
Modern car enthusiasts rarely use this socket for its intended purpose. Additional devices such as phone chargers are connected to the cigarette lighter socket. However, over time the device breaks down.
If you have the necessary knowledge and tools, replacing the cigarette lighter on a Lada Kalina car is a simple procedure. For repairs you will only need a standard set of hexagons, a screwdriver, pliers and a soldering iron.
Read about why a malfunction occurs, how to identify it and replace the device, and why you should pay attention to the fuse.
Lada Kalina relay location
The safety relays are located in the same block to the left of the driver's foot as the fuses. Below is a list for the main configurations of Kalina. In the case of the more expensive “Norma” and “Lux”, it is necessary to take into account that the difference between them is minimal, but it still exists and some of the relays are missing in the first.
| Relay number | Current strength, ampere | Purpose in the “Standard” package | Purpose in the “Norma” and “Lux” trim levels |
| K1 | 50 | Unloading relay | |
| K2 | 30 | Additional starter relay | |
| K3 | 30/40 | Wiper relay | Radiator cooling fan relay |
| K4 | 30 | Radiator cooling fan relay | |
| K5 | 30 | Turn signal relay | A/C compressor clutch relay |
| K6 | 30 | Power window relay | Heated rear window relay |
| K7 | 20 | High beam relay | |
| K8 | 20 | Horn relay | |
| K9 | 20 | Low beam relay | |
| K10 | 20 | Spare | Reverse light relay (in versions with automatic transmission) |
| K11 | 20 | ECM main relay | |
| K12 | 20 | Fuel pump relay | |
| K13 | 20 | Seat heating relay | |
| K14 | 30/70 | Alarm relay | Heated windshield relay |
| K15 | 30 | Heated rear window relay | — |
| K16 | 30 | Additional alarm relay | — |
Owners of Kalina with the ERA-GLONASS function will find the following relays in their mounting block:
| Relay number | Current strength, ampere | Relay purpose |
| K1 | 50 | Ignition switch unloading relay |
| K2 | 30 | Additional starter relay |
| K3 | 30 | Windshield Wiper Relay (WWI) / Auto Start Relay |
| K4 | 30 | Maximum speed radiator fan relay (HSF) |
| K5 | 30 | Turn and hazard warning relay (OVI) |
| K6 | 30 | Heated rear window relay |
| K7 | 20 | High beam relay |
| K8 | 20 | Horn relay |
| K9 | 20 | Low beam relay |
| K10 | 20 | Air conditioning compressor clutch relay (version with air conditioning or climate control) |
| K11 | 20 | ECM main relay |
| K12 | 20 | Fuel pump relay |
| K13 | 20 | Seat heating relay (HSI) |
| K14 | 70 | Heated windshield relay (for certain versions (OVI)) |
| K15 | 20 | Alarm relay |
| K16 | 30 | Hazard power relay/reverse lamp relay |
| K17 | 30 | Power window power relay/radiator fan relay in auto start mode |
| K18 | 30 | Minimum speed radiator fan relay (MRF) |
Where is the starter relay located?
It is located in the mounting block along with the fuses. The latter is located to the left of the steering column and the position of the driver's feet. Its cover can be identified by the location of the headlight and instrument panel dimmers on it.
Fuel pump relay location
It is located among other electrical elements of this type in the mounting block. To get to it, you need to open the cover using a small flat-tip screwdriver and find the element numbered K12.
Fan relay location
Responsible for cooling the radiator and its serviceability must be checked if overheating is detected. In the standard configuration it is designated as K4, and in the luxury configuration it is also designated as K3. You can get to it in the same way as other similar elements - by opening the cover of the fuse box located on the left side of the center console and bringing it out using a ten key.
Turning relay location
Relay number K5, located on the diagram in its upper left part, is responsible for the turn. The element, like other relays, is placed in the fuse box located in the interior of the Lada Kalina.
Wiper relay location
The windshield wiper relay has the number K3 for standard Lada Kalina equipment and is located among other electrical elements in a special block, together with the electrical circuit fuses.
Power fuses
| Name | Power, ampere | What is he responsible for? |
| FF1 | 50 | Heated windshields |
| FF2 | 60 | — |
| FF3 | 60 | Generator |
| FF4 | 40 | Motor cooling fan |
| FF5 | 50 | Electric power steering |
| FF6 | 40 | Motor ABS |
How to replace the cigarette lighter lamp
After we have removed the cigarette lighter, we will disassemble it and replace the backlight lamp, if one is burnt out.
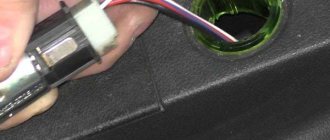
Removing the metal base of the cigarette lighter
We take out the green housing of the cigarette lighter, from which we remove the lamp socket
Carefully remove the A12-8 lamp from the socket and replace it.
Exactly the same lamps are used to illuminate the buttons and dashboard.
Cigarette lighter splitter: types and connection
How to find and replace the cigarette lighter fuse? 2 possible locations for the part
Sometimes it becomes necessary to connect 2-3 devices to the cigarette lighter, which cannot be done without a splitter, and, given the design features, it is not always possible to connect even a telephone charger normally. Well, since Lada Kalina does not provide other alternatives, it is better to use this one.
The most common type of splitter has 3 sockets plus one USB port. By connecting an inverter (converter of on-board current to 220 V), you can easily charge devices such as an e-reader, tablet computer or laptop on the road. The price of the device in question ranges from 170 to 300 rubles. Buying a power strip is much cheaper and easier than replacing a cigarette lighter.
You can, of course, connect the necessary devices to the ignition without touching the cigarette lighter. But here you cannot do without the hands and knowledge of an experienced auto electrician, and installation will take more time. There will be a lot of extra wires and additional fuses will be needed. However, some car owners consider this method more reliable for Lada Kalina.
It is, of course, better to use an inverter with direct wiring. But without it, a high-quality splitter will be enough. The only question is to find a really high-quality device. The splitters are structurally similar to any extension cords used in everyday life for sockets. But there are differences between different models, which do not always have a good effect on both their operation and the condition of the Lada Kalina’s electrics. Cigarette lighter socket splitters can be divided into three types:
- those in which the block with sockets is made in a single housing with a central plug;
- those in which the plug and socket are connected by a flexible connection;
- connected via a power cord.