Replacing the fuel pump on a VAZ 2107
Hello dear site visitors! Today I will talk about how to replace the fuel pump on a VAZ 2107 with your own hands. The reason for the replacement was poor engine performance and constant interruptions during which it was impossible to move. To independently replace the fuel pump on a VAZ 2107, we will need a flat-head, Phillips screwdriver, as well as a 13″ socket and an extension to it.
First, remove the clamp from the fuel filter and start the engine. When it stalls, it means there is no fuel left in the system. Then we collect the necessary tools.
After this, unscrew the 2 clamps on the sides of the fuel pump.
Then remove the fuel lines from the fuel pump.
Unscrew the fuel pump. To do this, you need to unscrew the 2 bolts on the sides of the fuel pump.
Now we remove the fuel pump.
After this, replace the gas pump gasket with a new one.
Video. Adjusting the fuel pump yourself.
Installation and adjustment of the fuel pump on the VAZ 2107 has been successfully completed. Let us remind you that the previous article was about adjusting the carburetor on a VAZ 2107 with your own hands.
'; blockSettingArray = 0;blockSettingArray = 0;blockSettingArray = []; blockSettingArray = 3; blockSettingArray = "p"; blockSettingArray = "#comments"; blockSettingArray = 0; blockSettingArray = "; blockSettingArray = 0;blockSettingArray = 0; var jsInputerLaunch = 15;
vazgarage.ru
Do-it-yourself absorber valve replacement
If signs of malfunction are detected, the valve will need to be repaired or replaced. The adsorber valve is inexpensive and easy to replace. To dismantle you need to have a pair of Phillips screwdrivers and know where the canister purge valve is located. Operating procedure:
The markings on the old and new valves must match.
- Open the hood and find a cylindrical device - an adsorber.
- Remove the negative terminal from the battery.
- Disconnect the wire block by pressing the latch and pulling it towards you.
- Loosen the valve.
- Remove the fittings under the latch and disconnect the hoses.
- Remove the valve together with the bracket from the adsorber.
- The new valve is installed in the reverse order.
Thus, even such a small element as the adsorber valve performs important functions and its malfunction can seriously disrupt the operation of the entire engine. Therefore, it is important to monitor the condition of your car and carry out diagnostics on time.
1200 rub. for the photo report
We pay for photo reports on car repairs. Earnings from 10,000 rubles/month.
Write:
Many car owners may be interested in the question of how to check the adsorber and its purge valve when the diagnostics showed it to be faulty (an absorber error popped up). It is quite possible to make such a diagnosis in a garage, however, for this it will be necessary to dismantle either the entire adsorber or just its valve. And to carry out such a test, you will need metalworking tools, a multifunctional multimeter (to measure the insulation value and the “continuity” of the wires), a pump, and a 12 V power source (or a similar battery).
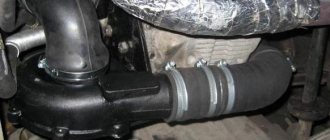
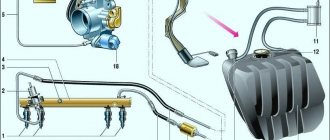
Power supply system for the injection engine of a VAZ 2107 car
The idle speed regulator for VAZ is
– 2107 shut-off valve driven by an electric stepper motor. The regulator is installed on the throttle body under the throttle position sensor. Based on an electronic signal from the control unit (ECU), the idle speed controller changes the cross-section of the additional supply air channel, thereby adjusting the idle speed of the crankshaft. Idle control valve VAZ 2107 Gas tank
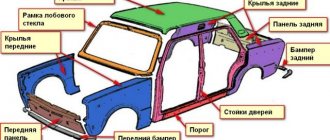
car 2107 VAZ - steel, leaded inside, welded from stamped two parts.
The gas tank is located in the trunk of the VAZ 2107 car on the right side. The filler neck of the gas tank is closed with a plug and is brought into the niche of the filler neck on the right wing. VAZ gas tank Fuel
2107 is supplied from the gas tank by a gas pump combined with a fuel level sensor.
A mesh filter is installed on the inlet pipe of the fuel pump, which traps large contaminant particles that enter the gas tank along with gasoline. car on the VAZ 2107 fuel pump is turned on by the Serviceable command. The fuel pump ECU should develop a pressure of not 3 bar, less than 2 bar (320 kPa). electric fuel pump VAZ receiving
1 – 2107 mesh filter; 2 – fuel pump; 3 – fuel level sensor indicator; 4 – supply tube; 5 – drain tube; 6 – electrical connector block; 7 – fuel pump float From the sensor, fuel flows through the fuel pipe into the fuel filter for more thorough cleaning.
The process of installing a fuel pump on a VAZ 2107
Now, after dismantling the fuel pump, before installing a new one, you must first check it. If the mileage of your VAZ 2107 car is more than 100 thousand km, then before installation, be sure to check the minimum protrusion of the pusher. Since the location of the fuel pump, as well as the correct stroke of the diaphragm unit of the fuel pump, directly depends on its position. In the case when the stroke of the diaphragm unit is disrupted or its position is incorrect, the fuel injection by the pump is sharply reduced; in other cases, the diaphragm itself may break directly. Changing the protrusion of the pusher on a VAZ 2107 is very simple; to do this, you need to select gaskets of the required height, installed between the spacer and the cylinders.
Let's start installing a new fuel injection pump on a VAZ 2107:
- When you check the amount of protrusion, this must be done with the gasket installed, taking into account its thickness, we are talking about the gasket that is installed between the spacer and the cylinders. Temporarily during the measurement period, you can install two gaskets - between the cylinder block and the spacer, for the purpose of greater accuracy;
- Correctly set the minimum projection by slowly rotating the crankshaft. Press the spacer onto the cylinders and measure how much the pusher protrudes. Its protrusion may fluctuate, but not more than 1.3 millimeters, or not less than 0.8 millimeters;
- In the case when the pusher protrudes more than due, then it is necessary to replace the gasket between the spacer and the cylinders with a new one;
- Well, if the pusher is not visible enough, then for this you need to reduce the thickness of the gasket (less than 0.3 millimeters).
This article described one of the possible problems associated with a malfunction of the VAZ 2107 fuel injection pump. Now, having read this information, you can easily find the location of the fuel pump in your car without unnecessary difficulties and, if necessary, dismantle it and correctly install a new one.
Causes of clogging of the distributed injection system
One of the faults, a clogged injector, can be repaired with your own hands. The cause of the blockage is the use of low-quality gasoline. The lower the quality of the fuel, the more heavy paraffins it contains. They are deposited on the walls of the fuel system, clog the injector openings, making it difficult to supply fuel.
In addition, paraffins are deposited on the exhaust valves, which leads to their burnout. The engine begins to detonate.
To prevent this from happening, you need to use high-quality gasoline with special additives. But if clogging cannot be avoided, you can wash it yourself using a special flush of injection systems.
To rinse, you must have a syringe and rinsing liquid.
Mix the liquid with gasoline in the proportion indicated in the instructions on the bottle. We fill it into the fuel distribution system through the hose fitting of the vacuum brake booster. First we do this with the engine not running. Then we start it and add the mixture in small portions. This helps break down paraffin deposits. Under the influence of washing, paraffin deposits dissolve, enter the cylinder, burn and come out along with the exhaust gases. In this case, black smoke may come out of the exhaust pipe.
How to check the adsorber valve
If after checking it turns out that the adsorber is in more or less working condition, then it makes sense to check its purge solenoid valve. It’s worth mentioning right away that for some machines, due to their design, some actions will differ, some of them will be present or absent, but in general the verification logic will always remain the same. So, to check the adsorber valve, you must perform the following steps:
- Visually check the integrity of the rubber hoses included in the fuel vapor recovery system, in particular those directly approaching the valve. They must be intact and ensure the tightness of the system.
- Disconnect the negative terminal from the battery. This is done to prevent false alarms of the system diagnostics and to enter information about the corresponding errors into the electronic control unit.
- Remove the absorber (usually it is located on the right side of the engine, in the area where the air system elements are installed, in particular the air filter).
- Turn off the electrical power to the valve itself. This is done by removing the electrical connector (the so-called “chip”) from it.
- Disconnect the inlet and outlet air hoses from the valve.
- Using a pump or medical bulb, you must try to blow air into the system through the valve (into the holes for the hoses). It is important to ensure the tightness of the air supply. To do this, you can use clamps or a thick rubber tube.
- If everything is in order with the valve, it will be closed and air will not be blown through. Otherwise, its mechanical part will fail. You can try to restore it, but this is not always possible.
- It is necessary to supply electric current from the power supply or battery using wires to the valve contacts. At the moment the circuit closes, you should hear a characteristic click, which signals that the valve has actuated and opened. If this does not happen, then perhaps instead of a mechanical failure there is an electrical failure, in particular, its electromagnetic coil has burned out.
- With the valve connected to an electric current source, you must try to blow air into it in the manner described above. If it is working properly, and therefore open, then this should work without problems. If it is not possible to pump through air, then the valve has failed.
- Next, you need to reset the power from the valve, and there will be a click again, indicating that the valve has closed. If this happens, it means the valve is working.
Is there any point in redoing it?
The carburetor engine has long been “morally obsolete”. Back in the second half of the 90s of the last century, VAZ cars were equipped with an injector. Nevertheless, carburetor engines still have a lot of “fans” who claim that the carburetor is not so bad. Before we begin converting the car, let’s look at it in detail, is everything so clear? Maybe it’s too early to consign the carburetor to the dustbin of history? Let's paraphrase Hamlet and ask ourselves: “Carburetor or injector, that is the question?” This is, of course, a joke. But is it really worth investing so much effort?
- To re-equip a VAZ-2109 you will need to invest at least $500. It is unlikely that the savings from using an injection engine will pay for such costs. Maybe only in the long term.
- The environmental performance of a car can be improved much more easily. Install a vortex aerodynamic device. It’s easy to buy such a unit, it’s inexpensive, and it installs quickly.
Fuel rail of a VAZ 2107 car – removal – installation | VAZ 2107 injectors - check
We remove the fuel rail from the VAZ 2107 car to check or replace the injectors, as well as when removing the intake manifold pipeline. To check the injectors you will need an ohmmeter.
Removing the fuel rail and injectors from a VAZ 2107 car 1. We prepare the VAZ 2107 car for operations (see “Preparation of the VAZ 2107 car for maintenance and repair”). 2. On a VAZ 2107 car, we relieve the pressure in the engine power system (see “Relieving pressure in the power system of an injection engine”). 3. Disconnect the wire from the negative terminal of the battery (see “Battery VAZ 2107 - removal and installation”). 4. Having released the latch, disconnect the injector wiring harness block from the engine harness.
5. Using an ohmmeter, we check the resistance of the injector windings by connecting one probe to terminal E (“ground”) of the wire block, and the other - alternately to four terminals (F, G, B, C), measuring the resistance of each injector, which should be within 12 -14.5 Ohm. 6. Remove the receiver from the VAZ 2107 car engine (see “Receiver - removal and installation”). 7. Using a 17 mm wrench, unscrew the fitting of the fuel drain tube from the fuel rail, holding the hose tip with a wrench of the same size.
Cleaning and preventing plaque in the system
The injector device is very sensitive to large inclusions in gasoline. If you are using a cheap brand of fuel, be prepared to change your injectors soon. So the first thing you should do for your VAZ fuel pump is change the brand of fuel. The power supply system of the VAZ 2107 should become cleaner; the possibility of plaque formation in the system is still not excluded. Since the flammable liquid in the channels occasionally stagnates and sometimes even freezes, an early breakdown can be prevented only in one way - regular cleaning.
Causes of injector clogging
Typically, problems with the injection system occur when using low-quality gasoline.
Heavy paraffins contained in such fuel settle on the walls of the system, cutting off the fuel supply. Manufacturers of high-quality gasoline add detergent to it - a special additive that dissolves deposits. Low-quality gasoline contains too much paraffin, which forms deposits faster than detergents can remove them. Deposits form more intensively at low temperatures, so when the car is frequently driven with a cold engine, the injector becomes clogged more often.
Deposits can accumulate not only in the injectors. Often vapors settle on the throttle valve, which leads to a change in the proportions of the air-fuel mixture entering the cylinders.
Deposits of substances contained in low-quality gasoline may also appear on the back of the intake valve plates. This can lead to valve burnout or fuel detonation.
To clean the injection system of deposits, it is necessary to use special flushing fluid and equipment. You can wash the injector in a garage. To do this, you need a syringe and washing liquid. The latter is mixed with gasoline and poured into the injection system through the hose of the vacuum brake booster. First, the operation is performed with the engine turned off, then with the engine running. The mixture is fed into the running engine gradually, in small portions. As a result, the deposits dissolve, enter the engine cylinders and burn there. In this case, clouds of smoke may briefly appear coming out of the muffler.
In the mid-90s, a massive transition of Russian models from a carburetor to an injection power system began. This requalification also affected the VAZ 2107 and 21074 cars. As a result, the model received new elements that structurally distinguish it from its predecessor:
- electric fuel pump. It takes fuel from the tank, maintaining constant pressure in the fuel line. The carburetor version had a mechanical fuel pump;
- fuel injectors that inject directly into the combustion chamber. Therefore, the fuel-air mixture is formed directly in the combustion chamber. On the previous modification, the mixture was formed due to the opening of the carburetor air damper;
- new engine control unit, which determines the moment of injection and forcibly performs it. The fuel mixture is forced into the cylinders by the injection system, while in the carburetor the fuel is supplied due to rarefied pressure after the valve opens.
Educational information about the adsorber
The article is educational in nature and may contain errors; it is recommended for car enthusiasts with a poor understanding of the adsorber.
The article is written in relatively simple words for better understanding
1) What is an adsorber
Adsorber or aAdsorber are often confused - the correct word is “adsorber”... A container with activated carbon, most often looks like a barrel (cylinder) with inlet and outlet hoses
Let's start with the definitions:
Sorption (from Latin sorbeo - absorb) - absorption by a solid or liquid of various substances from the environment. Adsorption is the accumulation of something on the surface of a sorbent. Adsorber (from Latin ad - on, with and sorbeo - absorb) - a device for absorbing dissolved or gaseous substances (fuel vapor) by a surface layer of a solid, called an adsorbent (activated carbon), not accompanied by a chemical reaction Gasoline vapor recovery system (EVAP) — Evaporative Emission Control) is designed to prevent the leakage of gasoline vapors into the atmosphere.
3) Euro-2 and Russia-83
The question arises: why are there no adsorbers on cars with Russia-83 standards, but on cars with Euro-2 and higher standards there is one?
Let's compare two cars - VAZ 21083 and VAZ Priora, namely the power system: VAZ 21083:
Through the drain hose (15), the tank is connected to a separator (19), which traps gasoline vapors. The condensate from the separator is drained back into the tank. The separator communicates with the atmosphere through a two-way valve (21), which prevents excessive increase or decrease in pressure in the fuel tank. The filler neck is connected to the tank with a gas-resistant rubber hose secured with clamps. The plug is sealed.
Those. When the pressure in the fuel tank increases or decreases, gasoline vapors are released into the atmosphere.
Fuel vapors that have passed through the tube from the tank into the separator (16) are partially condensed in it. The condensate from the separator is drained back into the tank through a tube. A gravity valve is installed in the upper part of the separator, which prevents fuel from leaking out of the tank when the vehicle rolls over. Fuel vapors accumulate in the adsorber (1) through the gravity separator valve and the tube connected to it in the adsorber (1) when the engine is not running. When the engine is running and other necessary conditions, the valve (14) communicates with the adsorber cavity with the throttle assembly - and the sorbent is purged: gasoline vapors are mixed with air and discharged through the throttle assembly into the intake manifold and further into the engine cylinders.
Those. Fuel vapor accumulates in the adsorber, during engine operation it is purged by the valve and enters the receiver, and then into the engine itself to burn out.
Euro-2 standards prohibit contact of the gas tank ventilation with the atmosphere; gasoline vapors must be collected (adsorbed) and, when purged, sent to the cylinders for afterburning. The Russia-83 standards did not prohibit contact between the gas tank ventilation and the atmosphere.
4) Pros and cons of the adsorber:
+ the atmosphere is not polluted by unnecessary, harmful fumes; + slight fuel savings, gasoline vapors do not evaporate, but burn out during engine operation. + absence of a persistent smell of gasoline (debatable) - takes up space in the engine compartment - unstable engine idling with a faulty adsorber - cost of the adsorber
5) Why do some car enthusiasts remove the adsorber?
Some car enthusiasts remove the working adsorber with the phrases: “I don’t like it, I’ll throw it out”, “it makes the car slower”, “the consumption with it is higher”, “a stupid thing” - in fact, the working adsorber does not affect the dynamics, the consumption is more likely to be reduced - in general, a useful thing. Others remove the adsorber when it becomes unusable; they do not replace it due to the high cost of the adsorber.
It is easy to remove: a fine filter (from carb. 2108) is placed on the hose from the separator; in this case, gasoline vapors escape into the atmosphere. The hose from the valve is closed. The engine control program is adjusted, otherwise an engine error will appear.
Source
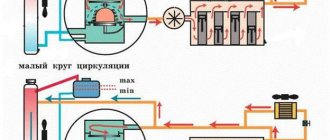
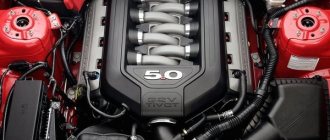
Principle of operation
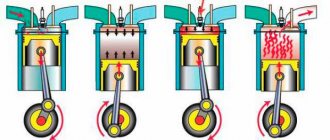
The internal combustion engine is designed to convert thermal energy into mechanical energy. The conversion process occurs in the cylinder block during combustion of the combustible composition. The preparation and delivery of a mixture of gasoline and air into the combustion chamber of the cylinder is carried out in different ways.
In an engine with external mixture formation, the mixture is prepared in the carburetor. The fuel is mixed with air and enters the combustion chamber through the suction manifold through the inlet valve. It is ignited by a spark plug and burns, expanding the gas, driving the piston.
In an engine with an injection system, the process occurs differently. The fuel-air mixture is prepared in the suction manifold just before entering the combustion chamber.
When the intake valve opens, the injector opens and sprays gasoline. It mixes with air, enters the combustion chamber and at a certain moment is ignited by a candle. From the generated heat, the gas expands and presses on the piston. A working process is taking place.
The VAZ 2107i was equipped with an engine with a distributed injection system, i.e. Each cylinder is supplied with fuel individually through its own injector. There are four injectors according to the number of cylinders.
The injectors, or rather the entire system, are controlled by an electronic control unit (ECU). Judging by its functionality and the amount of work performed, it can be called an on-board computer. All data from electronic and mechanical sensors enters the unit, is processed and commands the actuators to perform certain actions.
The operating principle is as follows. From the gas tank through the filter, the fuel pump supplies gasoline to the fuel rail, then to the injectors. Inside the ramp, a constant pressure of 300 mPa is maintained using a regulator. If the pressure rises, the excess fuel is dumped into the gas tank through a cutoff automatically.
The ECU sends a signal to open and close the injectors in the order in which the cylinders operate, while being guided by readings from the crankshaft position sensor.
The amount of fuel passing through the injector depends on the length of time it is open. The time is calculated by the control unit using information received from the mass fuel flow sensor and the throttle position sensor.
These are the fundamental parameters under which the engine can operate, but for the correct and smooth operation of the unit, the electronic control unit takes additional readings:
- from a coolant temperature sensor to regulate the combustion process of the fuel-air mixture;
- from a voltmeter to determine the voltage in order to clearly establish the start and end time of the injectors;
- from a tachometer to determine the crankshaft speed;
- from the catalyst to determine the composition of exhaust gases.
The ECU also controls the fuel pump, idle air control and ignition system.
Lambda probe
This is a sensor that allows you to estimate the oxygen content in exhaust gases. It should be noted that direct measurements cannot be taken, so you have to install a sensitive element inside and outside the exhaust pipe. And to improve sensitivity, you need to warm up the device to 600 degrees.
This sensor sets the ignition timing and regulates the quality of the fuel mixture. The presence of the device is due to the introduction of toxicity standards.
Diagnostics
The very first thing when diagnosing, as noted above, listen when you turn on the ignition to see if there is any noise from the fuel pump. The absence of a characteristic buzzing may indicate that:
- VAZ 2107 fuel pump fuse is faulty;
- relay malfunction;
- open circuit of the fuel pump;
- motor malfunction;
- ECU malfunction.
Below is a simplified connection diagram for a VAZ 2107 injector fuel pump:
You can check the fuel pump on a VAZ 2107 injector simply by checking the voltage at its connection block with a tester. The presence of voltage will indicate a malfunction of the electric motor. Instead of a tester (multimeter), you can use a test lamp to diagnose a malfunction.
In the absence of one, this can be done by disconnecting the connection block for the fuel pump and fuel level control and applying voltage with wires from the battery to the place where the gray wire is connected +12 and to the place where the black wire is connected - minus. A humming pump will indicate a faulty fuse, power circuit or ECU.
Checking the valve with a multimeter
Diagnostics can also be done with a voltmeter. How to check the fuel canister check valve? You need to open the hood and disconnect the wiring harness connector from the valve. Next, connect the negative probe of the multimeter to ground and turn on the ignition. Then bring the positive probe to the wire chip and look at the values of the device. The readings should not be lower than 12 V.
To inspect the valve itself, loosen the hose clamp with a screwdriver and remove the tube outward. Next you need to remove the valve itself by prying it off with a slotted screwdriver. It is necessary to turn on the ignition and apply “plus” and “minus” to the corresponding terminals on the element. If the valve is working properly, you will hear a characteristic click. Otherwise, the element is defective and must be replaced. The cost of a new element is 350 - 370 rubles (suitable for a VAZ of the tenth family).
To replace the valve, you only need a slotted screwdriver. She needs to unscrew the clamps of the gasoline hoses and pry off the edges of the element. The new one must be installed tightly into the grooves until it clicks. Next, put the hoses on the valve and tighten the clamps. At this point, the replacement of the Semyorka adsorber valve has been successfully completed.
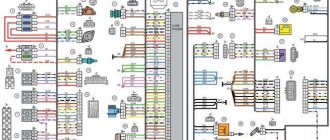
General diagram of the electrical equipment of the VAZ 21074 injector
General diagram of the electrical equipment of the VAZ 21074 injector
1. Electrical connection diagram of the wiring harness of the instrument panel assembly LADA 21074
- – ignition switch unloading relay;
- – relay-interrupter of direction indicators;
- – windshield wiper relay;
- – brake signal switch;
- – switch for headlights and direction indicators;
- – windshield wiper and washer switch;
- – ignition switch;
- – hazard warning switch;
- – instrument cluster;
- – rear window heating switch;
- – rear fog light switch;
- – external lighting switch;
- – heater motor switch;
- – additional resistor for the heater electric motor;
- – heater electric motor;
- – indicator lamp for heated rear window;
- – brake fluid level warning lamp;
- – instrument lighting switch;
- – cigarette lighter;
- - watch;
- – reverse light switch;
- – hand brake sensor;
- – rear fog light relay;
- – block of the instrument panel harness to the ignition system harness;
- – glove box lighting;
- – mounting block.
Removing the ramp and checking the injectors of the VAZ-2107-20 car
We carry out the work on a cold engine. Relieve pressure in the fuel system.
Unfasten or cut the plastic clamp securing the injector wire block to the front panel.
Disconnect the injector wire block from the control system wiring harness block.
Using a 17mm wrench, unscrew the fuel supply pipe fitting, holding the hose tip with a wrench of the same size.
Similarly, disconnect the tube fitting from the drain pipe hose.
Having disconnected the tubes and hoses, we check the condition of the rubber sealing rings placed on the ends of the tubes.
Use a 5mm hex to unscrew the two screws securing the fuel rail to the intake pipe
By pulling the ramp along the axes of the injectors, remove all four injectors from the holes in the intake pipe and remove the ramp assembly with the fuel pressure regulator, fuel pipes, injectors and wiring harness.
All injectors must remain on the fuel rail.
If any injector remains in the intake pipe, the retaining spring and injector body O-ring will need to be replaced.
To remove the fuel supply tube to the ramp, use a Phillips screwdriver to unscrew the screw securing the tube holder.
We remove the tube from the ramp.
The tip of the tube is sealed with a rubber ring.
To remove the injector, compress the spring clamp of the wire block and disconnect it from the injector.
Use a screwdriver to move the injector retainer along the ramp.
While rocking the nozzle, remove it from the ramp.
We check the resistance of the injector winding with a tester.
The resistance should be between 11–15 ohms.
To replace the injector sealing rings, use a screwdriver with a thin blade to pry the sealing rings off the injector body and sprayer.
We dismantle the other injectors in the same way.
We install the injectors on the ramp in the reverse order.
To check the injectors, we connect the block of their wiring harness to the block of the wiring harness of the engine management system, and connect the fuel hoses to the tubes of the ramp and pressure regulator.
We install the electric fuel pump fuse in the relay and fuse block of the engine control system.
Having placed transparent bulbs on the intake pipe under the injectors, we turn the engine crankshaft with the starter.
The shapes of the spray patterns, as well as the amount of fuel injected by each injector over a certain period of time, should not differ noticeably.
We check each injector separately by placing a transparent bulb under it and disconnecting the wire block from it.
We supply 12V voltage from the battery with two wires to the injector and turn on the ignition.
A characteristic type of jet should emerge from the nozzle holes of the nozzle, forming a conical torch.
After turning off the power from the injector, check whether fuel is leaking through the nozzle holes.
If the injector's electrical resistance is not correct, the performance and spray pattern are very different from other injectors, or if the injector is leaking, it will need to be replaced.
Install the ramp in reverse order.
We replace damaged rubber O-rings with new ones and apply engine oil to them during installation.
The tightening torque of the ramp mounting screws is 9–13 Nm, and the fuel pipe fittings are 20–34 Nm.
Preparatory stage
To set the ignition on a VAZ 2107 car, no special conditions are required; the operation can be done both in the garage and on the street, including in winter. For work, prepare the following set of tools:
- flat screwdriver;
- metal probe 0.35 mm thick;
- open-end wrench size 13 mm;
- a car light bulb designed for a voltage of 12 V with wires soldered to it;
- a wrench with a long handle designed to turn the crankshaft;
- key for unscrewing spark plugs.
Ignition tuning tool
Ideally, it is better to have in your arsenal a device for setting the ignition on a running engine - a strobe light. It is equipped with a lamp that flashes simultaneously with the moment of spark formation in the cylinder, which allows you to see the position of the notch on the crankshaft pulley at idle speed and clearly adjust the advance angle.
This is what a strobe looks like, which is convenient for adjusting ignition timing
Important point. The ignition is set in order to ensure that the spark appears in a timely manner and the engine starts, after which additional adjustments will be required. But the latter will not bring you the desired result when there is no compression in the cylinders or problems with the carburetor make themselves felt. If these faults are not eliminated, the engine operation will remain unstable, no matter how you configure the spark generation system.
Malfunctions of the engine with distributed injection
In any mechanism during its operation, certain breakdowns occur. The injection engine of the “Seven” is not immune from this. There are many faults and they are different, let’s look at the main, most common ones:
- unstable and unstable operation of the engine without load;
- clogged injectors;
- increased gasoline consumption;
- the permissible norm of CO2 in exhaust gases has been exceeded;
- when the throttle valve is opened sharply, dips in engine speed are formed;
- the power plant does not “pull”, power decreases.
To correct these defects, it is better to contact a specialized workshop. Specialists will carry out diagnostics using a computer with a specific program. They will determine the causes of failures, check whether the sensor readings are correct or not, and evaluate the operation of the ECU. After this, the necessary repairs will be carried out using equipment.
Coolant temperature sensor
A coolant temperature sensor is necessary to transmit readings about the temperature of antifreeze or antifreeze. It also participates in the formation of the fuel mixture necessary for engine operation. Creates a richer mixture while the engine warms up. This can be noticed by paying attention to the engine speed during the warm-up period.
Located between the cylinder head and the thermostat.
Signs of malfunction:
- There are no high speeds when warming up;
- Difficulty starting the internal combustion engine;
- High fuel consumption;
Signs of malfunctions and self-diagnosis
Problems in the operation of the fuel pump can be understood by the following facts:
- Fuel consumption increases.
- Extraneous noise is heard at the location of the node.
- A fueled car stalls after the engine starts.
- Jerks in the movement of the car, a slow increase in engine speed, a prolonged reaction of the car when you press the gas pedal.
- The engine starts only when the starter rotates for a long time.
- The car won't start.
When you turn on the ignition on a car with an injector, you can hear the characteristic sound of an electric fuel pump, followed by its shutdown. In carburetor cars, the housing of the unit in good condition should not get hot.
You can check the operation of the entire fuel supply system in a car with a mechanical pump if the hose coming from the outlet pipe is removed and directed into a plastic bottle. Gasoline must be supplied under pressure. When the engine makes 20 rpm, the pump pumps about 1 liter of fuel.
If the electric pump is working, but the machine motor rotates unevenly, you need to check the pressure in the ramp using the following algorithm:
- First remove the fuel pump fuse.
- To use up the remaining fuel, we start the car.
- After the car stalls, we connect a pressure gauge to the ramp by removing the plug.
- We put the fuse in place and start the engine again.
- We assess the pressure. It should be from 280 to 380 kPa.
- When driving at a speed of 45-50 km/h, the indicators cannot deviate.
When pressure surges are present, the filter mesh must first be cleaned. To do this, the pump will have to be removed. In addition, the pump will not work well if the valves at the injectors are worn out, there is dirt in the fine filter, or the pressure regulator is faulty.
Before repairing the fuel pump, you must purchase a repair kit that matches the brand of the part.
Troubleshooting - identify and eliminate
At an average speed of 80–100 km, this car consumes 6.5–7 liters per 100 km. This flow rate was achieved using an injector. An injector is a device that completely replaces the operation of a carburetor. It consists of injectors and a fuel rail, as well as electronic sensors that give a signal for fuel injection. Fuel is injected into the engine using injectors, so it is very important to monitor and clean them on time so as not to interfere with the operation of your car’s engine. It is also worth refueling with high-quality octane fuel.
As a result of untimely replacement of fuel and air filters, as well as the use of low-quality fuel, the injector may fail. Don’t rush to a car service center - first, make sure that the reason for the poor performance of the car and the decrease in power lies not in these spare parts, but in something else. One of the main reasons for poor injector performance is incorrect operation of the control unit, the so-called computer. To identify the causes, you need to undergo service diagnostics; in some cases, you will need to completely flash the unit.
During poor injector operation, the VAZ 2107 significantly increases fuel consumption, and the corresponding indicator should light up on the instrument panel, indicating the presence of an operating error. Problems in operation are also indicated by a decrease in engine power, and failures are also possible when pressing the gas pedal. Complete cleaning of the injector can be done at a car service center, or, after purchasing the necessary chemical fluid, you can do everything yourself.
These procedures will cost you much less, but they require technical skills and care. Before repairing or cleaning the injector, all electronic sensors must be checked. This action can be performed by turning off the chips on them, and a characteristic sound should be heard on the instrument panel and one of the indicators should light up.
Necessary equipment and tools
Of course, reworking an engine requires special equipment that can make basic manipulations easier. You will undoubtedly need:
- well equipped, warm garage. Agree, it is difficult to work in the cold or in the rain. Electricity is also required;
- convenient overpass or garage pit. It is not recommended to use a jack or improvised devices in order to avoid unsafe situations leading to accidents;
- spare car. It can be useful for quickly responding to various force majeure circumstances, such as the need to urgently replace a defective part.
To make the process easier, we recommend that you stock up on the following tools:
- a set of different screwdrivers. Keys and sockets, including a wrench and a hexagon, will also come in handy;
- a suitable container and a special hose up to 4 m long. Used when draining antifreeze with machine oil;
- a set of adjusting washers, probes and other devices for debugging valves;
- file;
- a chisel, drill and grinder, which can be useful in difficult situations;
- a set of various clamps.
In addition, it is recommended to keep an effective solvent on hand. This product is used to combat souring of nuts.
Additional designations
The fuses of the VAZ 2107 car are located as follows:
- taillights and reversing lights;
- electric motor of the heater fan, headlight washer and glass wiper pumps;
- indicator for turning on the rear window heater VAZ 2107;
- direction indicators and hazard warning relays;
- fog lights;
- tachometer, voltmeter;
- control lamps for oil pressure, fluid, fuel level and reserve indicators on the instrument panel, instrument panel lighting;
- cigarette lighter and clock;
- VAZ sound signal;
- interior lighting (up to 2000 there was one lamp on the ceiling, for those manufactured after 2000 there were two lamps on the rear door pillars);
- high beam headlights;
- high beam warning lamp;
- engine compartment lighting and license plate lighting;
- glove compartment lighting;
- right headlight;
- left headlight.
PROMOTION: SALE OF NEW CAR 2022 PRODUCTION
We recommend watching:
- Fuel line diagram for VAZ 2110 injector
- Fuel pressure sensor VAZ 2107 injector
- What is the pressure in the fuel rail of the VAZ 2114
- Fuel rail Kalina 8 valves
- How to properly remove the adsorber VAZ 2107 injector
- How to replace the fuel filter on a Lada Priora
Causes of clogging of the VAZ 2107 injector
Poor quality gasoline mainly causes problems with the injection system. This gasoline contains a high amount of heavy paraffins. They leave deposits on the walls of the fuel system, clogging it and making it difficult to supply fuel. When producing high-quality gasoline, special additives (detergents) are added that destroy such deposits. Low-quality gasoline contains a very high amount of paraffins that detergents do not have time to cope with their deposits.
- Such deposits accumulate not only in the nozzles. They can also settle on the throttle valve, which disrupts the proportionality of the fuel mixture that enters the cylinders.
- Layering may also appear on the exhaust valve plates, on their reverse side, for this reason the valve may burn out and detonation may occur when gasoline is burned.
- To clean the injection system from such deposits, it is necessary to use a special flushing fluid and some equipment. You can also clean the injector at home (in your garage). To do this you will need a washing liquid and a syringe.
Photo of flushing for a VAZ 2107 injector. Flushing fluid is added to gasoline and poured into the injection system through the brake hose. First, this procedure is done with the engine not running, then in its working condition. The mixture is fed into a running engine in small doses, slowly. This contributes to the destruction of the formed layers, which then, getting into the engine cylinders, burn out there. It should be borne in mind that during this procedure, black smoke may temporarily emit from the muffler.
How to repair the adsorber and valve
It’s worth noting right away that in most cases both the adsorber and the valve cannot be repaired; accordingly, they need to be replaced with similar new units. However, as for the adsorber, in some cases, over time, the foam in its body rots, which is why the carbon contained in it clogs the pipelines and the solenoid valve of the EVAP system. Rotting of foam rubber occurs for banal reasons - from old age, constant temperature changes, exposure to moisture. You can try to replace the foam separator of the adsorber. However, this cannot be done with all units; some of them are non-separable.
If the adsorber body is rusted or rotten (usually also due to old age, temperature changes, constant exposure to moisture), then you can try to restore it, but it is better not to tempt fate and replace it with a new one.
Similar reasoning is valid for the solenoid valve of the gasoline vapor recovery system. Most of these units are non-separable. That is, the electromagnetic coil is sealed into its body, and if it fails (insulation breakdown or winding break), it will not be possible to replace it with a new one. Same with the return spring. If it has weakened over time, you can try to replace it with a new one, but this is not always possible. But despite this, it is still better to perform a detailed diagnosis of the adsorber and its valve in order to avoid expensive purchases and repairs.
Some car owners do not want to pay attention to the repair and restoration of the gasoline vapor recovery system, and simply “turn off” it. However, this approach is not rational. Firstly, this really affects the environment, and this is especially noticeable in large cities, which are not known for their clean environment anyway. Secondly, if the EVAP system does not work correctly or does not function at all, then under pressure gasoline vapors will periodically escape from under the gas tank cap. And this will happen as often as the temperature in the gas tank increases. This situation is dangerous for several reasons.
Firstly, the tightness of the tank cap is broken, the seal of which is broken over time, and the car owner will probably have to periodically buy a new cap. Secondly, gasoline vapors not only have an unpleasant odor, but are also harmful to the human body. And this is dangerous provided that the car is parked in an enclosed area with poor ventilation. And thirdly, fuel vapors are simply explosive, and if they come out of the gas tank while there is a source of open fire next to the car, a fire hazard will arise with very dire consequences. Therefore, there is no need to “turn off” the fuel vapor recovery system; instead, it is better to keep it in working order and monitor the adsorber and its valve.
Conclusion
Checking the adsorber, as well as its electromagnetic purge valve, is not very difficult even for novice car owners. The main thing is to know where these components are located in a particular car, as well as how they are connected. As practice shows, if one or the other unit fails, they cannot be repaired, so they need to be replaced with new ones. As for the opinion that the fuel vapor recovery system needs to be turned off, it can be attributed to misconceptions. The EVAP system must work normally and ensure not only environmental friendliness, but also safe operation of the vehicle in various conditions.
Device
The VAZ 2107 injector consists of the following elements:
- Computer;
- Sensors;
- Fuel pipes and hoses;
- Fuel and air filter;
- Actuators;
- Gas tank;
- Wiring.
The injector power system contains the main element - a computer or ECU. Its permanent memory contains a program (algorithm) in accordance with which the control of actuators is implemented, these include:
- Fuel pump;
- Injectors;
- Idle air control;
- Canister valve.
Each of the above elements performs its own function.
Gasoline pump
Turned on by the ECU output signal through a relay. Has a strainer and fuel level sensor. The gasoline from it passes through the fuel filter. The pump is located in the tank and to remove it, you need to remove the back seat, remove the hatch and unscrew the fastener.
Nozzle
It is a sprayer equipped with a solenoid valve. Triggered by an ECU impulse. Accordingly, the duration of valve opening (the amount of gasoline supplied) depends on the time the pulse is applied. It is installed on a ramp common to all injectors, a constant pressure in which is maintained by a valve. If it is exceeded, the valve opens and gasoline returns back to the tank. The injector enters the intake manifold. The air flow, passing through the intake manifold, carries away a portion of gasoline ejected by the nozzle.
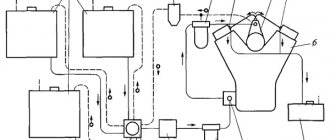
The structure of the VAZ 2107 fuel system
Idle speed control
The fuel system maintains engine idle speed using a regulator. It is a stepper motor connected to a conical shaped control body. Its approach reduces the air flow entering the intake manifold; its removal, on the contrary, increases it.
Canister valve
It is needed to turn on the ventilation of the adsorber, which accumulates gasoline vapors and releases them into the intake manifold at the right moment.
The following sensors are installed on the VAZ 2107:
- Crankshaft position;
- Mass air flow;
- Throttle position;
- Coolant temperature;
- Speed;
- Oxygen content in exhaust gases.
Crankshaft position
This parameter is needed by the ECU to open the injectors in a timely manner. If this sensor malfunctions, the VAZ 2107 will not drive.
Air flow
Allows you to supply fuel in the right quantity. The signal from this sensor is sometimes incorrect. The reason for this may be its malfunction caused by high humidity or low temperature. An air filter with condensation inside or dirty will adversely affect this sensor.
Coolant temperature
The parameter is needed so that the ECU understands whether the engine is warmed up. This is necessary for the correct operation of a cold motor. The mixture is enriched due to temperature correction.
Oxygen concentration
The oxygen content in the exhaust gases must be measured to adjust the composition of the fuel mixture. It doesn't work when it warms up. This is advisable because the mixture is enriched.
How to find a fault
You need to look for the cause of a fuel system malfunction in two directions: electrical and mechanical. The first option is diagnostics of sensors and their electrical circuits. The second is to check the pressure in the system, which will show how the fuel pump works and how gasoline flows to the injectors.
Error codes
It is recommended to start searching for any breakdown in an injection car by reading the error code issued by the electronic control unit, because most of the listed power system faults will be accompanied by a “CHECK” light on the dashboard. To do this, you can contact a service station, or carry out diagnostics yourself if you have a scanner designed for this. The table below shows error codes in the operation of the VAZ 2107 fuel system with their interpretation.
Table: error codes and their meaning
| Code | Decoding |
| R 0102 | Malfunction of the mass air flow sensor or its circuit |
| R 0122 | Malfunction of the throttle position sensor or its circuit |
| R 0130, R 0131, R 0132 | Lambda probe malfunction |
| P0171 | The mixture entering the cylinders is too lean |
| P0172 | Mixture too rich |
| R 0201 | Malfunctions in the operation of the injector of the first cylinder |
| R 0202 | Malfunctions in the operation of the injector of the second cylinder |
| R 0203 | Malfunctions in the operation of the injector of the third cylinder |
| R 0204 | Malfunctions in the operation of the fourth cylinder injector |
| R 0230 | The fuel pump is faulty or there is an open circuit |
| R 0363 | The fuel supply to the cylinders where misfires are recorded is turned off |
| R 0441, R 0444, R 0445 | Problems in the operation of the adsorber, purge valve |
| R 0506 | Malfunctions in the idle speed controller (low speed) |
| R 0507 | Malfunctions in the idle speed control (high speed) |
| P 1123 | Mixture too rich at idle |
| P 1124 | Idle mixture too lean |
| P 1127 | Too rich mixture under load |
| P 1128 | Too lean mixture under load |
Checking the rail pressure
As mentioned above, the operating pressure in the power system of the injection “seven” should be 2.8–3.2 bar. You can check whether it corresponds to these values using a special liquid pressure gauge. The device is connected to a fitting located on the fuel rail. Measurements are taken with the ignition on without starting the engine and with the power unit running. If the pressure is less than normal, the problem should be looked for in the fuel pump or fuel filter. It is also worth inspecting the fuel line pipes. They may be damaged or pinched.
A special liquid pressure gauge is used to check the pressure