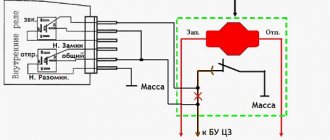
The reason for writing a new addition was the replacement of the standard speakers, which are installed by the factory in the “Lux” configuration. Previously, I wrote that due to poor sound insulation and the whine of the gearbox, I decided not to bother with the music, did not change anything, selected sound settings on the installed standard multimedia system (hereinafter referred to as MMS), which made the sound more or less normal, and used it without much discomfort . But recently I noticed that the rear left speaker began to grunt, introducing annoying notes into my favorite music. An autopsy showed that the diffuser in the installed speaker had come unstuck and, when trying to reproduce low-frequency sounds, produced the same grunting sounds. In general, I decided to change the speakers. And all at once, although the sound in the front doors was normal. I started studying sites with car audio. The factory installed DELTA speakers with a diameter of 13 cm both front and rear. On the forums, many car enthusiasts write about installing 16 cm speakers. At first I wanted to do this myself, but abandoned this idea for the following reasons:
Installing acoustics in Lada Granta yourself
Acoustics in Lada Granta
It's no secret that acoustics in a car are very necessary and perform various functions. Installing it is a bit of a concern for novice motorists: they find it difficult to choose the right speakers, they do not have enough money for high-quality installation, etc. This article was written solely to help everyone in this matter and we will find out how to install acoustics in a Lada Granta with our own hands. The Lada Granta and the acoustics, installed correctly in its interior, taken together, will create a completely different car, which even the owners of some foreign cars will look at with envy.
Acoustics Lada Granta
As a rule, installing acoustics in a car has three main stages of development:
- Car radio installation.
- Installation of rear speakers.
Installation of front speakers.
Let's look at everything in more detail.
How to process a cylindrical hole?
The purpose of pasting manipulation is to achieve two properties:
- creating a trumpet-like effect;
- ensuring protection of the speaker contact group from moisture when the side window is fully lowered.
The installation procedure on LADA Granta requires preliminary preparation. “Vizomat 10” needs to be cut into thick strips and when pasting, it is necessary to ensure that the lowered glass does not touch the outer surface of the created cylindrical hole.
The density of the structure plays an important role. To achieve a sufficient level, it is recommended to glue the outer circumference of the wooden ring
Bitoplast is suitable for this purpose. This action will ensure that the installed speaker is pressed tightly against the ring.
After installing the loudspeakers, we also cover their circumferences with Bitoplast. This measure will ensure sound intensity, because air will not be able to penetrate behind the door trim.
Car radio installation
Acoustics in Lada Granta
The car radio for the Lada Granta must be selected in such a way that its connection corresponds to the 1 din connector.
Note. You can also install a car radio with 2 din on the Lada Granta, but then you will have to cut out the partition and adjust the frame in the console to the size, which is very, very labor-intensive.
- We dismantle the plastic pocket that stands in place of the future car radio. We use a flat blade screwdriver. On the back of the pocket we see slots where you will need to insert ISO connectors.
Installation of car radio in Lada Granta
- The metal frame is removed from the radio and installed in the same place where the pocket was removed. We unbend the frame's antennae and securely fix it.
- We connect the connectors to the car radio. Then we insert it into the frame.
We check the operation of the car radio, and if it is functioning normally, then we move on to the next stage of our operation.
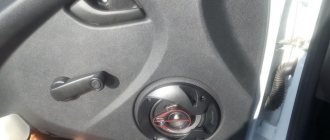
Removing the standard radio in Grant Lux
The difference between grants of the luxury configuration: the MMS (multimedia system) installed from the factory. This is a 2 din device.
To remove standard acoustic grants:
- take a knife or plastic spatula to dismantle the acoustics and disconnect the decorative trims to the right and left of the radio. It is not necessary to take pictures;
- in the gap between the cover and the panel we find the head unit lock. There are two of them on both sides. Press it out with a screwdriver;
- we take out the GU on ourselves.
Everything is described in detail in the video:
Replacing the standard MMC in Grant
The process - after removing the acoustics, we install a new system.
Difficulties: you may have to finish the fastenings of the new system for VAZ ones. Plus you need the right frame. The factory MMC frame may not fit.
Installing front speakers
Acoustics for Lada Granta
Before moving on to the actual algorithm for installing the front speakers (see How to choose speakers for a car radio on your own), let us remind you that this car has already been equipped with standard seats and there is no need to do anything new. But a serious problem arises when installing two-component acoustics. And yet, modernization will have to be carried out, since the diameter of the standard seats is quite limited, however, as on other car models.
Note. If, for example, we want to install high-quality 16 cm acoustics on a Lada Granta, then another intractable problem will arise. The front windows may not open all the way and will hit the speaker. You will have to make special spacers from plywood or chipboard.
Making podiums
- The first thing to do is to make podiums.
Installing rear speakers in Lada Granta
Acoustic systems in Lada Granta
As a rule, without rear acoustics there can be no talk of any high-quality sound. Of course, the main thing is the front speakers, but the sound coming from the rear is an undeniable addition to the overall sound stage created in the cabin of any car. Speakers from Morel Tempo Coax are ideal for the rear doors of the Lada Granta. This is a two-way speaker with a power of 6 dB. Rear speakers in the car door:
- We remove the door trim.
- We try on the speakers for the doors.
- To ensure that the speakers are firmly fixed and the sound quality is not lost, you need to cut off the protruding edges of the metal, and screw the cut pieces of plywood into this place. Material with a thickness of 10-15 mm is quite suitable for this.
Rear speakers in Lada Granta
- We also install crossovers from the inside so that they are not visible and do not interfere with the trim.
- We are modifying the rear door trim so that the peculiar pancakes for the speakers do not protrude. It is recommended to install aluminum mesh. They will need to be cut according to the pattern, and then secured to the rear doors using hot glue.
Note. If the color of the Lada Granta is light, then the metal of the door may be visible through the mesh cells. In this case, it will be enough to hide everything with a model or a piece of carpet.
- The wires are usually already laid here. You just need to connect them to the speakers.
Installation of 16 cm speakers can be divided into 3 stages:
1. Preparatory. Purchasing sound insulation, checking the presence of standard acoustic wires or purchasing new acoustic wires, preparing tools (find a jigsaw, check the battery charge level with a screwdriver, purchase a set of tools for removing door trim, buy solvent and rags).
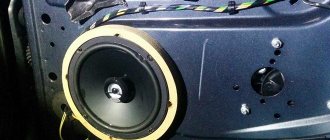
2. Installation. Using the Tool Set, remove the door trim. We place the speaker grill grids on the standard speaker installation locations (round timber on the upholstery) and mark the INNER size - the mounting diameter of your speaker. We cut out a place for the speaker. Sound insulation of the door and door trim: degrease with a solvent, glue the sound insulation (it is advisable to cut it into pieces: strips or squares for ease of gluing), the pieces are tightly butted, it is advisable NOT to leave gaps. If there are no acoustic wires in the door, we stretch the wires.
We take the spacer and try it on the door. She must stand up and not move. Using a screwdriver, fasten it with self-tapping screws (included) to the metal of the door. As you can see, the hole for the 13 cm speaker does NOT slightly coincide with the center of the spacer - this is normal (now you understand how “well” the standard speakers play).
Reinstalling the door trims.
We screw the speaker, not forgetting to connect the acoustic wires to it. Installation is complete.
3. Turn on the mafon and listen to the new 16 cm speakers play.
If you are installing not coaxial (as in our case), but component acoustics, then you will need additional stands for tweeters (for installing high-frequency tweeters). You must first pull the acoustic wires from the mafon to the crossovers (which are convenient to hide under the dashboard), and from the crossover a pair of wires goes to the midbass and a pair of wires to the tweeters, which are already built into the racks for the tweeters. And you will get great sound in the car.
Professional rear acoustics in Lada Granta
Acoustic shelf in Lada Granta
If the owner of a Lada Granta is a true connoisseur of sound, then the above methods for installing an audio system will not be enough for him. Therefore, we will present another method that involves installing professional acoustics in this car. To begin, prepare the necessary materials and equipment:
- Coaxial acoustics, preferably 6x9 from Pioneer. As for the rated power, 120 W will be enough.
- An acoustic shelf that you can make yourself, or you can buy ready-made.
- Kit for connecting a 4-channel amplifier, preferably from Supra.
- One roll of Splen.
As an amplifier, it is advisable to choose, again from Pioneer, a 2-channel option. As for the 4-channel option, this will be superfluous. The 2-channel amplifier exactly matches the selected acoustics.
Note. The kit for connecting a 2-channel amplifier can be used as for a 4-channel amplifier. The wires in this case are of higher quality and better.
The actual installation process itself:
- We dismantle the old shelf. We press out holes in the new one using hydraulics and cover it with two sheets of vibrating mat, and on top with a roll of Splen.
- We make podiums for the shelf to match the size of the speakers.
- We install everything in place.
Speakers in the rear doors of Lada Granta: how to install
Installing acoustics in a car is a delicate job that requires knowledge and certain experience. However, without setting the task of installing Hi-End class sound, you can easily handle it yourself. Especially if you need to install speakers in the rear doors of a Lada Granta or Kalina, a budget car, budget speakers, budget sound. Installing speakers in the rear doors of Grants, as well as what is needed for this, which speakers are best not to install, we’ll figure it all out right now.
Reviews
| № | Positive |
| 1. | Kirill , 33 years old: the standard front speakers are quite enough for me. To add volume to the sound, I installed a couple on the rear shelf. |
| 2. | Vasily , 44 years old: The standard radio on the Lada Granta Liftback is not bad, the sound is good. There are not enough speakers in the back row. I didn’t bother, I set the speakers to “13”. |
| 3. | Vitaly , 33 years old: after purchasing the Lada Granta Liftback, I supplemented the standard audio system with only two rear speakers, that’s enough for me. |
| 4. | Gennady , 41 years old: to increase the volume of sound, he added two speakers to the rear side doors and the rear parcel shelf. The standard radio works, no problems. |
| 5. | Mikhail , 35 years old: I heard a lot of complaints about the standard system, my feedback is positive. Yes, it is not super powerful, but it is enough for the average driver. |
| 6. | Gennady , 29 years old: the standard 2-DIMM radio on the Lada Granta Liftback is quite enough for good sound. Anyone who wants a concert hall should buy it separately. |
| 7. | Vyacheslav , 38 years old: I heard that they install rear speakers on the Grant at “16”, but did not bother. I bought it on “13”, I’m happy, there are no complaints about the sound, it’s not ideal, but it’s enough for me. |
| Negative | |
| 1. | Vasily , 28 years old: I didn’t believe the negative reviews until I bought the Lada Granta Liftback. Weak and terrible. Change the speakers and radio. |
| 2. | Kirill , 33 years old: I took the car with me, it had a standard radio, I replaced it with a new one from Pioneer. It's a completely different matter. |
| 3. | Georgy , 41 years old: when buying Grants, I knew in advance about problems with acoustics. I bought coaxial speakers and a good radio. |
Read also: Ideal oils oil club
Conclusion In general, the sound quality of the standard speakers on the Lada Granta liftback is good. Lovers of high quality and cleanliness do not like this, so they strive to replace it with expensive models.
It is necessary to start from the fact that the car is in the budget segment, which means there is no point in demanding the best. If desired, install 16 speakers on the rear side doors to enhance the sound quality.
What is needed to install speakers in the rear doors of Grants
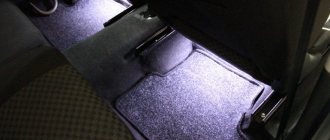
Regardless of the configuration of the Lada Grant or Kalina 2, there is more than enough space in the rear doors for speakers. In addition, the space even allows you to lay a layer of sound and vibration insulation so that vibrations are not transmitted to the body panel. Firstly, this will prevent the leakage of useful vibrations, and secondly, it will significantly improve the sound quality of the speakers, whatever they are.
Putting a speaker under the door card is half the battle. It is important that the acoustics do not suffer from accidental mechanical damage; the place, after all, is not the most suitable, but there is no other option in Granta door cards. And for this you will have to either make or buy a speaker cover, a mesh and think over the fasteners. We will proceed from what is in the simplest configuration of the Lada Grant, since in more expensive versions the issue with the rear speakers is at least partially resolved from the factory.
What you need to install speakers:
- The speakers themselves. We'll choose them later.
- Speaker casing with protective decorative mesh. The selection on sale is small, but you can find these - 2190-6202095 , left, 2190-6202094 , right.
- Wires for connecting to a crossover or radio, in most cases they are already laid, and the connector is located in the cavity of the door.
- A set of connectors, preferably high-quality ones, for car acoustics.
- Bracket for attaching the speaker to the door. The standard bracket has catalog numbers 2190-7901032 right and 2190-7901033 left.
Speaker installation
Many sedans are purchased in a classic configuration, without a radio and sound system. To install these fragments, it is important to follow the step-by-step instructions:
- The casing is removed. To do this, unscrew the handle, which is held on by two bolts, disconnect the latches and pull out the panel covered with fabric. Sound insulation is removed.
- The electrical wiring is disconnected, the old speaker is removed (if equipped).
- A hole is created in the cladding for musical equipment. An iron niche has already been created for size 13 acoustics. This is where the back of the speakers is inserted. Sometimes a little filing with a jigsaw is required.
- The equipment is fastened with self-tapping screws. The wiring is being connected.
- The facing card is returned to its place and secured with clips. They often break during removal, so it is worth purchasing an additional set of clamps. At the end the handle is screwed on.
There are more wires in the front door than in the back door. In addition to the electric lifts and the locking mechanism, the electrical wiring of the car's side mirror is connected there.
Which speakers are better for the Lada Granta in the rear doors?
First, let's decide on the parameters of the speakers. Size, of course, matters, but it is still not the main parameter. For example, we have a 4-way amplifier installed, we connect two speakers in the front and two in the back, as well as two subwoofers and two tweeters. This is the minimum program. Depending on the amplifier parameters, you can connect:
- 2 subwoofers of 4 ohms; 2 speakers in the rear doors (8 Ohms in series per channel); 2 speakers in the front doors (8 ohms in parallel per channel); two tweeters per remaining channel.
Therefore, the parameters of the speakers in the rear doors are 8 Ohms and we will connect them to one channel in series. We choose the brand at our discretion, but the speaker size - 5 ¼ inches (130 mm) will be optimal. There are speaker models operating in two-way mode with a diameter of 160 mm. The most inexpensive are the Chinese Kicks of the TL or RTS series. Price is about $30-45, Sony XS GT1320R - $85-90, Morel Tempo Coax 5x7, Pioneer TS 1339 R.
Speaker installation process
Installing the rear speaker, oddly enough, is even easier than the front speaker. We take the spacer and screw it to the back door, after which all that remains is to secure the speaker and connect it. With the front door, everything looks more complicated - there you need to glue threaded washers under the holes for the bolts. And normally these washers are held in place by brackets, which are not included in the “standard” configuration.
Rear and front door without trim
Each speaker is screwed onto 4 threaded screws, but it is better to connect the connectors first. One pair of speaker wires goes into each door, and they come from the main connector intended for the radio. Before making the connection, it is better to test the wires for breaks.
We have discussed in full how to install speakers in Kalina 2. We will not consider the method of installing and connecting the radio, but note that it is not at all necessary to dismantle the center console for this.