Repairing a car on your own is not only a way to save money, but also to do it efficiently, since not every master approaches his work responsibly. The owners of this car can easily adjust the wheel alignment on a VAZ 2106, especially if the car is operated at a considerable distance from the city and there is simply no opportunity to visit a car service center.
- Why adjustment is needed
What is camber - What is toe-in
Video: when to do a wheel alignment
- Table: angles of installation of the front wheels on the sixth model Zhiguli
- Road instability
- Video: wheel alignment installation under service conditions
- Preparatory work
Table: pressure in the wheels of the “six” depending on the tire size
- Video: do-it-yourself wheel alignment using the example of a VAZ 2121
Adjusting camber and toe on VAZ 2101-VAZ 2107
Welcome! Camber - this term refers to how the car’s wheel will stand relative to the vertical.
If the upper edge of the wheel is brought outward, then this means that the camber is positive, and if the same upper edge of the wheel is located in the inside of the car, then this camber will already be considered negative and indicated by the value “-”. Note! If the camber is incorrectly adjusted, namely when the camber of only one front wheel is adjusted, the car may drift to the side when driving - this can be very easily determined by removing your hands from the steering wheel while driving!
Toe-in - this term means how the wheels will converge with each other relative to the road. For example, on rear-wheel drive cars the wheels are at a positive angle, and on front-wheel drive cars they are at a negative angle, as shown in the photo. And all this was done so that when starting off and during further driving, the wheels are aligned and become completely level.
If the toe is incorrectly adjusted, the car's tires can wear out much faster than with the toe adjusted, so always keep an eye on it and adjust if possible!
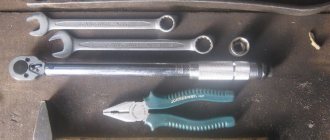
What tools will I need to make the adjustment? To make adjustments, you will definitely need a caliper, as well as a set of basic wrenches, Cobra-type pliers, a regular short thread and an unusual thread with hooks tied at both ends.
You will also need a block with a thickness of “22 mm”, and another block with a thickness of “6 mm”.
When do you need to adjust camber and toe? They are subject to adjustment when:
hodovik-razval › Blog › Wheel alignment on a Zhiguli (VAZ 2101-07)
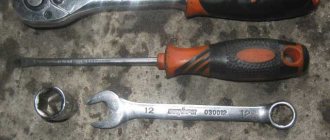
The entire process is captured on video. Well, some pictures that explain the topic. Here in the picture are the keys (tools) that will be needed for adjustment:
Well, I sketched out a table that shows how adjusting washers, placed between the lever axis and the beam, on the camber bolts, change the camber and caster on Zhiguli cars.
Comments 15
Hello! Today I had a wheel alignment done, they set the alignment at the rear, but they couldn’t adjust the alignment, they say there is nothing to turn to adjust the alignment. Is only toe-in done on the front axle? Ford Focus car.
That’s right - front and rear, on Focus, only toe is adjusted. The remaining angles can only be changed by replacing chassis parts or editing the body geometry. On the rear of the Focus, there are homemade adjustable suspension arms (to adjust the camber in the rear). But all this is unnecessary fuss. The camber is practically not felt by the driver at all when driving (especially on the rear axle).
How to adjust camber and toe, aka wheel alignment angles on a VAZ 2101-VAZ 2107?
Note! A more accurate check of wheel installation must be checked in a specialized workshop on a special stand. But if you don’t have the money for this, then you can almost as well adjust the wheel angles without using a stand!
And also when adjusting, pay special attention to the suspension elements, because if the suspension is faulty or if play is detected in most of its parts, adjusting the wheel angles will lead to nothing!
Preparation for adjustment:
1) At the beginning, for more precise adjustment of the wheel angles, it is recommended to load the car with an additional weight of “320 kg”. For example, you can put “4” people in a car and a load of about “50 kg”.
2) Now check how much fuel is in the fuel tank, if it’s not enough, bring it up to normal, because the tank must be completely filled.
3) Next, check the tire pressure, it should also be normal.
Checking and at the same time adjusting the camber and toe of the car:
Note! Unfortunately, setting the camber angle is very difficult to do yourself, because it is unlikely that it will be possible to adjust it properly. But you can check whether the camber angle is ok or not yourself, which is what we will do!
1) To check the camber, first sit in the car and turn the steering wheel so that it is pointing straight ahead.
2) Next, get out of the car and squeeze the car’s suspension, to do this, carefully use the trunk or, best of all, press the bumper with a force of “40-50 kg”, “2-3” times. Do the same operation with the front bumper of the car.
3) Then take the thread and a caliper and then pull it vertically as shown in the figure. And after the thread is tensioned, apply a caliper first from below, and then from above, and as a result you will find out the camber of the wheel.
Note! If you get a difference between the top and bottom points of the wheel, say, “3 mm”, then this will mean that the camber angle is approximately “30'”. The camber angle should be within “4°30'+20'” - this is when the car is loaded and provided that there are “4” people in the car. And when the car is unloaded, the camber angle should be “0°5'+20'”!
4) Now, in order to check the alignment, you need to do almost the same thing as when checking the camber, namely, align the wheels, if possible properly load the car, and only after that you need to start checking.
5) To check, take in your hand an unusual thread with hooks tied at both ends. And then hook one side of the thread to the beginning of the front wheel, and the other side to the end of the rear one, but hook it so that everything is on the same level, that is, so that the thread runs smoothly and does not bend.
Note! The track of the rear wheels is slightly narrower than that of the front wheels, approximately 44 mm, so for more precise adjustment, apply a block with a thickness of about 22 mm to the rear wheel and thereby draw the thread over this block!
6) Next, sit behind the wheel and turn the steering wheel so that the thread touches both sides of the front tire.
7) Then fasten the thread on the opposite side, but only this time place two bars under the back of the wheel, one of which will be “6 mm” thick and the other “22 mm”. Thus, if we add these two values, then the sum we get is “22 + 6 = 28 mm” the thickness of the bar.
Note! After the entire operation, check that the thread lightly touches “1-2 mm” for one front wheel at both points of the tire; if it does not touch, then adjust the toe-in of the front wheels!
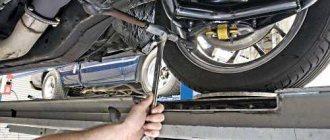
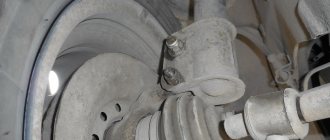
To adjust toe using two wrenches, loosen the outer tie rod coupling clamps.
9) And after that, using Cobra-type pliers, rotate the clutch itself and, as a result, adjust the length of the tie rod until the gap between the thread and the front wheel tire returns to normal.
10) And finally, tighten the tie clamps and do the same work with the second wheel and thereby achieve their total toe-in of about “2 mm”.
Note! Carry out the same adjustment procedure with the wheel that is on the opposite side of the car. And when re-checking the toe-in, remember one thing, if you are going to do the toe-in of one wheel not “1 mm”, but let’s say “2 mm”, then you need to place a block “22+12=34 mm” under the thread, if “1.5 mm" then "22+9=31" respectively!
Wheel alignment angles
Checking and adjusting the angles of the front wheels is carried out on special stands in accordance with the instructions for the stand.
Attention Checking the wheel alignment angles is mandatory if suspension parts are being replaced or repaired, which may result in a change in the wheel alignment angles. For a new car (before the first maintenance), the wheel alignment angles have the following values: Camber
For a new car (before the first maintenance), the wheel alignment angles have the following values: Camber
| 0° 30’ | +40’ |
| –30 |
Longitudinal angle of inclination of the axis of rotation
| 4° | +1° |
| –1°30’ |
Convergence
| 1 – 7 mm |
After the first maintenance (after 1500–2000 km) and during further operation of the vehicle, the wheel alignment angles should be:
| Camber | 0° 30’ ± 20’ (0° 5’ ± 20’) |
| Longitudinal angle of inclination of the axis of rotation | 4° ± 30’ (3° 30’ ± 30’) |
| Convergence | 2 – 4 mm (3 – 5 mm)* |
* The values of angles without a load are given in parentheses; without brackets - with a load. The difference in the longitudinal angles of inclination of the turning axes of the right and left wheels should not exceed 0° 30'.
Before adjusting wheel alignment, check:
– air pressure in tires; – axial clearance in the front wheel hub bearings; – serviceability of the shock absorber (no rod jamming); – radial and axial runout of tires; – clearance in the upper ball joints of the suspension; – free movement of the steering wheel.
Eliminate any detected faults and make the necessary adjustments.
Monitoring and adjustment of wheel alignment angles can be carried out both on a loaded vehicle and on an unloaded one, however, monitoring the angles on a loaded vehicle gives more accurate results. Therefore, in critical cases, it is recommended to control and set angles on a car under a static load of 3136 N (320 kgf), which corresponds to approximately the weight of four people and a load of 40 kg in the trunk.
The car is loaded either with special weights suspended from the bottom of the body, or with ballast (280 kg) placed on the seat cushions and in the trunk (40 kg). The front seats should be in the middle position of their longitudinal travel. The cargo in the trunk is evenly distributed. The lack of fuel is compensated by the cargo located on the right side of the trunk area. After installing the car on the stand, immediately before checking the angles, “press” the car’s suspension, applying a force of 392–490 N (40–50 kgf) 2–3 times, directed from top to bottom, first to the rear and then to the front bumper. In this case, the wheels of the car must be parallel to the longitudinal axis of the car.
The sequence of checking and adjusting wheel alignment angles is as follows:
– angle of longitudinal inclination of the axis of rotation; – camber angle; – toe-in.
Changing the camber angle and longitudinal inclination of the wheel rotation axis when changing the number of washers in the packages
| Number of washers added to or removed from the bag | Wheel camber | Longitudinal angle of inclination of the wheel turning axis | |||
| front bolt | rear bolt | thickness of washers, mm | |||
| 0,5 | 0,8 | 0,5 | 0,8 | ||
| +1 | +1 | –(7’–9′) | –(11’–14′) | ||
| –1 | –1 | +(7’–9′) | +(11’–14′) | ||
| +1 | –(18’–20′) | –(29’–32′) | |||
| –1 | +(18’–20′) | +(29’–32′) | |||
| +1 | –(7’–9′) | –(11’–14′) | +(18’–20′) | +(29’–32′) | |
| –1 | +(7’–9′) | +(11’–14′) | –(18’–20′) | –(29’–32′) | |
| –1 | +1 | –(7’–9′) | +(11’–14′) | +(36’–40′) | +(52’–64′) |
| +1 | –1 | +(7’–9′) | –(11’–14′) | –(36’–40′) | –(52’–64′) |
Angle of longitudinal inclination of the axis of rotation
Attention When adjusting the angles of the front wheels, it is allowed to use U-shaped shims, which must be installed with the slot down. Camber angle of the front wheels Toe of the front wheels
Why adjustment is needed
It is recommended to check and adjust wheel alignment for domestically produced cars every 10–15 thousand km. mileage This is due to the fact that even with a serviceable suspension, over such a mileage on roads with poor surface quality, the parameters can change quite a lot, and this will affect the handling. One of the common reasons why UUCs go astray is when a wheel falls into a hole at speed. Therefore, even an unscheduled inspection may be required. In addition, the procedure is necessary in the following cases:
What is camber
Camber is the angle of inclination of the wheels relative to the road surface. The parameter can be negative or positive. If the upper part of the wheel is tilted toward the center of the car, then the angle takes a negative value, and if it is tilted outward, it becomes positive. If the parameter differs greatly from the factory values, the tires will wear out quickly.
What is toe-in
Toe-in refers to the difference in distances between the front and rear points of the front wheels. The parameter is measured in millimeters or degrees/minutes, and can also be positive or negative. With a positive value, the front parts of the wheels are closer to each other than the rear ones, and with a negative value, vice versa. If the wheels are parallel to each other, the toe is considered zero.
Video: when to do a wheel alignment
What is caster
Caster (caster) is usually called the angle at which the axis of rotation of the wheel is tilted. Correct adjustment of the parameter ensures the stabilization of the wheels while the machine is moving in a straight line.
Table: angles of installation of the front wheels on the sixth model Zhiguli
| Adjustable Parameter | Angle value (values with vehicle without load) |
| caster angle | 4°+30′ (3°+30′) |
| camber angle | 0°30’+20′ (0°5’+20′) |
| toe angle | 2–4 (3–5) mm |
How does an incorrectly installed wheel alignment manifest itself?
There are not so many symptoms indicating a violation of the wheel angles and they usually boil down to a lack of vehicle stability, incorrect steering wheel position or excessive tire wear.
Road instability
If the car behaves unstable when driving in a straight line (pulls to the side or “floats” when a wheel hits a pothole), attention should be paid to the following points:
Uneven steering wheel position when driving in a straight line
The steering wheel may not be level for several reasons:
If the steering wheel is tilted and the car simultaneously pulls to the side, then you should first find out and eliminate the problem of instability, and then deal with the incorrect position of the steering wheel.
Increased tire wear
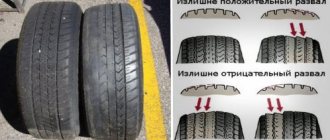
Tire tread can quickly wear out when the wheels are unbalanced or when the camber and toe angles are incorrectly adjusted. Therefore, first of all, you need to check and, if necessary, balance. As for the UUK, because the tires are worn out, it is sometimes possible to determine which suspension parameters need adjustment. If the camber angle on a VAZ 2106 is set incorrectly, the tire will have excessive wear on the outside or inside. If the camber is too positive, the outer part of the rubber will wear out more. With negative camber - internal. If the toe is set incorrectly, the tire wears unevenly, which leads to the appearance of burrs (herringbone) on it, which are easily felt by hand. If you run your hand along the tread from the outside to the inside, you will feel burrs, then the toe angle is insufficient, and if from the inside to the outside, it is too large. It is possible to more accurately determine whether the UUC values have gone astray or not only during diagnostics.
Measuring the longitudinal and transverse angle of inclination of the axis of rotation
Of greatest interest is the measurement of the tilt parameters of the rotary axes. Their position is determined by two key characteristics: lateral inclination and longitudinal (caster).
A short video (2 min) about what a caster is
If the wheels of a car could turn 90 degrees and stand across the body, these parameters could be easily calculated using an inclinometer. But in real conditions this is impossible to do, so you need to limit yourself to a rotation of 20 degrees in both directions relative to the zero position. The difference in the obtained angles must be multiplied by an additional factor of 1.5 - this is necessary to compensate for errors that are allowed during the measurement process.
To measure caster, the bubble level bulb must be mounted perpendicular to the plane of the wheel.
To determine caster, you first need to turn each wheel 20 degrees in front of the steering axis: right to left, and left to right. In this case, you need to set the inclinometer to zero or write down the results. Next, the wheels are turned behind the turning axis: right to the right, left to the left. If the angle measured behind the steering axis is greater than the angle measured in front of the steering axis, then the caster is positive. If it's the other way around, then the caster is negative. The protractor should show a slight difference of a few degrees. This difference should be multiplied by the same factor of 1.5. For example, if the protractor showed a value of +2 degrees, then the caster value should be taken as +3 degrees.
The transverse inclination is calculated in a similar way, but the protractor is installed in a slightly different position. For additional convenience, you can use a smartphone, on which you should install in advance an application that simulates two mutually perpendicular bubble levels. An ordinary building level, preferably with a rotating bubble, will also work for these purposes.
To measure the lateral inclination of the steering axis, the bubble level flask must be fixed parallel to the plane of the wheel. Measuring the level of lateral inclination of the axis of rotation.
If the task is not to measure specific numerical values of slopes, but only to compare them (they are not adjustable on most cars anyway), then the results do not need to be multiplied by a correction factor of 1.5. The main thing is to make sure that the angles are equal on both axes (right and left).
In the process of self-measurements, it is not necessary to strictly observe the rotation of the wheels exactly 20 degrees, especially when there are no appropriate tools to determine these angles (for example, graduated turntables). You can turn the steering wheel about 3/4 of a turn. It is necessary to ensure that when turning left and right, the steering wheel is locked in symmetrical positions. To do this, you can put some marks on the bottom of the steering wheel. When the steering wheel is in zero position, the line connecting the marks must run strictly horizontally.
Another way to get accurate results is to draw corners on the asphalt near the wheels using a protractor. If you don't have this tool, you can use a square sheet of paper with equal sides. Folding it diagonally, we get an angle of 45 degrees. Then one corner is folded in half again, resulting in an angle of about 22.5 degrees, which is close to the standard 20. Next, you need to attach the sheet to the wheel and outline its edge with chalk, thereby creating the necessary marks on the asphalt.
Marking the corners for turning the wheel
Wheel alignment adjustment at a service station
If you suspect that your “six” has a bad wheel alignment, then you should visit a car service center to diagnose the suspension and wheel angles. If it is discovered that some suspension elements are out of order, they will have to be replaced and only then adjustments must be made. The procedure can be carried out on different equipment, for example, an optical or computer stand. It is not so much the equipment used that is important, but the experience and approach of the master. Therefore, even on the most modern equipment, the setup may not give the desired result. The technology for checking the UCC may differ in different services. First, the technician checks the pressure in the wheels, inflates them according to the installed tires, enters the values into the computer, and then begins adjustment work. As for the car owner, he should be concerned not so much with the equipment that will be used for adjustment, but with the fact that after the procedure the car behaves steadily on the road, it does not go anywhere or throw, and does not “eat” rubber.
Video: wheel alignment installation under service conditions
Self-adjustment of wheel alignment on a VAZ 2106
Lada cars of the sixth model do not cause any particular problems during repair work. Therefore, visiting a car service center every time there is a suspicion that the UCC has been violated can be a costly undertaking. In this regard, many owners of the car in question check and adjust the wheel angles themselves.
Preparatory work
To carry out adjustment work, the car will need to be driven onto a flat horizontal surface. If this is not possible, then to install the wheels horizontally, chocks are placed under them. Before diagnosing, you need to check:
If suspension malfunctions are discovered during preparation, we will eliminate them. The machine must be equipped with wheels and tires of the same size. On a VAZ 2106, you need to set the tire pressure according to the following values: 1.6 kgf/cm² at the front and 1.9 kgf/cm² at the rear, which also depends on the tires installed.
Wheel alignment. What is it and why?
If we mentally draw one line along the vertical plane of the wheel and a second along the plane of its rotation, then we can see the camber angle, which is responsible for the position of the wheels when the car moves in a turn, for the clarity of its passage.
Camber angle
| Positive | The imaginary vertical plane of the upper part of the wheel relative to the plane of rotation is located outside |
| Negative | The imaginary vertical plane of the upper part of the wheel relative to the plane of rotation is located on the inside |
Positive and negative camber angle values
Now let's play with our imagination, looking at the car from above. We draw the lines of the plane of rotation of the wheels and the lines of the direction of its movement. Here we can observe the toe angle of the wheels, which gives our car stability and further predictability.
Toe angle
| Positive | The plane of rotation of the wheels is inside the frame of the direction lines |
| Negative | The plane of rotation of the wheels is outside the frame of the direction lines |
Positive and negative toe angle values
To understand the full importance of the wheel alignment process, you need to understand that the correct installation of the car’s wheels determines its stability while driving (tendency to rollover and skids), directional stability (controllability and maneuverability), the economic component (increased tire life and fuel economy ).
What does this adjustment provide?
The point of adjusting the wheel alignment comes down to the fact that the wheels of the car are set at a certain angle to the horizontal, as well as to each other. This is necessary to try to give the wheels the maximum possible vertical position when moving, i.e., no matter what position the wheel occupies relative to other structural elements, it must remain in a vertical plane. It is in this case that close to ideal contact of the tire with the road is achieved.
Wheel camber concept
Camber determines the angle at which the wheel is set relative to the road surface. A visual representation of this parameter can be obtained by drawing the angle between the plane of rotation of the wheel and a vertical line intersecting the center of the so-called rubber contact patch with the road.
Camber angle values
It is generally accepted that if the top of the wheel deviates from the central axis of the car, then the camber is positive, otherwise the angle is negative. Each manufacturer recommends its own camber adjustments depending on the technical characteristics of the car.
The most accurate way to determine the camber angles of a VAZ 2107 is when a load weighing 320 kg is placed in the car: this is approximately how much 4 passengers and the cargo in the trunk weigh. The tank must be filled with fuel. The camber angle should be:
- for a loaded vehicle 4°30'+20';
- for unloaded - 0°5'+20'.
As a rule, a negative camber angle creates a larger contact patch between the rubber and the road surface, but due to accelerated wear of the inner edge of the tire, its service life is reduced. The car will not drive straight if the wheel camber is off by 30′ or more.
Concept of convergence
If we imagine the angle between the plane of rotation of the wheel and the conditional axis dividing the car lengthwise into two parts, then this will be the toe-in of the wheel. In relation to one wheel, the toe is considered separate: two separate ones add up to a total toe.
The value of toe angles
When the front part of the wheel is turned towards the longitudinal axis of the car, we are dealing with positive toe-in, otherwise - with negative toe-in. A positive toe angle is used more often, but in some cases a negative toe angle is recommended: this increases the stability of the car, but also increases tire wear.
Normal toe-in for the VAZ 2107 is:
- 2–4 mm for a loaded car;
- 3–5 mm for the machine without load.
Custer
In addition to camber and toe, there is another wheel tilt adjustment called caster. This adjustment is also an angle, but between a vertical line and the projection of the wheel's turning axis onto the longitudinal plane of the machine. The value of this angle, as a rule, does not exceed 6°. A properly adjusted caster self-aligns the drive wheels as the vehicle picks up speed.
The nominal size of the boat is:
- 4°±30′ for a loaded vehicle;
- 3°±30′ for a car without load.
Car malfunctions associated with incorrect adjustment
Unadjusted camber and toe, as a rule, make it difficult to drive a vehicle and cause a number of vehicle malfunctions.
Road instability
A car with incorrectly adjusted camber and toe most often spontaneously “slides” to the left or right, and the driver is forced to make additional efforts to keep the car going straight. In this case, we are no longer talking about comfortable driving, and besides, the driver gets tired much faster when driving such a car.
Increased tire wear
The most common consequence of improper wheel alignment is rapid wear of your vehicle's tires. Obviously, too large a positive camber angle causes accelerated wear on the outer part of the tires, while a negative camber angle causes accelerated wear on the inner part. You should know that tires wear out quickly also due to incorrect air pressure in them (high or low) and due to angular vibration of the wheel.
A little about the cluster or how to adjust the position of the rear tires
A cluster is the longitudinal and transverse angle of an axis. It also needs to be taken into account when adjusting car wheels. If the cluster is not set correctly, the steering wheel will not be able to align the wheels automatically after making a turn.
Attention! The zero parameter of the longitudinal and transverse angles of the axle is the maximum angle of rotation of the wheel.
Cluster adjustment is performed by increasing the washers on the suspension braces. If the car owner wants to increase the angle, then he must reduce the number of washers. This procedure will correspond to the adjustment of the rear tires.
Signs of broken wheel alignment
As the car mechanic’s “manual” says: “...for the domestic fleet of early years of production, the frequency of checking the “geometry” is 10,000...15,000 kilometers...”, but for foreign-made cars, experts recommend carrying out diagnostics every 30,000 kilometers. For me, this is too vague an indicator that does not at all reflect the realities of modern operating conditions. Agree, it’s hard to bind to these recommendations an off-road enthusiast on a tuned Pajero, which actively “collects” all the bumps and potholes, and a grandfather on a “Seven”, for whom overcoming road unevenness is associated with a complete stop of the car. Therefore, the following signs can be used to determine the condition of the wheel alignment angles of the front and rear wheels:
In order not to be confused by the last point of this list of “symptoms”, it is necessary to periodically check the air pressure in the tires, as, in principle, the car’s operating instructions say. Normally, tire wear should be caused by the conditions of its operation, and not by the consequences of mechanical faults in the car’s suspension.
Examples and causes of premature wear
In addition, there is also an unscheduled need to check and adjust the wheel alignment angles. As a rule, this procedure should be carried out after:
When to check and adjust wheel alignment
It is worth noting that alignment adjustment on the VAZ 2107 should be carried out in cases where:
- The trajectory of the car changes, for example, the driver tries to drive straight, but the car moves to the side.
- In case of significant deviations of a certain wheel alignment angle. In this case, the motorist will observe rapid wear of some elements. Of course, with such indicators, fuel consumption will increase significantly, and certain suspension parts will cease to function.
- Experts recommend checking wheel alignment and alignment after an accident. It is likely that the adjustment of the suspension elements has been disrupted.
- The wheel alignment must be adjusted after replacing parts in the suspension.
- After 10-15 thousand kilometers, parts wear out, deviations from normal values are observed, so it won’t hurt to perform the adjustment again.
There are times when replacing parts does not have a serious effect on the alignment or does not have it at all. Then checking this parameter is optional. Such situations include replacement:
- stabilizer bushings;
- stabilizer assembly;
- shock absorber;
- shock absorber bushings;
- shock absorber assembly;
- hub bearings.
It is advisable or mandatory to check the wheel alignment when replacing/installing:
- steering tips and rod assemblies;
- extended or shortened springs;
- steering pendulum;
- steering column;
- lower and upper levers;
- silent blocks;
- assembled beams;
- spacers
Adjusting wheel alignment on passenger cars
Let's start with the fact that wheel alignment angles on different brands of cars can differ significantly. This is due both to the design features of the car’s suspension and directly to its purpose. For example, racing cars for drifting have negative camber, which gives them a small contact patch on a straight line (reduces rolling resistance), but when cornering, the contact patch has a maximum value, which allows you to corner at maximum speed. And camber naturally changes the values of the toe angles.
This “geometry” is common for drifting
Due to the above, I suggest you get acquainted with the methodology for setting wheel alignment angles using the example of a VAZ 2110 car, and then, if you wish, you can successfully apply it directly on your car.
Tools and prerequisites
Camber
Preparation
We install the car on sliding supports (pancakes), checking that they are on the same level, since the curvature of the floor greatly affects the accuracy of measurements.
I understand your dumb question about the presence of support “pancakes”; I propose to make them from four sheets of metal, having previously lubricated each pair with grease for better sliding.
I draw your attention to this, since when adjusting the wheel alignment angle of one of the wheels, the second one must be stationary.
Diagnostics
At this stage, we have a choice in the method of taking the wheel position values: using a plumb line or a building level.
In order for all measurements to be correct, we need to align the wheels strictly along the line corresponding to linear movement;
Having attached a plumb line to the wing (for example, with a magnet with a cloth placed under it), measure the distance “A” and “B” on the left and right wheels (the reference point is the wheel rim!), and write down the result;
How does the procedure work on trucks?
Setting camber angles
On cars with a front axle and on trucks with a beam, this parameter is unregulated. The camber angle is set by the position of the kingpin at the factory and can only change due to its wear. We can only check it using a plumb line using the method described above. Eliminating wear and tear is a purely plumbing issue.
Setting toe angles
How to check
To take measurements on trucks, it is better to use a telescopic ruler, since due to the large wheelbase, when measuring with a tape measure, you can get an error due to its deflection.
Most likely, most will have problems finding a telescopic ruler. I offer my solutions to the problem: