Replacing the timing chain on a VAZ 2107
To replace parts yourself, you will need tools and accessories:
- a set of wrenches and socket heads;
- pliers;
- hammer and chisel;
- screw puller;
- container for draining coolant.
The range of spare parts depends on the repair method and the condition of the parts installed on the engine. When removing the covers, it is necessary to install new gaskets; using old parts is strictly prohibited. It is recommended to moisten rusted bolts with WD40 liquid, which facilitates the unscrewing process and reduces the risk of breakage of fasteners.
Choosing a method
There are 2 methods for replacing parts:
- simplified (replacing only the chain);
- full (includes installation of new shoes and sprockets).
Installation process
A simplified procedure allows you to replace a worn element in 0.5-1 hour of work. After removing the cover covering the valve mechanism, access to the sprocket on which the chain is laid opens. It is necessary to open the links of the old and new tape. Then you need to connect the worn and new part with a temporary pin and begin to manually turn the crankshaft. The gear wheels will begin to wind the new drive element; the driver needs to pull the worn chain out by the free end. After removing the old part, the links are connected.
A simplified technique is used when performing urgent repairs (for example, while on the road). It should be taken into account that the worn-out shoes of the tensioning and calming mechanisms, as well as sprockets with wear on the teeth, remain on the motor. The engine will run without any extraneous noise, but the drive will wear out faster.
Algorithm of actions when replacing timing drive components on a VAZ 2107 with a carburetor:
Place the vehicle on a rack and then drain the coolant. It drains when the radiator and expansion tank caps are removed and when the interior heating system tap is open. It is necessary to unscrew the plug in the cylinder block; the heat exchanger has a separate drainage channel with a plug. Remove the electric fans along with the frame, which is held in place by 8mm socket head bolts. Before removing the frame, unfasten the power plug of the electric motor. Loosen the clamp and remove the upper rubber hose, and then separate the expansion tank sleeve. Remove the outlet hose from the thermostat housing, and then unscrew the two bolts securing the radiator to the body
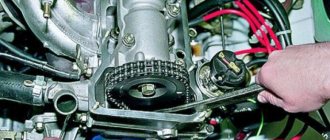
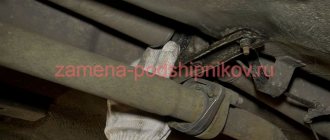
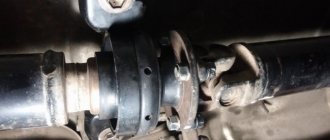
The product is removed carefully, since damage to the honeycomb leads to liquid leakage and deterioration of heat transfer. Remove the alternator drive belt, and then remove the metal timing case. Turn the crankshaft with a wrench until the mark on the upper sprocket aligns with the notch located on the camshaft support bed. Using a 36 mm wrench (on some machines - 38 mm), unscrew the pulley nut on the toe of the crankshaft, and then pull the part off the seating surface. Provide access to the sprockets by removing the front cover, which is screwed with 6 bolts and 3 nuts to the engine crankcase (head size - 10 mm). The pump pulley does not interfere with the work, but you can remove the part to expand the working area. After removing the cover, it is necessary to remove the remaining gasket sealing the joint line. Apply marks to the auxiliary drive sprocket and engine crankcase so that the ignition system settings can be saved. Bend the tab of the washer and unscrew the 17 mm nut securing the sprocket to the camshaft. Remove the sprocket and chain from the engine. Unscrew the 2 10 mm nuts that hold the tensioner mechanism
The device is checked for serviceability of the collet clamp, damaged parts must be replaced. Bend back the washer and unscrew the 17 mm nut holding the accessory drive sprocket. Remove the tension shoe, which is held in place by a 17mm bolt. To completely remove the chain band, it is necessary to unscrew the limit pin (key size 10 mm) located near the crankshaft gear. Using a puller, pull the gear off the crankshaft nose.
Installation of new parts is carried out in reverse order. When installing the gears, the position of the marks is checked; the tension mechanism requires preliminary “charging” (pushing the plunger in until it stops).
Then the threaded connections are tightened and the nuts are secured using the bent edges of metal washers. After replacing the radiator, it is necessary to restore the coolant level and perform a test run. If the ignition angle is violated, the position of the distributor body is adjusted.
VAZ 2105 - replacing the camshaft drive chain
We replace the camshaft drive chain on a VAZ 2105 and other models from the “classic” series if it is not possible to restore the required degree of tension using the usual method using a tensioner. The verdict is clear - the chain has stretched beyond the permissible limits and needs to be replaced. The dismantling work on all types of classic engines is identical, so let’s look at the replacement process using the example of the most popular engine of the VAZ 2103 family. On an injection engine, the sequence of work is also identical with the only difference being that you will have to disconnect the block with wires from the crankshaft position sensor.
To carry out repair work, we prepare a standard set of tools, namely wrenches of different calibers from ten to seventeen, screwdrivers, pliers, etc. There is no need to drive the car into a pit for repairs. If you have everything you need, we begin the process, the sequence of actions of which is as follows:
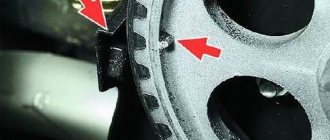
- We remove the valve cover and, turning the crankshaft as it rotates, align the marks on the camshaft sprocket with the mark on the camshaft bearing cover housing.
- Next, using a flat-head screwdriver and a hammer, bend the tabs of the lock washer on the camshaft sprocket mounting bolt.
- Now we need to loosen the bolt. To do this, stop the car with the parking brake and engage any gear. We just loosen the bolt without completely unscrewing it.
- We remove the VAZ 2105 chain guide and the tensioner shoe. To remove all this equipment, we need to remove the front cover of the camshaft chain, unscrewing all the bolts securing it around the perimeter. A sealing gasket is installed between the cover and the block, which, regardless of its condition, must be replaced with a new one during subsequent assembly.
- Loosen and completely unscrew the chain stop pin.
- Next, we need to straighten the petals of the auxiliary sprocket lock washer. We use a flathead screwdriver with a long shaft and a hammer.
- We unscrew the bolt securing the sprocket of the auxiliary devices. To prevent the sprocket from turning, carefully fix it with a flat screwdriver by inserting the rod between the teeth and resting the screwdriver against the cylinder block.
- After the bolt is unscrewed, use a small mounting blade to pull the sprocket off the shaft.
- We completely unscrew the bolt securing the camshaft sprocket and, carefully lifting the chain, remove the sprocket from the shaft.
- We lower the chain down and remove it from the crankshaft sprocket, and install the camshaft sprocket itself in place, aligning the marks as they were.
After removing the camshaft sprocket, auxiliary devices, crankshaft (if required), it is strictly forbidden to turn the crankshaft, auxiliary shaft and camshaft, as this will lead to a failure of the ignition system and the car will not start during assembly.
- After removing the old chain, you can begin installing the new one. The new chain is put on the auxiliary sprocket, after which the sprocket itself is installed in its place and secured with a fastening bolt (do not forget to install a new lock washer).
- Prepare a long metal hook, use it to pick up the chain from above and pull it towards the camshaft sprocket. Place the chain on the sprocket. Secure the sprocket and bend the tabs of the lock washer.
All. At this point, the process of replacing the old camshaft drive chain of the VAZ 2105 can be considered complete. At the final stage, install the tensioner, tensioner shoe and chain guide and stop pin in the reverse order of removal. Check the tightness of all bolts securing system elements. Turn off the speed and parking brake and turn the crankshaft a few revolutions and check the alignment of the marks on the sprocket and the camshaft bearing cap. If the marks do not match, then it is necessary to throw the chain onto the link either forward or backward. If the installation was successful and the marks match, tighten the tensioner cap nut. Check and adjust the ignition if necessary. This completes the repair work.
Main advantage of the chain
The main advantage of the chain is its long service life. In addition, its impulse is a very rare phenomenon, so the chain drive is very reliable. But over time, this type of drive requires replacement.
During operation of a car, the timing chain gradually stretches in its links, which leads to an overall increase in its length.
As a result, the engine experiences a shift in valve timing, accompanied by engine malfunction.
A heavily stretched chain can lead to poor starting of the power plant, unstable operation, especially at idle, and increased fuel consumption.
Moreover, all this will be accompanied by a ringing metallic noise during operation - a loose chain will hit nearby elements when moving.
It is the increase in engine noise that is the first sign of problems with the timing drive. If it appears, you should immediately check the condition of the circuit.
Features of the timing chain and belt
One of the components of servicing the VAZ-2105 engine, like any other, is replacing the gas distribution mechanism drive. But the difficulty of performing this operation on this car depends on the type of drive used. Replacing a VAZ-2105 timing belt is easier than replacing a chain, but it also needs to be changed more often.
The ease of replacing the belt is one of its most positive qualities. Additionally, the belt is not so noisy, costs much less, and does not stretch very quickly.
The main disadvantage of the belt is the possibility of it breaking. And although the negative consequences of this breakage are structurally reduced by applying special grooves on the pistons, eliminating the possibility of a collision between the open valve and the piston bottom, the fact of the breakage itself remains unpleasant. In addition, the service life of the belt can be significantly reduced due to engine fluids getting into it.
The possibility of a chain break when the engine is running is practically eliminated, given the fact that the VAZ-2105 timing chain is double-row. Another positive quality of the chain is that it has a significantly longer service life than a belt.
Related link:
Homemade pre-heater for a VAZ car engine
But the chain stretches over time, and although there is a mechanism for tensioning it, when stretched, the noise of the engine increases significantly. Also, the chain requires lubrication, so it must be located inside the engine, which makes replacing the VAZ-2105 timing chain more complicated.
The work of replacing the timing chain on a VAZ 2106 takes place in several stages:
Removing the air filter housing from the carburetor. You will need 8 and 10 wrenches to unscrew the nuts. When working, you should be careful not to drop anything, because in this case it will have to be removed, including dismantling the intake manifold. Disconnecting cables, pipelines, covers, etc. First of all, the distributor cover, as well as the fuel supply pipe, are removed. To do this, you will have to unscrew the valve cover fastenings (a total of eight nuts, plus washers with plates), after which the fuel supply pipe, choke cable, and throttle valve drive are disconnected. After removing the valve cover with the gasket, carefully inspect the latter: it may well be that you will also have to replace. Removing the protection and draining the antifreeze. Remove the protection from below, drain the antifreeze into a previously prepared container. The next step is to loosen the generator mount (this will require a 19mm wrench), as well as remove the clamps on the pipes, the clamp of the lower pipe of the water pump. All clamps are first loosened and then removed. We turn off the power to the temperature sensor on the radiator and the fan, then remove the radiator, including the thermostat and pipes. Removing the generator belt. The generator tensioner nut must be loosened and then moved forward using a pry bar. At this stage you can already remove the alternator belt. Removing the crankshaft pulley. Turning the crankshaft by the pulley, using a 36mm wrench, align the marks on the pulley and cover, on the bed casting and the camshaft sprocket. We unscrew the nut holding the crankshaft pulley to 36, lock the pulley (for this you need a special key or a complex combination of engaging fifth gear, pressing the brake pedal and unscrewing the nut). Once this nut is removed, the pulley can be removed and the camshaft cover can be removed. For the last operation you will need a 10mm wrench and a little patience (you need to unscrew three nuts and six bolts, plus three bolts at the bottom of the cover. Removing the chain tensioner. The chain tensioner is held in place by two fastening nuts
By unscrewing them, you can easily remove the tensioner. Removing the camshaft sprocket mount. At this stage, it is important to mark the position of the sprocket for alignment. Removing the sprocket is quite simple - just unscrew the fastening bolt. Removing the timing chain. The fuse, the bolt on which the auxiliary drive sprocket is attached, as well as the tensioner fastenings are unscrewed with a 10mm wrench
Before removing the sprockets and timing chain, leave marks corresponding to their position (the reverse steps will be much easier). Installation of new sprockets, crankshaft and auxiliary units. Before installing a new chain, it must be thoroughly lubricated - this way it will last longer. After installation, it is advisable to temporarily hold it with some tool so that it does not fall. Installation of new sprockets, crankshaft and auxiliary units is carried out in the reverse order. The camshaft sprocket is installed in such a way that all marks match and the descending branch of the chain is tensioned. The camshaft must be turned counterclockwise. Now we go back behind the crankshaft and tighten the chain. At this stage, you should check that the labels are correct and match. If they do not match, the chain can be thrown over the tooth and the installation process repeated. Installing the chain tensioner. Returning the chain tensioner to its rightful place is only half the battle. It is also necessary to tighten the mounting bolts and lock them. To check for correct installation, turn the crankshaft two turns. If the valves do not rest against the pistons, and the marks match, then everything has been done correctly. At this stage, you need to return the crankshaft cover to its place (after having lubricated it with sealant). We return the pulley to its place. We check again that the marks match and only after that tighten it. Installing the distributor. Unscrew the nut 13, take it out, turn the slider towards the contact of the 4th cylinder and install the distributor in place. We turn on the ignition.
The remaining operations are performed similarly to disassembly, in reverse order.
Also read with this article:
Installing central locking on a VAZ 2106
Changing the gearbox oil on a VAZ 2106 in 1 hour
VAZ 2106 engine interruptions
Self-replacement of VAZ 2106 thresholds
Replacing the Lada 2105 chain (VAZ 2105)
We replace the camshaft drive chain on a VAZ 2105 and other models from the “classic” series if it is not possible to restore the required degree of tension using the usual method using a tensioner. The verdict is clear - the chain has stretched beyond the permissible limits and needs to be replaced. The dismantling work on all types of classic engines is identical, so let’s look at the replacement process using the example of the most popular engine of the VAZ 2103 family. On an injection engine, the sequence of work is also identical with the only difference being that you will have to disconnect the block with wires from the crankshaft position sensor.
To carry out repair work, we prepare a standard set of tools, namely wrenches of different calibers from ten to seventeen, screwdrivers, pliers, etc. There is no need to drive the car into a pit for repairs. If you have everything you need, we begin the process, the sequence of actions of which is as follows:
- We remove the valve cover and, turning the crankshaft as it rotates, align the marks on the camshaft sprocket with the mark on the camshaft bearing cover housing.
- Next, using a flat-head screwdriver and a hammer, bend the tabs of the lock washer on the camshaft sprocket mounting bolt.
- Now we need to loosen the bolt. To do this, stop the car with the parking brake and engage any gear. We just loosen the bolt without completely unscrewing it.
- We remove the VAZ 2105 chain guide and the tensioner shoe. To remove all this equipment, we need to remove the front cover of the camshaft chain, unscrewing all the bolts securing it around the perimeter. A sealing gasket is installed between the cover and the block, which, regardless of its condition, must be replaced with a new one during subsequent assembly.
- Loosen and completely unscrew the chain stop pin.
- Next, we need to straighten the petals of the auxiliary sprocket lock washer. We use a flathead screwdriver with a long shaft and a hammer.
- We unscrew the bolt securing the sprocket of the auxiliary devices. To prevent the sprocket from turning, carefully fix it with a flat screwdriver by inserting the rod between the teeth and resting the screwdriver against the cylinder block.
- After the bolt is unscrewed, use a small mounting blade to pull the sprocket off the shaft.
- We completely unscrew the bolt securing the camshaft sprocket and, carefully lifting the chain, remove the sprocket from the shaft.
- We lower the chain down and remove it from the crankshaft sprocket, and install the camshaft sprocket itself in place, aligning the marks as they were.
After removing the camshaft sprocket, auxiliary devices, crankshaft (if required), it is strictly forbidden to turn the crankshaft, auxiliary shaft and camshaft, as this will lead to a failure of the ignition system and the car will not start during assembly.
- After removing the old chain, you can begin installing the new one. The new chain is put on the auxiliary sprocket, after which the sprocket itself is installed in its place and secured with a fastening bolt (do not forget to install a new lock washer).
- Prepare a long metal hook, use it to pick up the chain from above and pull it towards the camshaft sprocket. Place the chain on the sprocket. Secure the sprocket and bend the tabs of the lock washer.
All. At this point, the process of replacing the old camshaft drive chain of the VAZ 2105 can be considered complete. At the final stage, install the tensioner, tensioner shoe and chain guide and stop pin in the reverse order of removal. Check the tightness of all bolts securing system elements. Turn off the speed and parking brake and turn the crankshaft a few revolutions and check the alignment of the marks on the sprocket and the camshaft bearing cap. If the marks do not match, then it is necessary to throw the chain onto the link either forward or backward. If the installation was successful and the marks match, tighten the tensioner cap nut. Check and adjust the ignition if necessary. This completes the repair work.
Source
- https://remont-vaz2106.ru/vaz-2105-zamena-cepi-privoda-raspredelitelnogo-vala
Purpose of the timing chain on the VAZ 2106
The timing chain in the engine of a VAZ 2106 car connects two shafts - the crankshaft and the timing shaft. Both shafts are equipped with toothed sprockets, on which the chain is put.
The timing chain is put on two sprockets, one of which is attached to the timing shaft, the other to the crankshaft
After starting the engine, the chain ensures synchronous rotation of the two above shafts. If the synchronization is disrupted for some reason, this leads to malfunctions in the operation of the entire gas distribution mechanism of the car. In addition, malfunctions in the operation of the cylinders occur, after which the car owner notes the appearance of dips in engine power, poor response of the car to pressing the gas pedal and increased fuel consumption.
Timing chain characteristics
Classic VAZ cars are equipped with timing chains, which differ only in the number of links. The length of the chains is the same:
- on VAZ 2101 and VAZ 2105 cars a 114-link chain is installed, the length of which varies from 495.4 to 495.9 mm, and the link length is 8.3 mm;
- On VAZ 2103 and VAZ 2106 cars, chains of the same length are installed, but they already have 116 links. The length of the link is 7.2 mm.
The timing chain pins on the VAZ 2106 are made of high-quality alloy steel, which has high strength and wear resistance.
Checking the timing chain for wear
A car owner who decides to find out the degree of wear on the timing chain on a VAZ 2106 will have to solve a very difficult problem. The fact is that a worn and stretched chain is not much different in appearance from a new one. An old chain, as a rule, does not have serious mechanical damage, and it is almost impossible to notice the wear of its pins with the naked eye.
But there is one simple wear test that every car enthusiast should know about. It is carried out as follows: a piece of old chain about 20 cm long is taken from one side, placed horizontally, and then turned in the hand so that the chain pins are perpendicular to the floor.
If the overhang angle of the timing chain does not exceed 10–20 degrees, the chain is considered new
After this, the overhang angle of the chain is assessed. If the hanging section of the chain deviates from the horizontal by 10–20 degrees, the chain is new. If the overhang angle is 45–50 degrees or more, the timing chain is severely worn and needs to be replaced.
There is a second, more accurate method for determining timing chain wear. But here the car owner will need a caliper. On an arbitrary section of the chain, you need to count eight links (or 16 pins), and use a caliper to measure the distance between the outer pins. It should be no more than 122.6 mm.
Measuring the chain with a caliper should be done in at least three places
Another random section of the 16-pin chain is then selected and the measurement is repeated. Then the third and last section of the chain is measured. If in at least one measured area the distance between the outer pins exceeds 122.6 mm, the chain is worn out and should be replaced.
Refinement of the power system
It is best to use Weber modifications; in this case, adjusting fuel consumption for each VAZ 2105 carburetor is not so difficult. And Weber’s reliability is better. To install it, you will need a set of plumbing tools, tees, hoses and manifolds from Oka, the markings of which are in the catalog. It is worth remembering that it can be very difficult to achieve synchronous operation of carburetors. And why this happens is difficult to say. Most likely, each VAZ 2105 carburetor is unique, and therefore the fuel consumption adjustment is not ideal. So two carburetors are quite a risk. Although if everything can be set up synchronously, then the VAZ’s internal combustion engine will begin to operate very smoothly. And fuel consumption on a VAZ will increase, but by no more than 1 liter.
Considering the problematic carburetor of the VAZ 2105, the adjustment of fuel consumption of which takes a lot of time, it makes sense to switch to an injector. To do this, it is better to buy all spare parts at the official VAZ center. There is a special diagram for installation; all the work can be done in a couple of days in the garage. After this, you can forever forget about the VAZ 2105 carburetor, the adjustment of fuel consumption of which was so exhausting. However, the injector may also require initial setup.
Timing chain drive VAZ 2107 - description
The VAZ 2107 timing chain transmission has a long service life, but someday it’s time to replace it. The need for this arises as a result of stretching of the links, when the chain tensioner can no longer cope with the functions assigned to it. In addition, the parts responsible for the normal operation of the timing drive also wear out over time.
The main elements of the VAZ 2107 timing drive are a chain, a damper, a shoe, a tensioner and sprockets
Tranquilizer
In the chain drive of the VAZ 2107 gas distribution mechanism, a damper is used to dampen jerks and vibrations of the chain. Without this part, as the vibration amplitude increases, the chain may fly off the gears or break completely. A chain transmission break is most likely at maximum crankshaft speed, which happens instantly. At the moment of a break, the intake and exhaust valves fail. After such damage, the engine will at best require a major overhaul.
The chain damper is designed to dampen vibrations of the chain drive during engine operation.
By its design, the damper is a plate made of high-carbon steel with two holes for fastening. Another element that is simultaneously responsible for calming and tensioning the chain is the shoe. Its rubbing surface is made of high-strength polymer material.
The tensioner shoe provides chain tension, eliminating sagging
Tensioner
Based on the name, you can understand that the device is designed to prevent sagging of the timing chain while the engine is running. There are several types of such mechanisms:
- automatic;
- mechanical;
- hydraulic.
Automatic tensioners appeared not so long ago, but have already managed to show their positive and negative sides. The main advantage of the product is that there is no need to periodically adjust the chain tension, since the mechanism keeps it constantly taut. The disadvantages of the auto tensioner include quick failure, high cost, and poor tension, as evidenced by reviews from some car owners.
Hydraulic tensioners operate as a result of the action of oil under pressure, which is supplied from the engine lubrication system. This design does not require intervention from the driver in terms of adjusting the chain drive, but the mechanism can sometimes jam, which negates all its advantages.
The most common tensioner is mechanical. However, it has a significant drawback: the product becomes clogged with small particles, as a result of which the plunger jams and the mechanism is unable to perform its functions during tension adjustment.
The tensioner provides chain tension and allows for adjustments when needed.
Chain
The timing chain in the VAZ 2107 engine is designed to connect the crankshaft and camshaft: they have gears on which the chain is put. After starting the power unit, synchronous rotation of the indicated shafts is ensured through a chain transmission. If synchronization is disrupted for any reason, the timing mechanism malfunctions, resulting in the stable operation of the engine being disrupted. In such a situation, power failures, deterioration in dynamics, and increased fuel consumption are observed.
The timing chain in the VAZ 2107 engine is designed to connect the crankshaft and camshaft
As the vehicle is used, the chain stretches as high loads are placed on it. This indicates the need for periodic adjustment. Otherwise, the sagging will lead to the links on the gears jumping, which will disrupt the operation of the power unit. To prevent this from happening, the factory recommends adjusting the chain tension every 10 thousand km. mileage