Most often, random activation of the StarLine alarm is associated with incorrect settings of the shock sensor. The fact is that the name “shock sensor” itself is incorrect - it is a vibration sensor, so it also responds to strong noise, road vibrations from passing trucks, and so on.
Modern two-level shock sensors (like other alarm sensors in car security systems) have two separately adjustable levels:
- Warning level: as soon as the vibration recorded by the sensor exceeds a preset level, a short-term siren signal is activated, and the corresponding information is supplied to the key fob.
- The alarm level is set higher than the warning level. In this case, the siren turns on constantly, all interlock circuits are activated, and instead of a single signal and short-term vibration, the key fob transmits signals periodically.
A properly configured and installed (this is no less important) shock sensor does not cause serious problems, and occasionally it has to be reconfigured (for example, if construction begins next to the parking lot).
Why do you need to reduce
Could the alarm be too sensitive?
The question is not at all rhetorical. Its relevance has been felt by many owners of car alarms. It’s not at all difficult to understand when an alarm goes off properly and in a timely manner, and when, in addition to the hassle of idle ringing, it ruins the life of its owner. Still, it’s not a joke: 100 dB of a car’s security siren regularly howls in the middle of the night against the permitted 30 dB. If we also mention the loud keychain, which forces its owner to jump out into the street for no reason in order to save his car property, then it will become clear how harmless this very notorious sensitivity of the Starlien car alarm is. Although the reasons for the need to reduce it are quite simple and can be easily eliminated even on our own:
- The adjustment of the shock sensor, when installing it, is made taking into account the maximum sensitivity of the alarm system, incl. and Starline;
- reducing the “sensitivity” of car alarms, incl. and Starline, is associated with a violation of the sensor’s attachment to the car body;
- both reasons simultaneously influence the decrease in the “sensitivity” of the alarm;
- warranty or emergency case of poor car alarm operation.
Important: the main difficulty when setting it up for any alarm will be finding a shock sensor. Its approximate location is known - under the trim next to the clutch pedal. But you still have to look.
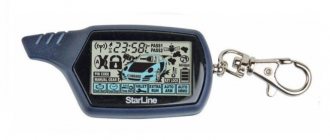
Connecting the key fob
For the Starline A 91 alarm to work correctly, it is necessary to connect the key fob to the vehicle’s electronic security system.
Connection is made in the following sequence:
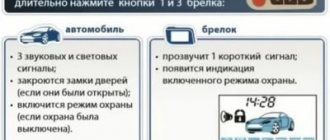
- To carry out the registration process, you need to find the “Valet” button (in the fuse box, under the steering wheel or glove compartment) and press it 7 times to activate the system with the engine off.
- Turn on the ignition. The siren should sound 7 times if all operations are completed correctly.
- To do this, we activate the key fob at the same time, press buttons 2 and 3, as a result of which one siren signal should sound, signaling that the key fob is connected.
- We connect the second key fob in the same sequence.
The correct operation of the Starline alarm is influenced by 3 main reasons;
- adjusting sensor sensitivity;
- installation location;
- correct fastening of sensors and signal unit to the car body.
The sensitivity of the sensors can be adjusted using the control unit.
For the Starline A 91 alarm to work correctly, it is necessary to connect the key fob to the vehicle’s electronic security system.
The correct operation of the Starline alarm is influenced by 3 main reasons;
- adjusting sensor sensitivity;
- installation location;
- correct fastening of sensors and signal unit to the car body.
The sensitivity of the sensors can be adjusted using the control unit.
General setup principles
If, due to the causeless howling of the siren and the ringing of the key fob, you have to get nervous too often, it’s time to start reducing the sensitivity of the car alarm, including. and starline. The general principles of this simple procedure are approximately the same for different alarms:
- carefully read the technical instructions attached to this car alarm;
- carefully study the section regarding adjusting the shock sensor;
- determine the location of the faulty sensor and the “jack” button;
- remove the car from security;
- if it is possible to change the car alarm settings, incl. and starline by reprogramming method, then perform the prescribed actions;
- if reducing the sensitivity of the alarm is possible by adjusting the shock sensor itself using screws or buttons, then by selecting the level of the car alarm, it is necessary to set its desired value;
- in case of negative results of alarm adjustment, incl. and starline, you need to consider resetting all settings using the “Jack” button and doing it again;
- Since adjusting the car alarm involves periodically turning on the siren, you should carefully select both the place and time for this work.
Important: when making adjustments, you should take into account the fact that the force of impact on different parts of the car will have different effects on the response of the sensor.
How to set up a Starline alarm if it goes off on its own
The most common problem that owners of an alarm system from Starline with a shock sensor encounter is a false alarm. It occurs even in devices that have been installed recently. As a result, the sensor goes off on its own and the alarm screams, although no one is nearby.
To fix the problem, the first thing you need to do is figure out what the warning signs were for the appearance of a false signal. Did this happen at a time when other people's cars were passing nearby? Or during certain weather events.
The time of day when such incidents occur plays a role. And also how often they happen. In some cases, false alarms occurred when the car's handbrake was engaged. To accurately determine the reasons, all details are important.
Another problem is a violation of the design of the sensor or module associated with external damage or wear. Replacing or repairing broken parts will help fix the problem. The signal is also triggered due to the interception of radio waves when the module and sensor loops are close to each other. To eliminate it, just separate them.
If the sensor is constantly disconnected, then the reason may lie in improper mounting. For the latter, I use plastic, which is deformed and destroyed due to impacts or other external influences. The plastic mount can be replaced with a metal one.
The best way to test the serviceability of newly installed sensors is to test at minimum sensitivity. If a reaction is observed even with minimal settings, then the system will probably need to be replaced.
Settings in “StarLine” alarms
On older models of shock sensors there are 2 adjusting screws and LED indicators for each of them.
One of the screws is designed to adjust the car alarm warning signal. This is where adjustments should begin. The second screw reduces the alarm level. Everything is quite simple and follows the recommendations described above. With more modern alarms, adjustment is carried out somewhat differently. So for the starline car alarm model A93, the process of adjusting (decrease or increase) the sensitivity of the alarm is as follows:
- Factory reset starline b9
- first of all, as noted above, you should find the shock and movement sensor itself; Usually, the location of its placement is chosen to be a transceiver antenna located on the windshield of the car;
- turn off the car ignition;
- the machine will give three light flashes and emit 2 signals from the built-in siren;
- repeat the long and short press of button No. 3 of the key fob;
Important: the transceiver antenna with shock and position sensor must be attached to the windshield using thin double-sided tape.
If during the process of adjusting the car alarm the desired results were not achieved, you should remove the shock sensor and send it to a service center for reprogramming. Still, whatever you say, the level of alarm sensitivity is a very serious indicator. Moreover, the driver's door of a car with a note nailed to it will suffer undeservedly.
Most often, random activation of the StarLine alarm is associated with incorrect settings of the shock sensor. The fact is that the name “shock sensor” itself is incorrect - it is a vibration sensor, so it also responds to strong noise, road vibrations from passing trucks, and so on.
The site employs an auto electrician-diagnostician, a certified StarLine specialist. If you have questions about car alarms, ask them at the end of the article in the comments or on Vkontakte. Modern two-level shock sensors (like other alarm sensors in car security systems) have two separately adjustable levels:
- Warning level: as soon as the vibration recorded by the sensor exceeds a preset level, a short-term siren signal is activated, and the corresponding information is supplied to the key fob.
- The alarm level is set higher than the warning level. In this case, the siren turns on constantly, all interlock circuits are activated, and instead of a single signal and short-term vibration, the key fob transmits signals periodically.
A properly configured and installed (this is no less important) shock sensor does not cause serious problems, and occasionally it has to be reconfigured (for example, if construction begins next to the parking lot).
Errors when installing the shock sensor
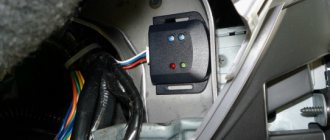
On older generations of StarLine alarms, an external shock sensor was used, which had to be placed in strictly defined places in the car. If it was not installed correctly, it either could not be adjusted adequately, or it would work on its own.
A common mistake is gluing the sensor to the plastic panel from the inside. Even with high-quality preparation, using a branded primer and 3M adhesive tape, it comes unstuck and either falls onto the bottom panel or dangles from its wire.
There is also an equally stupid solution - attaching the sensor with plastic ties to a thick wiring harness (if the alarm is hidden in the area of the mounting block). The sensor is adjusted in a warm box, when the harness is softer and transmits vibration less well, and in winter the wires “dumb”, and the alarm goes off on its own with significantly less vibration than before.
When the shock sensor is rigidly installed on metal brackets rigidly connected to the engine shield, random activations sometimes occur due to the cooling exhaust manifold - short-term vibrations (“clicks”) are transmitted through the cushions to the engine shield, and from it to the bracket.
Video: Setting up the Shock Sensor Alarm.*Avtoservis Nikitin*
The shock sensor itself has different sensitivity depending on the direction of its piezoelectric plate: better it detects vibrations that are directed perpendicular to its plane, worse - parallel to the plane. Therefore, if the sensor is directed to the side and is adjusted by tapping on the windshield, then it has increased sensitivity to vibrations from passing cars - hence the risk of Starline triggering for no reason.
Working principle and functions
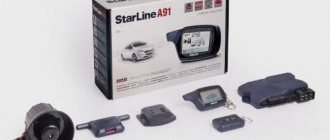
The A91 car alarm system includes a special piezoelectric sensor, which is attached to the metal panels of the vehicle body. The A93 model began to use a 3-axis accelerometer integrated into the transceiver unit. The sensor detects shocks that occur when attempting to enter the vehicle interior or dismantle parts (for example, wheels). The sensor reacts to external disturbances and sends a signal that triggers the alarm.
The user can independently configure the sensor on the Starline A91 or A93 alarm system by adjusting the warning and alarm level threshold. On early alarm models, adjustment is made by rotating a mechanical regulator; on later modifications (with an accelerometer), electronic adjustment was introduced. Depending on the settings of the parameters, the force of impact is determined at which the security complex gives a warning signal with a siren or activates the alarm mode.
We reduce the sensitivity of the sensor during autostart
A running motor creates increased vibrations, which are registered by the shock sensor as an alarm, and the alarm may go off during autostart. Therefore, by default, when the alarm is started, the shock sensor is turned off, but this reduces the security of the car - if the glass is broken while the car is warming up in the morning behind the house, the alarm will not go off.
Therefore, it makes sense to activate the shock sensor during autostart, but slightly reduce its sensitivity. To configure the sensitivity of the StarLine A91 or A93 alarm to turn on the sensor during autostart, you need to:
- enter the SF settings menu (we already wrote about how to do this earlier);
- go to function 03, which sets the algorithm for the operation of the shock and tilt sensors when the motor is running;
- set it to the value 03-2 or 03-4: in this case, at the beginning of the autostart cycle, the sensors will turn off, but after the engine has been successfully started, they will turn on again;
- check whether the sensors are triggered when the motor is running, and if necessary, reduce the sensitivity in the settings.
For more details, see the Starline A93 instructions.
Something else useful for you:
How to reduce sensitivity
Setting up an external shock sensor
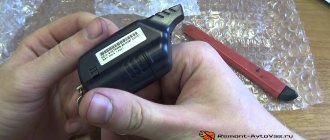
The external shock sensor of the StarLine Twage and Dialog alarm families has two separate controls - compact trimming resistors with heads for a thin flat-head screwdriver.
You cannot check the settings by kicking the wheels: after such adjustments, false positives occur.
Video: False alarms. Reasons for triggering.
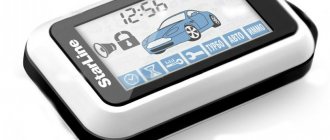
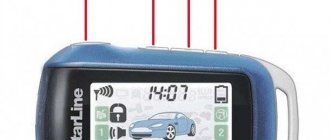
Setting up the built-in shock sensor
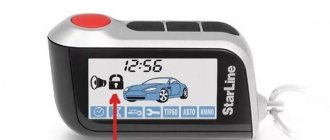
- disarm the car;
- on the main key fob, press button 3 until a beep sounds, then press it again briefly;
- a hammer icon and a number from 1 to 10 will appear on the screen, indicating the current warning level setting level;
- use buttons 2 and 3 to decrease or increase sensitivity;
- press button 3 again long and short;
- the screen will display the alarm level setting, which can be changed using buttons 2 and 3. In this case, the number on the screen should be less than that set for the warning level;
- Long and short press button 3 again to save the settings.
It's even easier to configure the shock sensor via a mobile application. Go to the Settings screen for the selected device and select Shock and Tilt Sensors. On the screen that opens, set the desired levels using the sliders and click the “Save” button.
Sources used:
- https://cartore.ru/3728-nastroyka-chuvstvitelnosti-signalizatsii.html
- https://ugonavto.net/mounting/kak-pravilno-nastroit-chuvstvitelnost-signalizacii-i-datchikov.html
- https://avtocity365.ru/avtosignalizatsii-i-protivougonnye-sistemy/umenshenie-chuvstvitelnosti-signalizatsii-starlajn/