An article with step-by-step photos and video instructions on how to independently replace the window regulator on the front doors of VAZ 2110, 2111, 2112 cars.
Each window regulator is stamped with the vehicle model number and part number. The last two digits indicate: 10 – right door; 11 – left door.
Withdrawal procedure
- To access the window regulator, remove the door trim.
- Special bolts are used to secure the glass frame. Lower the glass so that the mounting bolts are accessible through the top hole of the door. You need to unscrew the 2 bolts securing the glass frame to the window lifter slider.
- Using your hands, lift the glass all the way up and jam it in the upper position.
At the same time, lower the window lifter slider down until it stops.
5. On the front door, you need to unscrew the 4 nuts securing the guide and the 3 nuts securing the window lift mechanism itself.
6. On the rear door, you need to unscrew the 2 nuts securing the guide and 3 nuts securing the window lift mechanism.
7. The window regulator is removed through the technological hole in the door.
The most common causes of malfunction
Window lift repair
On a VAZ 2110, it is advisable to regularly lubricate the velvets with silicone or a penetrating lubricant such as WD-40. Poor glass movement can cause the window lifter to skew during operation, as well as failure of the electric motor due to overload caused by friction forces.
Often the cause of a VAZ window regulator malfunction is directly related to the electric drive. The main problem is the commutator brush mechanism. The brushes may become skewed or stick. In this case, just knock on the door in the area of the electric motor.
Window lift repair
By the characteristic sounds during operation of the VAZ 2110 window lifter mechanism, you can fairly accurately diagnose its mechanical malfunctions. A characteristic growl or crackling sound heard during operation indicates problems with the motor gears. And crunching sounds hint that the VAZ window lifter cable has become frayed.
Video on replacing the window regulator:
Replacement of the electric window motor for VAZ 2110 in the front left door. Unfortunately, the “Murzilka” from “Behind the Wheel” did not specifically talk about replacing the electric motor. The procedure for removing the door pocket, radio speaker and upholstery is most likely familiar to everyone. For me, the question was what to buy from which manufacturer and how to change it. As a result, I bought a left ESP motor for the LEFT front door, very similar to the one that came from the factory, made in Kaluga. However, when I removed the old one, I saw that the RIGHT motor was installed at the factory. But since they are interchangeable - you can put them on either side - you won’t miss there. And to remove the motor, you DO NOT need to take out the glass, just lift it to the top, and then climb with your hands and still be a little “GYNECOLOGIST” ;))
And so, the removal process itself (it was in the dark after 22-00 on May 29, 2007 with a flashlight in the yard): 1) disconnect the power window connector; 2) unscrew the 3 nuts securing the motor with a wrench; 3) on the motor, unscrew the 2 large rubber nuts with your hands - which connect the coil with the cable to the motor, inserting your hands into the holes in the door; 4) remove the motor - mine came out through the lower left hole - where the column is placed. Installation is in the reverse order, the problem arises when I tried to put the reel with cable on the motor by touch in the dark and then get the pin in the rubber nuts into the holes for fastening this reel to the motor. In terms of time - I fiddled around for almost 2 hours in the dark () I really wanted to finish it, because... It’s HOT to drive with the window closed), although now I understand that you can actually do everything there in 30 minutes - if you immediately hit the motor with a coil.
PS. Maybe it will at least be included in a new search.
why is it so difficult? technology: 1) unscrew and remove the door pocket 2) unscrew and remove the door handle 3) unscrew and remove the speaker 4) tear off the trim 5) tape the glass in a raised position to the top frame of the door, so that the tape goes over the top and glue it on the other side glass, 2-3 strips are enough 6) remove the terminal from the ESP motor 7) unscrew the 3 nuts securing the ESP motor, unscrew the 2 nuts of the ESP guide 9) unscrew the 2 bolts from the glass frame 10) remove the ESP from the door 11) repair 12) put everything back together sequence 12a) in the door trim, before putting it on the door, do not forget to replace the caps 14) drink beer
How complicated is everything here! I took it off without removing the tropezia, I have to dig deeper, but I took off nothing anyway. Unscrew it and pull it out of there.
But from this place in more detail, please!
My ECT failed in the right rear door. The voltage is fine, but the motor sucks! I tried to take it apart, but it was cold, so I blocked it! But a thought arose, perhaps somehow we can remove the motor without pulling the entire ESP out of the door. But I still haven’t figured out HOW to remove it and HOW to put it back in place! Share the technology, plzzzz!
A week ago I repaired the window regulator of the right rear door. I was afraid to take it off myself for a very long time. It turned out that everything is very simple. Technology: 1. Remove the casing and disconnect the connector. 2. Unscrew the 2 “10” nuts that secure the motor to the door. 3. Unscrew 2 more “10” nuts that secure the trapezoid to the door. 4. You jam the glass. Although I secured it with tape across the doors. Otherwise it may fall inside the door. 5. Using a “10” head, unscrew the 2 bolts that secure the trapezoid to the glass mount. 6. Remove all the threaded rods from the holes into the door. 7. Through the lower right hole in the door, unfold the entire structure so that the motor comes out first, and then everything else. Flexible cables can be bent. 8. Unscrew the two studs with rubber bands from the trapezoid and disconnect the motor.
Possible malfunctions and ways to eliminate them
Now we suggest that you familiarize yourself with the causes of the main malfunctions that can occur in the operation of a joint venture. If there is a problem, the window regulators will either refuse to work at all, or will function incorrectly or be noisy. Main causes of problems:
- Malfunctions in the operation of the electrical circuit, that is, wiring. If the wiring is damaged, the control motor of the joint venture will no longer receive a signal about the need to raise and lower, and accordingly, the operation of the joint venture will be impossible. The wiring may be damaged, in some cases the reason lies in insulation failure or oxidation of contacts. Damaged sections of the electrical circuit must be replaced, oxidized contacts must be cleaned or replaced.
- Inoperability of the gear motor. Electric motor failure usually occurs after several years of intensive use. If the unit fails, normal operation of the joint venture will be impossible, the drive must be repaired or replaced, here the specific nature of the breakdown must be taken into account.
- Damage to the control module with keys. If all the power windows do not work at once, then most likely the reason lies in the inoperability of the control unit. Perhaps the contact with the car's electrical network has been broken or the board itself has failed. The board itself must be replaced. If only one or more lifts do not function, then the reason may lie in poor contact of the control button with the network. Again, you need to get rid of the oxidation and reconnect the button.
- Mechanical wear of the gear. This problem is usually caused by long-term and intensive use of the joint venture; the gear teeth can be damaged as a result of wear. Repair is impractical; the gear must be replaced.
- The fuse responsible for the operation of the joint venture has blown. The fuse element may be located in the mounting block with all other fuses and relays. But if you installed the joint venture yourself, then the fuse may be located next to the battery. A failed device must be replaced (the author of the video is the V Village Life channel).
Photo report on the removal and installation of the VAZ 2110 electric window
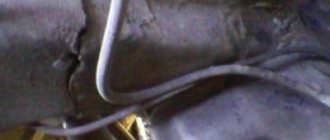
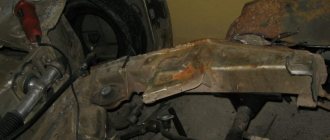
So, before you do anything, you will first need to remove the front door trim. Then, lowering the glass to the required height (so that the bolts securing it to the rail become accessible), unscrew everything with a 10mm head, as shown in the photo:
And the glass can be raised as high as possible so that it does not create problems when dismantling the window regulator . After this, unscrew all the nuts securing the VAZ 2110 electric window, which are shown in the photographs below:
Electric window repair/Replacement of the motor on a VAZ
Enjoy watching everyone, I hope my video helped someone with their choice or technical issues) Spare parts.
Kinds
Window lifters are devices that serve to move glass on windows and hold it in a given position. Today, the VAZ 2110 is available with quite a variety of window lifts, which differ not only in manufacturer, but also in purpose.
If we take into account the purpose, then devices can be divided into four types:
- For front doors;
- For rear doors;
- For left doors;
- For the right.
It is noteworthy that their design may be different, but they have quite a lot of common nuances.
Any of the listed window regulators includes several main components.
| Component | Functions |
| Gutters | They are installed on the inside of the door frame. Their function is to hold the glass sheet in a given position |
| Rails | They are mounted inside the door frame in a static position. Act as guides for moving glass up and down |
| Seal and damper | Products made of soft rubber. They ensure that glass movements are limited downwards and upwards. |
The design of any window regulator includes two main components - the drive and the lifting mechanism.
Drives
As in many other cars, in the case of the VAZ 2110 there are two types of drives.
- Electric. A rather complex set of elements, which consists of a drive drum or gear, as well as an electric motor with a worm gearbox built into it. This design allows you to raise and lower the glass at the touch of a button.
- Mechanical. The most simplified design, which includes several parts, gears and handles. To raise the glass in a VAZ 2110 using a power window lifter, you need to turn the handle clockwise. The drive roller takes on the required physical effort, so lifting is not difficult.
Lifting mechanisms
As for lifting mechanisms, there are several of them. For the VAZ 2110, various options are available.
Rack and pinion mechanisms
| Mechanism type | Peculiarities |
| Rack and pinion lift mechanism | It was installed on the VAZ 2107, then switched to the VAZ 2110. The advantages of such a mechanism are its simple repair and operation. But the design is not particularly reliable; for effective operation, the rack and pinion device must be lubricated. Design flaws forced the developers to abandon it |
| Cable mechanism | A more advanced system that eliminates the possibility of glass distortions. But the reliability is not the highest. The most attractive option for a cable mechanism is a structure made of galvanized metal. Their cost is 400 rubles. It is also worth paying attention to Metprom devices. Their current price is 300 rubles. Standard VAZ cable lifts will cost 250 rubles |
| Lifting lever mechanism | These are the most advanced mechanisms available for the VAZ 2110. Their operation is based on the use of hinges. The design ensures silent operation. However, the mechanism is only available on electric windows |
Electric glass lift
Rack and cable mechanisms are offered complete with electric and mechanical drives, while lever mechanisms are available only with an electric motor.
Repair
It is not possible to repair window regulators in all cases. Mostly, these glass lifting devices can be repaired in case of obvious mechanical fractures of the elements.
But we can still give some useful tips regarding restoring the functionality of the window regulator without replacing it.
- If the electric window motor fails to work, then the brushes or winding are most likely to blame. To verify this and fix the damage, you need to remove the motor, disassemble it and clean the outer and inner surfaces.
- For cleaning, it is recommended to use a lint-free cloth. The cloth is soaked in gasoline, alcohol or a special cleaning agent. When you buy the latter, you can use it for a long time, the efficiency is higher compared to gasoline.
- After cleaning and drying the parts, it is recommended to treat the moving elements with lubricant so that the mechanisms function longer.
- If the cable comes off the lifting mechanism, you will have to dismantle it, remove the electric motor, or unwind the cable if it is mechanical. Then the cable is pulled back onto the grooves and the assembly is reassembled.
- If a malfunction occurs in the mechanism or the electrical circuit of the device, it is necessary to study this circuit, determine the direction of the wires, and then ring them. This is the most effective way to check for electrical failure.
Lifting device diagram
Repairs in most cases only give temporary results, so soon you will still have to make a full replacement. This is due to the fact that each part has its own service life and degree of wear. When they are reached, the window regulator stops working.
Replacing or repairing mechanical or electrical window regulators cannot be called complex undertakings. It is quite possible to cope with such tasks with your own hands.
The VAZ 2110 car window lifter, like similar devices in other car brands, is designed to fix the position of the side windows of vehicles in various positions (open - intermediate positions - closed). Almost all passenger car models are equipped with front and rear body doors.
They come in two types:
- mechanical;
- electric.
Let's sum it up
Most often, rack-and-pinion electric windows are installed on domestically produced cars. Well-known manufacturers sell cable-driven mechanisms. The mechanism contains springs that compensate for the tension of the cable. Externally, the designs of window lifters are very similar, but they work with different gear motors.
Syzran-made mechanisms are equipped with imported motors, while all other manufacturers use domestic engines. The operating parameters of the products also differ.
The approximate cost of a cable electric window lift is 850 rubles, and lifts from the Granat company cost about 950 rubles.
Garnet window regulators have a highly reliable metal rack and pinion mechanism, which is characterized by quiet operation and consumes minimal energy. The mechanism is equipped with an imported gear motor. The main feature of the device is its good service life.
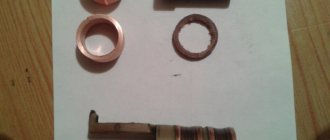
The steering rack is a part of any vehicle that can be quite expensive to repair, and replacement is even more expensive. At the same time, anyone can buy a repair kit and replace the main elements themselves.
Today, the domestic “ten” continues to confidently remain in a leading position among the most popular cars in the country. They have already stopped producing them, but this does not stop many people from driving a VAZ 2110.
The car is far from ideal, but it has a lot of positive qualities. One of them is the simplicity of the design, which allows you to perform a whole range of repair work with your own hands.
An example of a successful design that combines good reliability and the possibility of self-repair is window regulators.
How to install a new window lifter handle?
To do this, you need to take the washer that comes with the new handle and install it in place of the previous one. To insert the new handle, hold the washer with your hand. It is advisable to turn the newly installed handle several times. Thanks to this, better adhesion to the splines of the window lifter gears will be achieved. There should be no sudden movements when raising and lowering the glass. The glass should go down and up smoothly, without jamming or grinding.
If the glass sticks in the middle, it means that there is a foreign body in the mechanism or the set was defective. Also, as mentioned above, the problem may lie in the mechanism itself.
If after disassembling the door it turns out that the lifting mechanism is faulty, it will have to be replaced. It is not difficult to purchase a new one, and anyone can install it with proper effort.
We recommend that you inspect the window regulator in the store - it is extremely important that its cables are secured with plastic ties. The latter guarantee that the rod will not fly off the rollers during installation. The latch may be removed no earlier than the mechanism is secured in place.
The installation procedure is as follows:
- pre-lubricate the cable of the new mechanism with silicone compound;
- secure the glass lift to the door with three nuts;
- pull the cable onto the lower rollers;
- cut off the ties.
Now all that remains is to adjust the tension with the tension roller and secure the latter with another nut. Try to act as carefully as possible so as not to tangle the cable.
Make sure that the mechanism is securely fastened and return the door trim, as well as both handles.
When the replacement is completed, you should check how the entire mechanism works. The handle, in particular, should not dangle or spin idle. The operation of the lift, if everything is done correctly, occurs silently - the glass lowers and rises smoothly, without unnecessary effort on the part of a person.
As you can easily see, removing and installing the window lifter handle, as well as its mechanism as a whole, is not a very troublesome procedure. Here it is important to act carefully and perform the required manipulations in the order described above.
By the way, instead of mechanics, many now install an electric drive - they are now sold as a set and individually. With this improvement, your seven will become noticeably more comfortable. Installing this device is not much different from the algorithm given earlier.