Cooling radiators VAZ 2112
As you know, the cooling radiator is one of the main structural elements of a car. The cooling radiator occupies the main position in the cooling system, and it is entrusted with the task of dissipating the heat that comes from the engine into the air. On a VAZ 2112, replacing the cooling radiator is a responsible and common process. The VAZ 2112 cooling radiator is replaced when leaks or other problems are detected.
Instructions for removing the VAZ-2110 cooling radiator
In order to replace the cooling radiator on a VAZ-2110, you first need to properly remove the old device. To do this, remove the battery, otherwise it will interfere. Then follow the sequential instructions:
- Remove the ignition module. Now the path is open for you to carry out repairs on plugs on the cylinder block and radiator.
- Remove the plugs and drain the old coolant into a previously placed container.
- If the machine has a built-in injection device, remove the air filter.
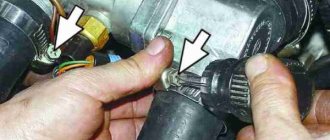
- Disconnect the wires going to the fan. To do this, remove the stamped block located on the fan and cut the clamp supporting the harness.
- Release the throttle linkage located right next to the fan shroud.
- After slightly loosening the casing connection, remove the cooling mechanism pipes from the thermostat mounting fittings.
- Set aside the disconnected pipe responsible for removing steam, leading from the radiator to the expansion tank in the area of fixation to the tank. Set the clamp aside.
- Remove the steam outlet pipe from the clamps connecting it. Usually in the VAZ-2110 these clamps are placed at 2 points - on the hose suitable for the expansion tank, and on the pipe connected to the water pumping device.
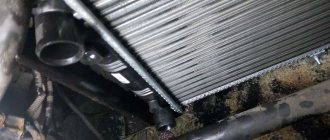
- Next, carefully disassemble the upper radiator fasteners located near the frame of the car. The fan is now freely available.
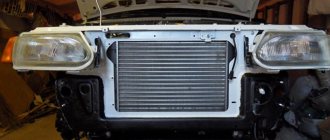
- Remove the radiator. To avoid having to pull it and use force, tilt it towards the engine.
- Disconnect the hoses and venting mechanism from the removed device. First, loosen the clamps and pull out the outlet and supply hoses, and remove the steam outlet. Then unscrew the bolts and nuts.
- If the pins located below have pads for a better fit, assess their condition after removal. If they are cracked or there are noticeable deformations, replace them with new devices.
- To determine the leak area, apply an air flow to the radiator with a pressure of up to 0.2 MPa and place it in water.
Cooling radiator device
The main structural elements include:
- frame;
- pipes;
- cores;
- drain valve located at the bottom of the housing;
- the fill plug is located on top of the main body, equipped with inlet and outlet valves;
- thermostat;
- fan.
Cooling radiator design: 1 – radiator;
2 – sensor for turning on the electric fan; 6 – rubber cushion; 7 – drain plug. The housing design includes two tanks with attached pipes that transmit cooling. The cores include brass tubes soldered to the cooling fins located in the inner part of the housing. The fill plug directs the cooling liquid into the radiator; the drain valve is necessary so that, if necessary, the liquid can be drained from the cooling unit. The operation of the engine depends on which direction the radiator fan on the VAZ 2110 should rotate; if the system is operating correctly, cooling air should be supplied to the engine.
Which radiator should I choose, aluminum or copper?
The VAZ 2110 after 2008 was equipped with aluminum radiators, which have a number of pros and cons. However, some car owners complain about cold interiors and foggy windows. Advantages of an aluminum radiator:
- They have a higher density compared to copper
- The width of the radiator channels is larger, which means more heat transfer
Minuses :
- If a leak occurs, it is not repairable
- Heats up quite quickly, but also cools down quickly
Initially, domestic cars were equipped with copper radiators. However, later, as we wrote above, they were replaced with aluminum ones.
Now it is quite difficult to find a high-quality copper radiator, since some manufacturers use impurities instead of pure copper.
Advantages of copper radiators VAZ 2110:
- Among the obvious advantages is its heat dissipation of 389.6 W/(m. deg), it is significantly higher than that of aluminum
- A copper radiator takes a long time to heat up, but also takes a long time to cool down.
- If it leaks, it can be repaired.
- The copper radiator can be soldered.
Minuses:
This type of radiator has fewer fins and thin channels that can become clogged.
VAZ 2110 heater replacement technology
Replacing the radiator of a VAZ 2110 stove is quite quick if you remove it not as the instructions say, but remove it without disassembling the entire body, and even more so, without disassembling the interior.
The radiator can be easily and simply removed towards the vacuum brake booster. To do this, you just need to remove the brake pedal along with the booster, and you don’t even need to touch the master cylinder and bleed the brakes. Simply remove the cylinder from the vacuum booster, unscrew the two 17mm bolts from the interior that secure the pedal and the vacuum chamber, remove or cut off the old hoses and first drain some antifreeze to the level of the radiator. it's about a liter.
Naturally, you will have to change all the clamps and install new pipes so as not to risk the old ones, but this would have to be done according to the standard replacement procedure. The entire work of replacing the stove radiator will take an hour at most, the only drawback in this method is that we will not be able to really look through the stove body from the inside without dismantling it, and there may be a lot of interesting things there. Be bold, and the warm interior of the dozen will be a reward for your dedicated work. Happy travels to everyone!
Work progress
- The first thing to do is drain the coolant;
- Then remove the air filter;
- After this, loosen the clamp of the lower supply hose;
- Disconnect the hose from the lower radiator pipe;
Now loosen the clamp on the upper outlet hose;
Disconnect the hose from the upper pipe;
Remove the radiator cooling fan (read here how to remove it);
Unscrew the 2 nuts of the upper radiator mounting to the studs of the radiator frame (the photo below shows only one nut, the second is located symmetrically);
Move the radiator a little back towards the engine;
Loosen the clamp of the steam exhaust hose and remove it;
Now you can remove the cooling radiator from the car;
- Next, remove the rubber cushions of the lower radiator mounting (if they are torn or have lost their elasticity, then we change them).
This completes the replacement of the main cooling radiator. The radiator must be installed in the reverse order.
When to change/remove the heater radiator
If you have a couple of days free, then you can shoot quite often if it brings moral satisfaction. If we change or remove the radiator, then there must be objective reasons for this. Since we need the stove to heat, we will remove it when it is not heating. But first you need to make sure that the problem is in the radiator. Even the very fact of an antifreeze leak can be caused not by the radiator at all, but by pipes of disgusting quality, which become woody and crack after a couple of years of operation. The difficulty is that the stove reliably hides its structure and is perfectly protected from industrial espionage, so that not a single part of it is accessible to enemies without disassembly.
Therefore, if antifreeze quickly leaks into the cabin or under the hood near the stove, you should at least try to determine the cause of the leak. A leak is fine, but with a groundless failure of the heater it’s more difficult. There can be many reasons:
- air lock in the heating circuit;
- clogged heater radiator;
- clogged cabin filter, if there is one at all;
- clogged air ducts;
- problems with the electric motor of the stove - it does not rotate, does not create pressure, creates insufficient pressure;
- electrical malfunctions - electronic climate control unit, violation of air recirculation operating modes, typical malfunctions of switches and regulators.
If there is still a need to replace the radiator, we will replace it, but first you need to select it.
VAZ 2111
The VAZ 2111 retained all the technical advantages of the “tens”, but at the same time was adapted for the transportation of goods. The car body was noticeably lengthened. It also became taller, which also increased cargo capacity. Rails are installed on the roof, which makes it possible to transport cargo weighing up to 50 kg on the top rack.
This is the first time such comfortable rear seats have been used. The rear seat can be folded in a special way and then any cargo up to two meters long can enter the interior and trunk of the VAZ 2111. In this case, the seat can also be folded across, leaving room for the passenger.
During the production of Lada 2111, several options were tried. The most worthy of more attention is the VAZ 2111-90. This is a kind of Niva hybrid. All four wheels are driven. In addition to greater capacity, this VAZ 21114 car also has high cross-country ability. The VAZ 2111 comes standard with a 1.6-liter engine. The new model uses a 1.8 liter engine! The suspension is completely from Niva. The new model was called "Tarzan". Passive and active safety characteristics have been noticeably improved throughout the Lada 21111 model range. In 2009, the VAZ 21112 was discontinued.
Club VAZ 2111 – these are photo reports of club meetings, mutual assistance and practical advice. The forum will always help you with solving non-standard problems, repairing and identifying problems with your car yourself - this is the VAZ 2111 forum.
Which heating radiator to choose?
The main source of heat in the car interior is the radiator, which modern manufacturers produce from two materials - copper or brass, and aluminum. Which heater radiator is better - copper or aluminum for a VAZ 2110 - 2112 remains to be seen, since not only the efficiency of the heater, but also comfortable driving in winter depends on this choice.
Advantages of an aluminum radiator
To find out which heater radiator is better to install on the seven, let’s make a comparative comparison. To do this, you need to find out all the advantages and disadvantages of the two types of stove heat exchangers. First, let's figure out what the pros and cons of aluminum units that are installed on classics from the factory.
- Cost is one of the main advantages of such devices, since it is precisely because of the low price that many choose models made of aluminum alloy. The price difference between copper (brass) and aluminum devices can be up to two times.
- Large selection - these models are more popular, despite some of their disadvantages. The reason for this popularity is their price, but you often have to make sure that it is better to buy a copper unit for the stove. Among the advantages, heat transfer should also be noted, however, practice shows that heat transfer rates are significantly inferior to brass devices.
Advantages of copper heater radiators VAZ 2110 - 2112
Now let’s find out why a copper stove radiator is better than an aluminum one. The advantages of these units include:
- Thermal conductivity - even if we take into account the fact that copper ones are only called such, since they contain much more brass than copper, they have high thermal conductivity. It is this indicator that is fundamental when choosing a heat exchanger from which you can get more heat to heat the interior.
- Easy to repair - even the slightest mechanical damage can be repaired at home. Moreover, after soldering work, the unit can last a long period of time (which also depends on the quality of the soldering). The entire radiator is made entirely of plastic without the use of plastic.
- Not only are the plates made of copper, or rather a brass alloy, but the body itself is also made of a similar material. This is a big advantage, because due to this design, operational parameters are increased.
Changing the VAZ 2110 cooling radiator with your own hands
Even for people who are quite far from technology, the purpose of a cooling radiator is clear - it removes excess heat from the engine, thereby preventing it from overheating and failing.
However, some time passes, the most important part of the cooling system may fail, or simply leak. Then there is a need to replace the cooling radiator of the VAZ 2110, which can be done not only at a service station, but also with your own hands.
New engine cooling radiator
Device
Any radiator on a car, regardless of its brand, consists of:
- Two halves (body);
- Patrubkov;
- Cores;
- Filler plug in the upper part of the radiator, equipped with valves (one is inlet, the other is outlet);
- Drain tap, in the lower half of the body.
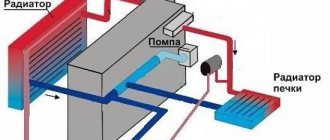
Design (diagram) of the engine cooling system
The body, which can often be made of aluminum, less often copper, consists of two tanks (one on top, the other on the bottom) and adjacent pipes through which the coolant circulates.
The core is rows of brass tubes soldered to cooling fins. They are located inside the case.
Cooling liquid enters the radiator through the filler plug and is drained through the drain valve, if necessary.
In addition, the power unit for maintaining thermal conditions includes an electric fan and a thermostat.
Causes of engine overheating
The reasons for overheating of the VAZ 2110 engine include, first of all, the insufficiently efficient operation of the cooling system. The reasons may be:
- The radiator pipes are clogged. A thing that is rarely seen today, and only when using coolant of extremely low quality. In this case, replacing them will help;
- Low coolant level due to leakage at the attachment points of the pipes or cracks in the pipes themselves. Need to replace fasteners or pipes;
- Housing contamination. Here you should take into account a small detail: the whole car, the radiator in particular, requires care. It should not be allowed to “overgrow” with dirt, fallen leaves, or other debris. Because of this, the efficiency of its work is significantly reduced;
- The radiator is leaking. It is necessary to remove it in order to decide based on the location, size of the leak, and general wear and tear of the unit whether it needs repair or replacement.
Model selection
For the VAZ 2110 you can choose either aluminum or copper radiators. To a large extent, the choice depends on what result you need: saving money or durability and reliability.
Their disadvantages and advantages:
- Aluminum. Lightweight, relatively cheap, the price depends on the manufacturer: - Luzar (2110-8101060) - about 1000 rubles; - Pramo (2110-1301012) - retail approximately 1600 rubles. But its thermal conductivity interferes, and it cools the engine worse. In addition, it is subject to fairly rapid corrosion; it takes less time for it to flow;
Aluminum radiator cooling
Copper cooling radiator with 40% increased efficiency
Dismantling and installation
To remove the cooling radiator from a VAZ 2110 with your own hands, you must:
- Drain the coolant through the bottom plug;
- Remove the battery as it is in the way;
- On the injection VAZ 2110, it is also necessary to remove the air filter;
- The upper mount to the frame must be disassembled, simultaneously releasing the fan;
- Remove the electric fan;
- Remove two hoses - for steam supply/discharge;
- Tilt the radiator towards the engine and remove.
That is, removal is quite simple. Now, if the radiator leaks slightly, but is not severely damaged by corrosion, you can repair it. Otherwise, replace it. When choosing a new radiator for a VAZ 2110, be sure to take into account the model of the previously installed one so that the new one fits perfectly.
When installing, make sure that the rubber pads on which the body rests with the lower part fit firmly into the holes on the cross member.
Next, you need to fill in the coolant (you can use the old one by filtering it), and then start the engine.
Radiator repair
You can also repair the RO with your own hands, if possible. In other words, if the core, upper or lower tank, or pipes on the RO are damaged, then in this case everything can be repaired yourself. Although this is a very painstaking job, it can still be done with patience, desire and knowledge. So:
- The repair of this element begins with checking the coolant level in the expansion tank. On the expansion tank of the VAZ 2112 there are min/max inscriptions, by which you can determine the norm. If the liquid constantly decreases, then we are probably talking about a leak that can form in the pipes.
- We inspect all hoses and replace any torn ones.
- It is easy to find a crack in the hoses, but finding it in the radiator itself is a little problematic, especially if the crack is small. But today, stores sell special antifreeze additives that, when they get into the radiator, close microcracks. Very convenient and practical.
- If a leak is found in the radiator pipes, it can be eliminated either with sealant, electrical tape, or a cut hose.
Instructions for replacing RO are given here with the aim of helping novice drivers carry out repair work on their own, the price of which today is clearly off the charts in specialized car repair shops. During the operation, it is recommended to view photos and videos - materials that provide practical understanding.
Possible breakdowns of the cooling radiator of a VAZ 2110 car
In a liquid cooling system, the most vulnerable part is the radiator. There are several reasons for its failure:
- Its body is made of a thin brass sheet with a large number of soldered joints, which causes its mechanical deformation, which can even occur from a tree branch or an accidentally flying stone.
- A large number of soldered joints and resistance welding points can lead to their destruction. This is explained by a weakening of the contact zone from prolonged use in a chemical environment, a violation of the operating mode of the pump or thermostat, which increases the coolant temperature, and the valve, which can stick, is not able to relieve pressure. The result is a large number of leakage points.
Car radiator repair VAZ 2110
Device leakage is the most common cause of the problem. Coolant begins to leak from the junction of plastic and metal. Compared to replacing the radiator, the cost of repair will be significantly lower.
- The breakdown can be eliminated with your own hands; you need to purchase a special substance from a car dealership and pour it in at the same time as antifreeze. After a while the hole becomes clogged. But such repairs can be done with small holes, otherwise you will need to replace the cooling radiator on a VAZ 2110 or use another repair method.
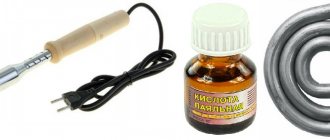
- You can try to eliminate more complex faults by soldering and welding. For a brass radiator, soldering is used with solders made of light alloys. To do this, you need to thoroughly clean the damaged area and then you can start soldering. For patches, use a sheet of brass.
Repairing the radiator of a VAZ 2112 car by soldering
- If the surfaces of cracked tubes are damaged by no more than 10 percent, they can also be soldered. A heated rod of the required diameter is inserted into the tube. When the solder becomes soft, the tube with the rod is pulled out, and a new one is mounted in its place.
- If the issue cannot be resolved with a soldering iron, argon arc welding is used. In this case, a special aluminum welding wire will serve as a filler material. The use of argon arc welding is associated with poor weldability due to the formation of aluminum oxide deposits. In addition, the high temperature in the radiator during operation melts the elements, causes internal deformations, and reduces strength. Treating the welding site with argon protects the metal from oxidation.
- The VAZ 2110 radiator can be restored using gas-dynamic spraying. It is used in the repair of thin-walled aluminum elements. At a very high speed, a special powder is accelerated inside the radiator and a coating is formed on the damaged surface, the thickness of which is up to 1.5 millimeters.
If it is impossible to perform one of the listed operations, you will need to replace the VAZ 2110 cooling radiator.
Removing and replacing the cooling radiator
Detailed procedure for removing the radiator on a VAZ 2110 car with video support. This information will help in replacing it on other cars. A detailed procedure for removing the radiator on a VAZ 2110 car with video support. This information will help in replacing it on other machines.
A modern car is a complex system of interconnected parts. Violation of the normal operating mode of any of them will ultimately lead to the breakdown of several others. A clear example for this statement is cases of radiator failure.
The radiator of the cooling system is one of the most vulnerable parts of a car. Having a thin brass body with a large number of soldered joints, it is more susceptible to mechanical deformation than any other part. And in simple terms - a breakdown from the blow of a accidentally flying stone or tree branch.
The second common cause of radiator breakdowns is the destruction of solder and contact welding points. It is in this case that the mutual influence of the car’s elements has a destructive effect: long-term use of chemicals weakens the contact zone, violation of the operating mode of the pump or thermostat increases the temperature of the coolant, a stuck lid valve does not allow the pressure to be released in time and as a result we get many leakage points.
There are many more reasons why the radiator may need repair, but this is already a topic for another very voluminous article, and in this review we will briefly tell you how to properly remove the radiator of the cooling system of a VAZ 2110 car if a leak is suddenly discovered.
How to replace the radiator of a VAZ-2112 stove of different types
Depending on the position of the element, air passes through the radiator deflectors and spreads throughout the cabin. Directional flows, as well as the intensity of air heating, are regulated by the driver. The most common reason for the need to replace the radiator in the heater of a Lada Priora car is an antifreeze leak. Thanks to our article, you will learn how to replace the radiator of different types of stove in a VAZ-2112 and how to do it yourself.
Heating system Lada Priora
If the heater in your car is faulty, it is impossible to keep your car cozy in winter. In the interior of the car model we are considering with a 16-valve engine, the interior ventilation system is a supply and exhaust system.
Through special holes in the windshield trims, air enters the vehicle system. This happens spontaneously or forcefully, using the heater fan. Air exits the passenger compartment through cracks in the door panels and holes in the ends. There are special valves with the help of which air comes out but does not get in, which stabilizes the circulation of flows and helps maintain the required temperature.
Without dismantling the engine shield, it will not be possible to determine at random why antifreeze is leaking. After all, this reason is the most common reason for the failure of a heating unit. Therefore, most VAZ-2112 car owners, after purchasing a vehicle, almost immediately change the old stove to a new model. Cars produced before 2003 have exactly the old model of the heating unit, but after that they were already produced with a new stove.
Replacing a radiator in an old-style oven
Before installing a new element, it is necessary to dismantle the old one, for which the following manipulations are performed:
- Completely drain the antifreeze from the engine block into a specially prepared container or through the expansion tank, which is located under the hood. But for the latter option you will have to remove the ignition module. Do not forget that removing the hose and rubber pipe (has a profile in the shape of the letter “L”) from the stove is necessary if the coolant is drained through the tank.
- Drained antifreeze can be reused, but dirty antifreeze is better replaced with new one.
- Remove the frill and wipers to gain access to the stove.
- Remove the plastic cover.
- Disconnect the terminal on the antifreeze level sensor in the system, if your car model has one. They are not always installed.
- Remove the steam exhaust hose.
- Disconnect the hose for the windshield washer fluid.
- Remove the clamps and fan that secure the heater housing in the desired position.
- Remove the screws on the heater housing and cabin filter, then remove all loose parts.
- Remove the back of the fan guard.
- Loosen the clamps and release the hoses supplying antifreeze and removing steam.
- Only now can you remove the unusable old radiator.
- Clean the niche of the extracted element.
- If you insert a new old-style radiator, its installation occurs in the reverse order of everything you did earlier.
Replacing a new radiator
The procedure also begins with dismantling, like other broken mechanisms in the car. But, unlike the old one, the new heater is secured with just one screw, located in the lower middle of the windshield end. If your car model has a washer fluid reservoir, it must be removed.
Sequencing:
- Remove the air filter.
- After unscrewing all the screws, gain access to the inside of the stove, which is divided into two parts. Move the first one to the right, and remove the left one completely. Only then remove the right side.
- Remove the steam hose.
- The right side of the new stove also consists of a pair of parts, connected by brackets, between which there is a seal. Only by combining them can you get to the damper.
- Set the new damper manually to a position that will supply cold rather than hot air. In this position, the radiator is closed.
- Set the temperature sensor to minimum.
- Install the sensor only after turning on the ignition - this makes it easier to install it in the desired position.
There are simpler ways in which you do not need to disassemble almost the entire front part of the car:
- This can be done through the brake pedal by removing the vacuum brake booster. But this can only be done with a new type of stove.
- Through the europanel you can get to the stove, both old and new. At the same time, experts do not recommend that novices go there, as they can easily damage something due to ignorance.
During the radiator replacement procedure, experts recommend immediately changing the cabin filter.
New cooling system
The sequence of your actions in this case is as follows:
- First of all, for safety reasons, disconnect the negative terminal of the battery. We drain the cooled antifreeze or antifreeze, first opening the expander cap. To drain the liquid you will need a container with a volume of 4-5 liters.
- Now, after unscrewing the two nuts, remove the wipers from the car.
- Then we dismantle the released protective plastic cover under the windshield, which is secured with 2 nuts and 4 self-tapping screws.
- To access the stove, remove the frill of the car by unscrewing 5 self-tapping screws, 1 screw and 2 nuts located at the bottom, in the middle of the frill, in the area of the steering rack.
- In order to remove the stove, remove the yellow cross brace, if any, as well as the curved bellows of the air filter.
- We pull the chokes off the radiator pipes.
- Then disconnect all electrical wires from the stove terminals.
- At the steering rack, unscrew 2 nuts that secure the heater, 1 nut securing the heater to the body.
- We unscrew the 3 screws connecting the two halves of the stove.
- We take it out by swinging the right side of the stove, first moving it to the right.
- The radiator in the removed half of the stove is secured with 3 screws. We take it out and replace it with a new one, not forgetting to put on the foam seal. We check the operation of the fan and, if necessary, repair it or replace it with a new one.
- Before installing the assembly, it is advisable to rinse the coolant supply hoses with running water.
- Assembly is carried out in reverse order.
Brake replacement procedure
Man has always strived to minimize his own labor, to solve a problem with a minimum number of movements. The impetus for the development of technology is a very interesting factor - our laziness.
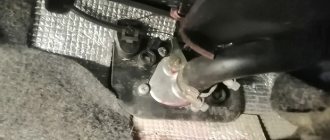
Removed the brake cylinder
It was laziness that largely led to the emergence of an original method of replacing the heater radiator on a VAZ 2110. In this case, the heater does not have to be removed. The entire job will take more or less experienced car owners an hour, but a beginner may need a little more.
The work is carried out as follows.
- Drain the coolant using the remote control heating pipe.
- Disconnect all pipes and remove the expansion tank.
- Disassemble the frill.
- Remove the brake pedal, grabbing the VUT at the same time, to gain access to the radiator.
- We take out the old radiator from there and install a new one in its place.
- Assembly is performed in reverse order.
- Return the coolant.
- With such a procedure, it would not be amiss to replace the cabin filter at the same time.
As you can see, the process is quite simple and original, not requiring excessive effort or professional skills. Any car owner can cope with such a task.
Regardless of which radiator you choose, try to carry out each stage of its replacement as competently and carefully as possible. To be fair, let’s add that the copper unit is better than DAAZ. And the money spent on it is largely worth it. Of course, if you are not going to sell the car right away, but plan to use your own VAZ 2110 for several years to come.
Old style cooling system
Such heaters were installed on early 21120 models. You can determine the modification of the system by its appearance, after first removing the frill of the car.
To replace the radiator you need:
- Carry out steps 1, 4-7 for removing the new type cooling system.
- We dismantle the expansion tank of the cooling system.
- We remove the vacuum booster by unscrewing the 2 nuts (17 mm) and carefully (without damaging the brake system pipes) move the brake master cylinder to the side. Remove the vacuum booster pipe.
- Inside the car, unscrew the 4 nuts from the brake pedal studs and, together with the pedal, remove the car's amplifier.
- Thus, we gained access to the heater core, which is secured with three screws. We replace it and reassemble the entire system in the reverse order.
Choosing something new
Before removing the cooling radiator from your VAZ 2110, you need to think about what unit will be in its place. There are not many options, but the choice should be made wisely.
Kraft model
For the domestic “ten” there are two types of cooling devices - aluminum and copper
And here it is important to think about what exactly you want - reliable, long-term operation, or minimal financial costs for its purchase.
- Aluminum. They are light in weight and quite cheap. Prices directly depend on the manufacturer. But such radiators have poorer thermal conductivity and do not cool the engine as effectively. Plus, aluminum units are characterized by the appearance of corrosion after a short period of operation. Among the most popular models, we note two: Luzar. Its cost is now about 1000 rubles;
- Pramo. You will have to pay about 1600 rubles for it.
Diagnostics of the heating system of VAZ 2110
If the function of the temperature regulator is malfunctioning, two most common reasons can be noted:
- incorrect operation of the control unit,
- damper malfunction.
If the temperature controller malfunctions, the first thing you need to do is pay attention to the condition of the temperature sensor. The temperature analyzer is located next to the lampshade located on the ceiling. You can check the functionality of the temperature analyzer as follows: you need to turn the temperature knob several times and tactilely analyze the temperature of the air flow
You can check the functionality of the temperature analyzer as follows: you need to turn the temperature knob several times and tactilely analyze the temperature of the air flow.
If the air flow temperature changes only when the regulator is in the extreme position, the analyzer must be replaced. If, however, the temperature of the air flow changes according to the position of the regulator, the sensor is functioning properly and the cause of the breakdown is the incorrect operation of the control unit.
In order to check the function of the VAZ 2110 heater, it is necessary to move the damper located in the engine compartment. Next, it is necessary to visually diagnose the tightness of the radiator. If the check shows a violation of the heater seal, it is necessary to replace it with a new one. Replacing the heater involves dismantling and completely disassembling the VAZ 2110 stove. If you have a new heater, you can replace it yourself.