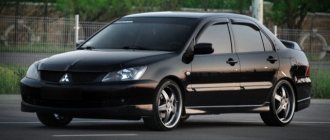
Low and high beam VAZ 2110
Lighting and light signaling are one of your guarantees of safe driving on the road. Malfunctions usually occur in this system for several reasons: weakening of contact connections, leading to periodic losses of current in their circuit, oxidation of these connections, as a result of which the passing current through this circuit increases, causing the fuse to blow. Failure of the lighting lamp. Malfunctions with lighting are divided into cases of complete failure of the light, or short-term unstable operation. Let's look at all these reasons in this article and find out how to eliminate them.
How do lights work on a car?
Malfunctions that arise may be in the nature of a complete failure of the headlights or their periodic inoperability; there may be cases when your light will burn dimmer than usual and intermittently.
High beam is usually adjusted for night driving on the highway, in contrast to the fact that low beam is often used during the day, in combination with fog lights. The easiest way to troubleshoot a complete failure of the VAZ 2110 light. In this case, there is a specific breakdown or malfunction that you can simply methodically identify and eliminate. In the case of periodic failures, and at the time of elimination, when everything is working, this malfunction is much more difficult to determine, since it can hide anywhere. Before searching for the reason for the failure of the low beam or high beam headlights, you should understand the mechanism of operation and the principle of operation, which is as follows:
Power from the battery is supplied to the ignition switch - then power goes to the side light switch - from which it goes to the light switch located on the steering column - then control goes from it to the corresponding relay in the fuse box, the steering switch turns on a certain relay, supplying voltage to his contacts.
Thus, if the lighting fails, you need to understand and find out in which part of the circuit the circuit break or voltage loss occurred. Or determine that the malfunction lies in the failure of the lighting lamps. On this car, the low and high beam are divided into two lamps in each headlight.
- Headlight unit
- Fuse box
- Light switch
- Side light switch
- Ignition switch
- Dashboard
- K4 - Low beam headlight relay
- K5 - High beam headlight relay
- F12 - Right headlight fuses, low beam
- F13 - Right headlight high beam fuses
- F3 - Left high beam headlight fuses, high beam CL
- F13 - Right high beam headlight fuses
Let's consider the case when the right high beam does not work. Do not forget that the light is turned on by a relay, and in the event of a failure of the low or high beam of one headlight and at the same time the functionality of the other, this means that the light switching circuit before the relay is functioning normally and the cause should be looked for after the relay, starting with the fuses. Almost all circuits are protected by fuses, even installed additional accessories - navigator, video recorder, radar detector, receive power from the cigarette lighter, which is protected by a fuse
Fuse F13 is responsible for the far right fuse; we take it out and check for functionality; if by visual inspection it is not clear whether it works or not, replace it with a known-good fuse of the same power. When replacing it, two options are possible: the light will not light up or the fuse will blow. In case of short circuit. We need to look for its cause. Next, open the headlight and replace the high beam bulb. All this can be made a little easier if you have a test light at your disposal, which you can use to check whether voltage is supplied to the headlight itself, since removing the light bulb requires a little skill.
If you determine that when you turn on the high beam, the voltage approaches the headlight, then you can safely remove its pot from the back of the headlight and replace the bulb. There is one more malfunction, this is a break and loss of “mass” on the paw, take this point into account and do not rush to immediately spend money buying a new light bulb. Perhaps this wire is simply disconnected and when power comes to the lamp, there is no ground power.
Low beam on VAZ 2110 - replacement of lamps and repairs
Did you like the article? Follow our channel for new ideas of useful car tips. Subscribe to us in Yandex.Zen. Subscribe.
As a rule, the cause of low beam malfunction on a VAZ 2110 is burnt out light bulbs. However, sometimes the lack of lighting is due to the failure of other components. Below we will look at how to replace lamps, as well as the most common reasons why the low beam does not light up and how to eliminate them.
Replacing lamps
Choice
The process of replacing lamps on a VAZ 2110 is extremely simple. However, before you begin this operation, you must purchase new lighting elements.
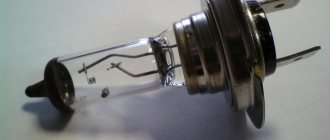
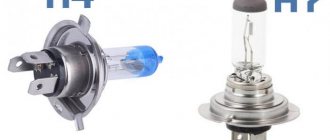
This vehicle is factory equipped with H7 standard halogen bulbs. Today there is a large selection of lamps on sale, not only halogen, but also other types - xenon and LED.
Their features, advantages and disadvantages have been discussed many times on car enthusiast forums, so below we provide only a comparative table with the main characteristics of these lamps:
| LED | Xenon | Halogen | |
| Brightness | Up to 2000 lm | Up to 3300 | Until 1550 |
| Durability | 50,000 hours | 3000 hours | 1500 hours |
| Colorful temperature | 4300-8500 K | 4300-8500 K | 3300 K |
| Lamp price | From 10 USD | From 30-40 USD | From 20-30 USD |
Note! The most optimal color temperature of the light flux is in the range of 4300 – 5000 K.
It must be said that in addition to the data from the table, when choosing, you should also take into account the penetrating ability of the light flux. Halogen lamps are the leaders in this parameter - they illuminate the road much better in rain, fog or snow.
In addition, installing xenon or LEDs in the fog lights of the VAZ 2110 will require electrical intervention, in particular the installation of additional equipment (ignition units). Therefore, it will not be possible to perform their high-quality and safe installation with your own hands.
Note! Experts recommend changing light bulbs in pairs so that both headlights shine equally. In addition, their service life is approximately the same, so if one of them burns out, the second one will soon fail.
Each car owner must choose for himself which light for the VAZ 2110 will be better based on his own financial capabilities, weather conditions of the car, etc.
How to replace the lamp
Instructions for replacing light bulbs look like this:
- First of all, you need to open the hood and disconnect the terminal from the battery.
- Then you need to remove the plug located closer to the wing.
- Next, you need to unfasten the spring clip, which presses the light bulb to the headlight housing.
- After this, you should carefully disconnect the block from the contacts and remove the light bulb itself, since nothing else interferes with it.
- Now you need to insert new light bulbs in the same position in which the old ones were located, connect the block to the contacts and secure everything with a bracket.
- At the end of the work, you should install the plug in place.
Note! When replacing lamps, it is important not to touch the glass with your fingers. Otherwise, grease stains will remain on the surface, which will lead to overheating and failure of the lighting element.
The lamp replacement is now complete. As a rule, this operation takes several minutes even for beginners.
Advice! Many car owners are interested in how to improve headlights? The easiest way is to disassemble the headlights, wash them, replace the glass if necessary and adjust the light beams. As a rule, these simple procedures give good results.
Breakdowns that prevent adjustment
The question often arises of how to adjust the headlights of a VAZ 2110 if the headlight is damaged or the hydraulic corrector breaks down. The latter device is needed so that when driving, the headlights are automatically adjusted. If the car is stationary loaded, then the light flows onto the road. If the rear part of the machine is heavily loaded, the front part moves up and the light beam begins to shine into the sky. At this moment the corrector turns on. With its help, the headlights are automatically lowered.
Eliminating headlight diff
If adjusting the VAZ 2110 headlights does not give the expected results, the inspection begins with these devices. Their disassembly is carried out as follows:
- All fasteners are turned out and the headlights are removed from the socket.
- The lamps are removed from them.
- To separate the diffuser, use a hairdryer. It is used to melt the sealant. Separation is carried out with a screwdriver or other flat object. If this is a Bosch headlight, then you will also need to remove the brackets securing the glass.
- The reflector is removed. It is supported by 3 points.
- All parts of the disassembled headlight are washed. Faulty elements are replaced with new ones. Then the assembly is carried out in reverse order. Silicone is used as a sealant.
Corrector repair
A common failure is loss of corrector density. Since this device is non-separable, in order to adjust the headlights 2110 it needs to be changed.
The work is carried out in the following order:
- The first step is to remove all the clamps that secure the product to the body, as well as the expansion tank. The control knob is removed from the interior. All tubes are dismantled. In some cases, they are removed in parts, by biting.
- To remove the cylinder, you need to grab the switch on the panel with your hand and pull it towards you. Then the cylinder is simply removed.
- After cleaning the debris, a brand new tube is pulled through.
- The entire installation is carried out in reverse order. Attention is paid to seals.
In order to carry out proper adjustment of the 2110 headlights with your own hands, you need to carefully study the instructions. The work is not difficult, but requires painstaking preparation. Increased attention is paid to the location of the work. It should be level and without tilting. Next you need to follow all the controls correctly.
Sources:
https://vaz-2110.ru/optika-avtomobilya/regulirovka-far-vaz-2110.html
Repair
If the fuses are intact, but the lighting still does not turn on, you need to find the cause of the malfunction. To do this, you will need a test lamp, or even better, a multimeter.
It must be said that repairing the low beam on a VAZ 2110 is not difficult - you just need to ring the circuit and find a break in order to fix it.
Below is the optimal procedure:
- Since the low beam relay on the VAZ 2110 is often the cause of a low beam malfunction, you can start checking with it. Using the device, you need to determine whether voltage is supplied to it and whether it is at the output. If there is no voltage at the output, then the relay needs to be replaced.
- If there is no voltage supplied to the relay and there is no voltage at the fuse terminals, then you should check the VAZ wiring from the switch to the fuses, as well as the switch itself.
- If there is voltage at the output of the relay, you need to check whether it is supplied to the lamp connector. Often the cause of the malfunction is burnt or oxidized contacts. If the low and high beams disappear at once, then the ground wire in the headlight may have come loose.
Note! The cause of relay malfunction is often oxidized contacts, which simply need to be cleaned.
Thus, by checking all the main components along the circuit, you will definitely find the cause of the malfunction. The low beam diagram for the VAZ 2110, which is shown above, will help to simplify this work.
Causes of malfunctions, possible options
Quite often, the culprits are two relays that control the headlights. In this case, it is enough to clean the contacts for the relay to work properly again.
Another possible breakdown is in the network. It is necessary to check the contacts of the wires that go to the headlights, instrument lights and fog lights.
If this does not help, remove the headlight dimmer and the exterior lighting control, then check their contacts.
Adjustment
Once a year, the low beam on the VAZ 2110 should be adjusted. This procedure is necessary in order to increase the lighting efficiency and also to prevent dazzling oncoming drivers.
Below we will take a closer look at how to adjust the low beam headlights:
- You need to find a flat area with a wall that will serve as a screen.
- The car should be placed at a distance of five meters from the screen. A passenger must sit in front. You can also put a load weighing 75 kilograms in the car.
- On the screen you need to draw a horizontal line at 600 mm, as well as a second line 75 mm below the first.
- Then you need to draw three vertical lines - the two outer lines should correspond to the centers of the headlights, and the middle one should be located in the middle between them.
- The headlight hydraulic adjustment handle should be moved to the position corresponding to the minimum load.
- One of the headlights must be covered with cardboard or a sheet of plywood.
- Then the light beam is adjusted according to the diagram. Adjustment is carried out with screws with plastic heads, which are located on the back side of the headlights. They rotate the optical element around the horizontal and vertical axis.
- Next, you need to adjust the second headlight in the same way.
Here, in fact, is all the information on how to adjust the low beam headlights.
Preparing for adjustment
To get started, we recommend watching a video on adjusting headlights on a VAZ 2110. Training lessons will allow you to understand the nuances of the procedure in more detail and pay attention to the important points of the operation.
Everything is not as complicated as it might seem at first glance. First, prepare the car appropriately for adjusting the optics.
- Wash your car headlights to keep them as clean as possible.
- Examine the condition of the optic glass. In some cases you will have to polish it. The procedure is not complicated, but requires a careful and careful approach.
- Now check the reflector for defects or damage. If they are, it is better to immediately replace it with a new one.
- If the car has been in use for a long time, then the existing lamps are unlikely to be modern and highly efficient. Experts recommend using modern halogen bulbs, which do an excellent job of illuminating the road surface.
- Pay attention to the standard indicators specified in the owner's manual for your vehicle. Before adjusting the headlights on a VAZ 2110, you must: fill the fuel tank, inflate the wheels to the required levels, and check the spare wheel.
Having completed the preparation to obtain the necessary conditions, you can proceed directly to the settings.
How to turn on low beam on a VAZ 2110
Lighting for the VAZ 2110 car. Headlight adjustment.
Design Features:
fittings
.
Cars use side lights that combine running lights, low beams (single beam lights) and turn signals. In addition, the lights have parking lights. The long and long beam beams are activated by auxiliary relays K4 and K5 located in the mounting block. The control voltage to the relay coils is supplied by the headlight switch when the exterior lighting switch is fully pressed. When the flasher is on, the low beam is illuminated, and when it is on the High beam
, all lamps (passage and traffic) are illuminated.
turn on
as soon as possible by pulling the light switch lever toward you.
In this case, the voltage at terminal “30” of the switch is supplied directly from the power sources. In wiring harnesses B for connecting wires when installing low beam headlights with double hood. In this case, the wire with the gray/red stripe in connector B must be connected to the same color wire as the "56b" switch switch. Then, when the beam is on low beam
, the low beam lamp flashes in the two brake lights and, when the main beam is on, the intermediate light of the two lamps and the lamp light up.
Fog lights
.
For VAZ 2110 cars, fog lights can be installed as an option on the front bumpers. The headlights are switched on by switch 27 (see Instrument panel) using an additional relay type 113.3747 installed in a block attached to the rear of the mounting block. The fog lights can only be turned on when the exterior lighting
26 is on.
Turning on the headlights and low beam.
Accelerated driving training for novice drivers: registration for lessons.
Scandinavian light on vase 2110 Including medium light from the hands of the generator
HOW TO CONNECT YOU AUTOMATICALLY WITH MORE LIGHT
,CONTROL OF TREATMENT WORK I.
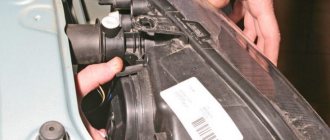
How to change a low beam light bulb (simple light bulb replacement) step by step
- Open the hood of the car.
- Remove the rear casing.
- Disconnect the terminals with the wires.
- Remove the spring that secures the lamp.
- Turn the lamp holder and pull it out.
- Then we replace the lamp with a new one.
Design Features:
Headlights
. Cars use block headlights that combine low and high beam headlights (lamp with one filament) and direction indicators. In addition, the headlights contain side light lamps. The low and high beam headlights are switched on using auxiliary relays K4 and K5 located in the mounting block. The control voltage to the relay windings is supplied from the headlight switch if the exterior lighting switch button is fully pressed. When the low beam is turned on, the low beam lamps light up, and when the high beam is turned on, all lamps (low and high beam) come on. Regardless of the position of the switch key, you can briefly turn on the high beam headlights by pulling the headlight switch lever towards you. In this case, voltage is supplied to contact “30” of the switch directly from power sources. The wiring harness has a block B for switching wires when installing headlights with double-filament low beam lamps. In this case, the gray wire with a red stripe in block B must be connected to a wire of the same color going to plug “56b” of the switch. Then, when the low beam is turned on, the low beam filaments of the double-filament lamps will light up, and when the high beam is turned on, the high beam filaments of the double-filament lamps and the high beam lamp will light up.
Fog lights
. On VAZ 2110 vehicles in a variant version, fog lights can be installed in the front bumpers. The headlights are switched on by switch 27 (see instrument panel) using an auxiliary relay type 113.3747 installed in a block attached to the rear side of the mounting block. The fog lights can only be turned on if the exterior lighting switch 26 is turned on.
Outdoor Lighting
. The side light is turned on by the external lighting switch 26 (in the key positions “I” and “II”). The power for the side light and brake light lamps is supplied through relay K1 for monitoring the health of the lamps. If any lamp burns out, the relay turns on the corresponding LED indicator in block 5 (see instrument panel) of the on-board control system indication.
Direction indicators
. The direction indicators for the right or left side are activated by the switch lever. In emergency mode, switch 42 turns on all direction indicators. The flashing of the lamps is ensured by a short-circuit relay-breaker in the mounting block.
How to replace a low beam bulb if you need to dismantle the headlight unit, step-by-step instructions
To replace the low beam bulb, it is necessary to dismantle the block design of the headlight, for which slightly loosen the fastening of the front bumper of the VAZ 2110. Then follow the further instructions:
- Remove the negative terminal from the battery.
- Disconnect the electrical connectors of the headlight unit.
- From the bumper side, unscrew the fender liner, which is usually fixed with three screws.
- Next, unscrew the two bolts holding the headlight on top.
- Unscrew the two bolts securing the decorative radiator grille.
- Then you should disengage the two latches located near the decorative grille.
- We dismantle the grate.
- Unscrew the mounting bolts from the bottom of the headlight.
- Then loosen the two bolts of the upper headlight mounting.
- Use a screwdriver to pull the decorative trim away from the headlight block.
- Next, through the resulting gap, you need to get to the tongue engaged with the wing.
- Let's unhook it.
- We dismantle the decorative trim by moving it towards the center.
- Unscrew the nut that secures the headlight to the bracket.
- We take out the headlight block.
- We unhook the hydraulic corrector cylinder clamp, and then remove it from the car body by turning it.
- Turn the turn signal lamp socket counterclockwise and remove it.
- Carefully press the lamp inward and remove it from the socket.
- Next, turn the headlight unit cover counterclockwise and remove it.
- Disconnect the electrical wire from the low beam lamp.
- We squeeze the spring clamp and remove the antennae of this element from the grooves.
- Move the spring clamp upward and remove the low beam lamp.
- We install a new working lamp.
Adjusting the headlights of the VAZ 2110
Check and adjust the headlights when the vehicle is equipped: with a fully filled fuel tank, a set of tools and a spare tire.
Fig1.
1.Preliminarily check and, if necessary, adjust the air pressure in the tires to normal.
2. Place the car perpendicular to a smooth wall (for example, a garage) at a distance of 5 m. Place an additional weight weighing 75 kg on the driver’s seat. Mark the screen on the wall as shown in Fig. 1. The longitudinal plane of symmetry of the car should pass along line 0 on the screen.
3.Measure the height of the headlight centers to the floor on your car. This will be the distance h on the screen (for a new car h = 600 mm).
4.Turn on the low beam.
5. Turn the hydraulic corrector handle to position “I” (driver and front passenger).
6.Open the hood and adjust screws 1 (in the horizontal plane) and 2 (in the vertical plane) for manual adjustment of the light beam to the position of the light spot for each headlight on the screen if the location of the light spots on the screen does not correspond to the picture.
7.Adjust the direction of the light spot for each headlight separately. Cover the second headlight with opaque material during adjustment.
8. The headlights are considered adjusted if the upper border of the left parts of the light spots coincides with line N, and the vertical lines A and B pass through the intersection points C1 and C2 of the horizontal and inclined sections of the light spots.
If you liked it?! Share with a friend or girlfriend or a plus from the heart. Thank you so much, friends. (Social networks connected in August 2013)
Your reviews, comments, questions and answers on LADA-10.ru
Everyone is welcome to participate in the discussion about the causes of the malfunction and other problems. If you know what to answer, write and thereby help other VAZ 2110 owners in searching for the truth.
Comments on LADA-10.ru from VKontakte were launched in August 2013
We also have Lada
The site was created in 2010 – 2019
gg.
© In accordance with the law on copyright and related rights, reprinting of any site materials is possible only with the permission of the administration (Contacts)
and by indicating a direct link
lada-10.ru
Fuses and relays VAZ 2110 - 2112, electrical diagrams
If some devices on your VAZ 2110 or VAZ 2112 , fuses or relays may be to blame. At the very least, the first thing you need to do is check them, and then draw some conclusions regarding the malfunctions.
Correct diagnosis of many electrical problems will allow you to accurately determine the cause of the inoperability of a particular unit. To find out what the fuses and relays of the VAZ 2110 - 2112 are responsible for and how to find the right one, read this article.
As in many other cars, in the VAZ-2112 and VAZ-2110, when the engine is turned off, the devices are powered directly from the battery. When the engine is running, voltage is supplied to the devices from the generator, which simultaneously charges the battery. If the current exceeds the permissible value or a short circuit occurs, the circuit fuse will blow. Powerful electrical appliances are connected via relays.
Fuse and relay box
The fuse and relay box is located on the left, lower part of the instrument panel. It is accessible by pressing the button and folding the lid down. To remove fuses, there are special non-conductive pliers in the upper left part of the mounting block.
1 - K5 - high beam relay . If the high beams in two headlights do not work, check this relay. If one of the high beam headlights does not work, check fuses F3 and F13, as well as the lamps and the high beam switch.
2 - K4 - low beam relay . If the low beam in both headlights does not work, check this relay. If only one low beam headlight does not work, check fuses F2 and F12, as well as the lamps themselves and the light switch.
3 - K1 - lamp health control relay.
4 - non-conductive tweezers for removing fuses.
5 - power window relay . If your power windows stop working, check this relay. It could also be in fuse F5, or in the window lift drive system itself. To get to the mechanism, you need to remove the door trim. Check the electric motor, the appearance of the gears and the absence of binding of the mechanism.
Replacing fuses
If after replacing the bulbs the lighting still does not work, you should check the fuses. The mounting block is located on the left side of the steering wheel.
Fuse layout
Fuse F2 is responsible for low beam lighting in the left headlight unit, and F12 in the right one. It must be said that a fuse malfunction cannot always be detected visually. Therefore, it is better to install new fuses.