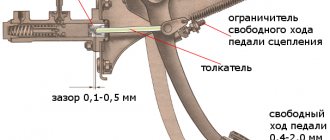
When it gets cold in the car in winter, the interior is poorly heated, the flow of warm air is too weak, the first thing that comes to mind is to replace the motor or heating fan. Replacing the fan (motor) of a VAZ-2107 stove requires certain knowledge, however, if a breakdown occurs, there is no other way out.
Purpose of the heating fan on the VAZ 2107
The main task of the heating fan is to blow on the hot stove radiator and through special air ducts to pump warm air into the interior of the VAZ 2107, heating it. The fan is made of ordinary plastic and is driven by a small electric motor.
The stove fan on the VAZ 2107 is made of plastic and is not very durable
Both plastic and the electric motor are not highly reliable, so car owners have to carefully monitor the condition of these parts so that they do not fail at the most inopportune moment.
Furnace Fan Location
The VAZ 2107 heating fan is located under the central panel, behind the heater casing.
The heating system of the VAZ 2107 is quite complex, so getting to the fan is not easy
That is, in order to get to it, the car owner will have to disassemble the central panel of the car, and then remove the stove casing. Without these preliminary operations, replacing the heating fan is impossible.
Installation
The new electric drive is installed in the reverse order. Do not forget to check the functionality of the purchased unit before installation. This will avoid unnecessary steps to re-disassemble the heater. It is not difficult to check whether the engine is functioning; just connect it to the battery installed on the car directly.
When replacing the fan, it makes sense to also inspect other elements of the heating system of your “Seven”. Make sure that:
- there is no damage to them;
- the seal is not broken.
Pay special attention to the heater valve and radiator. Timely detection of problems will allow them to be eliminated with minimal expenditure of money and time.
This video will give you a better idea of the process:
Causes and signs of heating fan failure
The list of reasons why a VAZ 2107 stove fan may break is small. Here he is:
- breakage of the blade in the impeller. As mentioned above, the furnace fan impeller on the VAZ 2107 is unreliable because it is made of very fragile plastic. To make matters worse, the fragility of this material increases in the cold. Therefore, you should not be surprised that the impeller breaks in the most severe frost;
As a rule, the plastic blades in the impeller of the VAZ 2107 break at the root
If the brushes in the VAZ 2107 motor are worn out, the fan will not rotate
The signs by which you can recognize a breakdown of a heating fan are also well known. Let's list them:
- After turning on the heater the fan does not make noise. This means that either the motor is broken, or it is working properly, but the current supply to it is interrupted. This usually occurs due to a blown fuse responsible for this section of the vehicle’s on-board electrical network;
- The rotation of the heating fan is accompanied by a loud grinding or crackling noise. This means that a piece of the blade has broken off from the impeller and is hitting the inside of the furnace casing;
- The furnace fan rotates with a loud, continuous squeaking noise that gets louder as the speed increases. The source of the squeak is the bushing in the fan. Over time, it wears out, and play appears on the fan, which causes a characteristic creaking sound.
About lubrication of the heating fan VAZ 2107
In short, lubricating the fan on a VAZ 2107 is a pointless task. Now more details. All heating fans on the VAZ 2107, regardless of the year of manufacture of the car, are equipped only with bushing bearings. As mentioned above, the bushing wears out over time and begins to creak piercingly. If the play resulting from wear of the bushing is small, then the creaking can be eliminated with the help of lubricant. But this is only a temporary measure that will lead to nothing, because very soon the lubricant will run out, the play will increase, and the fan will creak again. Therefore, the only rational option in this situation is to replace the furnace fan with a new one. Moreover, it is desirable that the new fan be equipped not with a bushing, but with a ball bearing, which will last twice as long.
Work order
Before starting work, you need to fully read the instructions on how to repair the device. A complete understanding of the process will allow you to act more confidently. The technician must first understand how to remove the fan. First you need to prepare the car for work: remove the gear shift lever, remove the radio and all the blocks with wires. Now you can start working:
- To gain access to the device, carefully remove several parts. First you need to remove the shelf on the passenger side, it is secured with 4 bolts.
Now you need to remove the panel with the cigarette lighter, it is removed with a screwdriver, you need to pry the corners one by one until it clicks.
Then you need to dismantle the console with the buttons; it can be easily lifted with a screwdriver and moved upward. This makes the two fasteners located underneath accessible; they need to be removed. Now the part is completely free, it can be removed and put aside.
- Also, access to the motor cooler is blocked by air ducts; to dismantle them, you need to pry off the plastic latches with a screwdriver. But you need to understand that the fasteners are made of fragile plastic and must be bent carefully. Access to the bottom of the heater is now open. There are four latches on the stove - two on each side. You can bend them with your fingers or a screwdriver, but be careful - the latches spring strongly and fly off far away.
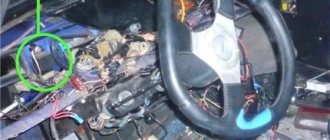
- Now access to the required unit is open, and you can begin to remove the VAZ 2107 heater fan. The electric motor and cooler are secured with two steel latches, one on top, the other on bottom.
You can bend them with a screwdriver with a thin and long tip. The dismantled unit is removed and a new device is installed in its place. - Now you can perform assembly in the reverse order of disassembly.
You can also see the procedure for replacing the stove fan on a VAZ 2107 in this video:
Replacing the heating fan on a VAZ 2107
Before starting work, you should select everything you need. Here's what we need:
- screwdrivers (phillips and flat);
- wrenches (set of open-end and socket wrenches);
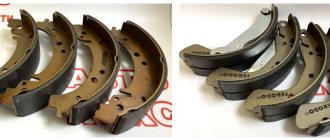
- new stove fan for VAZ 2107.
Sequencing
First you need to carry out one preparatory operation: remove the gear shift lever. In the VAZ 2107 it creates serious problems when dismantling the furnace fan. Then you should remove the radio from its niche. It is attached with two self-tapping screws. When removing the radio, do not forget about the wires that are located behind it. The device carefully slides out of the niche so that you can stick your hand into the gap formed between the radio and the front panel and remove all the connectors with wires located on the back cover of the radio.
- Now, using a Phillips screwdriver, unscrew the shelf located in front of the passenger. It is attached with four self-tapping screws.
The shelf in the interior of the VAZ 2107 is held on by only four screws
To remove the VAZ 2107 cigarette lighter panel, you will have to carefully pry it off with a screwdriver
It is most convenient to unscrew the nuts on the casing of the VAZ 2107 with a 10mm socket
You can only get to the screws under the buttons by bending the panel with a screwdriver
Having removed all the fasteners, it is better to place the panel on the floor, to the right of the gearshift lever
The latches on the air duct of the VAZ 2107 are made of very fragile white plastic
Extreme caution must be used when bending these latches.
It is better to open the latches on the heating motor of the VAZ 2107 with a long and very thin screwdriver
The VAZ 2107 stove fan is freed from the fasteners and is removed together with the motor
Video: independently changing the stove fan on a “classic” (VAZ 2101–2107)
Where to begin
If the fan of the VAZ-2107 stove does not work, it is most likely necessary to change the motor. Replacing the VAZ-2107 stove fan begins with preparing the necessary keys and screwdrivers. It is better to work with gloves.
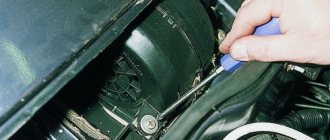
The first step is to remove the trim from the windshield. To do this, open the hood and begin to remove the trim from the corners: unscrew the fastening nuts. After the nuts, unscrew the screws along the entire length of the windshield.
We remove the seal, being careful not to damage it, and put it aside. Carefully remove the cover. Disconnect the hose from the washer. We will also need to remove the trim and frill, for which we unscrew all the screws under the plastic plugs. We remove the remaining linings and insulation, getting to the heater housing. Next we need to get to the electric motor itself.
Important points
When replacing a heating fan on a VAZ 2107, you should remember several important nuances, neglect of which can ruin all the work. Here they are:
- When bending the plastic latches on the central panel and on the cigarette lighter panel, there is no need to apply much effort, since these latches are made of the same fragile plastic as the heating fan. They break very easily, especially if repairs are made in the cold;
- You need to be very careful when removing the motor after opening the latches. Behind it are wires with terminal blocks. If you pull such a wire carelessly, its terminal block may crack, since it is very thin. It is not possible to find this spare part for sale. Therefore, cracked pieces of plastic will have to be glued together using universal glue. All this can be avoided if you act carefully and slowly.
How to get to the heater
First of all, to make it more convenient to work, you need to think about additional lighting for the place where you will be replacing the VAZ-2107 heater motor. Unscrew the negative wire from the heater motor. It is screwed on with a nut and it will take some effort to unscrew it.
If the nut is rusty, it is better to first lubricate it with penetrating lubricant. We unscrew it first with a key, and then by hand, trying not to drop the consumables. If there is another nut, unscrew it with a deep head; if not, remove the wire. Remove the clamp from the self-tapping screw. We are looking for another positive wire and disconnect it from the plug.
Now it is most convenient to use a short screwdriver to unscrew the screws securing the heating system box and remove the 4 spring brackets. The bolts in the middle are the longest, so set them aside to screw them into place later.
Let's figure out how to remove the fan of the VAZ-2107 stove. It is necessary to move the housing with the fan to the side. If it falls down, then all the bolts have been removed. If not, look for the remaining screws. The motor is inserted into the grooves and rotates freely. Next, the VAZ-2107 heater electric motor is directly replaced. Usually it is very dusty and dirty here, so we remove all the dust and what gets into this compartment.
Other actions
Owners of VAZ-2107 cars are well aware of most of the intricacies of repairing their iron horse with their own hands. Anyone who does not disdain such an activity understands perfectly well that replacing a part in a given car can be much easier than getting to it. Therefore, if you have disassembled almost half of the torpedo, you should take the opportunity and carefully inspect all those spare parts that are in your public domain.
It is necessary to pay attention to possible malfunctions that are visible to the naked eye, a violation of the tightness of the same stove, as well as signs of a possible imminent failure of some other spare part.
By conducting such a simple study and discovering, and then eliminating all possible problems, you will save a decent amount of time that you would have to spend in the future on the next disassembly of the VAZ-2107 instrument panel.
At the same time, we should not forget that there are a huge number of service stations where highly qualified specialists can not only detect problems on their own, but also fix them in a matter of hours.
Replace without removing the panel
But no matter what method is used, you will first have to drain the coolant from the system. Therefore, you will have to stock up on antifreeze in the required quantity in advance.
First, let's look at the replacement method without removing the panel. As already mentioned, this will require making cuts in some places.
To complete the work you will need:
- Set of screwdrivers of different lengths;
- Hacksaw blade for metal;
- Flat container for draining residual coolant from the radiator;
- Rags.
Having prepared everything and drained the coolant from the cooling system, you can begin work:
- We remove the storage box (glove compartment) from the panel, for which it is necessary to unscrew 6 screws securing it;
- Remove the side trims on the center console;
- Using a metal blade, we make the necessary cuts: The first cut is vertical
, we make it on the inner wall of the panel near the center console (behind the metal strip of the glove compartment).
Moreover, here you will have to make two cuts. The second cut is horizontal
, running in the upper part along the rear wall of the opening under the glove compartment.
The third is also vertical
, but not end-to-end. It is done on the right on the rear wall of the lower storage shelf of the panel; - After all the cuts, part of the panel together with the wall can be bent down, which will provide access to the radiator. We bend this part and fix it;
- Unscrew the near bracket for fastening the heating system flap control cable and move the cable to the side;
- Loosen the clamps of the coolant supply pipes to the radiator. In this case, you should place a prepared container under the connection points, since liquid will flow out of the heat exchanger. Remove the pipes;
- We unscrew the three screws securing the radiator, remove it and immediately inspect it.
Afterwards we replace the heat exchanger, fix it in the seat, connect the pipes to it and clamp it with clamps. To make the pipes fit easily, lubricate them with soap.
At this stage of work, you should fill the cooling system with liquid and run it to remove air pockets.
Next, it remains to make sure that the connections between the pipes and the radiator are not leaking, and that the damper and faucet are connected without errors.
After this, all that remains is to return the cut part of the panel to its place and fix it. To do this, you can use screws and plates.
The main thing is to fix it in several places so that in the future the cut off part does not rattle when moving. Use sealant or silicone.
This method is convenient because if you replace the radiator again (which is quite possible), all the work will be very simple - you just need to remove the storage box and unscrew a few screws.
In addition, all cuts are made in such places that after assembling the panel and installing the glove compartment they will not be noticeable.
The heater blows poorly into the legs and side windows
The heating system of the VAZ-2114 is not reliable. Over time, the stove stops heating the legs and side windows normally. Moreover, the problem is not in the temperature of the air (on the contrary, it can be hot), but in the strength of the flow with which it comes from the nozzles. In this case, you will have to modify the air flow channels. To do this, remove the front panel so that there is access to the nozzles.
Next, a new corrugated hose is installed (just plastic tubes come from the factory). Additionally, we treat the joints with the heat-insulating material “Spleen”. All cracks between the top and bottom of the panel are also covered with it. Next, you should modify the stove damper, which directs the flow to the desired area. Often it does not fit well against the body. Because of this, a large percentage of hot air is simply lost in the panel and “walks” in the cracks. So, we remove the damper and remove the old yellow factory seal. We seal all the cracks with modelin. Instead of a sponge, we glue “Bitoplast”. It is advisable to apply it in several layers.